General Setup
General Setup
Use this screen to configure general settings such as the system name and time. Click SYSTEM > General Setup in the navigation panel to display the screen as shown.
SYSTEM > General Setup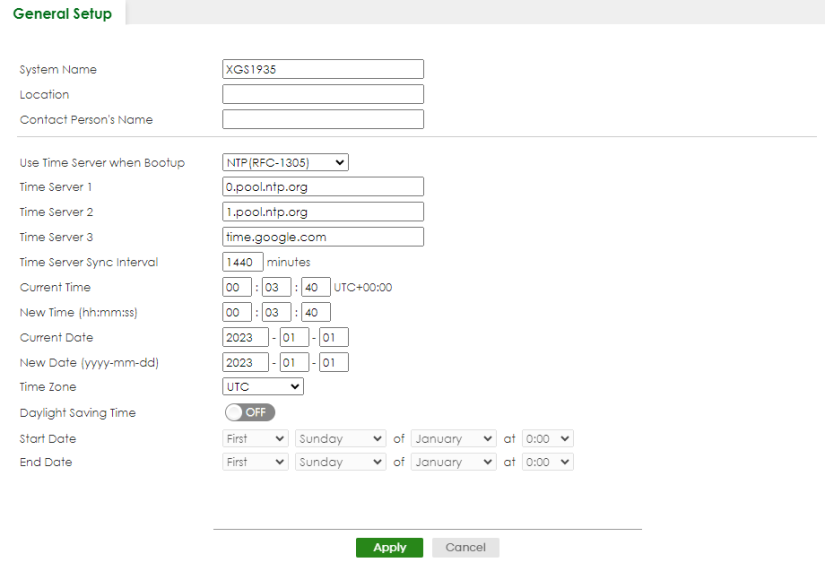
The following table describes the labels in this screen.
label | description |
|---|---|
System Name | Choose a descriptive name for identification purposes. This name consists of up to 64 printable ASCII characters; spaces are allowed. |
Location | Enter the geographic location of your Switch. You can use up to 128 printable ASCII characters; spaces are allowed. |
Contact Person's Name | Enter the name of the person in charge of this Switch. You can use up to 32 printable ASCII characters; spaces are allowed. |
Use Time Server when Bootup | Enter the time service protocol that your time server uses. Not all time servers support all protocols, so you may have to use trial and error to find a protocol that works. The main differences between them are the time format. When you select the Daytime (RFC-867) format, the Switch displays the day, month, year and time with no time zone adjustment. When you use this format it is recommended that you use a Daytime timeserver within your geographical time zone. Time (RFC-868) format displays a 32-bit binary number giving the total number of seconds since 1900/1/1 at 00:00:00. NTP (RFC-1305) format is the default value, and it is similar to Time (RFC-868). Select None to enter the time manually. Each time you turn on the Switch, the time and date will be reset to 2023-01-01 00:00:00. |
Time Server 1/2/3 | Enter the IPv4 / IPv6 address or domain name of your time server. The Switch searches for the three time servers for around 60 seconds. The Switch searches for Time Server 1 first, then Time Server 2, then Time Server 3. |
Time Server Sync Interval | Enter the period in minutes between each time server synchronization. The Switch checks the time server after every synchronization interval. |
Current Time | This field displays the time you open this menu (or refresh the menu). |
New Time (hh:mm:ss) | Enter the new time in hour, minute and second format. The new time then appears in the Current Time field after you click Apply. |
Current Date | This field displays the date you open this menu. |
New Date (yyyy-mm-dd) | Enter the new date in year, month and day format. The new date then appears in the Current Date field after you click Apply. |
Time Zone | Select your time zone with the time difference in UTC (Coordinated Universal Time) from the drop-down list box. |
Daylight Saving Time | Daylight saving is a period from late spring to early fall when many countries set their clocks ahead of normal local time by one hour to give more daytime light in the evening. Enable the switch button if you use Daylight Saving Time. |
Start Date | Configure the day and time when Daylight Saving Time starts if you selected Daylight Saving Time. The time is displayed in the 24 hour format. Here are a couple of examples: Daylight Saving Time starts in most parts of the United States on the second Sunday of March. Each time zone in the United States starts using Daylight Saving Time at 2 A.M. local time. So in the United States you would select Second, Sunday, March and 2:00. Daylight Saving Time starts in the European Union on the last Sunday of March. All of the time zones in the European Union start using Daylight Saving Time at the same moment (1 A.M. UTC). So in the European Union you would select Last, Sunday, March and the last field depends on your time zone. In Germany for instance, you would select 2:00 because Germany's time zone is one hour ahead of UTC (UTC +1). |
End Date | Configure the day and time when Daylight Saving Time ends if you selected Daylight Saving Time. The time field uses the 24 hour format. Here are a couple of examples: Daylight Saving Time ends in the United States on the first Sunday of November. Each time zone in the United States stops using Daylight Saving Time at 2 A.M. local time. So in the United States you would select First, Sunday, November and 2:00. Daylight Saving Time ends in the European Union on the last Sunday of October. All of the time zones in the European Union stop using Daylight Saving Time at the same moment (1 A.M. UTC). So in the European Union you would select Last, Sunday, October and the last field depends on your time zone. In Germany for instance, you would select 2:00 because Germany's time zone is one hour ahead of UTC (UTC +1). |
Apply | Click Apply to save your changes to the Switch’s run-time memory. The Switch loses these changes if it is turned off or loses power, so use the Save link on the top navigation panel to save your changes to the non-volatile memory when you are done configuring. |
Cancel | Click Cancel to begin configuring this screen afresh. |
Hardware Monitor Setup
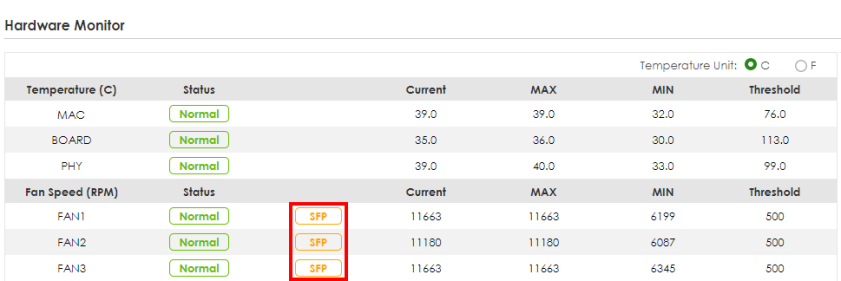
This section introduces Fan Control for the temperature of the SFP transceiver inserted in the Switch.
When the SFP transceiver temperature exceeds the temperature threshold (see your transceiver documentation), the Switch automatically turns on the fans with maximum fan speed to cool down the system.
The fans do not automatically turn off after the SFP transceiver temperature returns below threshold. To turn off the fans, you have to temporarily disable SFP Detect or reboot the Switch.
Click SYSTEM > Hardware Monitor Setup to display the screen as shown below.
SYSTEM > Hardware Monitor Setup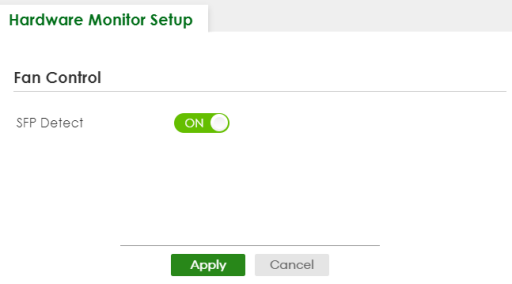
The following table describes the labels in this screen.
label | description |
|---|---|
Fan Control | |
SFP Detect | Enable the switch button to enable SFP Detect on the Switch. |
Apply | Click Apply to save your changes to the Switch’s run-time memory. The Switch loses these changes if it is turned off or loses power, so use the Save link on the top navigation panel to save your changes to the non-volatile memory when you are done configuring. |
Cancel | Click Cancel to begin configuring this screen afresh. |
You will see SFP warning icons next to the FANs in the MONITOR > System Information screen when SFP Detect has triggered the fans.
Hardware Monitor: SFP Module Temperature Warning