Interface Setup
Interface Setup Overview
This chapter shows you how to create virtual interfaces for interface-based configurations. An IPv6 address is configured on a per-interface basis. The interface can be a physical interface (for example, an Ethernet port) or a virtual interface (for example, a VLAN).
Interface Setup
Use this screen to view and set IPv6 interfaces on which you can configure an IPv6 address to access and manage the Switch.
The interfaces you create here will only take effect after you configure them in the SYSTEM > IPv6 screens.
Click SYSTEM > Interface Setup in the navigation panel to display the configuration screen.
SYSTEM > Interface Setup
The following table describes the labels in this screen.
label | description |
|---|---|
Index | This field displays the index number of an entry. |
Interface Type | This field displays the type of interface. |
Interface ID | This field displays the identification number of the interface. |
Interface | This field displays the interface’s descriptive name which is generated automatically by the Switch. The name is from a combination of the interface type and ID number. |
Select an entry’s checkbox to select a specific entry. Otherwise, select the checkbox in the table heading row to select all entries. | |
Add/Edit | Click Add/Edit to add a new interface or edit a selected one. |
Delete | Click Delete to remove the selected interfaces. |
Add/Edit Interfaces
Click Add/Edit, or select an entry and click Add/Edit in the SYSTEM > Interface Setup screen to display the configuration screen.
SYSTEM > Interface Setup > Add/Edit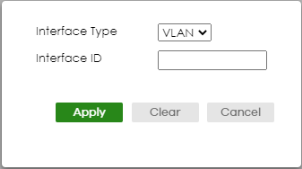
The following table describes the labels in this screen.
label | description |
|---|---|
Interface Type | Select the type of IPv6 interface for which you want to configure. The Switch supports the VLAN interface type for IPv6 at the time of writing. |
Interface ID | Specify a unique identification number (from 1 to 4094) for the interface. To have IPv6 function properly, you should configure a static VLAN with the same ID number in the SWITCHING > VLAN screens. |
Apply | Click Apply to save your changes to the Switch’s run-time memory. The Switch loses these changes if it is turned off or loses power, so use the Save link on the top navigation panel to save your changes to the non-volatile memory when you are done configuring. |
Clear | Click Clear to clear the fields to the factory defaults. |
Cancel | Click Cancel to not save the configuration you make and return to the last screen. |