Tutorials
Overview
This chapter shows you how to use the NCC’s various features.
Add a Nebula Device
This section shows you how to add a Mobile Router, Security Gateway, Nebula Firewall, Access Point or Switch to a selected organization and site on NCC for management.
1 Go to the Site-wide > Configure > Add devices screen. Click +Add.
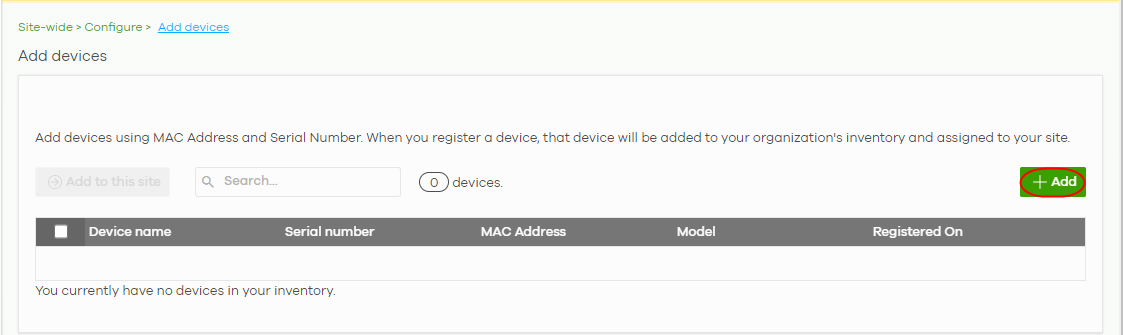
2 Enter the Serial number and MAC address of the Nebula Device you want to add. Click the Finish button to save the changes.

Activate and Assign a License for a Nebula Device, Site, or Organization
This section shows you how to activate and assign a license for a Nebula Device, site, or organization. See Organization License Tiers for a summary of NCC licenses.
The following table describes the license types at the time of writing.
Location | license type | application |
|---|---|---|
MSP (Managed Services Provider) | MSP | NCC (Nebula Control Center) user account |
Organization-wide | PRO / PLUS | AP (Access Point) / NSG (Nebula Security Gateway) / Switch / USG FLEX device |
Organization-wide | Gold Security | ATP device |
Site-wide | NSS (Nebula Security Service) | NSG device |
Site-wide | UTM (Unified Threat Management) Security / Secure WiFi | USG FLEX device |
Site-wide | Content Filter | USG FLEX 50 / USG20-VPN / USG20W-VPN device |
Site-wide | Connect & Protect (CNP) / Connect & Protect Plus (CNP+) | NWA1123ACv3, WAC500, WAC500H / NWA110AX, NWA210AX, WAX510D, WAX610D, WAX630S, WAX650S device |
Bundled License and Add-on License
A bundled license is a license that is included when you purchase a Nebula Device (Mobile Router, Access Point, Switch, NSG, USG FLEX, ATP, and USG20(W)-VPN). The bundled license is automatically assigned to the purchased Nebula Device when you add the Nebula Device to NCC. A bundled license cannot be transferred to another Nebula Device.
An add-on license is a license purchased separately from a Nebula Device as a license key, from Zyxel or another vendor. An add-on license can be applied to any Nebula Device.
License States
The following are the license states in NCC.
• Active – the license pack is assigned to a Nebula Device, is activated, and is in use (expiration countdown/timer has started).
• Queued – the license pack is assigned to a Nebula Device, is activated, but not yet in use.
• Inactive – the license pack is assigned to a Nebula Device, but is not yet activated in NCC.
• Unused – The license pack is assigned to an organization, but is not yet assigned to a Nebula Device and not yet activated in NCC.
License Activation Process
You must have a Nebula Device and a license pack to activate a license. Perform the following to activate a license.
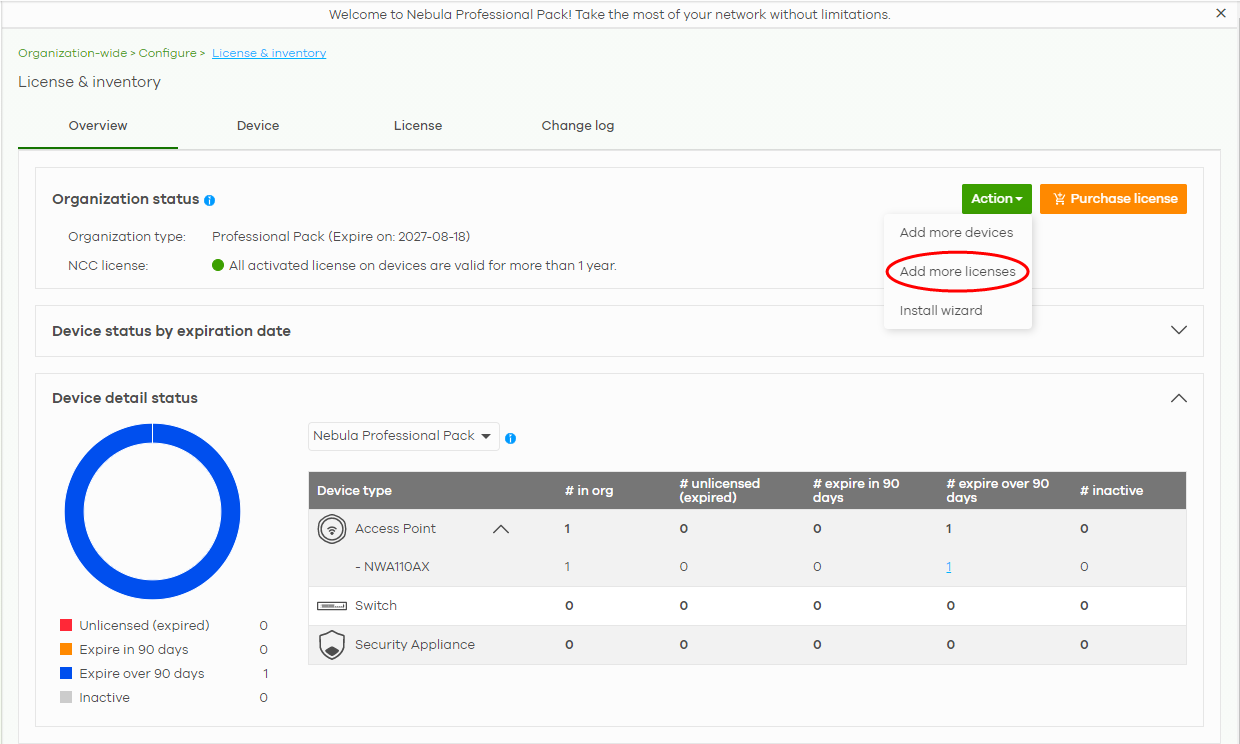
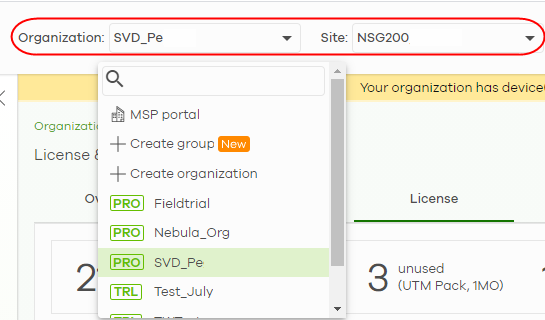
1 In the Organization-wide > Configure > License & inventory, click Action > Add more licenses.
2 Enter the License key and the License information will display.
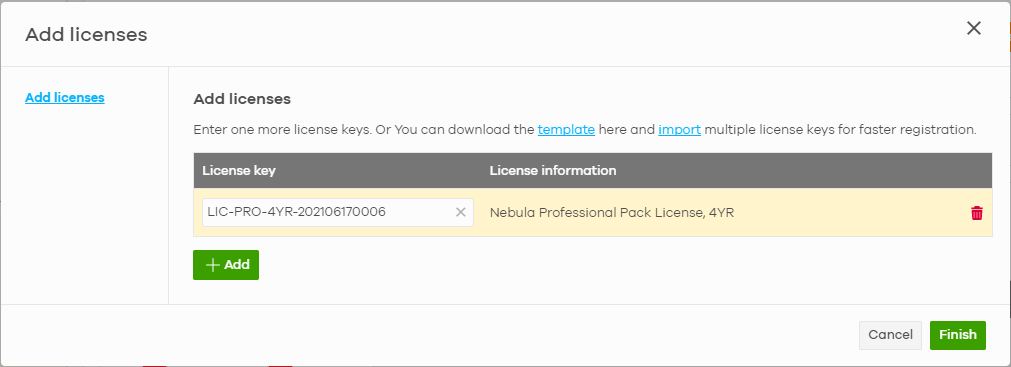
3 Click Finish. The license is now assigned to your organization and site.
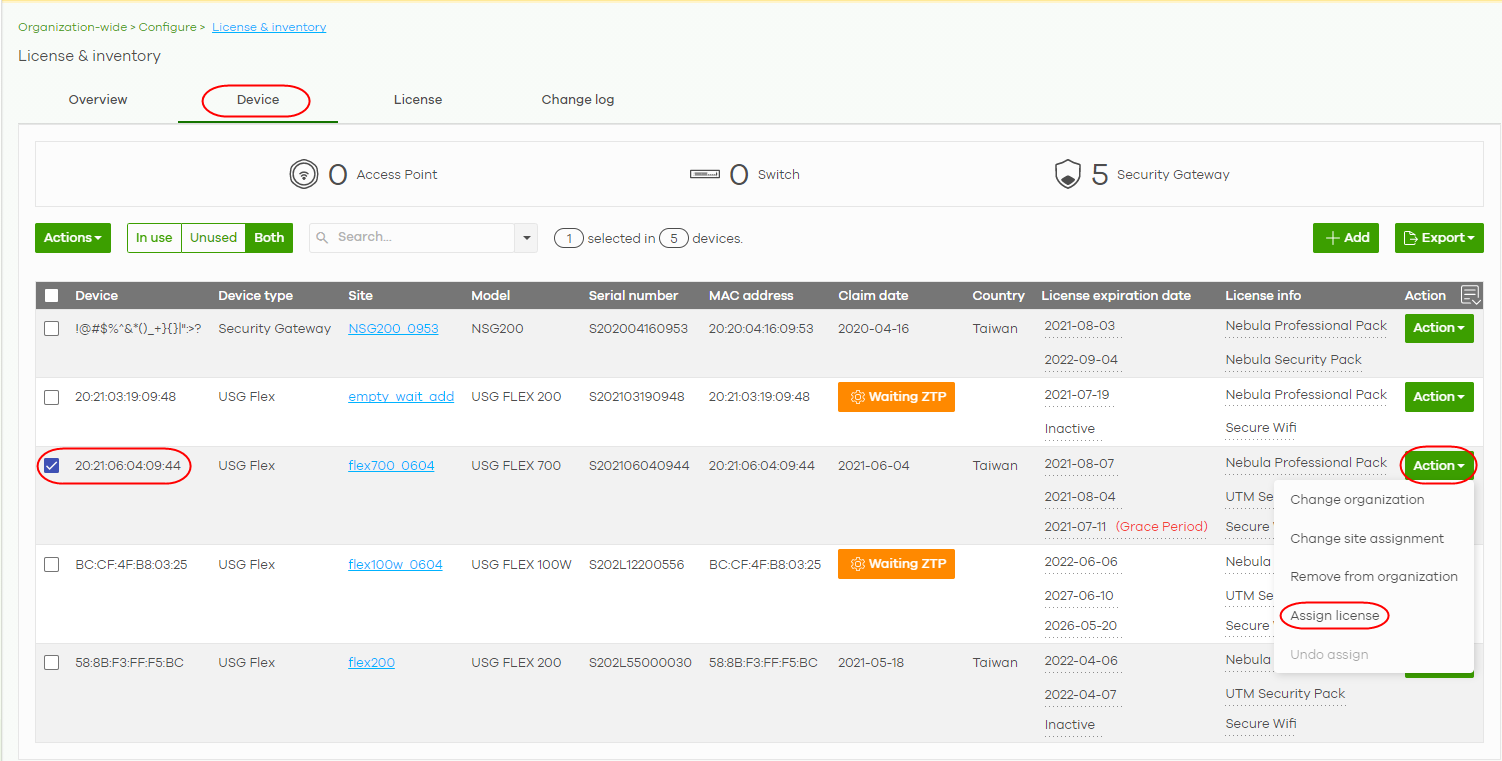
4 In the Organization-wide > Configure > License & inventory, select the Device tab.
5 Locate the Nebula Device to assign a license(s). Click the Action button and select Assign license on the device row.
6 Clear any license that you do not want added to the Nebula Device.
7 For multiple licenses of the same type to be added to the Nebula Device, set the number of licenses in the Select # of license field.
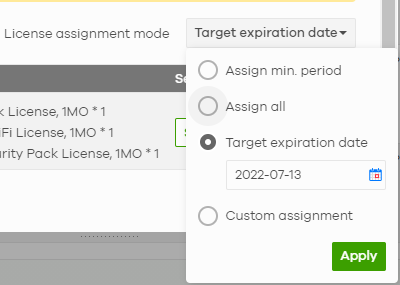
8 Set the expected expiration date criteria from the License assignment mode.
• Assign minimum period – NCC assigns one of each license type with the shortest duration to each Nebula Devices.
• Assign all – NCC assigns all selected license type equally to each Nebula Device.
• Target expiration date – Set a future date. NCC assigns an equal number of licenses to each Nebula Devices until the expiration date (future date) is reached or exceeded.
9 Click Please check this box if you want to activate licenses and upgrade. Then, click Finish.

The features that will be unlocked depends on the license type purchased.
License Activation Process
Monitor a Site
This section shows you how to view and monitor your Nebula Devices and WiFi/wired networks within a site.
1 Go to the Site-wide > Monitor > Dashboard screen. To change the default view, click Customize to show the Widget, Reset, and Close buttons.
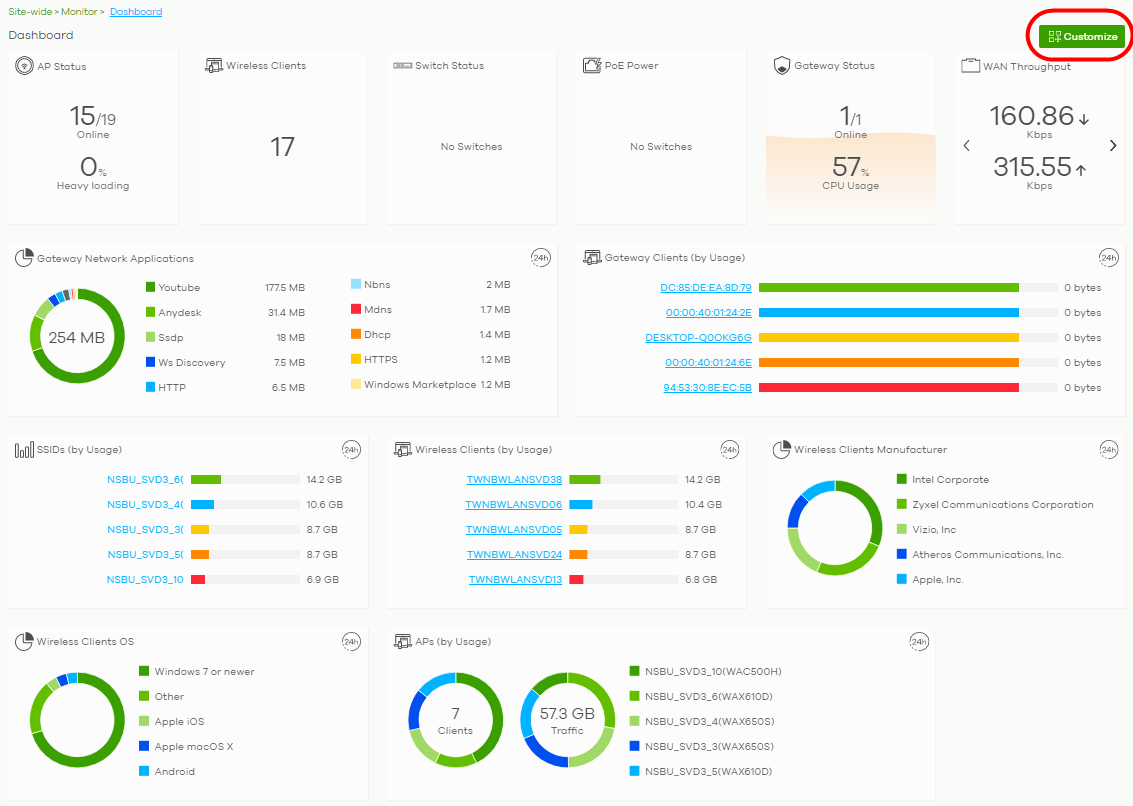
2 Click Widget to select which widgets to display. For example, clicking SSIDs (by Usage) will show the top 5 SSIDs with the highest percentage of bandwidth usage in the past 24 hours.
Click Reset to restore the dashboard back to the default view.
Click Close to hide the Widget. Reset, and Close buttons and show the Customize button.
Click Reset to restore the dashboard back to the default view.
Click Close to hide the Widget. Reset, and Close buttons and show the Customize button.

Know What Licenses are Set to Expire in My Site or Organization
Use the Overview tab in the Organization-wide > Configure > License & inventory to keep track of what licenses are set to expire to prevent a cut in services.
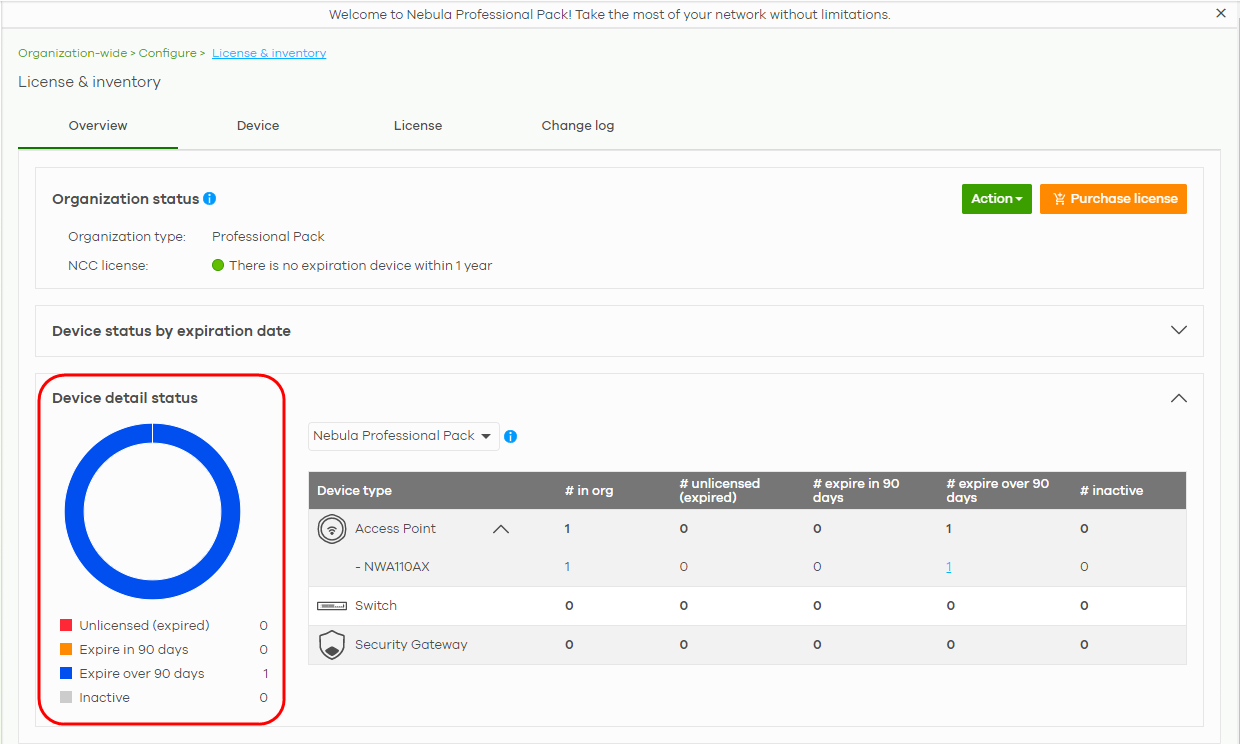
The license health is shown in the Device detail status and the following are the definition:
• Red – Nebula Device with expired license.
• Orange – Nebula Device with license that will expire in 90 days.
• Blue – Nebula Device with license that will expire in less than a year but over 90 days.
• Green – Nebula Device with license that will not expire within a year.
If a Pro or Plus tier license expires while assigned to a Nebula Device or you add an unlicensed Nebula Device to the organization, you have a 15-day grace period during which the organization’s license remains active. See Organization License Grace Period for details on a Nebula Device entering the grace period and what actions you must take.
Renew an Expired License
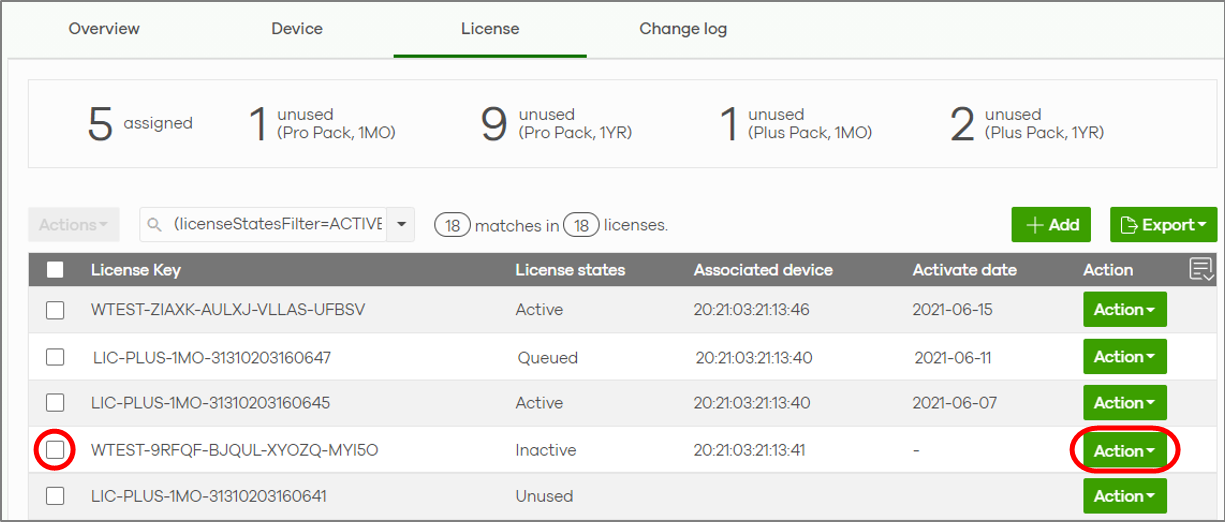
An administrator account should have read and write (Full) access privilege to add or renew licenses for Nebula Devices in the organization. Go to Organization-wide > Configure > License & inventory to view the available (unused) licenses assigned to your organization.

In the example figure above, four kinds of licenses are available for assigning to your Nebula Device: Pro Pack 1MO / 1YR and Plus Pack 1MO / 1YR. Click any one of the license. For example, if you click Plus Pack 1YR, then only the two Plus Pack License Keys with 1-year validity will display in the table.
Select the check box and click Action. Then click Assign license. See License Activation Process for details on assigning a license to a Nebula Device.
If the expired Nebula Device is still in the organization after the grace period elapses, the organization automatically downgrades to the Base tier. See Organization License Grace Period for details on a Nebula Device entering the grace period and what actions you must take.
Transfer Licenses
A license assigned to an organization and Nebula Device can be transferred to another Nebula Device in the same or different organization. The following guidelines apply when transferring licenses:
• The Nebula Devices must have the same owner.
• Bundled, Trial, and Promotion licenses cannot be transferred. (Organization-wide > Configure > License & Inventory > Device for more information.)
• If the license transfer causes the Nebula Devices in the organization to be without a valid license, the organization automatically downgrades to the Base tier.
Select Transferable Licenses
To select a transferable license(s), do the following:
1 Go to the Organization-wide > Configure > License & inventory > License screen.

2 Select the licenses you want to transfer.

Undo Assigning a License
An administrator account should have read and write (Full) access privilege to un-assign licenses. Only an Inactive license (license is assigned to a specific Nebula Device but not activated) can be un-assigned.
To un-assign a license, do the following:
1 Go to the Organization-wide > Configure > License & inventory > License screen.
2 Select the License Key with an Inactive license state that you want to undo assign. Click Action, then click Undo assign. The license will return to the Unused license state.
Transfer a License to a Different Organization
Only an Unused license (a license which is assigned to an organization but not assigned to a specific Nebula Device) can be transferred. Both source and destination organizations should belong to the same owner.
To transfer a license to another organization, do the following:
1 Perform the steps described in Select Transferable Licenses.
2 With the licenses you want to transfer selected, click Actions and then click Change organization.

3 Select the Organization you want to transfer the licenses to. The current organization will be excluded from the list. Then click Yes.
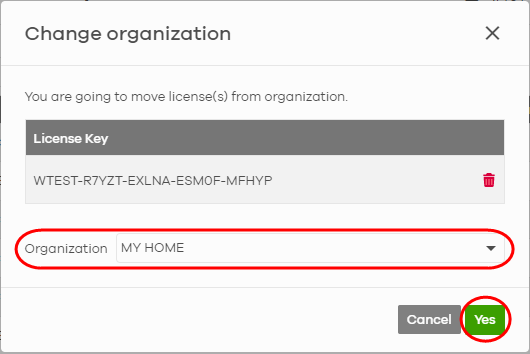
You have successfully transferred a license(s) to another organization, but without assigning it to a Nebula Device yet.
Assign a License to a Nebula Device in the New Organization
To assign a license(s) to a Nebula Device in the new organization, do the following:
1 Perform the steps mentioned in Transfer a License to a Different Organization.
2 Select the Organization and Site where the license is transferred.
3 Go to the Organization-wide > Configure > License & inventory > Device screen.
4 Select the Device, click Action, then click Assign license.
5 Select the License assignment mode to have NCC filter licenses that can be assigned.
• Assign min period – one month license packs for your Nebula Device will be picked and displayed.
• Assign all – all licenses that can be assigned are displayed.
• Target expiration date – all licenses that meet the expiry criteria you set and can be assigned are displayed.
• Custom assignment – any change in value to Assign min period and Assign all licenses above will become a Custom assignment and are displayed.
6 Click Select # of license. In the pop-up window, confirm or edit the value appearing beside the license type based on the criteria set in License assignment mode. Click Select to confirm. Then click Finish.

Transfer a License to a Nebula Device in a New Organization
To transfer a license(s) to a Nebula Device in the new organization, do the following:
1 Perform the steps mentioned in Assign a License to a Nebula Device in the New Organization.
2 Click Organization-wide > Configure > License & inventory > Device tab.
3 Select the devices with the license to be transferred.
4 Click Actions and select Transfer License.
5 The License transfer window appears. Click Search to set the filter to select the licenses.
6 Click Select target device to transfer all licenses to one Nebula Device by selecting the same/different Organization and target Device. Then click OK. Or select the devices individually.
Maintain Firmware
This section shows you how to update and maintain a Nebula Device’s firmware.
1 Go to the Site-wide > Configure > Firmware management screen. Under Upgrade time, select the day and time of the week when NCC will detect if any new firmware is available. NCC will send out a reminder email to the administrator for the available updates. If the administrator does NOT perform the update, after the 90-day period is over, NCC will automatically upgrade the firmware for the Nebula Devices in the site.
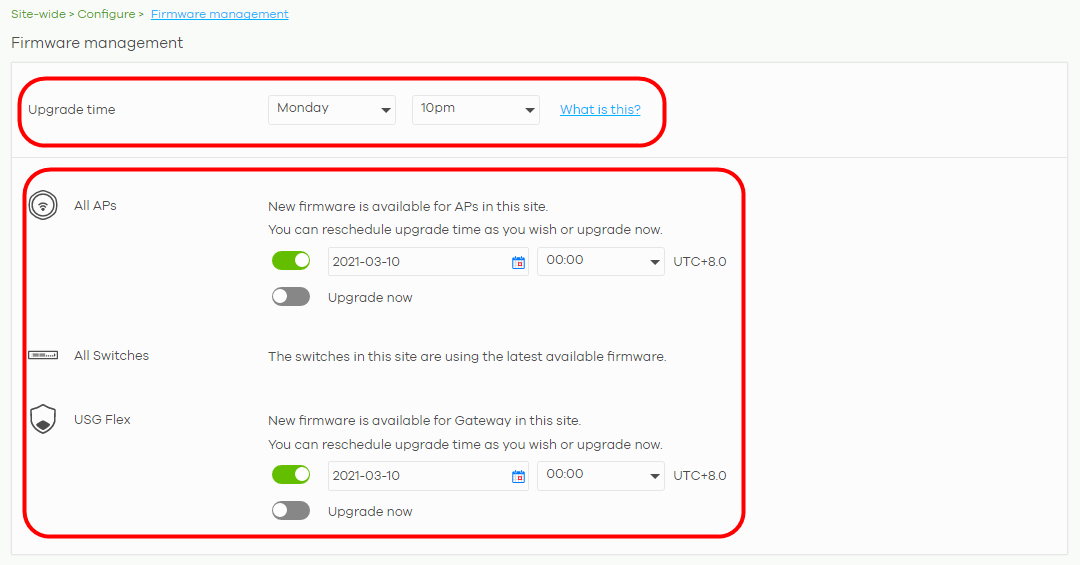
2 You can set different times to upgrade firmware for your Mobile Router, Access Points, Switches, Nebula Firewall, and Security Gateways to overwrite the site-wide weekly Upgrade time. Or select Upgrade Now to upgrade immediately.
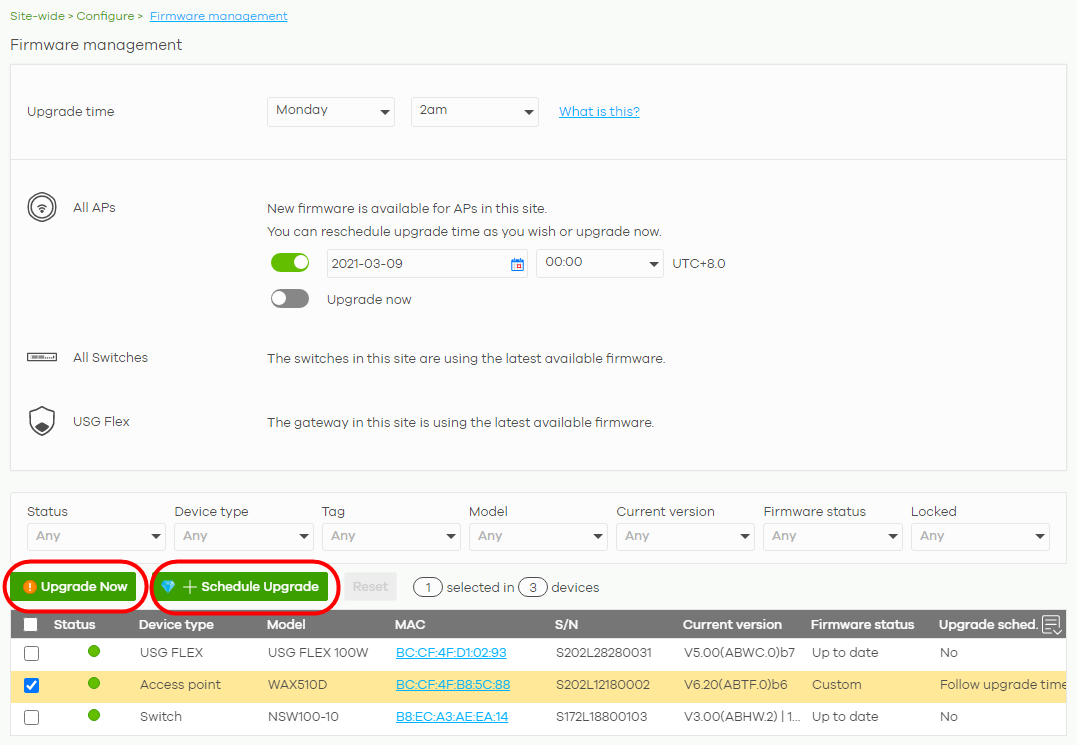
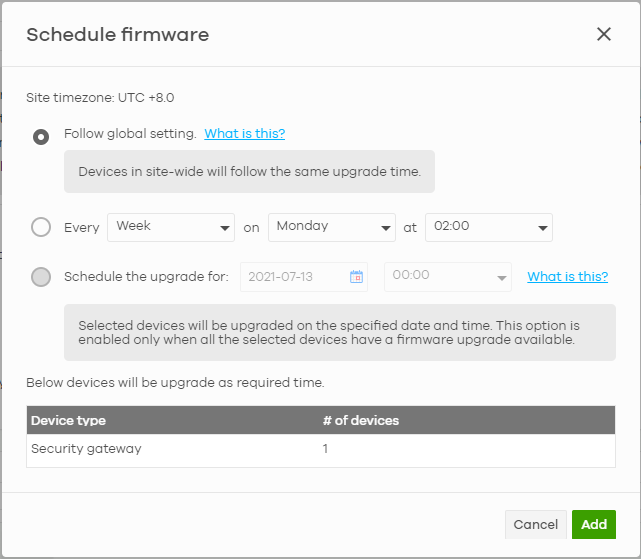
3 If you do not want to upgrade the firmware immediately, you can click +Schedule Upgrade to create a schedule for your Nebula Device.
• Select Follow global setting to upgrade the Nebula Device according to the site-wide schedule configured for all Nebula Devices in the site.
• Select Every Week/Month to set up a routine schedule for upgrades.
• Select Schedule the upgrade for to set up a specific date and time for upgrades. This option can be enabled only when the selected Nebula Devices have a new firmware available.
4 Click Add to save the settings.
Assign an Administrator to Manage a Nebula Device
This section shows you how to assign an administrator to manage your Nebula Device.
1 Go to the Organization-wide > Configure > Administrators screen. Click +Add.
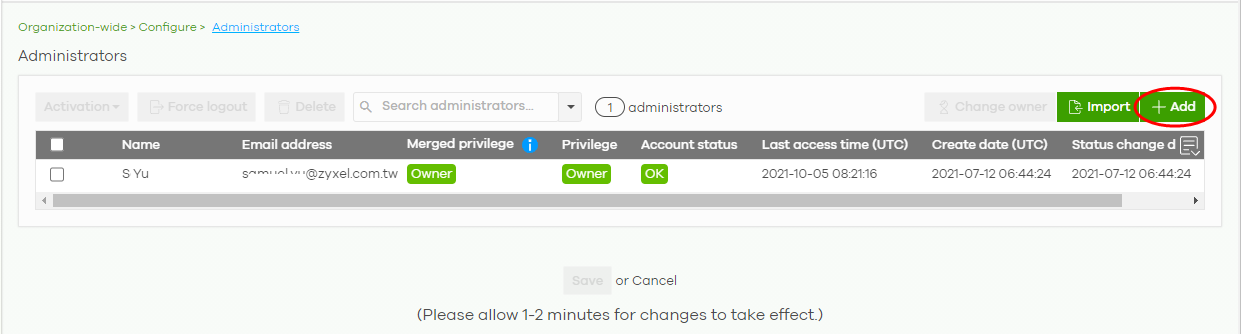
2 Enter the Name and Email of a myZyxel account. Assign the Organization access (Full, Read-Only, None). See MSP > Configure > Admins & teams > Admins for information on organization privileges.
If you select Full for Organization access, select Delegate owner’s authority to grant owner privileges to the new administrator except deleting/transferring organization ownership. Otherwise, do not select this option.
Select Yes if you wish to Activate the account administrator. Alternatively, select No if you wish to create an account administrator, but activate at a later time. The click Create admin.

3 The Account status field will show Unverified. Click Save.

The Account status field will show OK after saving. The new administrator will receive an email notification.

Manage a Configuration Template
This section shows you how to use a configuration template to manage sites for your organization. Create a site and then bind a site to a template. You may enable the local override function if you want to configure some specific settings directly in a site after a site is bound to a template.
Create and Bind a Template Site/Setting
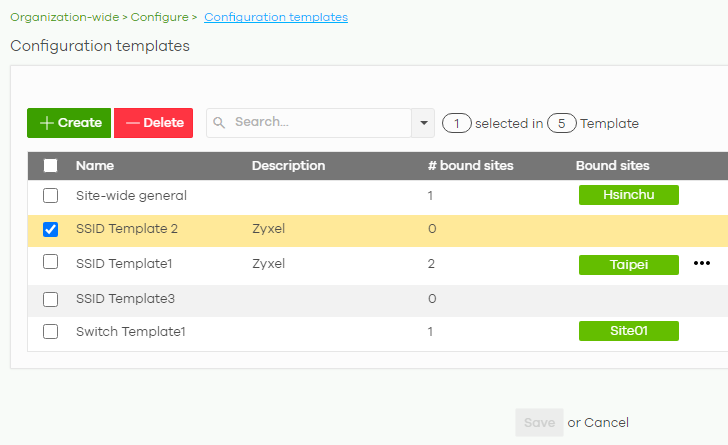
1 Go to the Organization-wide > Configure > Configuration templates screen. Click +Create.

2 The following screen appears. Enter a Template name and Template description for the template site or setting you want to create.
To create a new configuration template, select Create new configuration template.
To import an existing template from a site or template, select Import settings from.
To create a new configuration template, select Create new configuration template.
To import an existing template from a site or template, select Import settings from.
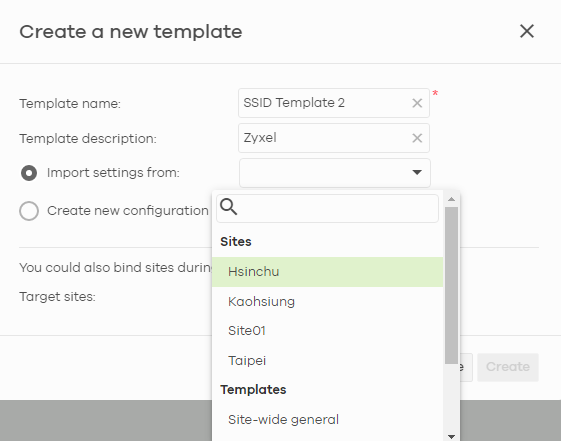
3 Select a site from the Target sites drop-down list box to bind the template to a site.
Click Create and then click Save to save the changes.
Click Create and then click Save to save the changes.

If you skip this step, you can bind a template to a site later. Go to the Organization-wide > Configure > Configuration templates screen. Select the template you want to use and then click the row with the template that you want to bind to a site.
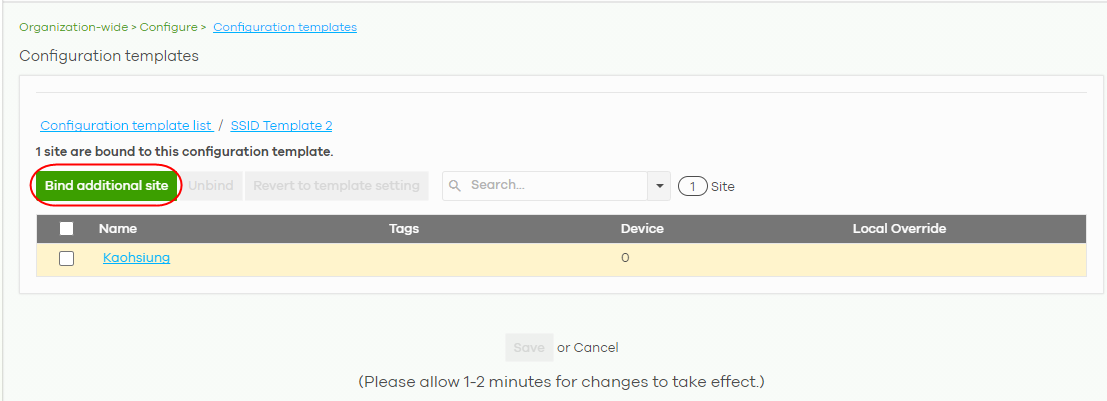
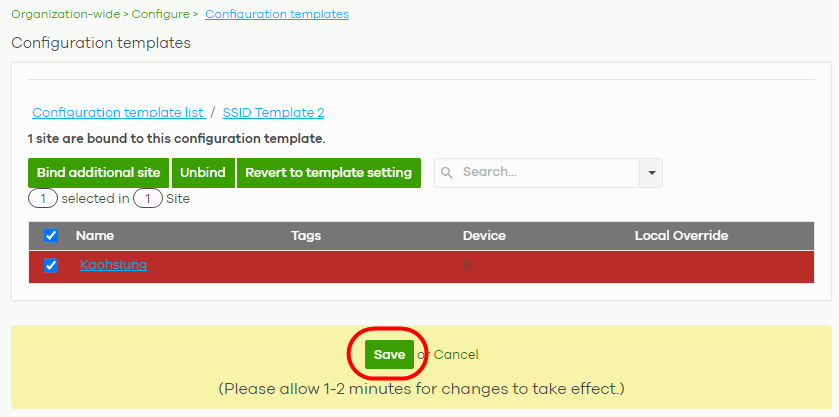
4 The following screen appears. Click Bind additional site to select the site you want to bind the template to.
5 The following screen appears. Click the Target sites drop-down list box.
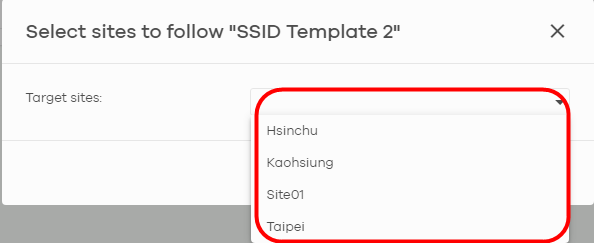
6 Select a site from the Target sites drop-down box list and then click Bind.

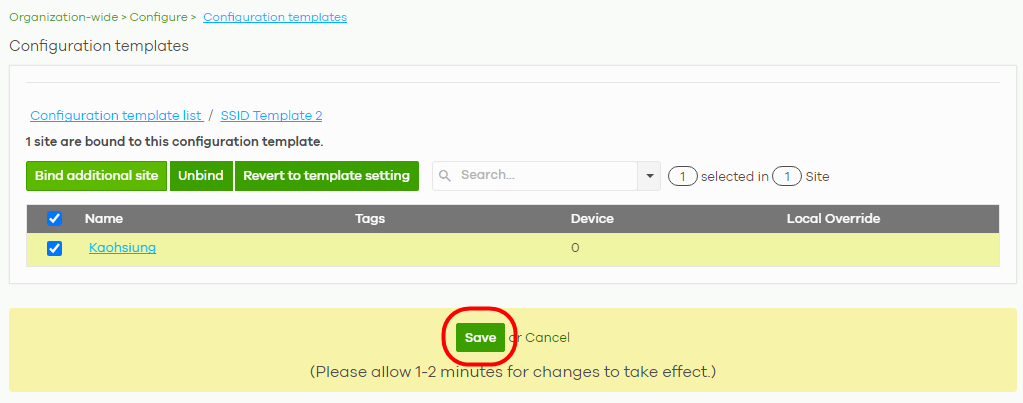
7 Click Save to save the changes.
8 A configuration template is created as shown in the Organization-wide > Configure > Configuration template screen.

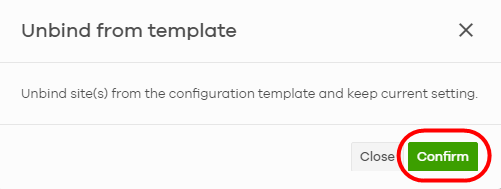
9 To release a site from using a configuration template, select a site and then click Unbind to unbind the site. The site which is unbound from the template still retains the settings applied from the template. The following screen appears. Click Confirm to confirm the changes.
10 Click Save to save the changes.
Duplicate and Import a Template Setting to a Site
This section shows you how to duplicate and then import the following template settings to a site:
• The site-wide general setting includes the device configuration, SNMP and captive portal re-authentication.
• An Access Point’s SSID setting.
• A Switch’s port setting.
The site-wide general setting
1 Select a bound site from the Site drop-down list box.

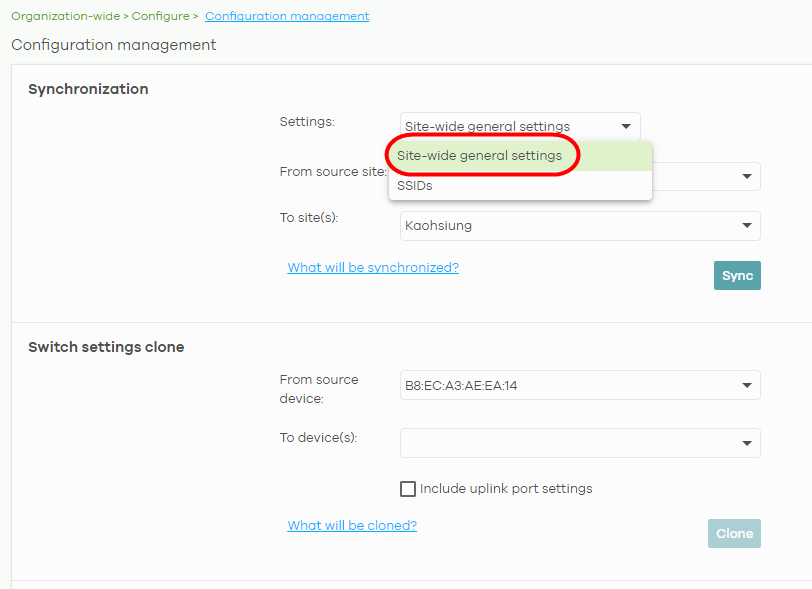
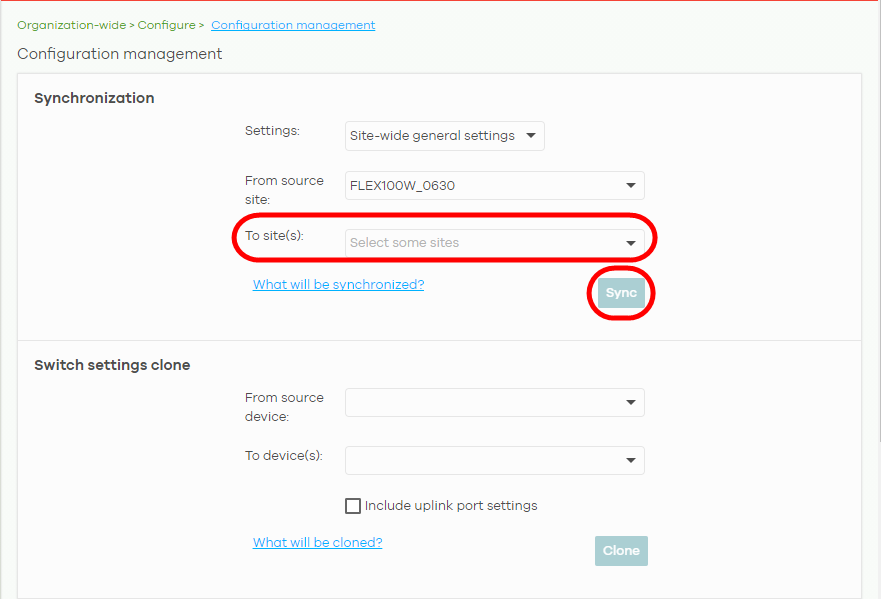
2 Go to the Organization-wide > Configure > Configuration Management screen. Under Synchronization, select the Site-wide general settings in Settings to copy a site’s general setting to another site.
3 From the From source site drop-down list box, select the site you want to copy the Site-wide general settings from.
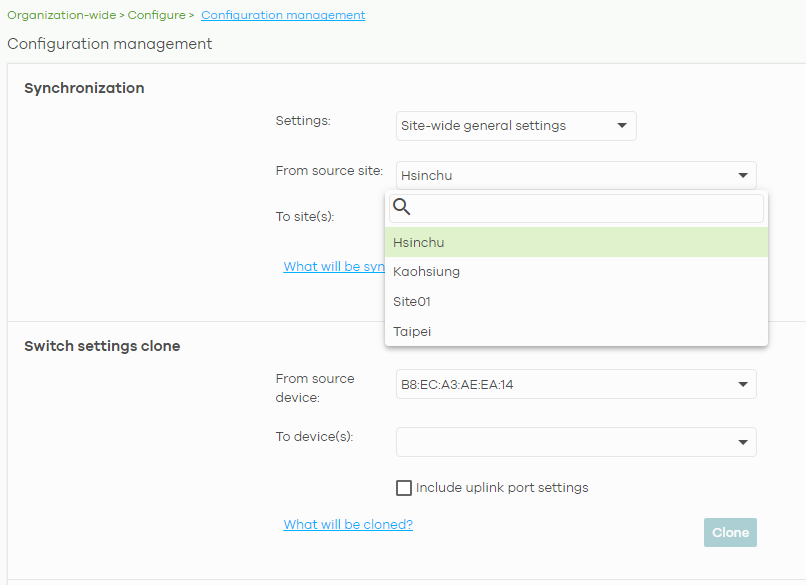
4 From the To site(s) drop-down list box, select the site you want to import the Site-wide general settings to. Click Sync to save the changes.
An Access Point’s SSID Setting
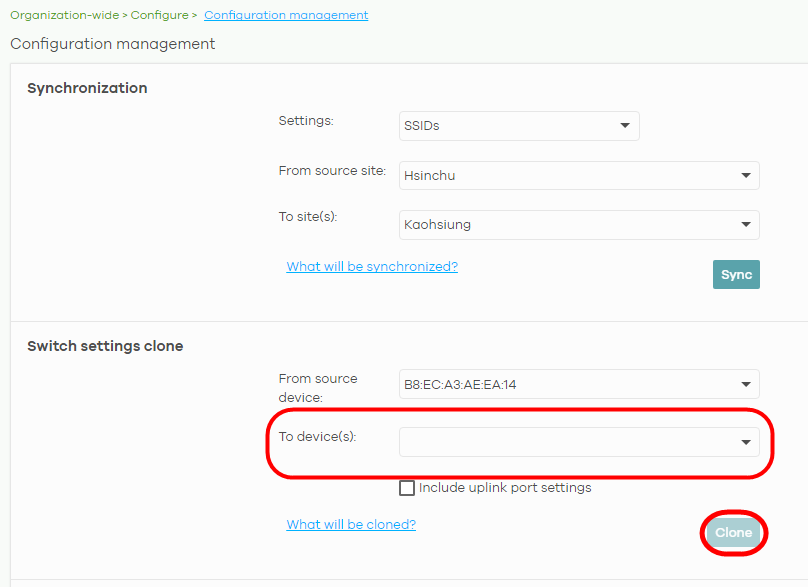
1 Go to Organization-wide > Configure > Configuration Management screen. Under Synchronization, select SSIDs to copy a site’s SSIDs settings to another site. The duplicated SSIDs include the authentication and captive portal settings.
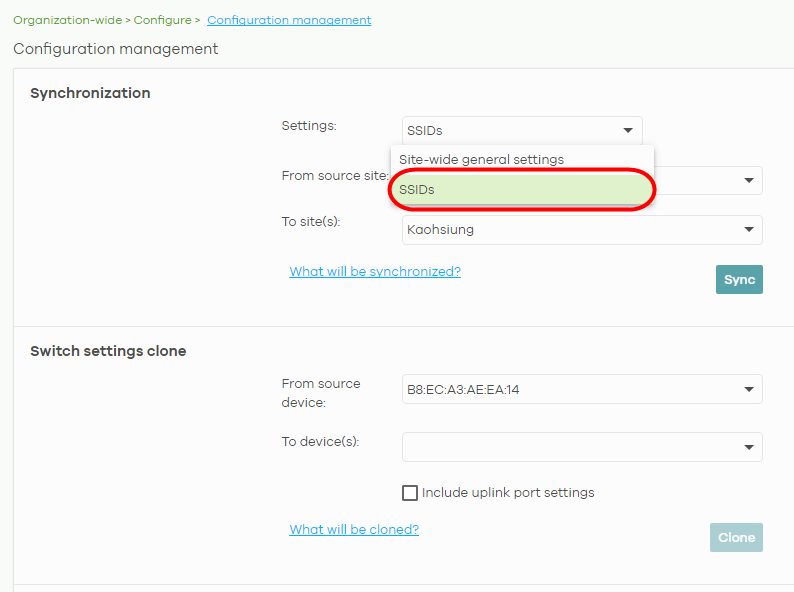
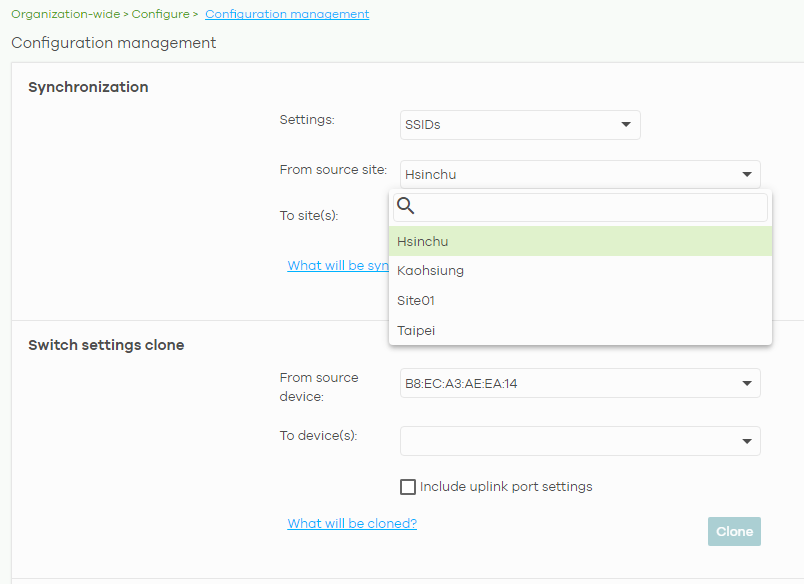
2 From the From source site drop-down list box, select the site you want to copy the SSIDs from.
3 From the To site(s) drop-down list box, select the site you want to import the SSIDs to. Click Sync to save the changes.

A Switch’s Port Setting
1 Go to the Organization-wide > Configure > Configuration Management screen. Under Switch settings clone, select the Nebula Device’s MAC address from the From source device drop-down list box. The cloned switch setting includes the port setting, IGMP advanced settings and STP bridge priority.
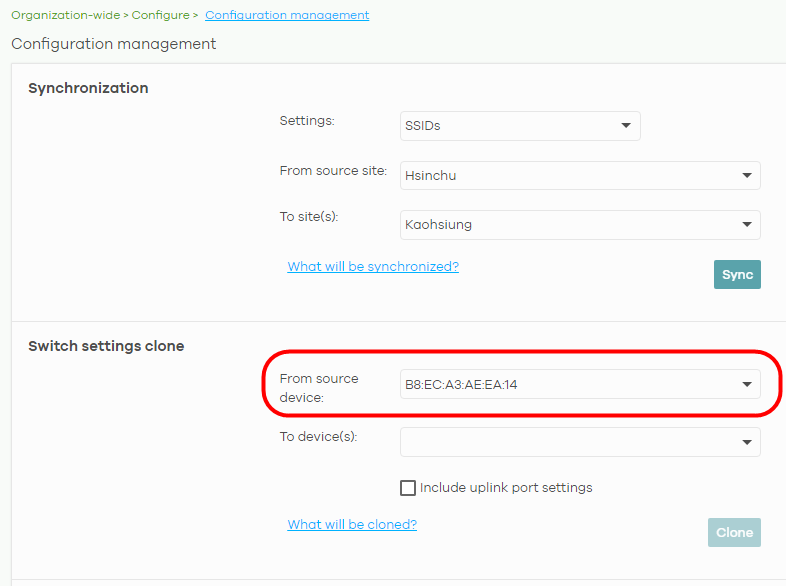
2 From the To device(s) drop-down list box, select the Nebula Device’s MAC address you want to import the Switch setting to. Click Clone to save the changes.
Enable the Override Site-wide Configuration (Local Override) Feature
A configuration template is a list of common settings that you can bind (apply) to a site. If you do not want to apply any new settings from the template to a site, just unbind that site. If you want to configure some specific settings directly in a site after the site is bound to a template, turn on the local override function. This feature is available to an organization administrator with full privileges only.
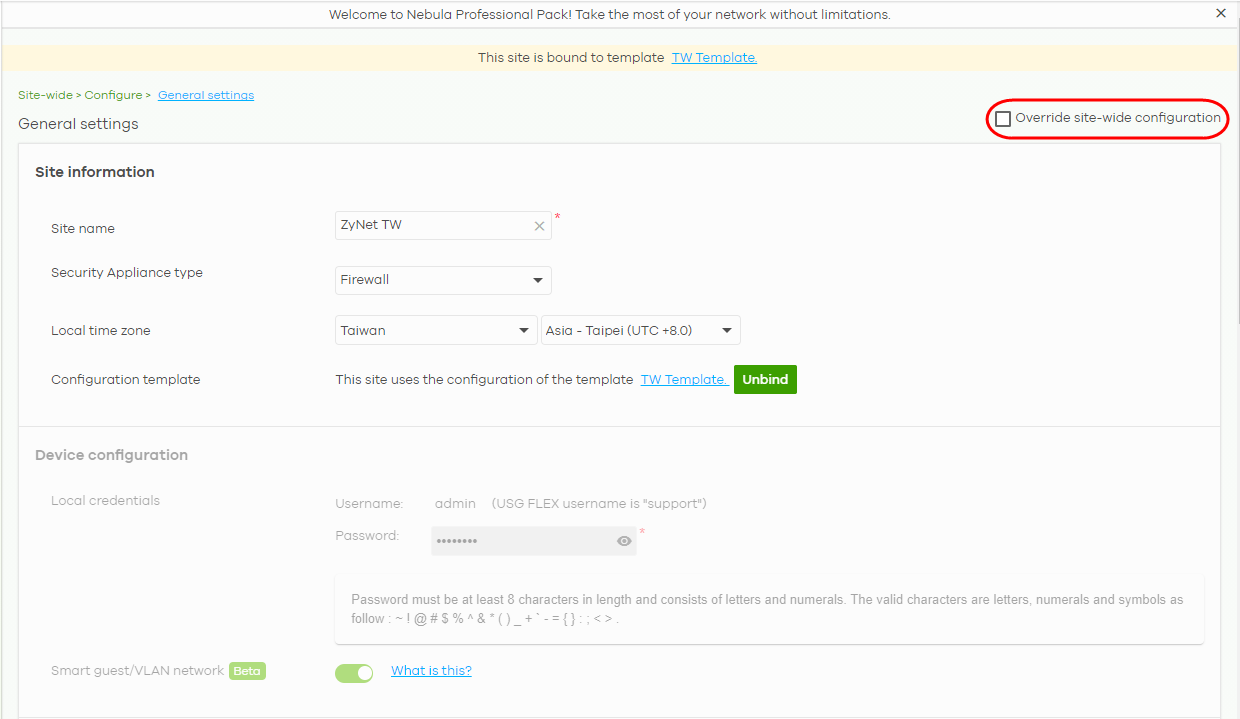
This section shows you how to enable the Override site-wide configuration feature to update site information. Select a bound site from the Site drop-down list box to edit the details of the selected site.
1 Go to a page under Site-wide > Configure and then select the Override site-wide configuration box. The Configuration page of a bound site contains an Override site-wide configuration box.
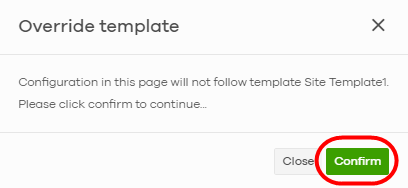
2 The following screen appears. Click Confirm to continue.
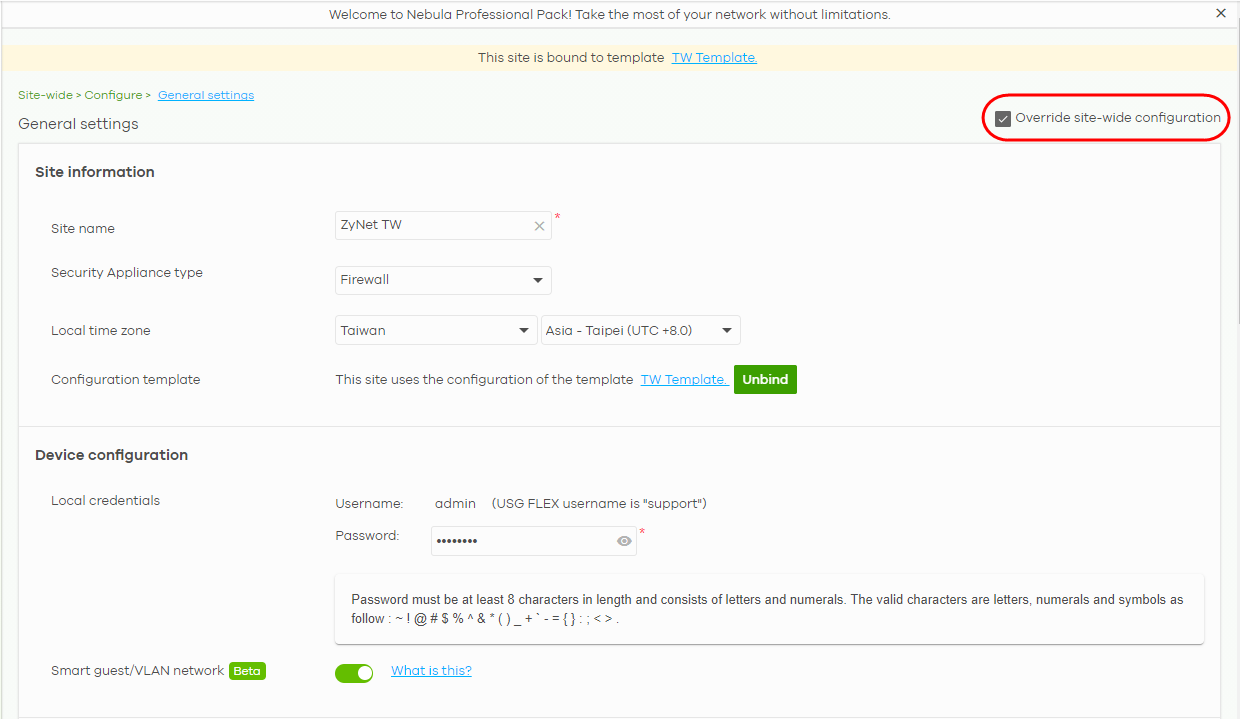
3 In the Site-wide > Configure > General settings screen, edit the Site information, Device configuration, Captive portal reauthentication, SNMP and Voucher settings on the following page. Click Save to save the changes.
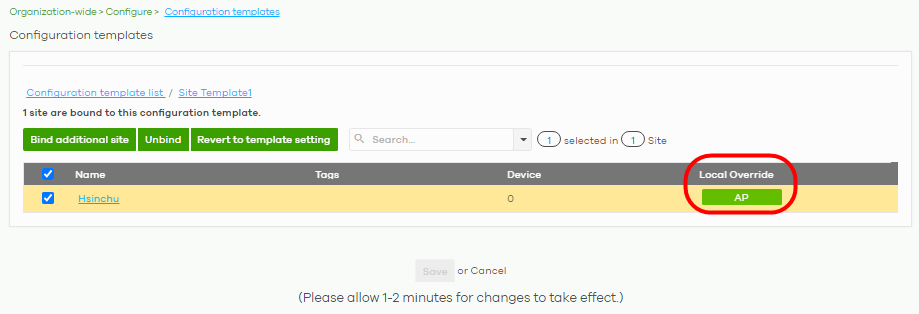
4 To verify the local override setting of a site, go to Organization-wide > Configure > Configuration templates. The Local Override field may show that AP/SWITCH/GATEWAY/SITE-WIDE settings in the template do not apply to the site. A tag for AP, as shown in the following figure, indicates that Access Point settings have a local override and any further changes in the template’s AP settings will not be synchronized to the site.
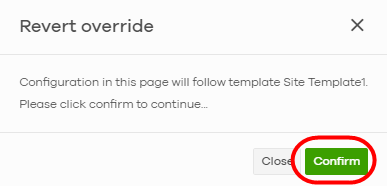
5 If you decide to go back to the original template settings, clear the Override site-wide configuration box on any page under Site-wide > Configuration. The following screen appears. Click Confirm to continue.
Overwrite the Access Point / Switch Setting
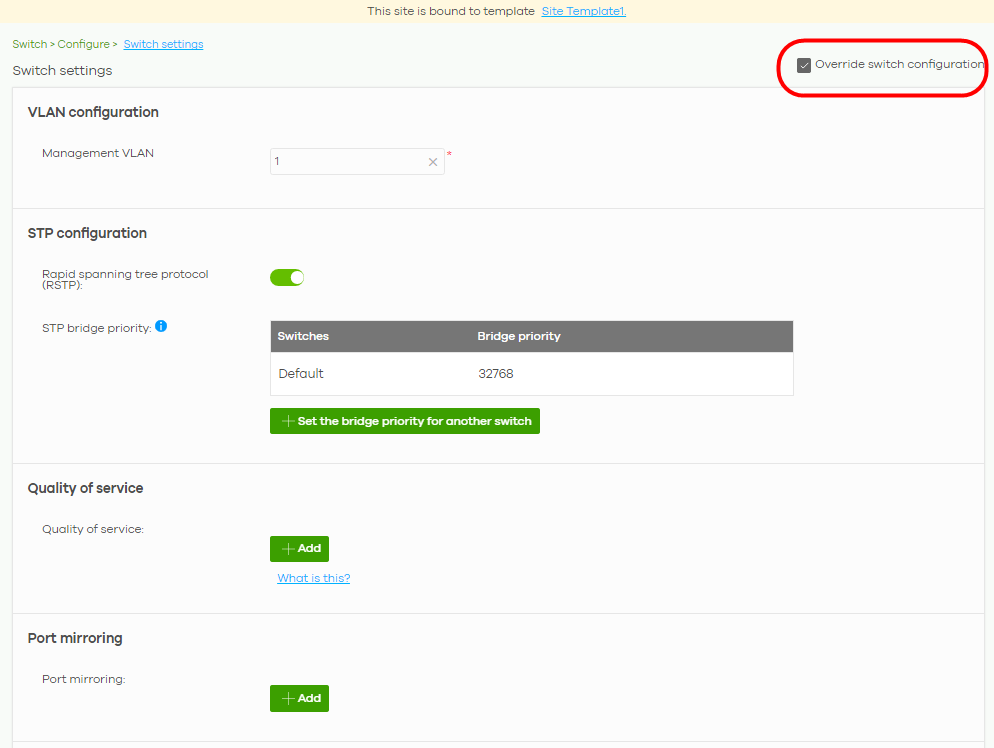
1 Go to any page under Access point / Switch > Configure and then select the Override access point configuration box. Every Configuration page of a bound site contains an Override site-wide configuration box.

2 This allows a specific type of Nebula Device setting override. The following screen appears. Click Confirm to continue.

3 In Access point > Configure > SSID settings, edit your SSIDs, authentication or captive portal settings on the following page. Click Save to save the changes.

In the Switch > Configuration > Switch settings screen, edit VLAN configuration, STP configuration, Quality of service, or Port mirroring settings on the following page. Click Save to save the changes.
4 To go back to the original template settings, clear the Override switch configuration box on any page under Access point / Switch > Configuration. The following screen appears. Click Confirm to continue.
Activate an MSP License
You must have an NCC account and an MSP license pack to activate an MSP license.
To activate an MSP pack, do the following:
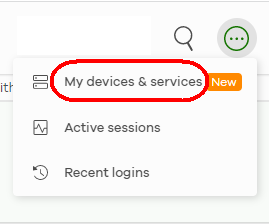
1 Click the More icon (upper right) and select My devices & services.
2 Select the Services tab.
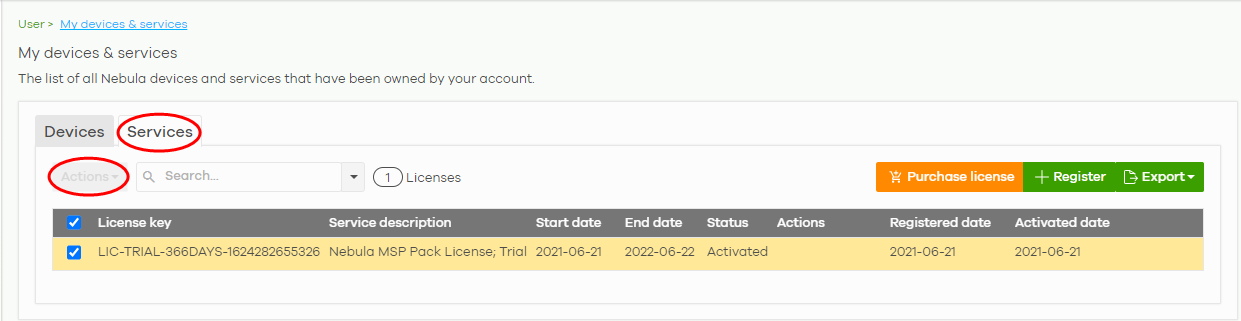
3 Select the MSP Pack license, click Actions, and select Activate license. The MSP menus can now unlock the MSP branding, Admins & teams, Cross-org synchronization, and MSP alerts features (see MSP for details on the MSP menus).
Configure CNP/CNP Plus Security Services
Different features are enabled depending on the type of trial license you purchased.
If you activate the CNP trial license, only the IP reputation filter is enabled. If you activate the CNP Plus trial license, IP reputation filter and application visibility & optimization are enabled.
IP Reputation Filter
An IP address with a bad reputation is an IP address associated with suspicious activities, such as spam, virus, and phishing. These are stored in a database. IP reputation checks the reputation of an IPv4 (only) IP address from the database. When there are packets coming from an IPv4 address with bad reputation, you can set the Nebula Device to respond by blocking these packets. You can change the response action set in NCC. You can also configure an exempt list to allow packets from specific IP addresses regardless of their content rating.
Both the CNP/CNP Plus licenses enable the IP reputation filter feature. To configure IP reputation filter, do the following:
1 Go to Access point > Configure > Security service.
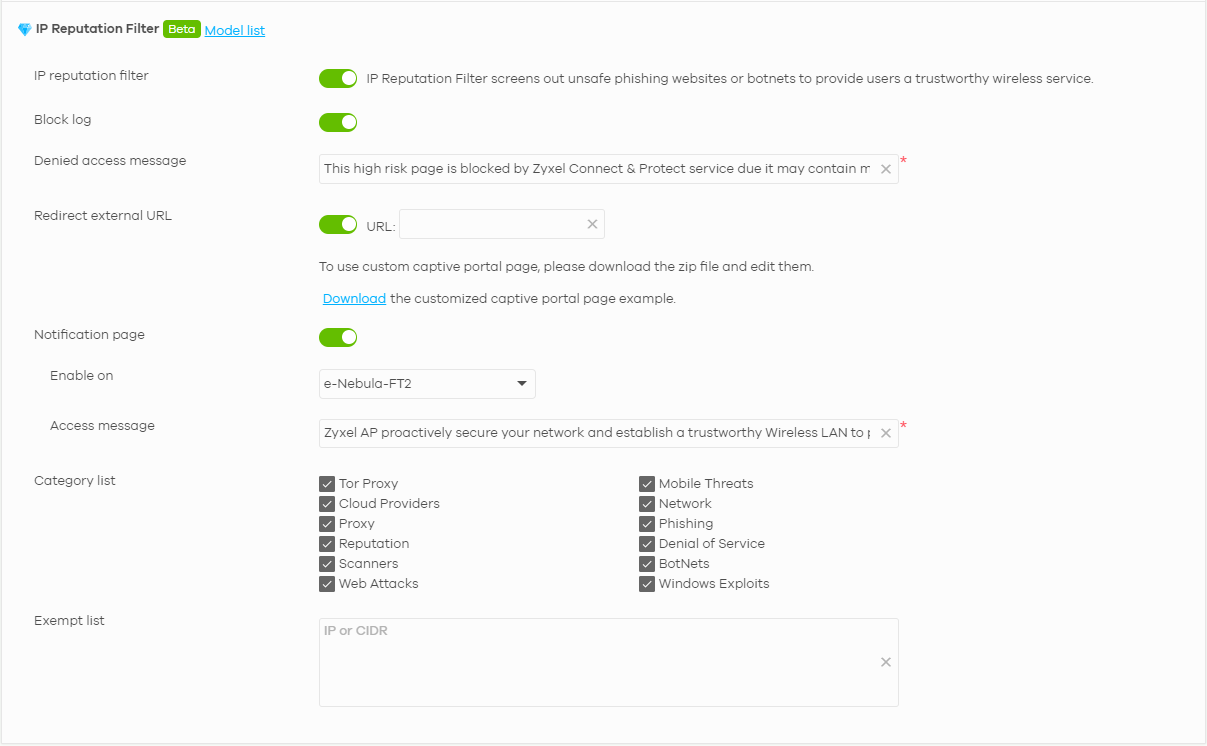
3 Then click Save.
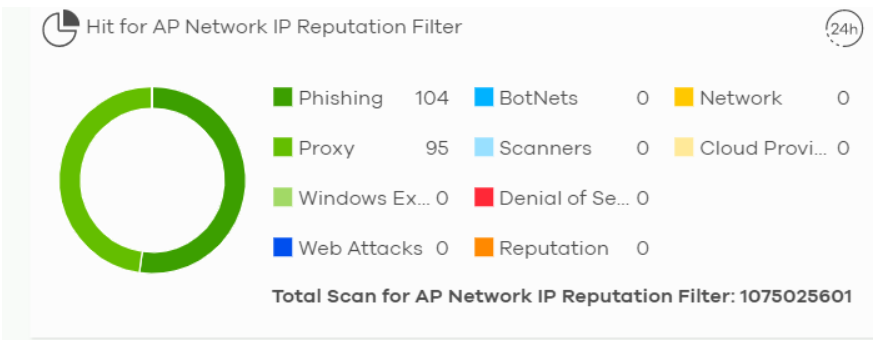
Go to Site-wide > Monitor > Dashboard: Hit for AP Network IP Reputation Filter to view the following:
• total number of times packets coming from an IPv4 address with a bad reputation occur, and
• the number of times connection attempts to an IPv4 address with a bad reputation occur.
Application Visibility & Optimization
Application visibility provides a way for a Nebula-managed Access Point to manage applications in WiFi network. It can detect the type of applications used by WiFi clients and how much bandwidth they use.
Application optimization is a way to limit the bandwidth usage of applications in the WiFi network. For example, applications that need real time traffic such as video streaming may use more resources. Use application optimization to limit the bandwidth used to stream video to prevent it from slowing down your WiFi network. Application optimization limits the applications bandwidth usage by their categories. You can manage and view the applications and their categories in Site-wide > Monitor > Applications > Application View by Access Point.
You need to purchase the CNP Plus license to enable application visibility & optimization. To configure application visibility & optimization, do the following:
1 Go to Site-wide > Monitor > Applications.
2 Make sure you are in Application View (--> Category View is displayed)
3 Select Application view by Access Point in the Applications field.
4 Hover the mouse pointer anywhere on an application row. Click the Limit icon to set its Bandwidth limit.

5 Use the slider or enter the Traffic allowed in Mb/s (1 – 30 or Unlimited).
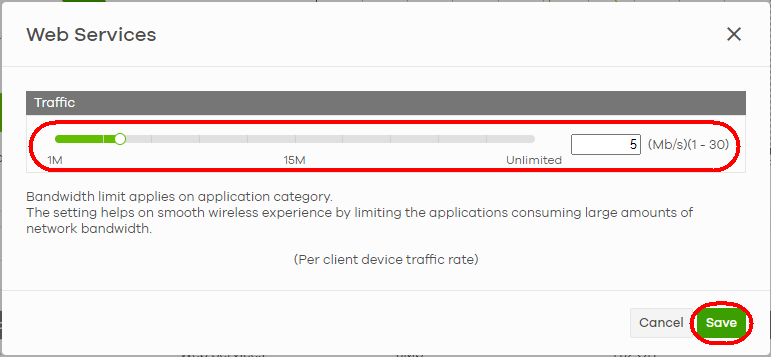
6 Then click Save.
To monitor the application bandwidth usage, go to Site-wide > Monitor > Dashboard: AP Traffic to view the top ten applications that use the most bandwidth in the site.

Delete an Organization
Only the Organization owner can delete an Organization. An Organization can be deleted only when it has no site(s), administrator(s), user(s), license(s), or Nebula Device(s) in the Organization.
To delete an Organization from the NCC, do the following:
Remove All Nebula Devices
1 Go to Organization-wide > Configure > License & inventory > Devices tab (1).
2 Click the check box (2) to select all Nebula Devices.
3 Click the Actions button (3).
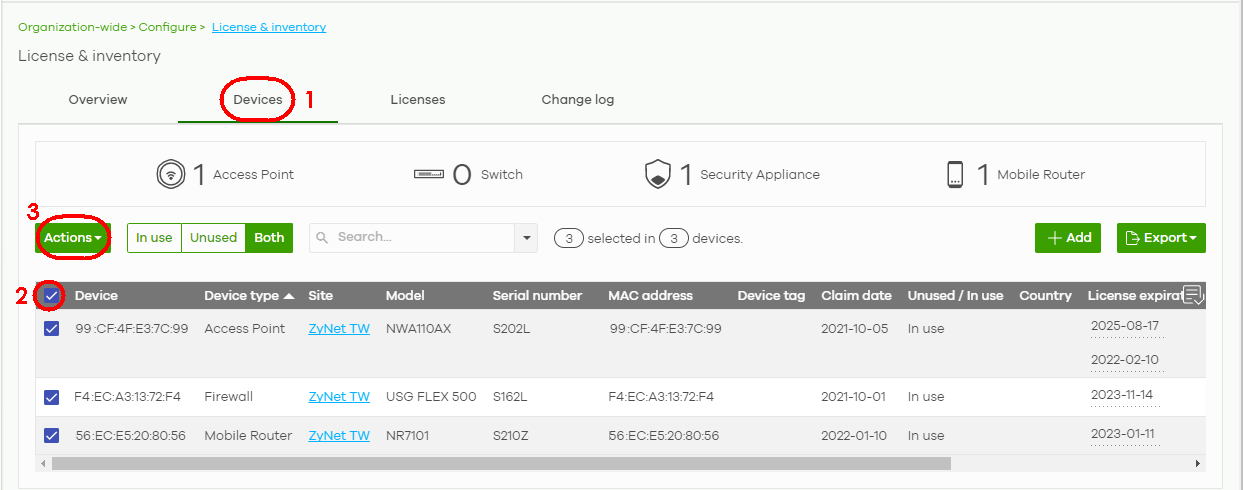
4 Click Remove from organization.
5 Click the Yes button to confirm, or click the delete icon to remove each devices individually.

Transfer All Licenses
See Transfer Licenses in this chapter for information on how to transfer licenses assigned to an organization and Nebula Device to another Nebula Device in a different organization.
Delete All Sites
1 Go to Organization-wide > Monitor > Overview > Sites tab (1).
2 Click the check box (2) to select all sites.
3 Click the Delete button (3) to remove all sites.

4 Click the Delete sites button to confirm.

Delete All Administrators
1 Go to Organization-wide > Configure > Administrators (1).
2 Click the check box to select all administrators (2).
3 Click the Delete button (3).
4 Click the Save button (4) to confirm.

Remove All Users
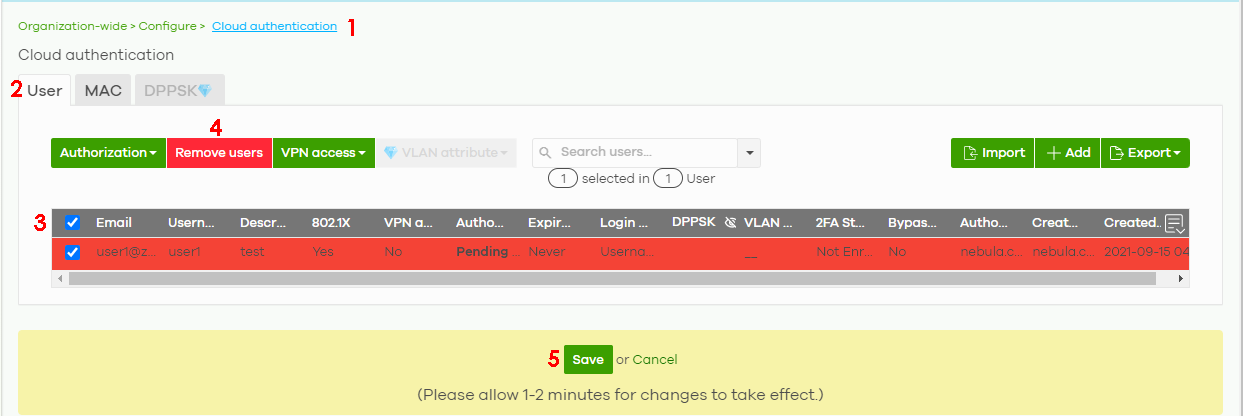
1 Go to Organization-wide > Configure > Cloud authentication (1).
2 Select the User tab (2).
3 Click the check box to select all users (3).
4 Click the Remove users button (4).
5 Click the Save button (5) to confirm.
Delete the Organization
1 Go to Organization-wide > Configure > Settings (1).
2 Enter the Name of the organization you wish to remove (2).
3 Click the Delete organization button (3).
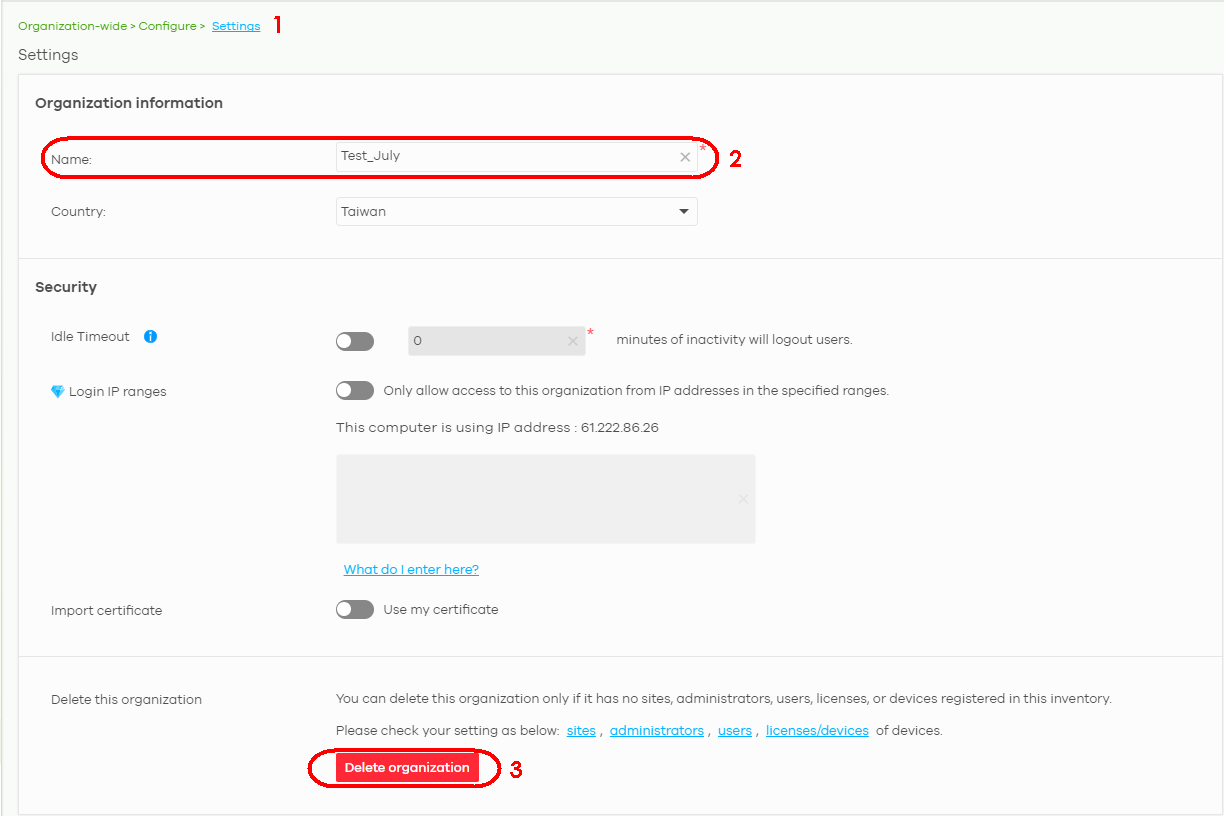
4 Click the OK button to confirm.

Manage IPTV
This section shows you how to configure IPTV settings and view IPTV reports:
Set up the VLAN for IPTV
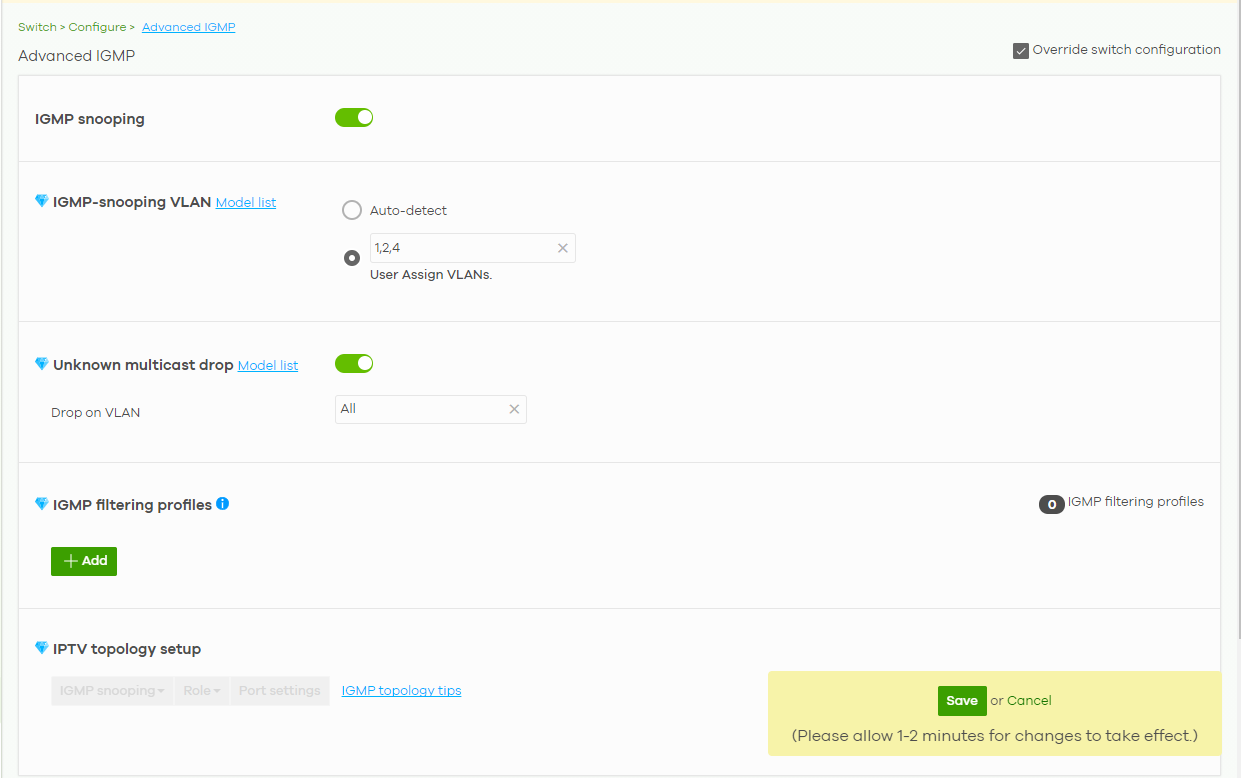
1 Go to the Switch > Configure > Advanced IGMP screen. Click IGMP snooping to enable IGMP snooping on all Switches in the site. Under IGMP-snooping VLAN, select Auto-detect to automatically detect which VLANs are used for IPTV. Otherwise, manually enter the VLAN IDs (1 – 4094, up to 16 VLANs, separated by commas, no spaces) in the User Assign VLANs field. Click Save when you are finished.
2 If you have not defined the IP address of the Switch, go to the Switch > Configure > IP & Routing screen and click +Add under IP interface. The following screen appear. Enter the Interface IP, Subnet mask and ID number of the VLAN used for IPTV. Click Create to save the setting.

Define the Role of a Switch
1 Go to the Switch > Configure > Advanced IGMP screen. Under IPTV topology setup, select a Switch you want to configure and select a Role to define the role of your Switch from the drop-down list box.
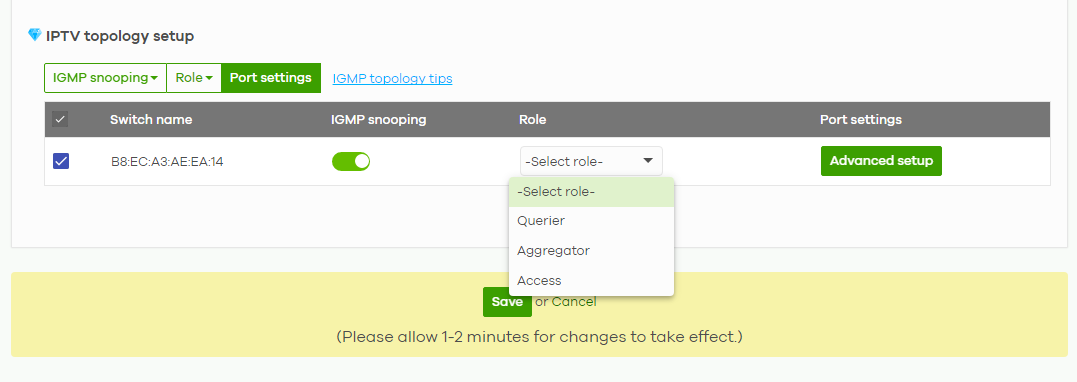
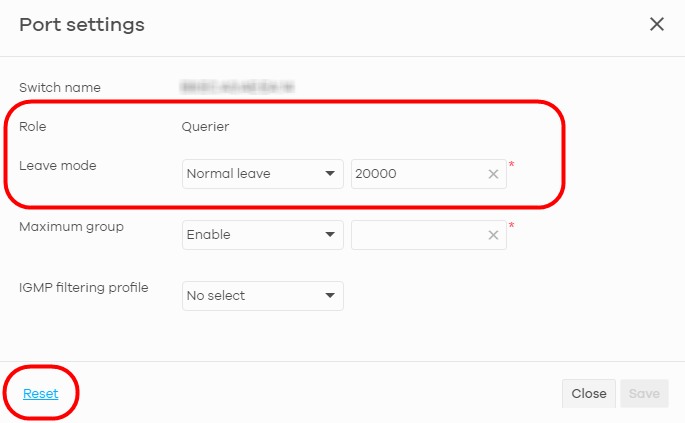
2 After you define the role of the Switch, click Advanced setup and the following screen appears. The Leave mode will show the default setting based on the role you select. But you can still go back to the Advanced IGMP screen to configure the Role and Leave mode. Under Maximum group, you can select Enable and enter the maximum number of channels allowed at a time. Otherwise, select Disable. Click Save to save the changes.
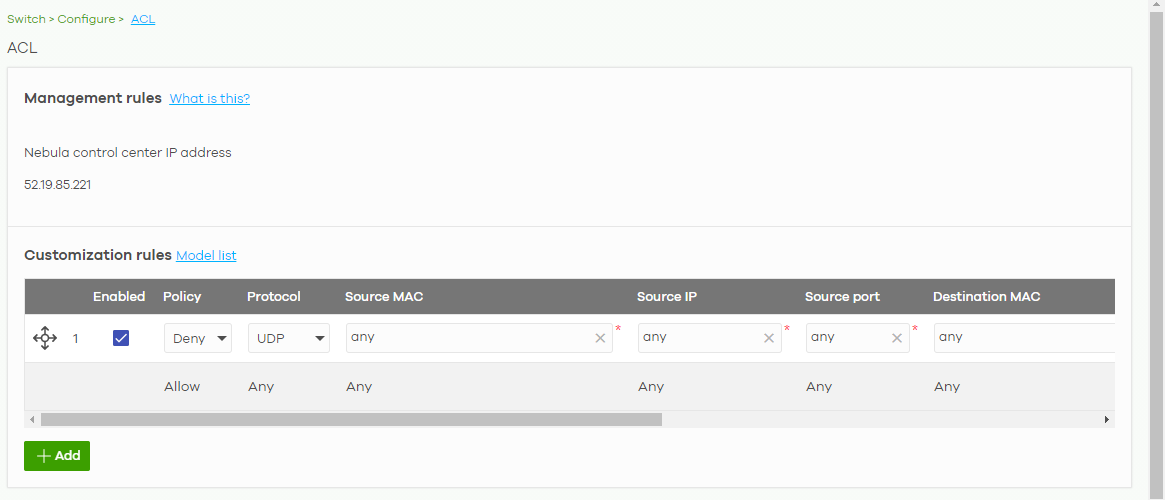
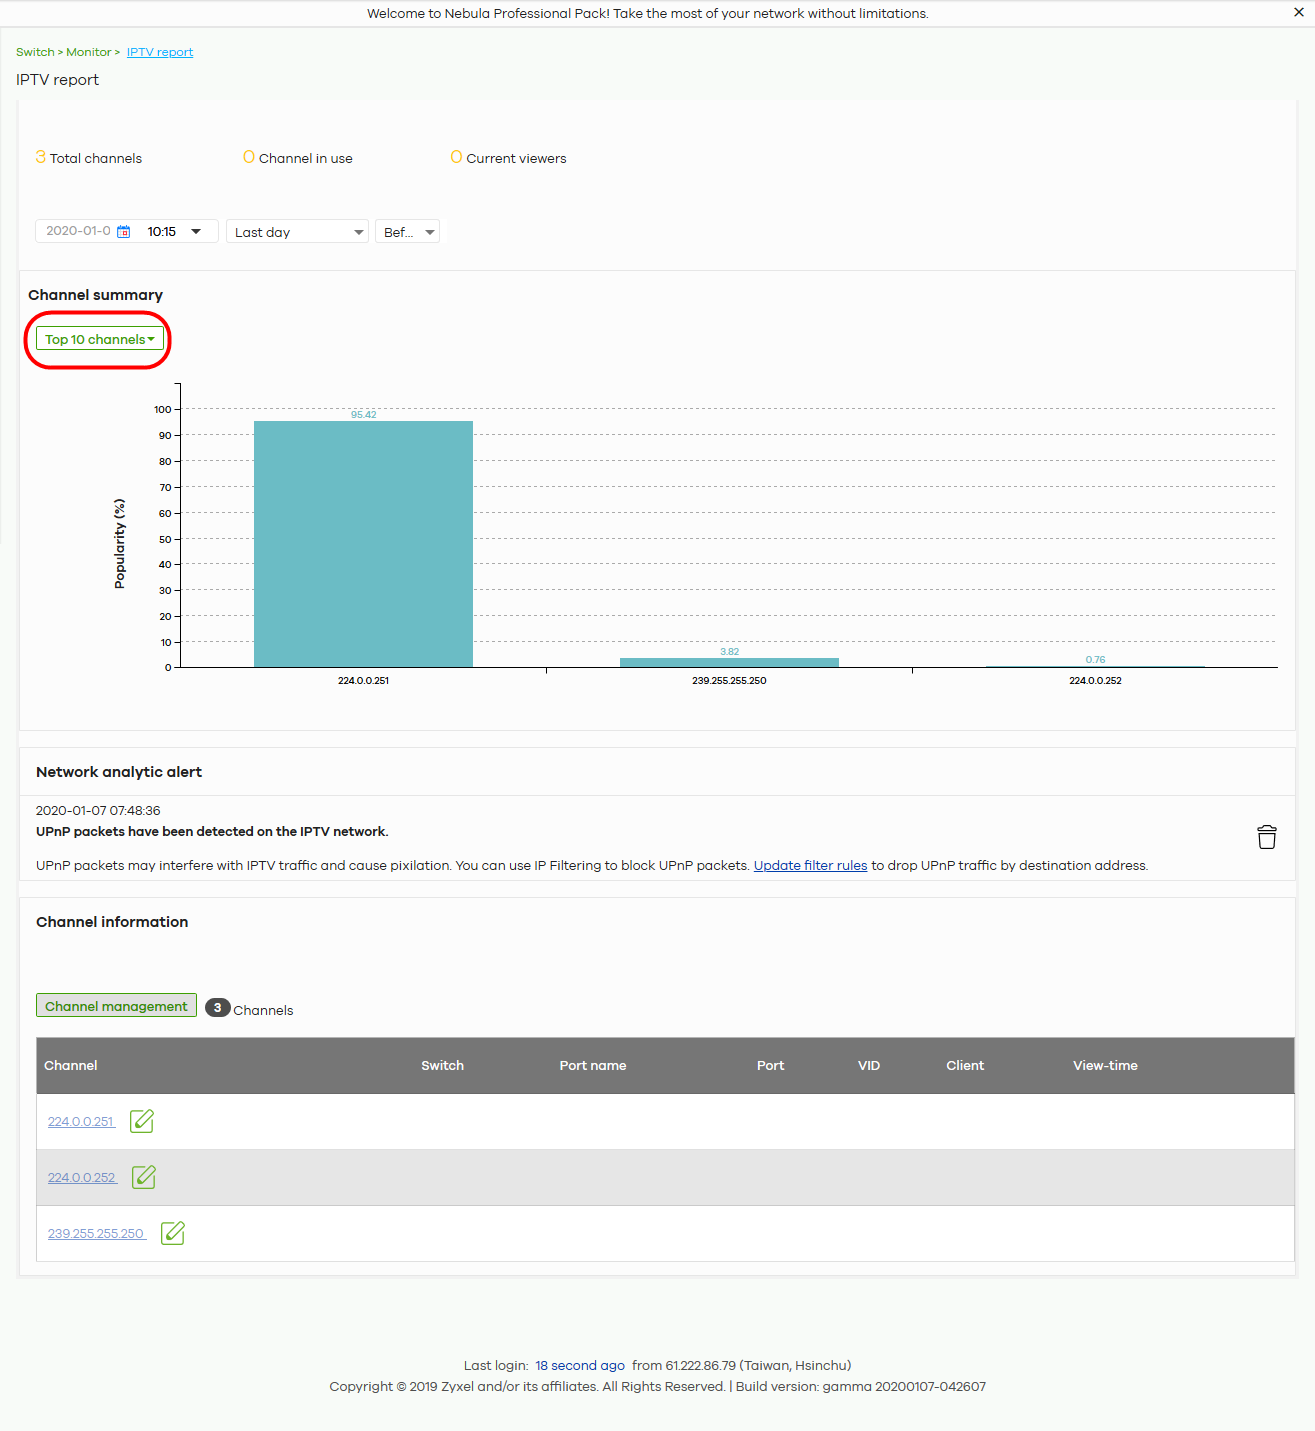
3 If a reminder of Network analytic alert appears on the Switch > Monitor > IPTV report page, click the Update filter rules link below to use the default ACL rules to block UPnP packets. In the example screen below, a Network analytic alert indicates that your IPTV traffic flow is affected by unneeded UPnP packets. Click the Update filter rules link to define IP filtering rules in the Switch > Configure > ACL screen to block these packets.

4 The Update filter rules link will lead you to the following screen. Click Save to save the default setting to block UPnP packets.
Configure the Channel Profile and Naming
A channel profile is the IP address range allowed to receive IPTV channels. An IPTV channel is used to send video traffic to the IP addresses in the channel profile.
1 To set up a range of available IPTV channels, go to the Switch > Configure > Advanced IGMP screen. Under IGMP filtering profiles, click +Add and the following screen appear. Enter a Profile name and enter the Start IP address and End IP address. Click Save & Back to save the changes.

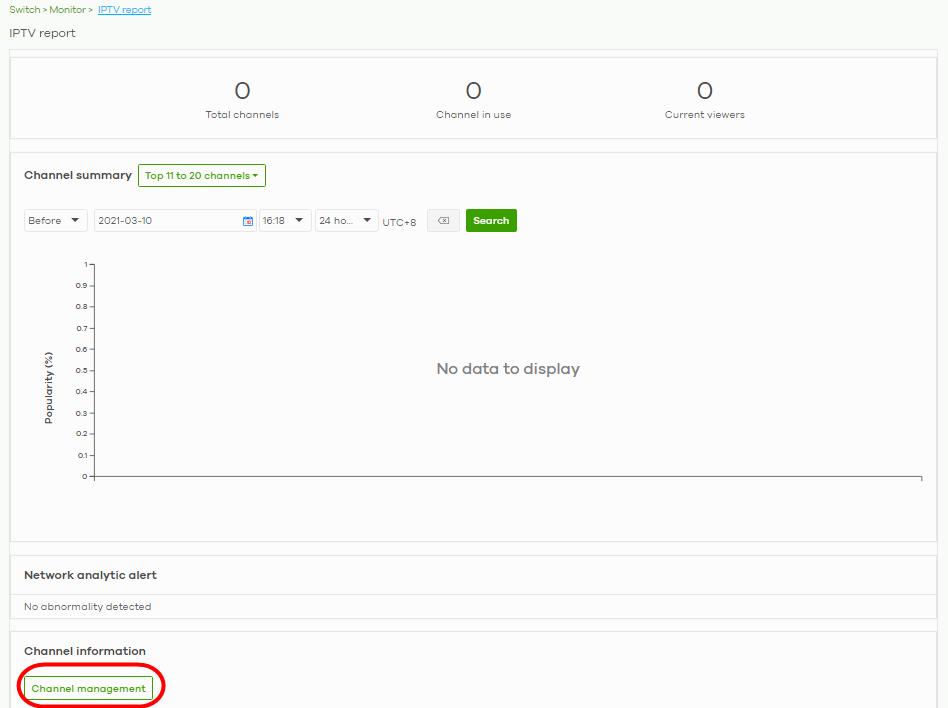
2 To edit the naming of the IPTV channels, go to the Switch > Monitor > IPTV report screen and click Channel management under Channel information.
3 You can choose to either import an updated channel list (channels.xlsx), or enter/edit each Channel address and Channel name individually.
• Under Channel management, click channel list to download a blank Excel file template, edit accordingly and save it, and then click import to import the complete channel list to NCC. Or,
• Click +Add to add and then add/edit a Channel address and Channel name at a time.

4 To view the summary of the IPTV report, go to the Switch > Monitor > IPTV report screen. Click Channel summary to see the top or bottom viewed channels within the specified time period you choose.
Setup Remote Access VPN
To setup a remote access VPN client on the NCC, do the following:
Create a VPN User
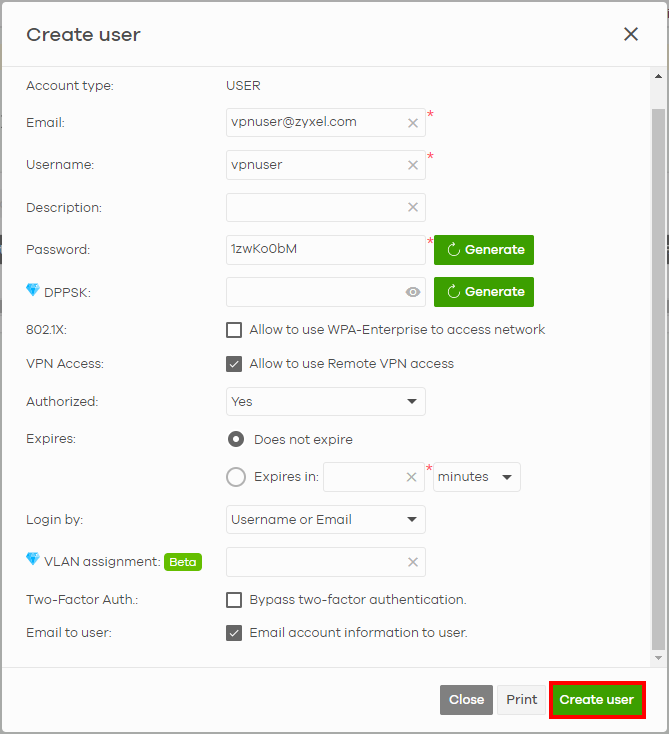
1 Go to the Site-wide > Configure > Cloud authentication screen. Click +Add to create a user.

2 Enter an Email, Username, generate or enter a Password (4 – 31 characters, including 0–9 a–z A–Z `~!@#$%&*(_+-={}|[];'"./<> ?). Click to Allow to use Remote VPN access. Click Does not expire to set no time limit. Select Username or Email in Login by. Click to select Email account information to user. Then click Create user.
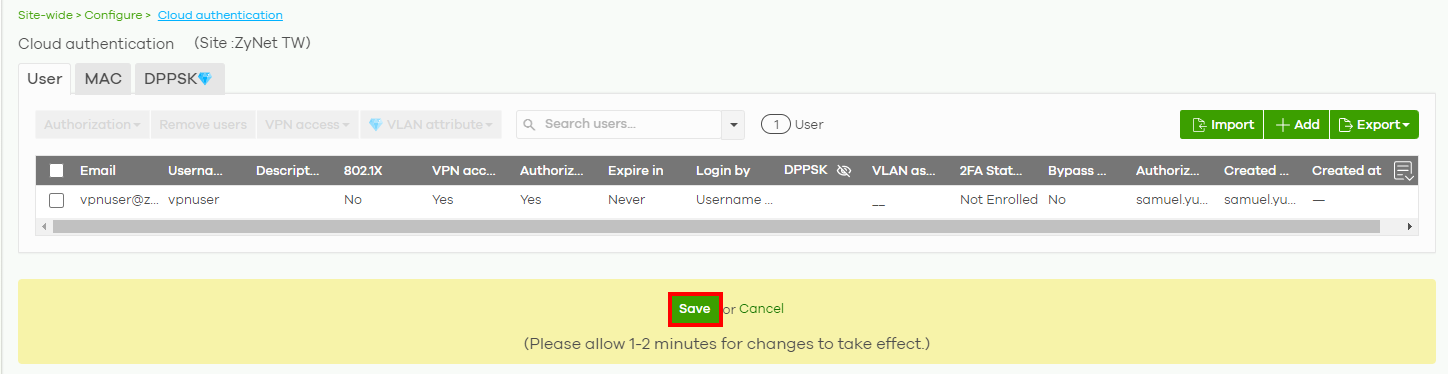
3 Click Save.
Enable the Remote Access VPN Rule for IPSec VPN Client
1 Go to the Firewall > Configure > Remote access VPN screen. Click IPSec VPN server to enable VPN. Enter the IP address range in Client VPN subnet. Select IKEv2 in IKE version.
Click Two-factor authentication with Captive Portal to enable 2FA. The VPN client will be asked to provide a Google authenticator passcode. Then click Save.
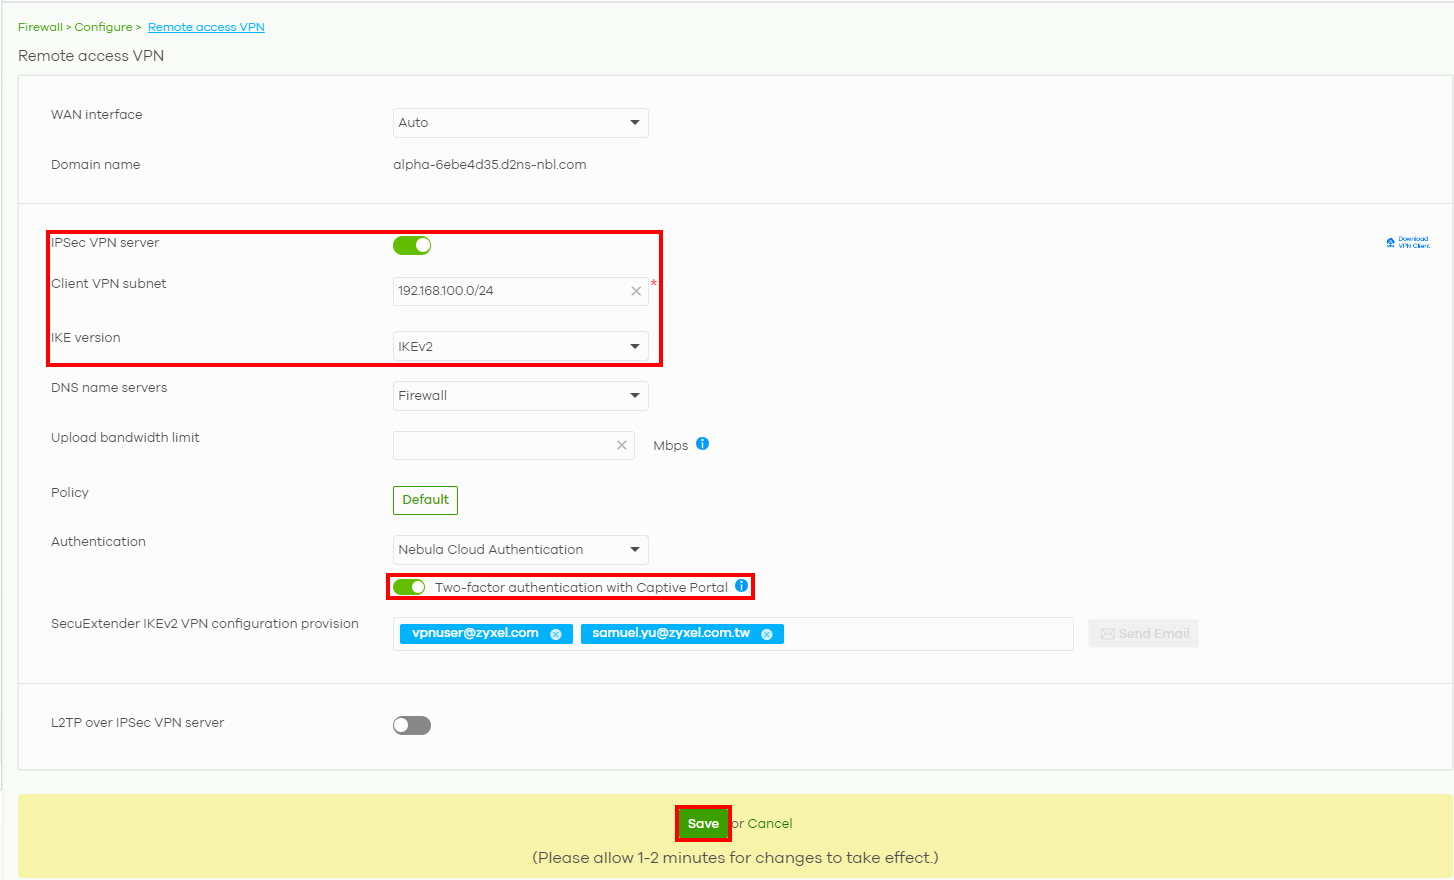
2 Click Send Email to give your VPN client the configuration instructions through email.

VPN Setup by the User
1 The VPN user should receive the following emails:
• Nebula Cloud Account Information email with the following login information: Email, Username, Password, and Expired time (validity = NEVER).
• Configuration for SecuExtender IPSec VPN Client email with attached VPN configuration file (.tgb).
2 Click the link in the Configuration for SecuExtender IPSec VPN Client email for instructions on activating the SecuExtender license key. The How to activate SecuExtender license key after your online purchase webpage appears.
• Click Download.
• Select the SecuExtender app based on your computer’s operating system to install it.
• Follow the online prompts to activate the SecuExtender license.
Import VPN Configuration File
1 Save the attached VPN configuration file (.tgb) from the Configuration for SecuExtender IPSec VPN Client email on the VPN user’s computer.
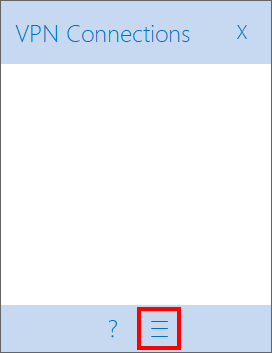
2 On your computer, open SecuExtender. Click the menu icon.
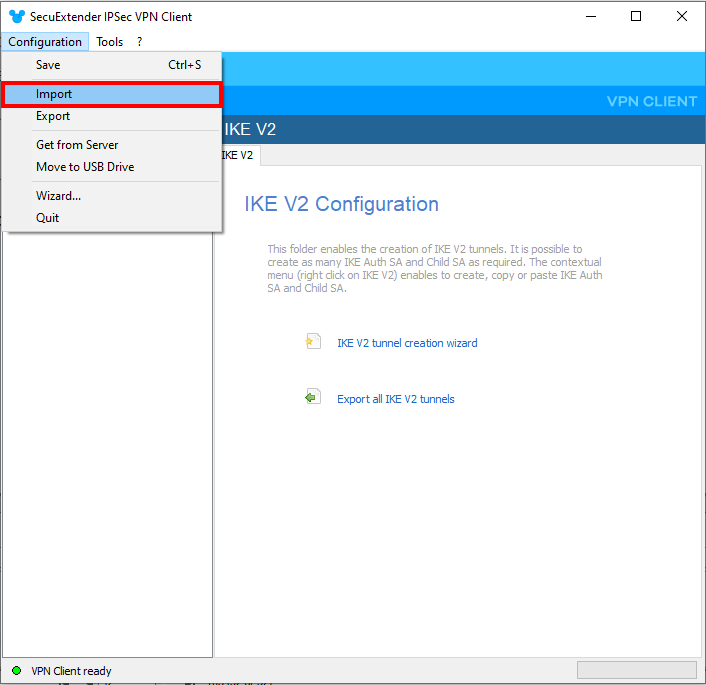
3 Click Configuration > Import.
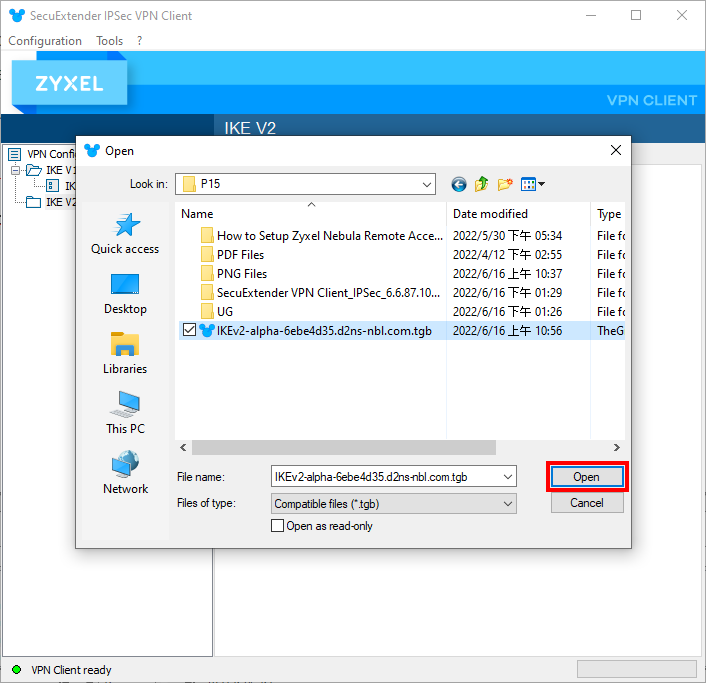
4 Locate and click Open to import the VPN configuration file.
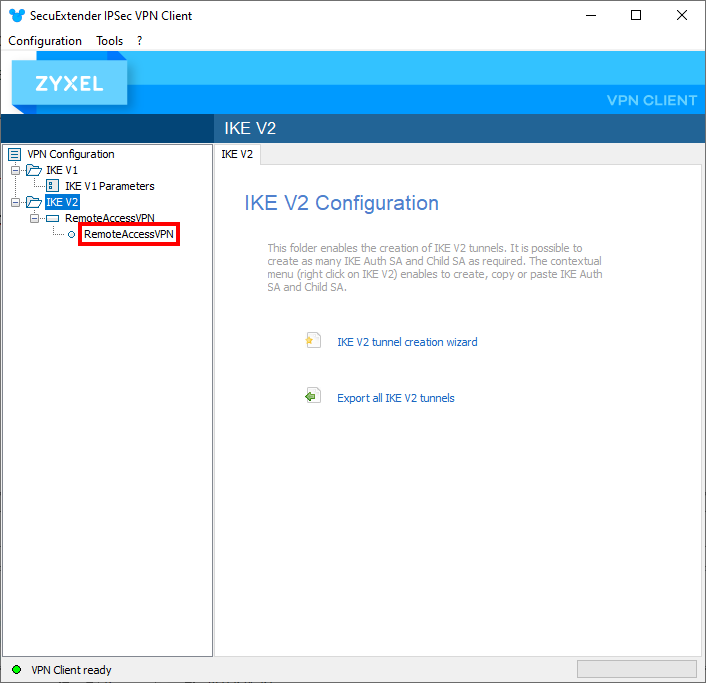
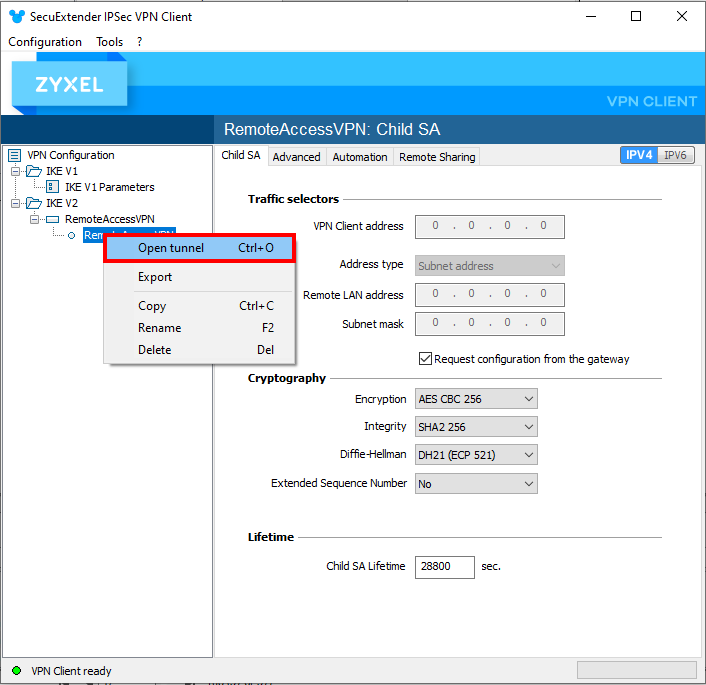
5 Click RemoteAccessVPN in VPN Configuration > IKE V2 > RemoteAccessVPN.
Open the VPN Tunnel
1 Right-click RemoteAccessVPN in VPN Configuration > IKE V2 > RemoteAccessVPN and click Open tunnel.
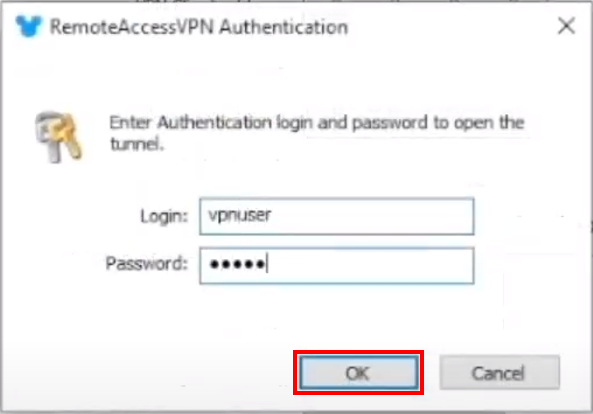
2 On the next screen, enter the Login: Username and Password from the Nebula Cloud Account Information email. Then click OK.
IKEV2 Auth sent will appear on the lower right of the screen.
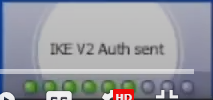
Wait until Tunnel opened appears on the lower right of the screen.

An IP address will now appear in VPN Client address to replace the previous 0.0.0.0. The button lights green in front of RemoteAccessVPN in VPN Configuration > IKE V2 > RemoteAccessVPN.
3 When Your connection isn’t private appears on the web browser, click Advanced to continue.
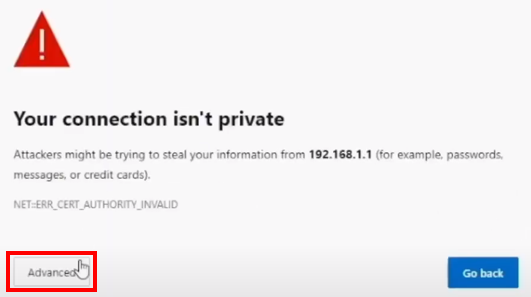
4 Click the Continue to xxx.xxx.x.x (unsafe) link on the bottom of the screen.

Set Up Two Factor Authentication to Bind the User Account
1 On the Two factor authentication screen, click Setup.
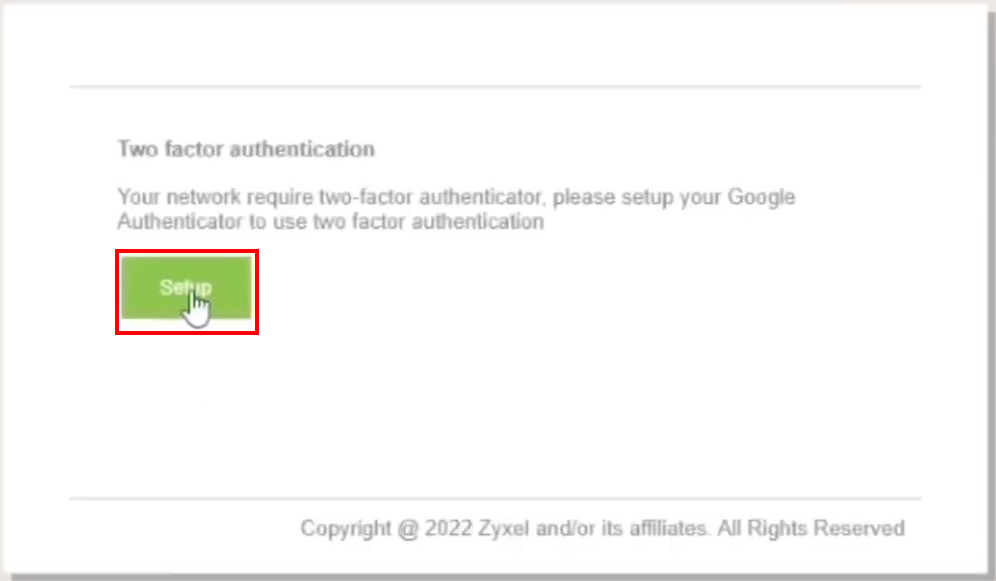
The prompt to download and install the Google Authenticator app on the mobile device appears.
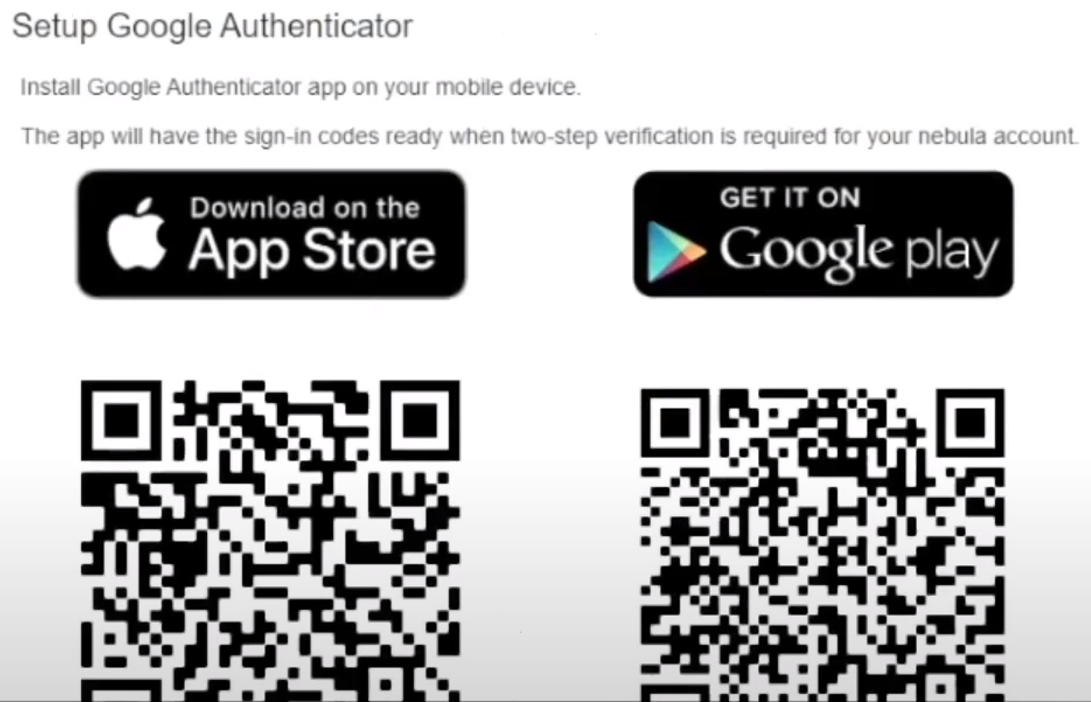
2 Install the Google Authenticator app. Then click Next.
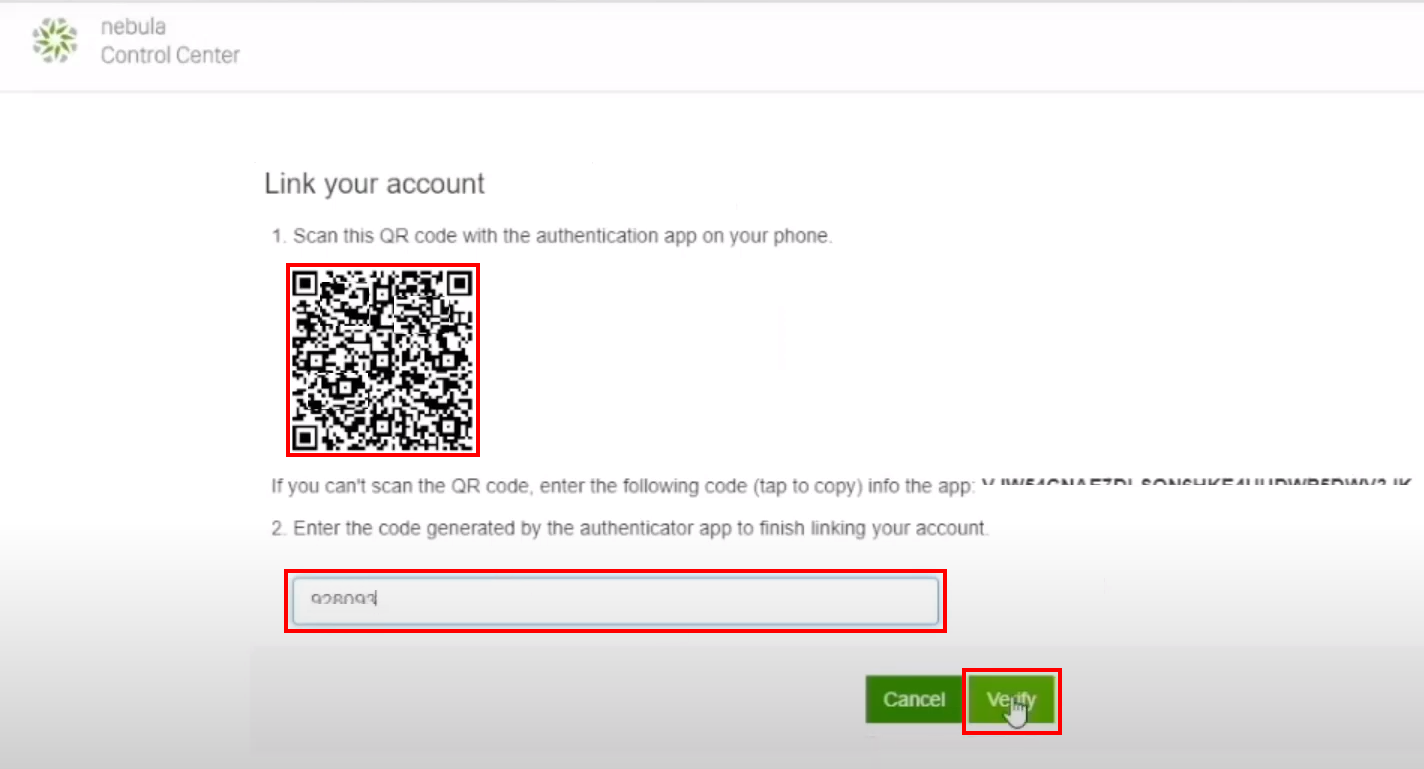
Use the Google Authenticator app to scan the QR code. The QR code contains the user account information created in step 2 of Create a VPN User. Enter the code. Then click Verify. The following screen appears in the NCC portal when the connection is successful.
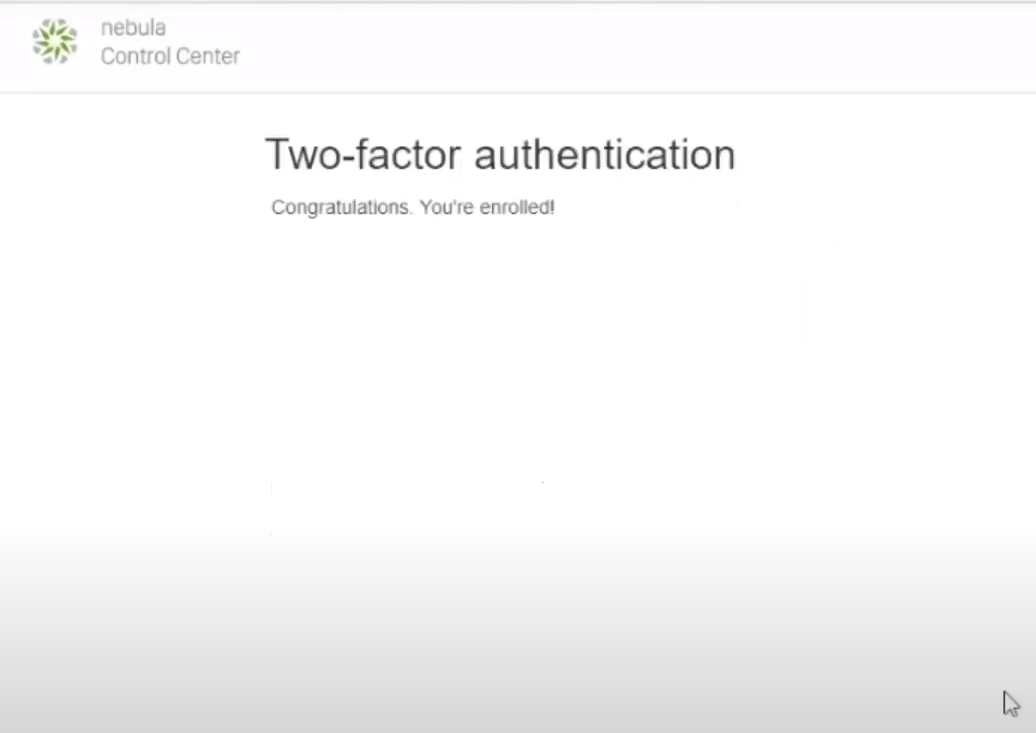
The following screen will appear in the user’s web browser.

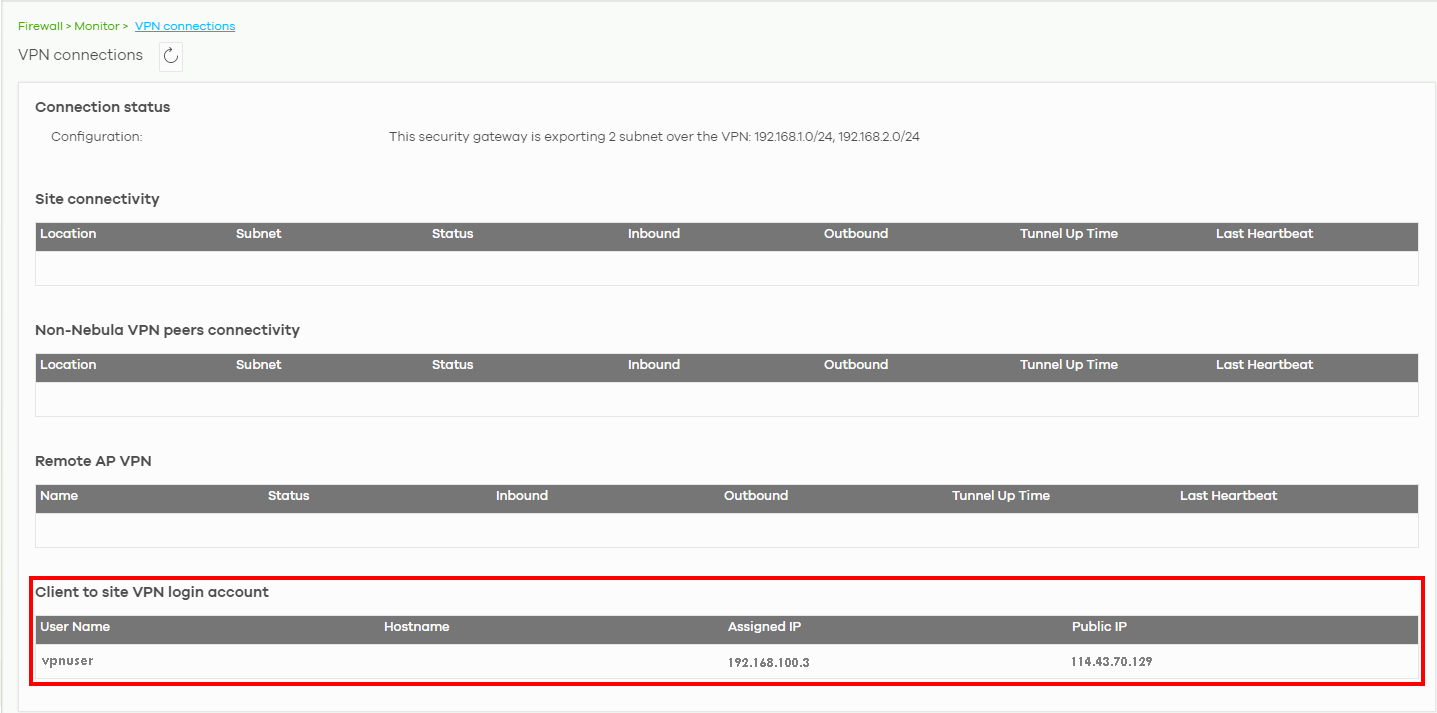
Check the Connection in NCC by the Administrator
Go to the Firewall > Monitor > VPN connections screen. The remote VPN connection should appear in Client to site VPN login account table.