Group-wide
Introduction
This chapter discusses the menus that you can use to monitor and manage your groups settings.
A group is a collection of two or more organizations. Groups allow you to view and manage multiple organizations, and create VPN links between groups in the organization.
Creating a Group
Follow the steps below to create a group.
1 Ensure that you are the owner of two or more Pro Pack organizations that are not currently in a group.
2 Click the Organization list, and then select Create Group.
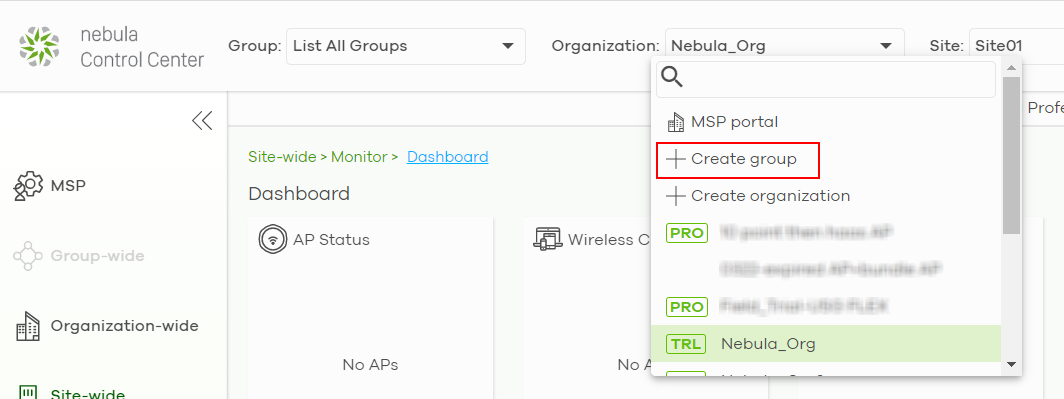
3 In the Create group window, enter a group name and then select two or more organizations to add to the group. You must be the group owner, and each group must have a Pro Pack license. Then click OK.

Group-Wide Menu
The Group-wide menu and the Group list appear when you create at least one group. You can select a group to manage by selecting it in the Group list.
Group > Monitor > Overview: Group
Monitor
The Group menus allow you to monitor and configure group settings, and also the inventories and logs of the sites and organizations in the group.
Overview
The overview screen allows you to view the status of organizations in a group. Click Group-wide > Monitor > Overview to access this screen.
Group-wide > Monitor > Overview
The following table describes the labels in this screen.
Label | Description |
|---|---|
Search | Specify your desired filter criteria to filter the list of organizations. |
matches in | This shows the number of organizations that match your filter criteria after you perform a search. |
N Organizations | This shows the number of organizations (N) tin the group. |
Status | This shows the status of Nebula Devices in the organization. • Green: All Nebula Devices are online and have no alerts. • Amber: One or more Nebula Devices have alerts. • Red: One or more Nebula Devices are offline. • Gray: All Nebula Devices have been offline for 7 days or more. • White: No Nebula Devices. |
Organization | This shows the descriptive name of the organization. |
Type | This shows the NCC license type of the organization. |
NCC License Status | This shows whether the license is valid (OK), the license has expired and the organization downgraded from NCC Pro or Plus Pack to the base tier (Expired), or this is a free organization and an NCC license is not required (N/A). |
Payment mode | This shows the payment method of the organization’s license if you arranged a special payment method with Zyxel. If you bought the license through the Zyxel web store or a third-party vendor, the value will be blank. |
NCC License expiration (UTC) | This shows the date when the license will expire, or N/A when there are no Nebula Devices in the organization or if this is a free organization and an NCC license is not required. |
Sites | This shows the number of sites belonging to this organization. |
Devices | This shows the number of Nebula Devices in the organization that have one of the following status: • Green: The Nebula Device is online and has no alerts. • Amber: The Nebula Device has alerts. • Red: The Nebula Device has been offline for less than 7 days. • Gray: The Nebula Device has been offline for 7 days or more. |
AP | This shows the number of Nebula Access Points in the organization. |
SW | This shows the number of Nebula Switches in the organization. |
SA | This shows the number of NSG and USG FLEX, ATP series, and USG20(W)-VPN Security Appliances connected to the sites in this organization. |
Inventory
Use this screen to view all Nebula Devices in the organizations of the selected group. Click Group-wide > Monitor > Inventory to access this screen.
Group-wide > Monitor > Inventory
The following table describes the labels in this screen.
Label | Description |
|---|---|
Unused | Click this button to show the Nebula Devices which are not assigned to a site yet. |
Used | Click this button to show the Nebula Devices which are assigned to a site. |
Both | Click this button to show all Nebula Devices which are registered for the organizations in the group. |
Search | Enter a key word as the filter criteria to filter the list of connected Nebula Devices. Open the search box drop-down list to filter the search results by site, model, and country. |
Devices | This shows the number of the Nebula Devices in the list. |
Export | Click this button to save the Nebula Device list as a CSV or XML file to your computer. |
MAC address | This shows the MAC address of the Nebula Device. Click on the MAC address to view the Nebula Device details page. |
Serial number | This shows the serial number of the Nebula Device. |
Organization | This shows the organization of the Nebula Device. |
Site | This shows the name of the site to which the Nebula Device is connected. |
Model | This shows the model number of the Nebula Device. |
Registered on (UTC) | This shows the date and time that the Nebula Device was registered at the NCC. |
Country | This shows the country where the Nebula Device is located. |
Change Log
Use this screen to view logged messages for changes in all organizations in the group. Click Group-wide > Monitor > Change log to access this screen.
When the log is full, it deletes older entries one by one to make room for newer ones.
Group-wide > Monitor > Change log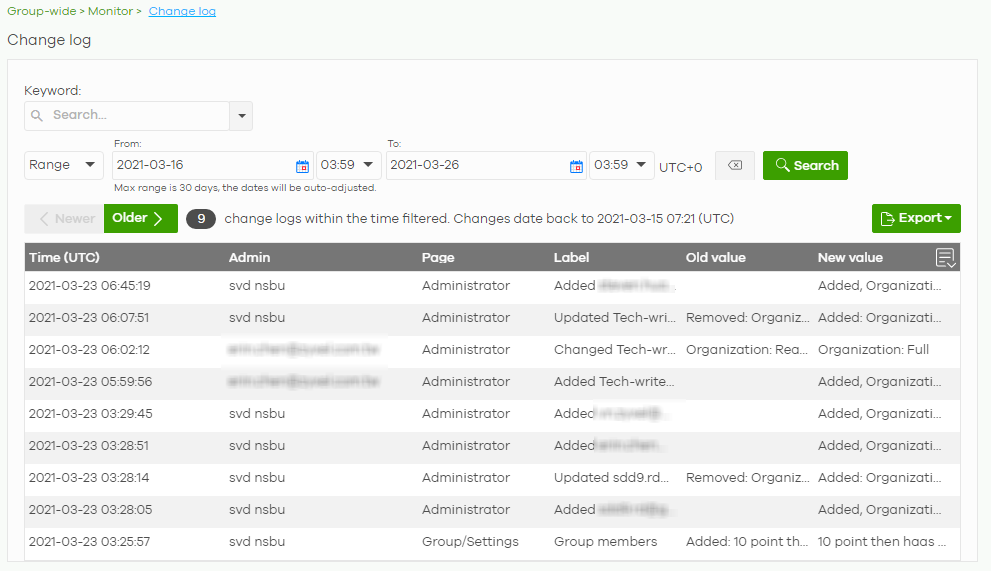
The following table describes the labels in this screen.
Label | Description |
|---|---|
Keyword | Enter a keyword or specify one or more filter criteria to filter the list of log entries. |
Range/Before | Select a filtering option, set a date, and then click Search to filter log entries by date. Range: Display log entries from the first specified date to the second specified date. Before: Display log entries from the beginning of the log to the selected date. |
Search | Click this to update the list of logs based on the search criteria. |
Reset filters | Click this to return the search criteria to the previously saved time setting. |
Newer/Older | Click to sort the log messages by most recent or oldest. |
N change logs within the time filtered. | This shows the total number of the log messages that match the search criteria. It also shows the date and time the very first log was created. |
Export | Click this button to download the log list as a CSV or XML file to your computer. |
Time (UTC) | This shows the date and time in UTC+00:00 (or UTC+0) when the log was recorded. UTC is a standard time for use around the world (formerly known as Greenwich Mean Time or GMT). UTC is an international abbreviation that is neither French nor English. It means both "Temps Universel Coordonné" and "Coordinated Universal Time". |
Admin | This shows the name of the NCC administrator account that made the changes. |
Page | This shows the name of the NCC menu in which the change was made. |
Label | This shows the action that triggered the log entry |
Old value | This shows the old setting or state that was overwritten with the new value. |
New value | This shows the new setting or state. |
Click this icon to display a greater or lesser number of configuration fields. |
Configure
Use the Configure menus to create a new group and manage group general settings, administrator accounts and VPN members.
Group Settings
Use this screen to change your general group settings, such as the group name and members. Click Group-wide > Configure > Settings to access this screen.
Group-wide > Configure > Settings
The following table describes the labels in this screen.
Label | Description |
|---|---|
Group name | Enter a descriptive name for the group. |
Description | Enter a description for the group. |
Group members | Click in the box to add an organization to the group. Click X to remove an organization from the group. |
Delete this group | Click this to delete the group. |
Org-to-Org VPN
Org-to-Org VPN allows devices in different organizations in a group to access each other’s services, such as a website, database, or ERP server, through VPN tunnels.
Configure Org-to-Org VPN
Follow the steps below to configure Org-to-Org VPN in the group.
1 Configure Smart VPN for each organization you want included in the Org-to-Org VPN.
1a In the Organization list, select the organization.
1b Go to Organization-wide > Configure > VPN Orchestrator.
1c Configure a VPN area with hub-and-spoke topology, and then assign at least one site as a hub. If a site contains a server that you want to share between organizations, then ensure the server is in a hub site or that Branch to Branch VPN is enabled.
2 Go to Group-wide > Configure > Org-to-Org VPN, and then enable Hub to Hub VPN.
3 Click + Hub. In the Select Hubs window, add at least one hub site from each organization to the Within Org-to-Org list.
4 Click + Org-to-Org Service, and add a server’s fully qualified domain name (FQDN) and IP address.
5 Devices in the organizations included in the Org-to-Org VPN are now able to access the server by IP address or FQDN.
Org-to-Org VPN Example
Org-to-Org VPN Example shows organization O1 with two VPN areas and hubs H1 and H2. Area communication and Branch to Branch VPN are both enabled. It shows another organization O2 with its own set of sites and a hub. H1 and H3 belong to the Org-to-Org VPN. The server behind S9 is listed as an org-to-org service. If a Nebula Device behind S5 wants to access the server behind S9, traffic will pass through its hub H2 and then to H1 and H3.
Org-to-Org VPN Example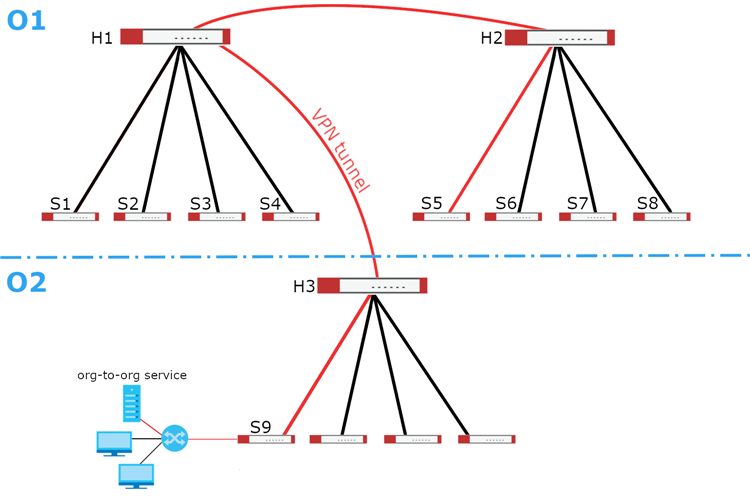
Org-to-Org VPN Screen
Click Group-wide > Configure > Org-to-Org VPN to access this screen.
Group-wide > Configure > Org-to-Org VPN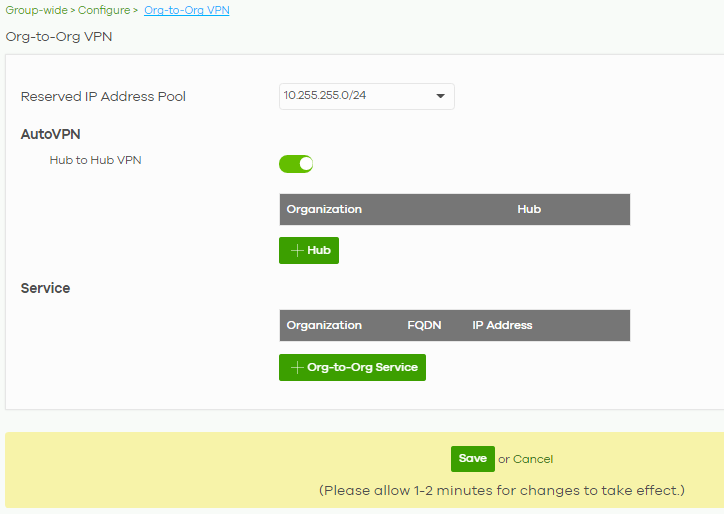
The following table describes the labels in this screen.
Label | Description |
|---|---|
Reserved IP Address Pool | Specify the IP addresses that Nebula Devices use to create the VPN tunnels between the gateway devices in the org-to-org VPN network. You can select a set or custom range. This IP address range must not overlap with any IP address ranges already in use within any sites in the org-to-org VPN. |
AutoVPN | |
Hub to Hub VPN | Turn the switch to On to enable create VPN tunnels between the hubs in the list. This is required to enable Org-to-Org VPN. When this setting is disabled, Org-to-Org VPN will not work and can only be configured. |
Organization | This column lists down the organization to which the hub site belongs. |
Hub | This column lists down the names of the hub sites included in the Org-to-Org VPN. |
+Hub | Click this to set up which hub site you want to add to the Org-to-Org VPN. |
Service | |
Organization | This displays the organization to which the network service belongs. |
FQDN | This displays the Fully-Qualified Domain Name (FQDN) associated with the network service which Security Gateway devices and Nebula Devices behind them are given access. |
IP Address | This displays the IP address of the network service which Security Gateway devices and Nebula Devices behind them are given access. |
+Org-to-Org Service | Click this to add a service that can be accessed within the org-to-org VPN. |
Save | Click this button to save your changes and close the screen. |
Cancel | Click Cancel to exit this screen without saving. |
Add Hub
Click the +Hub button on the Group-wide > Configuration > Org-to-Org VPN screen to access the following screen. If Hub to Hub VPN is enabled, use this screen to select which hubs you want to include in the Org-to-Org VPN.
Group-wide > Configure > Org-to-Org VPN: SD-WAN Hubs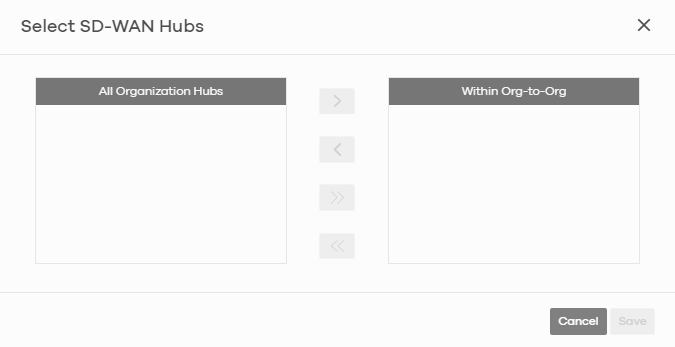
Hubs are listed in this screen and you may choose whether to include them in the org-to-org network or not by clicking the “<”and “>” buttons. The “<<” and “>>” buttons move all hubs at once. Details about this screen are described in the table below.
The following table describes the labels in this screen.
label | description |
|---|---|
All Organization Hubs | This box lists all hub sites in the group that are outside the org-to-org network. It shows the name of the hub followed by the Organization it belongs to in parentheses. |
Within Org-to-Org | This box lists all hub sites inside the org-to-org network. It shows the name of the hub followed by the Organization it belongs to in parentheses. |
Cancel | Click Cancel to exit this screen without saving. |
Save | Click Save to add the hubs to the org-to-org network. |
Service
Use this screen to add a service accessible through the org-to-org VPN. Note that you can choose to add only the FQDN or only the IP address. Click +Org-to-Org Service and then the following screen appears.
Group-wide > Configure > Org-to-Org VPN: Service
The following table describes the labels in this screen.
label | description |
|---|---|
Organization | Select the organization to which the service you want to add is linked to. |
FQDN | Enter the Fully-Qualified Domain Name (FQDN) associated with the service. An FQDN starts with a host name and continues all the way up to the top-level domain name. For example, www.zyxel.com.tw is a fully qualified domain name, where “www” is the host, “zyxel” is the third-level domain, “com” is the second-level domain, and “tw” is the top level domain. Underscores are not allowed. Use "*." as a prefix in the FQDN for a wildcard domain name (for example, *.example.com). |
IP Address | Enter the IP address of the service you want to add to the org-to-org VPN. |
Save | Click Save to allow access to the service through the org-to-org VPN. |
Cancel | Click Cancel to exit this screen without saving. |
Administrators
Group Administrator accounts can be added, modified, or deleted through this screen. A group administrator has administrator privileges in all organizations in the group. Group administrators are registered using their NCC account email address.
Click Group-wide > Configure > Administrators to access this screen.
Group-wide > Configure > Administrators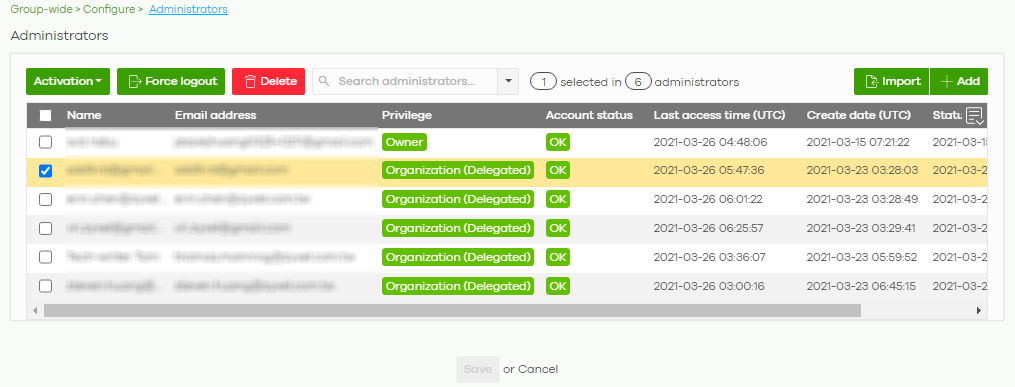
The following table describes the labels in this screen.
Label | Description |
|---|---|
Activation | Click this button to Activate/Deactivate the selected accounts. Then, click Update. |
Force logout | Click this button to force the selected accounts to log out of NCC. |
Delete | Click this button to remove group administrator privileges for the selected accounts. |
Search | Specify your desired filter criteria to filter the list of administrator accounts. |
administrators | This shows the number of administrator accounts in the list. |
Import | Click this button to create administrator accounts in bulk by importing a complete list of all new administrators in an Excel file. |
Add | Click this button to create a new group administrator account. See Create/Update Administrator. |
Name | This shows the name of the administrator account. |
Email address | This shows the email address of the administrator account. |
Privilege | This shows the privileges the administrator has within all organizations in the group. Full: the administrator can edit settings, create or delete other administrator accounts, create or delete a site, and add or renew licenses for Nebula Devices in the organization. Read-only: the administrator account has no write access to the organization, but can be a site administrator. Delegate owner’s authority: The administrator account has delegated owner privileges. This type of account can perform all of the same actions as the organization owner, except for the following: • Delete organization • Transfer organization ownership • Assign delegate owner privileges to an administrator account. |
Account status | This shows whether the administrator account has been validated (OK). It shows Deactivated if an administrator account has been created but cannot be used. This may happen since you can only have up to five active administrator accounts in the NCC base tier. |
Last access time | This shows the last date and time traffic was sent from the administrator account. |
Create date | This shows the date and time the administrator account was created. |
Status change date | This shows the last date and time the administrator account status was changed. |
Click this icon to display a greater or lesser number of configuration fields. |
Create/Update Administrator
In the Group-wide > Configure > Administrators screen, click the Add button to add a new group administrator account or double-click an existing account entry to modify the account settings.
Group-wide > Configure > Administrators: Create/Update administrator
The following table describes the labels in this screen.
Label | Description |
|---|---|
Name | Enter a descriptive name for the administrator account. |
Email | Enter the email address of the administrator account, which is used to log into the NCC. This field is read-only if you are editing an existing account. |
Organization access | This shows the privileges the administrator has within all organizations in the group. Full: the administrator can edit settings, create or delete other administrator accounts, create or delete a site, and add or renew licenses for Nebula Devices in the organization. Read-only: the administrator account has no write access to the organization, but can be a site administrator. |
Delegate owner’s authority | This setting is only available when Organization access is set to Full. Select this setting to grant delegate owner privileges to an organization full administrator account. An account with delegate owner privileges can perform all of the same actions as the organization owner, except for the following: • Delete organization • Transfer organization ownership • Assign delegate owner privileges to an administrator account. |
Activate | Select Yes to enable the account or No to temporarily disable the account. |
Close | Click this button to exit this screen without saving. |
Create admin/Update admin | Click this button to save your changes and close the screen. |