MSP
Overview
The MSP (Managed Services Provider) menus allow you to view the summary of organizations and change the branding on NCC.
An MSP license that expires will keep the previous settings in MSP but disable the MSP features.
An MSP license can be transferred to another MSP administrator. Click the More icon at the top right-hand corner of the Dashboard screen and click the Services tab to view the Status of MSP licenses. To transfer an MSP license, select the MSP license and click Actions > Transfer license. Alternatively, click Transfer license under Actions.
Transfer an MSP License
MSP Portal
This screen lists every organization to which your account has at least read-only access.
To access this screen, select MSP portal from the Organization drop-down list box in the title bar, or click MSP > Monitor > MSP portal in the navigation panel.
MSP > Monitor > MSP portal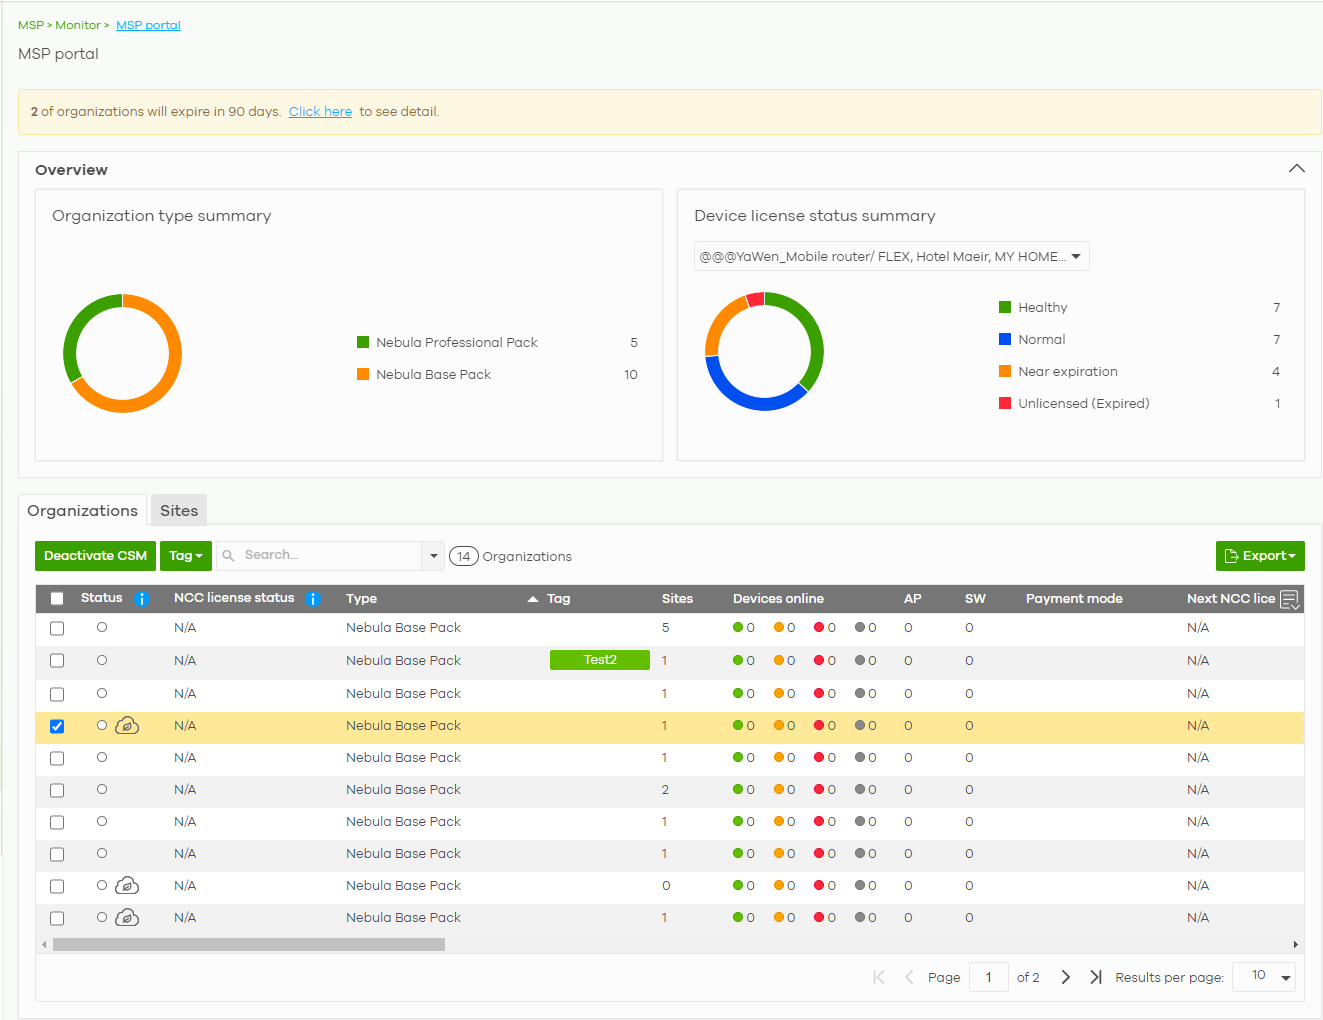
The following table describes the labels in this screen.
Label | Description |
|---|---|
Organization type summary | This pie chart shows the total number of the organization mode (for example, x PRO, x Plus, x Base organizations). |
Device license status summary | This pie chart shows the total number of Nebula managed devices with NCC and ATP licenses only. You can select the organization to display in the drop-down list. Click a particular color in the pie chart to show the details of the licenses of the selected organizations. |
Organizations | |
Deactivate CSM | Select the organization(s) and click this button to disable CSM (Cloud-Saving Mode). See Cloud-Saving Mode for more information on Cloud-saving mode. |
Tag | Assign a name to an organization or to a group of organizations. 1. Select the organizations. The Tag button will be enabled. 2. Click Tag. 3. In the Add field, enter a tag (up to 32 alphanumeric characters and spaces are allowed). 4. Click +Add new. Then Add to confirm. To remove the tag assigned to an organization or to a group of organizations. 1. Select the organization with an assigned tag. 2. Click Tag. 3. Enter the name of the tag. As you type along, NCC will automatically show the names of tags that matches. 4. Select the tag. Then click Remove. |
Search | Specify your desired filter criteria to filter the list of organizations and organization status. |
matches in | This shows the number of organizations that match your filter criteria after you perform a search. |
Organizations | This shows the number of organizations that you can manage. |
* | Click this to select all rows. Alternatively, click a row to go to the Sites tab that will show the sites belonging to the organization. |
Status | This shows the status of Nebula Devices in the organization. • Green: All Nebula Devices are online and have no alerts. • Orange: Some Nebula Devices have alerts. • Red: Some Nebula Devices are offline. • Gray: All Nebula Devices have been offline for 7 days or more. • White: No Nebula Devices in this organization. • |
NCC license status | This shows the license status of Nebula Devices in the organization. • Green: All Nebula Devices with over 1 year licenses. • Blue: Any Nebula Device with over 90 days but less than 1 year license together with another Nebula Device with over 1 year license. • Orange: Any Nebula Device with license that will expire in 90 days together with another Nebula Device with over 90 days license. • Red: Any Nebula Device with an expired license or is unlicensed. • Gray: No Nebula Devices in this organization. |
Organization | This shows the descriptive name of the organization. Click an Organization to go to the Organization-wide > Monitor > Overview screen. Hover the mouse over the name of the Organization to display the site information window. Clicking a Site name will go to the Site-wide > Monitor > Dashboard screen. |
Type | This shows your NCC version type. |
Tag | This shows the tag name assigned to this organization. Otherwise, the organization does not have a tag. |
Sites | This shows the number of sites belonging to this organization. |
Devices online | This shows the number of Nebula Devices in this organization which are online (green), have recently had alerts (orange), recently went offline (red), or have been offline for more than 6 days (gray). |
AP | This shows the number of Nebula access points connected to the sites in this organization. |
SW | This shows the number of Nebula switches connected to the sites in this organization. |
Security appliance | This shows the number of Nebula security appliances connected to the sites in this organization. |
MR | This shows the number of Nebula mobile routers connected to the sites in this organization. |
Payment mode | This shows the payment method of the NCC license if you arranged a special payment method with Zyxel. If you bought the license through the Zyxel webstore or a third-party vendor, the value will be blank. |
Next NCC license expiration date | This shows the date when the license will expire, or N/A when there is no Nebula-managed device in the organization. For example, if you have two Nebula Devices in the organization: • Nebula Device 1 is with NCC license expiration date on 2022/10/1 • Nebula Device 2 is with NCC license expiration date on 2022/11/1 This field will show the nearest expiration date ‘2022/10/1’. |
# devices will expire in 90 days | This shows the number of Nebula-managed devices with licenses that will expire in 90 days or less in this organization. |
# unused NCC license | This shows the number of unused NCC (Nebula Control Center) licenses in this organization. |
Click this icon to display a greater or lesser number of configuration fields. | |
Export | Click this button to save the MSP Portal list as a CSV or XML file to your computer. |
Sites | |
Search | Specify your desired filter criteria to filter the list of sites. |
matches in | This shows the number of sites that match your filter criteria after you perform a search. |
sites | This shows the number of sites that you can manage. |
* | Click this to select all rows. |
Status | This shows the status of Nebula Devices in the site. • Green: All Nebula Devices are online and have no alerts. • Orange: Some Nebula Devices have alerts. • Red: Some Nebula Devices are offline. • Gray: All Nebula Devices have been offline for 7 days or more. • White: No Nebula Devices in this site. |
Organization | This shows the descriptive name of the organization. |
Site | This shows the descriptive name of the site. Clicking a site name will go to the Site-wide > Monitor > Dashboard screen. |
Tags | This shows the tag name assigned to this site. Otherwise, the site does not have a tag. |
Devices | This shows the number of Nebula Devices connected to the site. |
Offline devices | This shows the number of Nebula Devices in this site which are offline. |
% Offline | This shows the percentage of Nebula Devices in this site which are offline. |
Template | This shows the name of the template that is bound to a site. |
Click this icon to display a greater or lesser number of configuration fields. | |
Export | Click this button to save the MSP Portal list as a CSV or XML file to your computer. |
Change Log
Use this screen to view logged messages for changes in the Admins & teams and Cross-org synchronization screens. Click MSP > Monitor > Change log to access this screen.
When the log is full, it deletes older entries one by one to make room for newer ones.
MSP > Monitor > Change log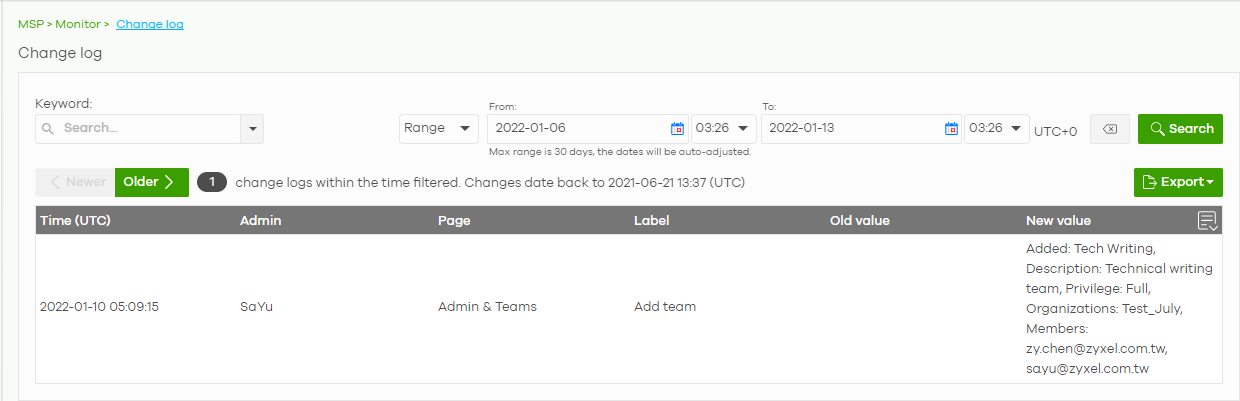
The following table describes the labels in this screen.
Label | Description |
|---|---|
Keyword | Enter a keyword or specify one or more filter criteria to filter the list of log entries. |
Range/Before | Select a filtering option, set a date, and then click Search to filter log entries by date. Range: Display log entries from the first specified date to the second specified date. Before: Display log entries from the beginning of the log to the selected date. |
Search | Click this to update the list of logs based on the search criteria. |
Reset filters | Click this to return the search criteria to the previously saved time setting. |
Newer/Older | Click to sort the log messages by most recent or oldest. |
N change logs within the time filtered. | This shows the total number of the log messages that match the search criteria. It also shows the date and time the very first log was created. |
Export | Click this button to download the log list as a CSV or XML file to your computer. |
Time (UTC) | This shows the date and time in UTC+00:00 (or UTC+0) when the log was recorded. UTC is a standard time for use around the world (formerly known as Greenwich Mean Time or GMT). UTC is an international abbreviation that is neither French nor English. It means both "Temps Universel Coordonné" and "Coordinated Universal Time". |
Page | This shows the name of the NCC menu in which the change was made. |
Label | This shows the action that triggered the log entry |
Old value | This shows the old setting or state that was overwritten with the new value. |
New value | This shows the new setting or state. |
Click this icon to display a greater or lesser number of configuration fields. |
Create Organization
Use this screen to create an organization. You can copy the settings from an existing organization if you already created one. Click MSP > Configure > Create organization to access this screen.
MSP > Configure > Create organization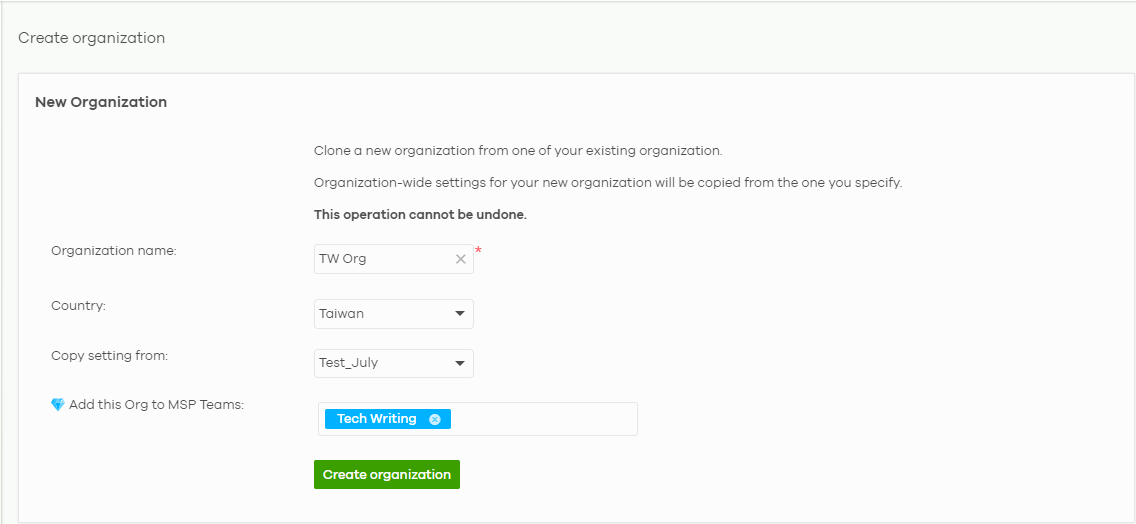
The following table describes the labels in this screen.
Label | Description |
|---|---|
New Organization | |
Organization name | Enter a name for your organization. Enter up to 100 characters in this field including special characters inside the square quotes [~!@#$%^&*()_+{}|:”<>?–=[]\;’,./]. |
Country | Select the country or region where the devices in the organization is located. |
Copy setting from | If you already have one, or more than one organizations in your account and you want to copy the organization settings of an existing one, select the organization name. |
Add this Org to MSP Teams | If you already have one, or more than one MSP teams (MSP > Configure > Admins & teams) in your account and you want to add this organization to an existing one, select the MSP team. |
Create organization | Click this button to add a new organization. |
MSP Branding
The Dashboard logo section of this screen allows organization owners to replace the Nebula Control Center logo with a new MSP logo. The Support contact section allows addition of a customized message or MSP contact information in the Help > Support request page. To access this screen, click MSP > Configure > MSP branding.
MSP > Configure > MSP branding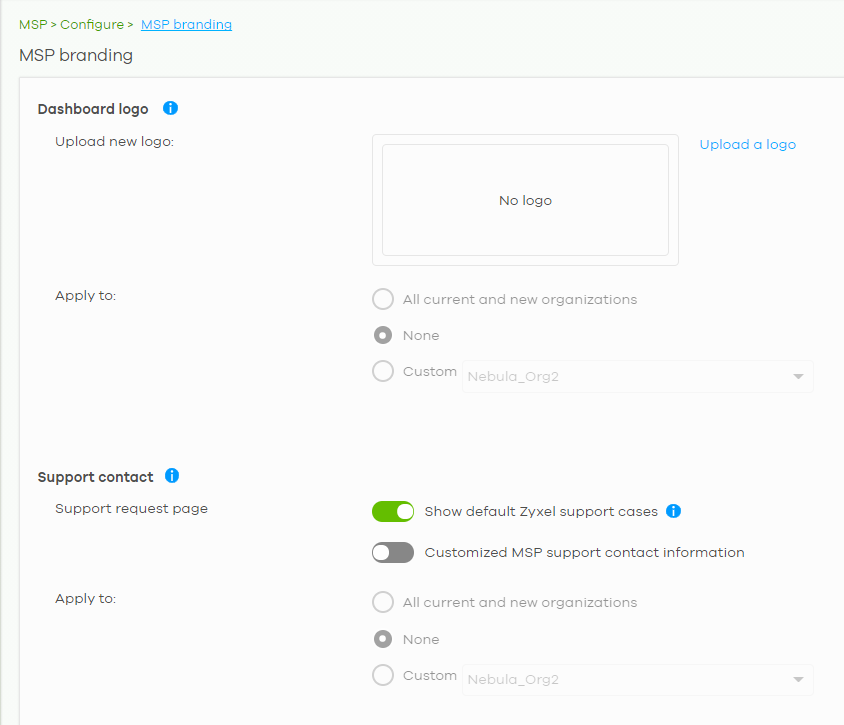
The following table describes the labels in this screen.
Label | Description |
|---|---|
Dashboard logo | |
Upload new logo | Click this to browse for the location of the image file to be used as your dashboard logo. • Allowed image file formats: JPG/JPEG, PNG, GIF. • Maximum image file size: 200 KB. • NCC converts the image file to a 160 x 44 pixel logo after uploading. |
Replace this logo | Click this to browse for the location of the image file to replace your current dashboard logo. |
Remove this logo | Click this to remove your current dashboard logo. |
Apply to | Select All current and new PRO organizations to apply the logo to all Nebula Professional Pack organization dashboards. Select Custom to choose which Nebula Professional Pack organization to apply the logo. Select None if you only wish to upload the image file but will not apply it yet. |
Support contact | |
Support request page | |
Show default Zyxel support cases | Select ON to display the standard Zyxel support contact information in the Help > Support request screen. Organization owners can choose to hide the default Help > Support screen section to only show their information to clients. But the organization owner and administrators with full privilege will still see the hidden default screen section. |
Customized MSP support contact information | Create your own support contact information. Enter up to 1000 characters in this field including special characters inside the square quotes [~!@#$%^&*()_+{}|:”<>?–=[]\;’,./]. |
Apply to | Select All current and new PRO organizations to apply the support contact information to all Nebula Professional Pack organization Help > Support request screens. Select Custom to choose which Nebula Professional Pack organization to apply the support contact information. Select None if you only wish to save the settings but will not apply it yet. |
Admins & Teams
The Admins & teams enables you to assign an administrator or a group of administrators (a team) to multiple organizations at the same time. This is faster than configuring administrators for each organization at Organization-wide > Configure > Administrators, especially if you have a large number of organizations.
Administrator Privilege Priority
You can configure organization administrator privileges on the following screens:
• MSP > Configure > Admins & teams > Admins
• MSP > Configure > Admins & teams > Teams
• Group-wide > Configure > Administrators
• Organization-wide > Configure > Administrators
If an NCC account has different administrator privileges configured on different screens, then the highest privilege level takes priority.
Example, account User1 has four different privilege levels configured for organization Org1 on the four screens above: None, Read-Only, Full, Full (Delegate). User1’s final privilege level for Org1 is Full (Delegate).
Admins Screen
The admins screen allows you to assign an administrator account to multiple organizations. To access this screen, click MSP > Configure > Admins & teams > Admins.
MSP > Configure > Admins & teams > Admins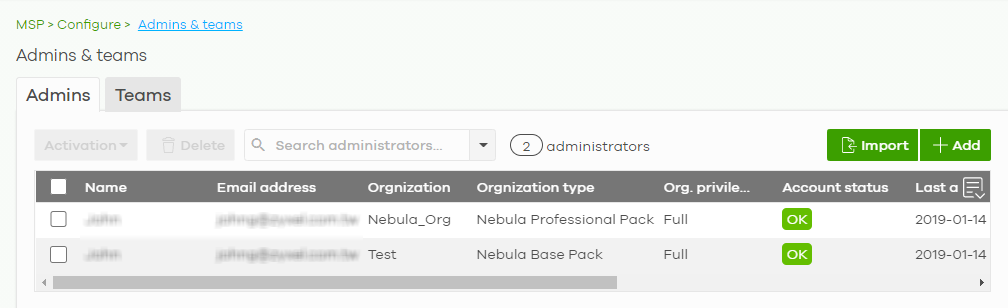
The following table describes the labels in this screen.
Label | Description |
|---|---|
Activation | Click this button to Activate/Deactivate the selected accounts. Then, click Update. |
Delete | Click this button to remove group administrator privileges for the selected accounts. |
Search | Specify your desired filter criteria to filter the list of administrator accounts. |
N administrators | This shows the number of administrator accounts (N) in the list. |
Import | Click this button to create administrator accounts in bulk by importing a complete list of all new administrators in an Excel file. |
Add | Click this button to create a new group administrator account. |
Name | This shows the name of the administrator account. |
Email address | This shows the email address of the administrator account. |
Organization | This shows the name of the organization in which the privileges apply. |
Organization type | This shows the license tier of the organization. |
Org. privilege | This shows the privileges the administrator has within the specified organization. Full: the administrator can edit settings, create or delete other administrator accounts, create or delete a site, and add or renew licenses for Nebula Devices in the organization. Read-only: the administrator account has no write access to the organization, but can be a site administrator. Delegate owner’s authority: The administrator account has delegated owner privileges. This type of account can perform all of the same actions as the organization owner, except for the following: • Delete organization • Transfer organization ownership • Assign delegate owner privileges to an administrator account |
Account status | This shows whether the administrator account has been validated (OK). It shows Deactivated if an administrator account has been created but cannot be used. This may happen since you can only have up to 5 active administrator account in NCC base tier. |
Last access time (UTC) | This shows the last date and time traffic was sent from the administrator account. |
Create date (UTC) | This shows the date and time the administrator account was created. |
Status change date (UTC) | This shows the last date and time the administrator account status was changed. |
Creator | This shows the name of the MSP user account that added the privilege settings. |
Click this icon to display a greater or lesser number of configuration fields. |
Create/Update Administrator
In the MSP > Configure > Admins & teams > Admins screen, click the Add button to add a new administrator account, or double-click an existing account entry to modify the account settings.
MSP > Configure > Admins & teams > Admins: Create/Update administrator
The following table describes the labels in this screen.
Label | Description |
|---|---|
Name | Enter a descriptive name for the administrator account. Enter up to 100 characters in this field including special characters inside the square quotes [~!@#$%^&*()_+{}|:”<>?–=[]\;’,./]. |
Email address | Enter the email address of the administrator account, which is used to log into the NCC. This field is read-only if you are editing an existing account. |
Assign privilege | |
Organization | Select one or more organizations to assign the account privileges to. Only organizations belonging to an MSP account with full privileges can be selected. |
Privilege | Select the privileges the administrator has within the selected organizations. Full: the administrator can edit settings, create or delete other administrator accounts, create or delete a site, and add or renew licenses for Nebula Devices in the organization. Read-only: the administrator account has no write access to the organization, but can be a site administrator. |
Activate | Select Yes to enable the account or No to temporarily disable the account. |
 | Click the remove icon to delete the current set of admin privileges. |
Add | Add administrator privileges for an organization. |
Close | Click this button to exit this screen without saving. |
Create admin/Update admin | Click this button to save your changes and close the screen. |
Teams Screen
The team screen allows you to assign administrator privileges to a group of NCC accounts (a team). To access this screen, click MSP > Configure > Admins & teams > Teams.
MSP > Configure > Admins & teams > Teams
The following table describes the labels in this screen.
Label | Description |
|---|---|
Delete | Click this button to remove the selected teams. |
Search | Specify your desired filter criteria to filter the list of teams. |
N teams | This shows the number of teams (N) in the list. |
Add | Click this button to create a new administrator team. |
Select an entry’s check box to select a specific team. Otherwise, select the check box in the table heading row to select all teams. | |
Name | This shows the name of the team. |
Description | This shows a description of the team. |
Org. privilege | This shows the privileges the team has within the specified organizations. Full: the administrator can edit settings, create or delete other administrator accounts, create or delete a site, and add or renew licenses for Nebula Devices in the organization. Read-only: the administrator account has no write access to the organization, but can be a site administrator. |
Organization | This shows the names of the organizations in which the privileges apply. |
Administrator | This shows a list of the administrators in the team. |
Create date (UTC) | This shows the date and time the team was created. |
Status change date (UTC) | This shows the last date and time the team status was changed. |
Creator | This shows the name of the MSP user account that added the privilege settings. |
Click this icon to display a greater or lesser number of configuration fields. |
Create/Update Team
In the MSP > Configure > Admins & teams > Teams screen, click the Add button to add a new administrator team, or double-click an existing team entry to modify its settings.
MSP > Configure > Admins & teams > Teams: Create/Update Team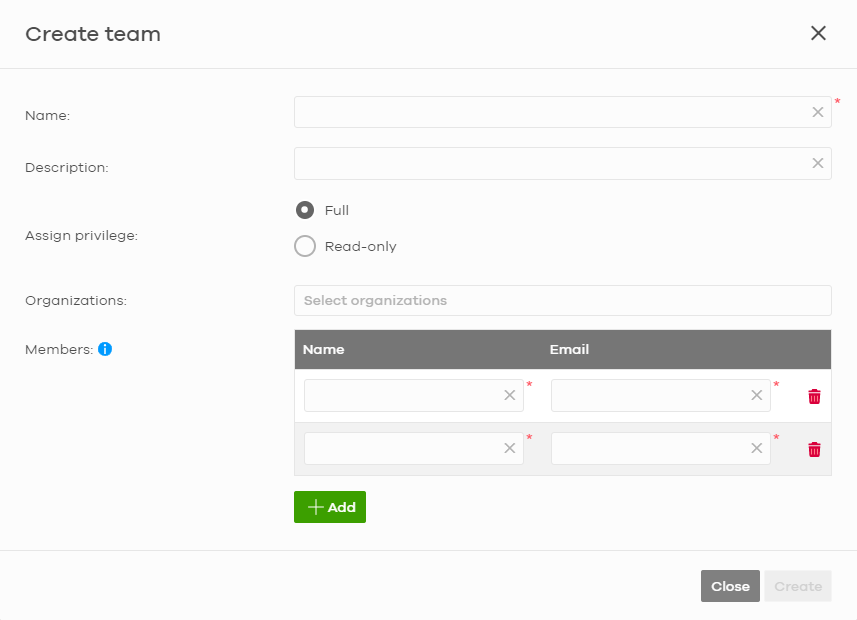
The following table describes the labels in this screen.
Label | Description |
|---|---|
Name | Enter a descriptive name for the team. Enter up to 15 characters in this field including special characters inside the square quotes [~!@#$%^&*()_+{}|:”<>?–=[]\;’,./]. |
Description | Enter a description of the team, for example their role or membership. Enter up to 64 characters for this field including special characters inside the square quotes [~!@#$%^&*()_+{}|:”<>?–=[]\;’,./]. |
Assign privilege | Select the privileges the team members have within the selected organizations. Full: Each member of the team can edit settings, create or delete other administrator accounts, create or delete a site, and add or renew licenses for Nebula Devices in the organization. Read-only: Each member of the team has no write access to the organization, but can be a site administrator. |
Organization | Select one or more organizations to assign the team privileges to. An organization can belong to multiple teams. |
Members | |
Name | Enter a descriptive name for the members. Enter up to 15 characters for this field including special characters inside the square quotes [~!@#$%^&*()_+{}|:”<>?–=[]\;’,./]. |
Email address | Enter the email address of the members who can log into the NCC. |
| Click the remove icon to delete the current set of admin privileges. |
Add | Add another NCC account to this team. |
Close | Click this button to exit this screen without saving. |
Create/Update | Click this button to save your changes and close the screen. |
Cross-org synchronization
The Cross-org synchronization screen allows you to copy settings or a site from one organization to another. You can also move Nebula Devices with its settings to another organization.
Cross-Org setting sync
Cross-org sync copies the following items from one organization to another organization:
• Organization-wide settings
• Administrators
• Cloud Authentication accounts (Users and MAC)
• Configuration templates
Your account must have owner or organization-full privileges in both source and destination organizations. When copying organization-wide settings, the following settings will not be overwritten if they are already configured in the destination organization:
• Organization-wide > Configure > Settings > Country
• Organization-wide > Configure > Settings > Login IP ranges
• Administrators privileges (when source and destination organizations have the same admin account)
• Cloud Authentication account privileges (when source and destination organizations have the same Cloud Authentication account)
When copying configuration templates:
• No sites are bound to the new template site.
• If the destination organization has a template with the same name, then the new template will have a number appended to the end of its name.
Cross-Org site clone
Cross-org site clone copies a site and all of its settings from one organization to another. Your account must have owner or organization-full privileges in both source and destination organizations.
If the destination organization has a site with the same name, then the new site will have a number appended to the end of its name.
The following table describes the Nebula Device (Access Point, Switch, Security Firewall) during cross-org site clone.
Nebula Device | cross-org site clone | move Nebula Device to cloned site – enabled | keep management/wan interface – enabled |
|---|---|---|---|
Access Point (AP) | When enabled: • AP site-wide configuration is cloned • Individual AP configuration is NOT cloned (for example, radio settings) | When enabled: AP site-wide configuration and individual AP configuration are cloned (for example, radio settings) | When enabled: AP site-wide configuration and individual AP configuration are cloned (for example, radio settings) |
Switch | When enabled: • Switch site-wide configuration is cloned • Individual Switch configuration is NOT cloned (for example, IGMP) • Switch port configuration is NOT cloned | When enabled: • Switch site-wide configuration is cloned • Individual Switch configuration is cloned (for example, IGMP) • Switch port configuration is cloned | When enabled: • Switch site-wide configuration is cloned • Individual Switch configuration is cloned (for example, IGMP) • Switch port configuration is cloned |
Security Firewall | When enabled, the site-to-site VPN settings are reset. | When enabled, the site-to-site VPN settings are reset. | When enabled, the site-to-site VPN settings are reset. |
Cross-org synchronization Screen
Use this screen to configure cross-org synchronization and cross site clones.
MSP > Configure > Cross-org synchronization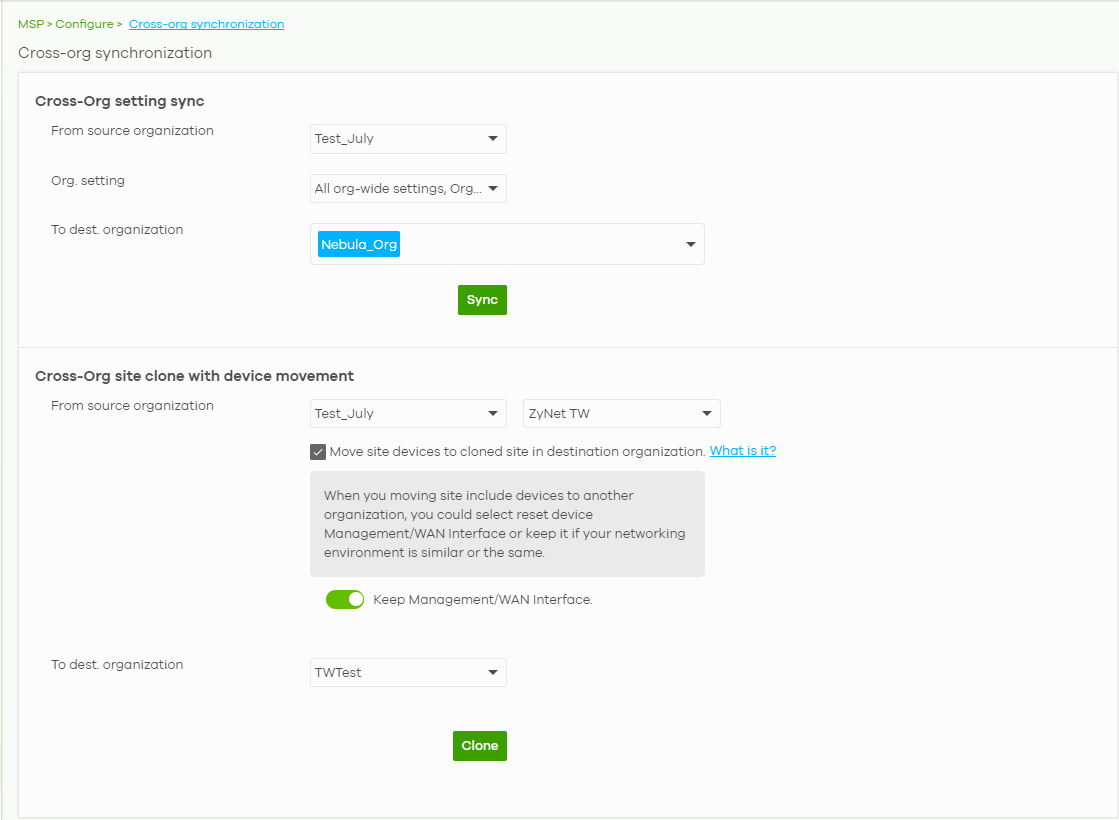
The following table describes the labels in this screen.
Label | Description |
|---|---|
Cross-Org setting sync | |
From source organization | Select the organization to copy settings from. |
Org. setting | Select the settings that you want to copy from the source to the destination organization. Select All org-wide settings to copy everything. |
To dest. organization | Select the organization to copy settings to. |
Sync | Click this to copy the selected settings from the source to the destination organization. |
Cross-Org site clone with device movement | |
From source organization | Select the organization to copy settings from. Then select one or more sites. Select All sites to copy all sites from the source to the destination organization. Select Move site devices to cloned site in destination organization to include the Nebula Devices. Enable Keep Management/WAN interface to copy the WAN connection settings for the Nebula Devices to the destination organization. |
To dest. organization | Select the organization to copy the selected sites to. |
Clone | Click this to copy the selected organization and sites from the source to the destination organization. |
MSP Alert Template
The MSP administrator can configure MSP alert template to monitor Nebula Devices for unexpected events (for example, online / offline events). This screen will list the alert templates you have created. See Alert Settings for details on creating an alert template.
To access this screen, click MSP > Configure > MSP alert template in the navigation panel.
MSP > Configure > MSP alert template
The following table describes the labels in this screen.
Label | Description |
|---|---|
+ Create | Click this button to add a new alert template (see Alert Settings). |
Delete | Click this button to remove alert templates already created. |
Search | Specify your desired search criteria to filter the list of alerts. |
selected in | This shows the number of alerts that match your filter criteria after you perform a search. |
Template | This shows the number of alert templates you have created. |
Name | This shows a descriptive name of the alert template. |
Description | This shows more details on the alert template. |
Creator | This shows your email address. |
Bound organizations | This shows All organizations or a list of the selected organizations to send alerts to. |
Exclude sites | This shows the sites that will not receive any alerts. |
Enable | Click this to activate the alert template. |
Alert Settings
Use this screen to set which alerts are created and emailed, and set the email addresses to which an alert is sent. Click MSP > Configure > MSP alert template > Create to access this screen.
For example, an AP is receiving power from a PoE switch. If the AP loses power because its Ethernet cable is disconnected, NCC generates an alert. If the AP loses power because the switch has a PoE schedule that disables power to the AP, NCC does not generate an alert.
MSP > Configure > MSP alert template > Create/Update alert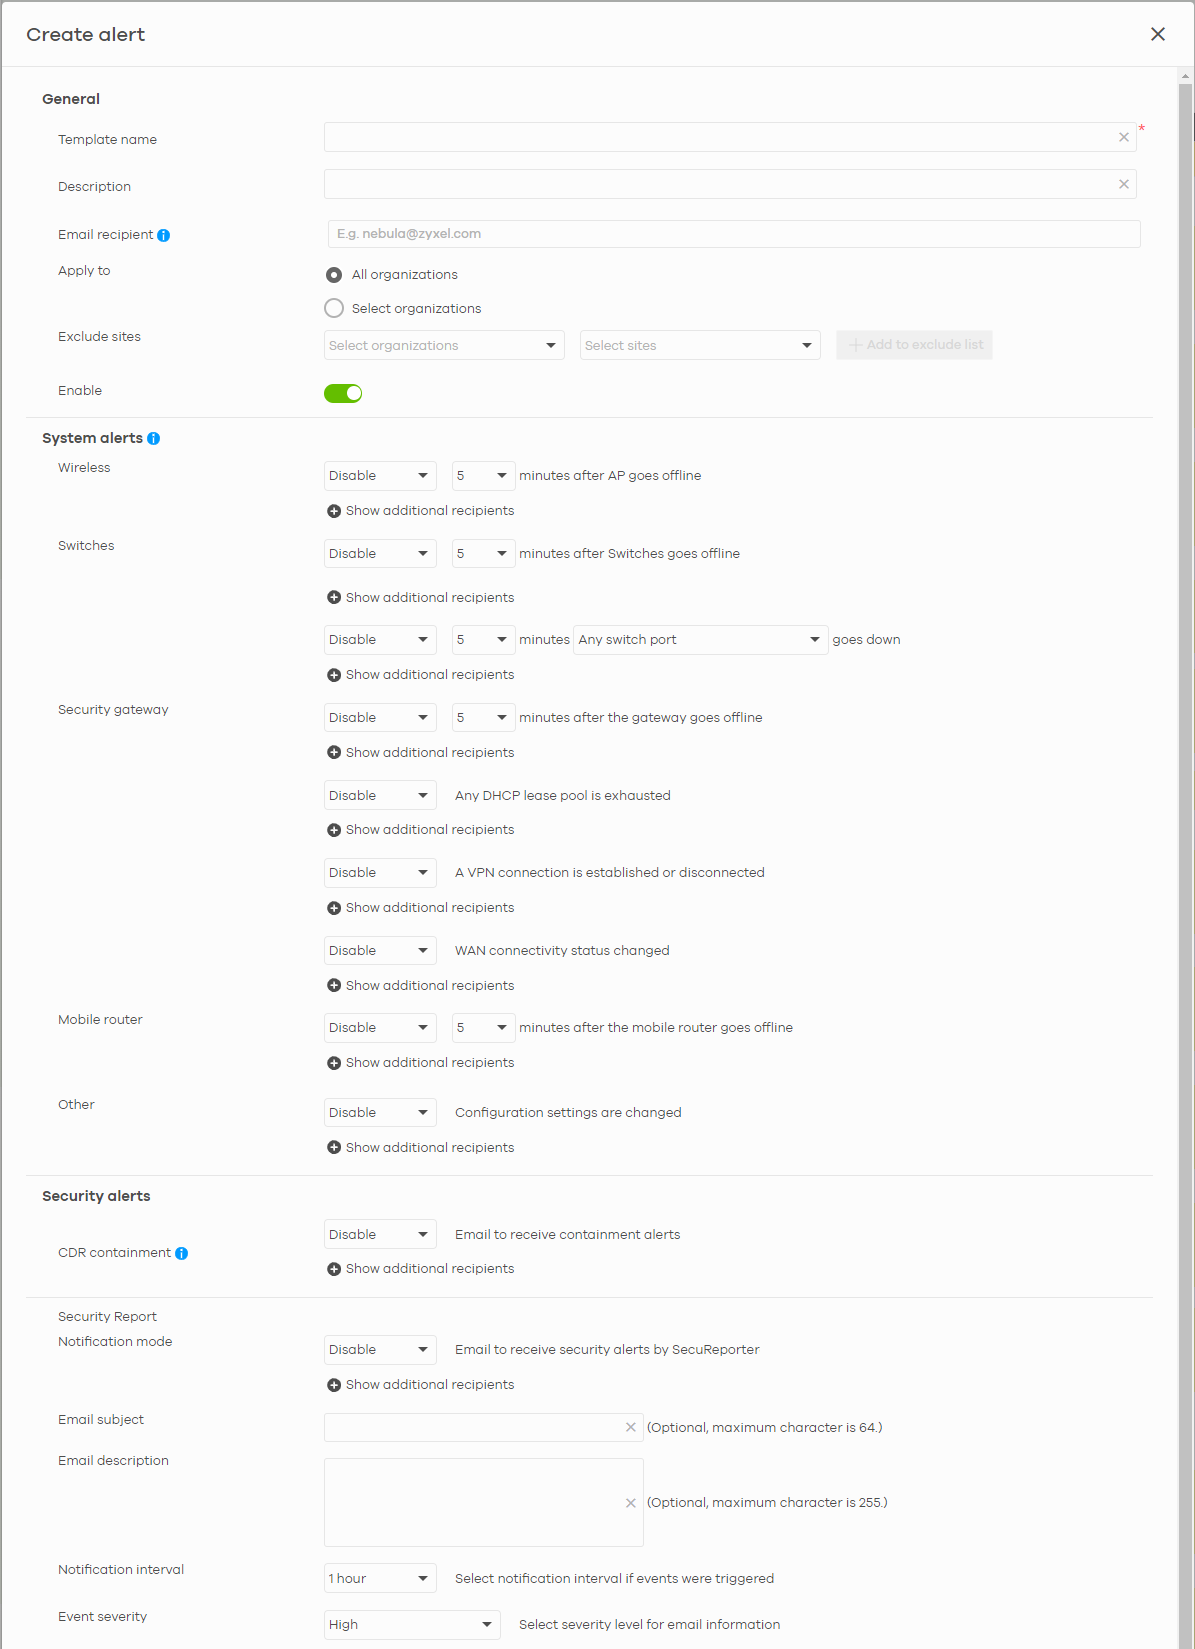

The following table describes the labels in this screen.
Label | Description |
|---|---|
General | |
Template name | Enter a descriptive name for the alert template (up to 64 alphanumeric characters including spaces). |
Description | Enter more details of the alert template (up to 64 alphanumeric characters including spaces). |
Email recipient | Enter the email addresses to which you want to send alerts. For example, ORG 1 is a Base tier organization, and ORG 2 is a Professional tier organization. An MSP alert template is created to monitor AP offline events. If there are three email recipients in both ORG 1 and ORG 2 with the following licenses: • REP 1 (recipient 1) has an account which includes an MSP license. • REP 2 (recipient 2)and REP 3 (recipient 3) has accounts which does not include an MSP license. When an AP offline event occurs, an email alert will only be sent to REP 1 in ORG 1. While an email alert will be sent to all recipients (REP 1, REP 2, and REP 3) in ORG 2. |
Apply to | Select All organizations or specify the selected organizations to send alerts to. |
Exclude sites | Select the sites in organizations that will not receive any alerts. |
Enable | Click this to activate the alert template. |
System alerts | |
Notification Type | For each alert, you can set how to receive alert notifications: • Email: Alert notifications are sent by email to configured recipients. • In-app Push: Alert notifications are sent to site administrators who are logged into the Nebula Mobile app. This type of notification is not available for some features. • Both: Alert notifications are sent by email and app notification. • Disabled: No alerts are sent. |
Show additional recipients | Add additional user accounts who will receive email and in-app notifications for the alert. |
System Alerts | |
Wireless | Specify how long in minutes the NCC waits before generating and sending an alert when an access point goes offline. |
Switches | Specify how long in minutes the NCC waits before generating and sending an alert when a port or a switch goes offline. |
Security gateway | Specify how long in minutes the NCC waits before generating and sending an alert when the following events occur: • A gateway device goes offline. • Any DHCP pool on the gateway device runs out of IP addresses to assign. • A VPN connection to or from the gateway device is created or terminated. • The WAN connectivity goes offline. |
Mobile router | Specify how long in minutes the NCC waits before generating and sending an alert when an mobile router goes offline. |
Other | Specify whether to send an alert each time configuration settings are changed. |
Security alerts | |
CDR containment | Specify whether to send an alert each time a CDR block or containment action is triggered. |
Show additional recipients | Add additional user accounts who will receive email and in-app notifications for the alert. |
Security Report | |
Notification mode | Select whether to receive email security reports from SecuReporter. |
Show additional recipients | Add additional user accounts who will receive email and in-app notifications for the alert. |
Email subject | Enter an email title here. |
Email description | Enter a description of the emails to be sent here. For example, maybe these emails are just for high severity events. |
Notification interval | Specify how often to receive a SecuReporter report. If no security events were triggered, SecuReporter will not send a report. |
Event severity | Select the severity level of events that will be included in each report. |
Event threshold | This table lists the events that trigger SecuReporter security alerts. You can set the alert threshold. For example, X count(s) of malware/virus attack within 5 minutes means SecuReporter includes a report in the email if the total number of combined malware and virus detection events exceed X within a 5 minute time period. |