Maintenance
What You Can Do
• The Access Management screen (Access Management Screen) enables or disables the service you may use to access the PoE12-3PD.
Access Management Screen
Use the Access Management screen to enable or disable the service you may use to access the PoE12-3PD. Click Maintenance > Access Management to display the following screen.
Maintenance > Access Management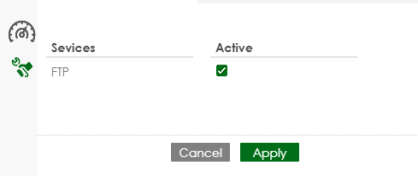
The following table describes the labels in this screen.
LABEL | description |
|---|---|
Services | The service you may use to access the PoE12-3PD is here. • FTP - Transfer files to and from the PoE12-3PD over a network using the FTP protocol. ZON Utility uses FTP to upgrade firmware. If you disable FTP, you won’t be able to upgrade the firmware through the ZON Utility. |
Active | Select this check box for the service that you want to allow to access the PoE12-3PD. |
Cancel | Click this to reset the fields to the previous configuration. |
Apply | Click this to save your changes to the PoE12-3PD. |
Change Password
Use the Change Password screen to change the login password of the Web Configurator. Click Maintenance > Change Password to display the following screen.
Maintenance > Change Password 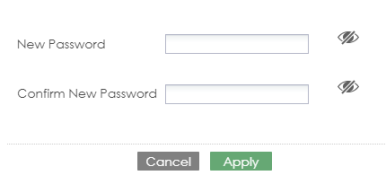
The following table describes the labels in this screen.
LABEL | description |
|---|---|
New Password | Enter your new password for the Web Configurator. Alphanumeric characters are allowed except [ ? ], [ | ], [ ' ], [ " ], [ , ] or [ space ]. The password must be 4 to 63 characters long. |
Confirm New Password | Retype your new password for confirmation. |
Cancel | Click this to reset the fields to the previous configuration. |
Apply | Click this to save your changes to the PoE12-3PD. |
Firmware Upgrade
You can upgrade the PoE12-3PD’s firmware through the Web Configurator or NCC.
Firmware Upgrade Through NCC
In cloud mode, NCC will first check if the firmware on the PoE12-3PD needs to be upgraded. If it does, the PoE12-3PD will upgrade the firmware immediately. If the firmware does not need to be upgraded, but there is newer firmware available for the PoE12-3PD, then it will be upgraded according to the firmware upgrade schedule for the PoE12-3PD on the NCC.
On the NCC web portal, go to Site-wide > Configure > Firmware management to schedule the firmware upgrade time.
Note: While the PoE12-3PD is rebooting, do NOT turn off the power.
Firmware Upgrade Through Web Configurator
Use the screen to upgrade your PoE12-3PD to the latest firmware.
 Make sure you download and upload (and unzipped) the correct firmware version so the PoE12-3PD can successfully update the firmware.
Click Maintenance > Firmware Upgrade to view the screen as shown next.
Maintenance > Firmware Upgrade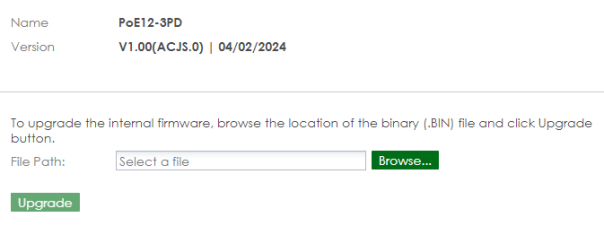
The following table describes the labels in this screen.
LABEL | description |
|---|---|
Name | This is the name of the device. |
Version | This is the firmware version and the date created. |
Browse... | Click the Browse... button to find the .bin file you want to upload. Remember that you must decompress compressed (.zip) files before you can upload them. |
Upgrade | After a successful upgrade, the system will reboot, and you will need to log into the PoE12-3PD again. |
Log
Use the Log screen to view the log messages of the PoE12-3PD. Click Maintenance > Log to display the following screen.
When a log reaches the maximum number of log messages, new log messages automatically overwrite existing log messages, starting with the oldest existing log message first.Events that generate an alert (as well as a log message) display in red. Regular logs display in black.
Click a column’s heading cell to sort the table entries by that column’s criteria. Click the heading cell again to reverse the sort order.
Maintenance > Log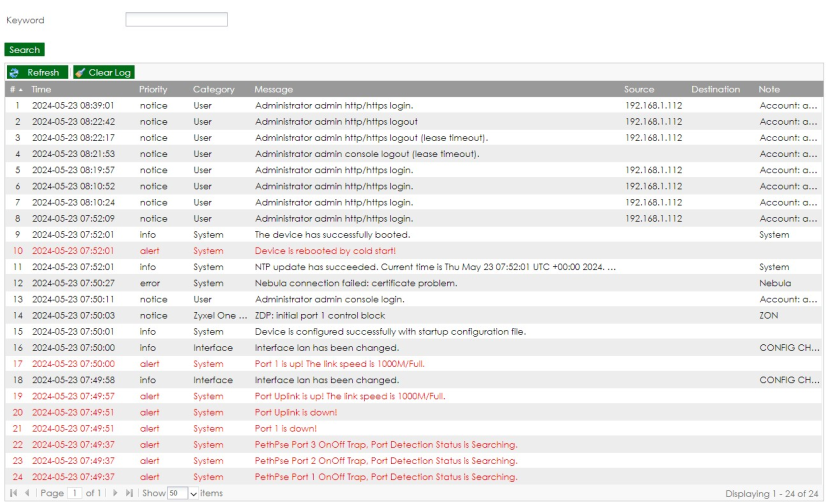
The following table describes the labels in this screen.
LABEL | description |
|---|---|
Keyword | Type a keyword to look for in the Message, Source, Destination and Note fields. If a match is found in any field, the log message is displayed. You can use up to 63 alphanumeric characters begin with a letter. The valid characters are a-z, A-Z, 0-9, '()[]+,/:=?!*@$_-.". |
Search | Click this button to update the log using the keyword you typed. |
Refresh | Click this to update the list of logs. |
Clear Log | Click this to clear the whole log, regardless of what is currently displayed on the screen. |
# | This field is a sequential value, and it is not associated with a specific log message. |
Time | This field displays the time the log message was recorded. |
Priority | This field displays the priority of the log message. |
Category | This field displays the type of the log. |
Message | This field displays the reason the log message was generated. |
Source | This field displays the source IP address of the incoming packet that generated the log message. |
Destination | This field displays the IP address of the destination of the incoming packet when the log message was generated. |
Note | This field displays any additional information about the log message. |
Reboot
Use this screen to restart the PoE12-3PD.
What You Need To Know
If you made changes in the Web Configurator, they were saved when you click Apply. They do not change when you reboot the PoE12-3PD.
Reboot is different to reset; reset returns the PoE12-3PD to its factory default configuration.
Reboot Screen
You can reboot your PoE12-3PD when the Internet connection is slow or intermittent.
This screen allows you to restart the PoE12-3PD. Click Maintenance > Reboot to display the following screen. Click Reboot to restart the PoE12-3PD immediately.
Maintenance > Reboot
After the PoE12-3PD reboots, wait a few minutes until the login screen appears. If the login screen does not appear, type the IP address of the PoE12-3PD in your Web browser.