Hardware Installation and Connection
Installation Scenarios
This chapter shows you how to install and connect the Switch.
The Switch can be:
• Placed on a desktop.
• Rack-mounted on a standard EIA rack.
Safety Precautions
Please observe the following before using the Switch:
• It is recommended to ask an authorized technician to attach the Switch on a desk or to the rack or wall. Use the proper screws to prevent damage to the Switch. See the Installation Requirements sections in this chapter to know the types of screws and screwdrivers for each mounting method.
• Make sure there is at least 2 cm of clearance on the top and bottom of the Switch, and at least 5 cm of clearance on all four sides of the Switch. This allows air circulation for cooling.
• Do NOT block the ventilation holes nor store cables or power cords on the Switch. Allow clearance for the ventilation holes to prevent your Switch from overheating. This is especially crucial when your Switch does not have fans. Overheating could affect the performance of your Switch, or even damage it.
• The surface of the Switch could be hot when it is functioning. Do NOT put your hands on it. You may get burned. This could happen especially when you are using a fanless Switch.
• The Switches with fans are not suitable for use in locations where children are likely to be present.
To start using the Switch, simply connect the power cables to turn it on.
Freestanding Installation Procedure
1 Make sure the Switch is clean and dry.
2 Remove the adhesive backing from the rubber feet.
3 Attach the rubber feet to each corner on the bottom of the Switch. These rubber feet help protect the Switch from shock or vibration and ensure space between devices when stacking.
Attaching Rubber Feet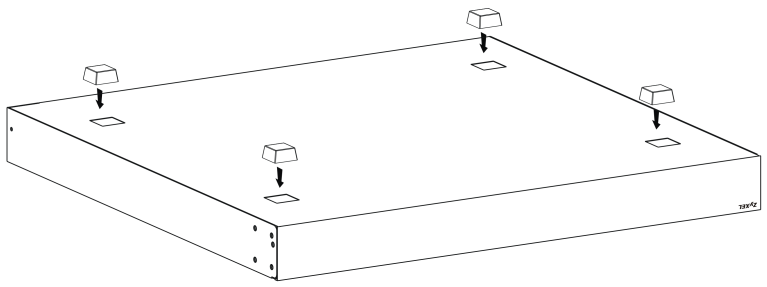
4 Set the Switch on a smooth, level surface strong enough to support the weight of the Switch and the connected cables. Make sure there is a power outlet nearby.
Cautions:
• Avoid stacking fanless Switches to prevent overheating.
• Ensure enough clearance around the Switch to allow air circulation for cooling.
• Do NOT remove the rubber feet as it provides space for air circulation.
Mount the Switch on a Rack
The Switch can be mounted on an EIA standard size, 19-inch rack or in a wiring closet with other equipment. Follow the steps below to mount your Switch on a standard EIA rack using a rack-mounting kit.
Installation Requirements
• Two mounting brackets.
• Eight M3 flat head screws and a #2 Philips screwdriver.
• Four M5 flat head screws and a #2 Philips screwdriver.
Precautions
• Make sure the rack will safely support the combined weight of all the equipment it contains. The maximum weight a bracket can hold is 21.5 kg.
• Make sure the position of the Switch does not make the rack unstable or top-heavy. Take all necessary precautions to anchor the rack securely before installing the unit.
Attaching the Mounting Brackets to the Switch
1 Position a mounting bracket on one side of the Switch, lining up the four screw holes on the bracket with the screw holes on the side of the Switch.
Attaching the Mounting Brackets
2 Using a #2 Philips screwdriver, install the M3 flat head screws through the mounting bracket holes into the Switch.
4 You may now mount the Switch on a rack. Proceed to the next section.
Mounting the Switch on a Rack
1 Position a mounting bracket (that is already attached to the Switch) on one side of the rack, lining up the two screw holes on the bracket with the screw holes on the side of the rack.
Mounting the Switch on a Rack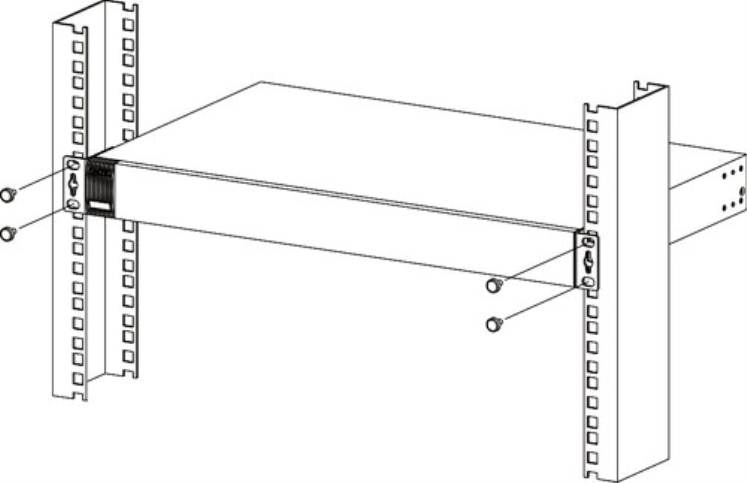
2 Using a #2 Philips screwdriver, install the M5 flat head screws through the mounting bracket holes into the rack.