AAA
Authentication, Authorization and Accounting (AAA)
This chapter describes how to configure authentication, authorization and accounting settings on the Switch.
The external servers that perform authentication, authorization and accounting functions are known as AAA servers. The Switch supports RADIUS (Remote Authentication Dial-In User Service) as the external authentication, authorization, and accounting server.
AAA Server
What You Can Do
• use the RADIUS Server Setup screen (RADIUS Server Setup) to configure your RADIUS server settings.
• Use the AAA Setup screen (AAA Setup) to configure authentication, authorization and accounting settings, such as the methods used to authenticate users accessing the Switch and which database the Switch should use first.
What You Need to Know
Authentication is the process of determining who a user is and validating access to the Switch. The Switch can authenticate users who try to log in based on user accounts configured on the Switch itself. The Switch can also use an external authentication server to authenticate a large number of users.
Authorization is the process of determining what a user is allowed to do. Different user accounts may have higher or lower privilege levels associated with them. For example, user A may have the right to create new login accounts on the Switch but user B cannot. The Switch can authorize users based on user accounts configured on the Switch itself or it can use an external server to authorize a large number of users.
Accounting is the process of recording what a user is doing. The Switch can use an external server to track when users log in, log out, execute commands and so on. Accounting can also record system related actions such as boot up and shut down times of the Switch.
Local User Accounts
By storing user profiles locally on the Switch, your Switch is able to authenticate and authorize users without interacting with a network AAA server. However, there is a limit on the number of users you may authenticate in this way.
RADIUS
RADIUS is a security protocol used to authenticate users by means of an external server instead of (or in addition to) an internal device user database that is limited to the memory capacity of the device. In essence, RADIUS authentication allows you to validate an unlimited number of users from a central location.
RADIUS Server Setup
Use this screen to configure your RADIUS server settings. Click SECURITY > AAA > RADIUS Server Setup to view the screen as shown.
SECURITY > AAA > RADIUS Server Setup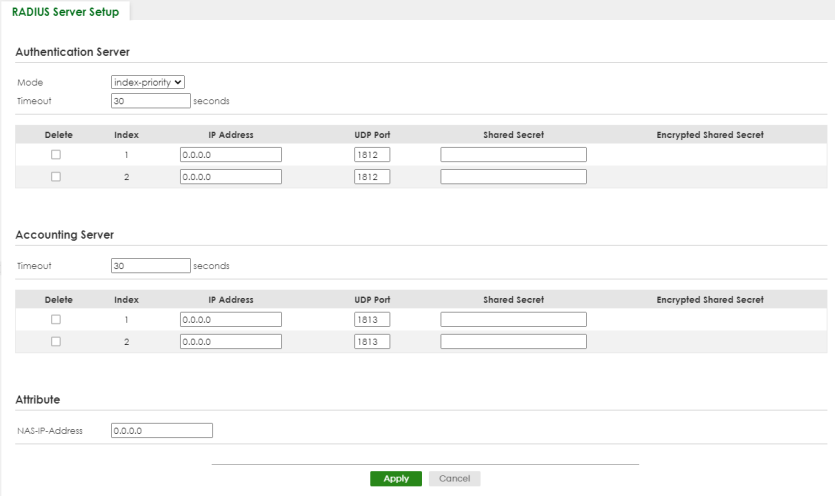
The following table describes the labels in this screen.
label | description |
|---|---|
Authentication Server Use this section to configure your RADIUS authentication settings. | |
Mode | This field is only valid if you configure multiple RADIUS servers. Select index-priority and the Switch tries to authenticate with the first configured RADIUS server, if the RADIUS server does not respond then the Switch tries to authenticate with the second RADIUS server. Select round-robin to alternate between the RADIUS servers that it sends authentication requests to. |
Timeout | Specify the amount of time in seconds that the Switch waits for an authentication request response from the RADIUS server. If you are using two RADIUS servers then the timeout value is divided between the two RADIUS servers. For example, if you set the timeout value to 30 seconds, then the Switch waits for a response from the first RADIUS server for 15 seconds and then tries the second RADIUS server. |
Delete | Check this box if you want to remove an existing RADIUS server entry from the Switch. This entry is deleted when you click Apply. |
Index | This is a read-only number representing a RADIUS server entry. |
IP Address | Enter the IPv4 address or IPv6 address of an external RADIUS server. |
UDP Port | The default port of a RADIUS server for authentication is 1812. You need not change this value unless your network administrator instructs you to do so. |
Shared Secret | Specify a password (up to 32 alphanumeric characters except [ ? ], [ | ], [ ' ], [ " ], [ space ], or [ , ]) as the key to be shared between the external RADIUS server and the Switch. This key is not sent over the network. This key must be the same on the external RADIUS server and the Switch. |
Accounting Server Use this section to configure your RADIUS accounting server settings. | |
Timeout | Specify the amount of time in seconds that the Switch waits for an accounting request response from the RADIUS accounting server. |
Delete | Check this box if you want to remove an existing RADIUS accounting server entry from the Switch. This entry is deleted when you click Apply. |
Index | This is a read-only number representing a RADIUS accounting server entry. |
IP Address | Enter the IPv4 address or IPv6 address of an external RADIUS accounting server. |
UDP Port | The default port of a RADIUS accounting server for accounting is 1813. You need not change this value unless your network administrator instructs you to do so. |
Shared Secret | Specify a password (up to 32 alphanumeric characters except [ ? ], [ | ], [ ' ], [ " ], [ space ], or [ , ]) as the key to be shared between the external RADIUS accounting server and the Switch. This key is not sent over the network. This key must be the same on the external RADIUS accounting server and the Switch. |
Attribute Use this section to define the RADIUS server attribute for its account. | |
NAS-IP-Address | Enter the IP address of the NAS (Network Access Server). |
Apply | Click Apply to save your changes to the Switch’s run-time memory. The Switch loses these changes if it is turned off or loses power, so use the Save link on the top navigation panel to save your changes to the non-volatile memory when you are done configuring. |
Cancel | Click Cancel to begin configuring this screen afresh. |
AAA Setup
Use this screen to configure authentication, authorization and accounting settings on the Switch. Click SECURITY > AAA > AAA Setup to view the screen as shown.
SECURITY > AAA > AAA Setup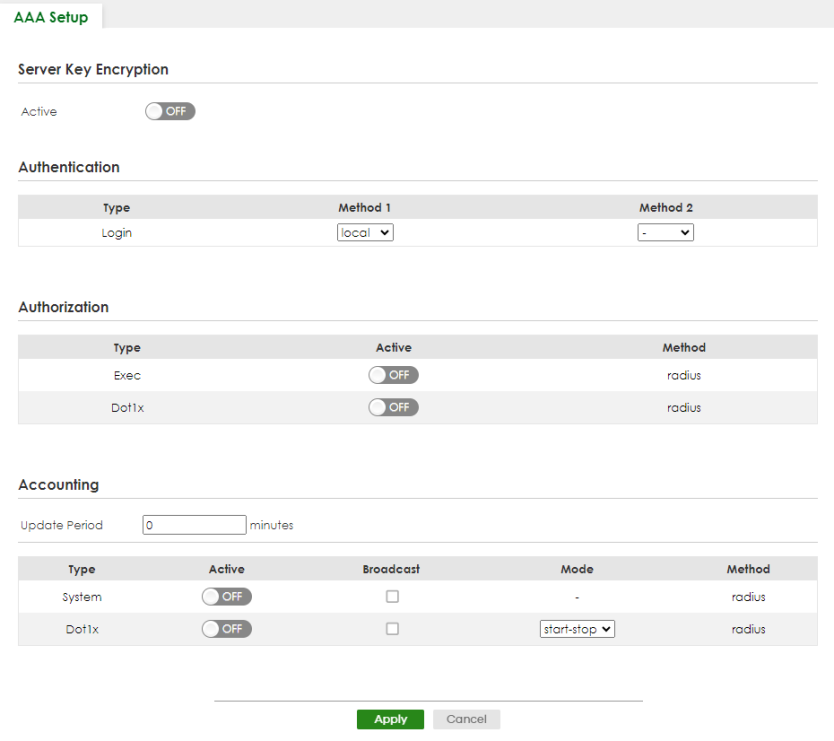
The following table describes the labels in this screen.
label | description |
|---|---|
Server Key Encryption Use this section to configure server key encryption settings. | |
Active | Enable the switch button to enable server key (shared secret) encryption for RADIUS server and TACACS+ server for security enhancement. The shared secret will be stored on the Switch in an encrypted format and displayed as ‘*’ in the SECURITY > AAA > RADIUS Server Setup and SECURITY > AAA > TACACS+ Server Setup screens. |
Authentication Use this section to specify the methods used to authenticate users accessing the Switch. | |
Login | These fields specify which database the Switch should use (first and second) to authenticate administrator accounts (users for Switch management). Configure the local user accounts in the SYSTEM > Logins screen. The RADIUS is an external server. Before you specify the priority, make sure you have set up the corresponding database correctly first. You can specify up to two methods for the Switch to authenticate administrator accounts. The Switch checks the methods in the order you configure them (first Method 1, and then Method 2). You must configure the settings in the Method 1 field. If you want the Switch to check another source for administrator accounts, specify them in the Method 2 field. Select local to have the Switch check the administrator accounts configured in the SYSTEM > Logins screen. Select radius to have the Switch check the administrator accounts configured through your RADIUS server. |
Authorization Use this section to configure authorization settings on the Switch. | |
Type | Set whether the Switch provides the following services to a user. • Exec: Allow an administrator which logs into the Switch through Telnet or SSH to have a different access privilege level assigned through the external server. • Dot1x: Allow an IEEE 802.1x client to have different bandwidth limit or VLAN ID assigned through the external server. |
Active | Enable the switch button to activate authorization for a specified event type. |
Method | RADIUS is the only method for authorization of the Exec type of service. |
Accounting Use this section to configure accounting settings on the Switch. | |
Update Period | This is the amount of time in minutes before the Switch sends an update to the accounting server. This is only valid if you select the start-stop option for the Exec or Dot1x entries. |
Type | The Switch supports the following types of events to be sent to the accounting servers: • System – Configure the Switch to send information when the following system events occur: system boots up, system shuts down, system accounting is enabled, system accounting is disabled. • Dot1x – Configure the Switch to send information when an IEEE 802.1x client begins a session (authenticates through the Switch), ends a session as well as interim updates of a session. |
Active | Enable the switch button to activate accounting for a specified event type. |
Broadcast | Select this to have the Switch send accounting information to all configured accounting servers at the same time. If you do not select this and you have two accounting servers set up, then the Switch sends information to the first accounting server and if it does not get a response from the accounting server then it tries the second accounting server. |
Mode | The Switch supports two modes of recording login events. Select: • start-stop – to have the Switch send information to the accounting server when a user begins a session, during a user’s session (if it lasts past the Update Period), and when a user ends a session. • stop-only – to have the Switch send information to the accounting server only when a user ends a session. |
Method | RADIUS is the only method for recording System or Exec type of event. |
Apply | Click Apply to save your changes to the Switch’s run-time memory. The Switch loses these changes if it is turned off or loses power, so use the Save link on the top navigation panel to save your changes to the non-volatile memory when you are done configuring. |
Cancel | Click Cancel to begin configuring this screen afresh. |
Technical Reference
This section provides technical background information on the topics discussed in this chapter.
Vendor Specific Attribute
RFC 2865 standard specifies a method for sending vendor-specific information between a RADIUS server and a network access device (for example, the Switch). A company can create Vendor Specific Attributes (VSAs) to expand the functionality of a RADIUS server.
The Switch supports VSAs that allow you to perform the following actions based on user authentication:
• Limit bandwidth on incoming or outgoing traffic for the port the user connects to.
• Assign account privilege levels for the authenticated user.
The VSAs are composed of the following:
• Vendor-ID: An identification number assigned to the company by the IANA (Internet Assigned Numbers Authority). Zyxel’s vendor ID is 890.
• Vendor-Type: A vendor specified attribute, identifying the setting you want to modify.
• Vendor-data: A value you want to assign to the setting.
The following table describes the VSAs supported on the Switch.
Function | attribute |
|---|---|
Ingress Bandwidth Assignment | Vendor-Id = 890 Vendor-Type = 1 Vendor-data = ingress rate (Kbps in decimal format) |
Egress Bandwidth Assignment | Vendor-Id = 890 Vendor-Type = 2 Vendor-data = egress rate (Kbps in decimal format) |
Privilege Assignment | Vendor-ID = 890 Vendor-Type = 3 Vendor-Data = "shell:priv-lvl=N" or Vendor-ID = 9 (CISCO) Vendor-Type = 1 (CISCO-AVPAIR) Vendor-Data = "shell:priv-lvl=N" where N is a privilege level (from 0 to 14). |
Tunnel Protocol Attribute
You can configure tunnel protocol attributes on the RADIUS server (refer to your RADIUS server documentation) to assign a port on the Switch to a VLAN based on IEEE 802.1x authentication. The port VLAN settings are fixed and untagged. This will also set the port’s VID. The following table describes the values you need to configure. Note that the bolded values in the table are fixed values as defined in RFC 3580.
Function | attribute |
|---|---|
VLAN Assignment | Tunnel-Type = VLAN(13) Tunnel-Medium-Type = 802(6) Tunnel-Private-Group-ID = VLAN ID |
Supported RADIUS Attributes
Remote Authentication Dial-In User Service (RADIUS) attributes are data used to define specific authentication elements in a user profile, which is stored on the RADIUS server. This section lists the RADIUS attributes supported by the Switch.
Refer to RFC 2865 for more information about RADIUS attributes used for authentication.
This section lists the attributes used by authentication functions on the Switch. In cases where the attribute has a specific format associated with it, the format is specified.
Attributes Used for Authentication
The following sections list the attributes sent from the Switch to the RADIUS server when performing authentication.
Attributes Used for Authenticating Privilege Access
User-Name
– The format of the User-Name attribute is $enab#$, where # is the privilege level (1 – 14).
User-Password
NAS-Identifier
NAS-IP-Address
Attributes Used to Login Users
User-Name
User-Password
NAS-Identifier
NAS-IP-Address
Attributes Used by the IEEE 802.1x Authentication
User-Name
NAS-Identifier
NAS-IP-Address
NAS-Port
NAS-Port-Type
– This value is set to Ethernet(15) on the Switch.
Calling-Station-Id
Frame-MTU
EAP-Message
State
Message-Authenticator