Access Control
Access Control Overview
This chapter describes how to control access to the Switch.
FTP is allowed one session each, Telnet and SSH share nine sessions, up to five web sessions (five different user names and passwords) and/or limitless SNMP access control sessions are allowed.
SSH | Telnet | FTP | Web | SNMP |
Share up to nine sessions | One session | Up to five accounts | No limit | |
What You Can Do
• Use the Service Access Control screen (Service Access Control) to decide what services you may use to access the Switch.
• Use the Remote Management screen (Remote Management (IPv6)) to specify a group of one or more “trusted computers” from which an administrator may use a service to manage the Switch.
• Use the Account Security screen (Account Security) to encrypt all passwords configured in the Switch. You can also display the authentication, authorization, external authentication server information (RADIUS), system and SNMP user account information in the configuration file saved.
Service Access Control
Service Access Control allows you to decide what services you may use to access the Switch. You may also change the default service port and configure “trusted computers” for each service in the SECURITY > Access Control > Remote Management screen (see Remote Management (IPv6) for more information). Click SECURITY > Access Control > Service Access Control to display the following screen.
SECURITY > Access Control > Service Access Control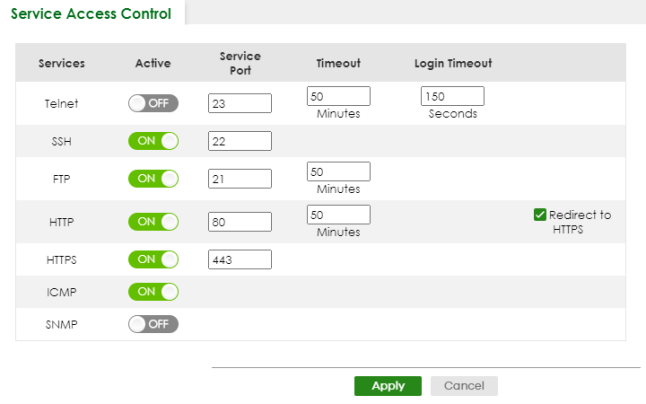
The following table describes the fields in this screen.
LABEL | Description |
|---|---|
Services | Services you may use to access the Switch are listed here. |
Active | Enable the switch button for the corresponding services that you want to allow to access the Switch. |
Service Port | For Telnet, SSH, FTP, HTTP or HTTPS services, you may change the default service port by typing the new port number in the Service Port field. If you change the default port number then you will have to let people (who wish to use the service) know the new port number for that service. |
Timeout | Enter how many minutes (from 1 to 255) a management session can be left idle before the session times out. After it times out you have to log in with your password again. Very long idle timeouts may have security risks. |
Login Timeout | The Telnet or SSH server do not allow multiple user logins at the same time. Enter how many seconds (from 30 to 300 seconds) a login session times out. After it times out you have to start the login session again. Very long login session timeouts may have security risks. For example, if User A attempts to connect to the Switch (through SSH), but during the login stage, do not enter the user name and/or password, User B cannot connect to the Switch (through SSH) before the Login Timeout for User A expires (default 150 seconds). |
Redirect to HTTPS | This option allows your web browser to automatically redirect to a secure page, from HTTP to HTTPS (secure hypertext transfer protocol). SSL (Secure Sockets Layer) in HTTPS encrypts the transferred data by changing plain text to random letters and numbers. |
Apply | Click Apply to save your changes to the Switch’s run-time memory. The Switch loses these changes if it is turned off or loses power, so use the Save link on the top navigation panel to save your changes to the non-volatile memory when you are done configuring. |
Cancel | Click Cancel to begin configuring this screen afresh. |
Remote Management (IPv4)
Use this screen to specify a group of one or more “trusted computers using IPv4 addresses” from which an administrator may use a service to manage the Switch.
Click SECURITY > Access Control > Remote Management IPv4 to view the screen as shown next.
SECURITY > Access Control > Remote Management IPv4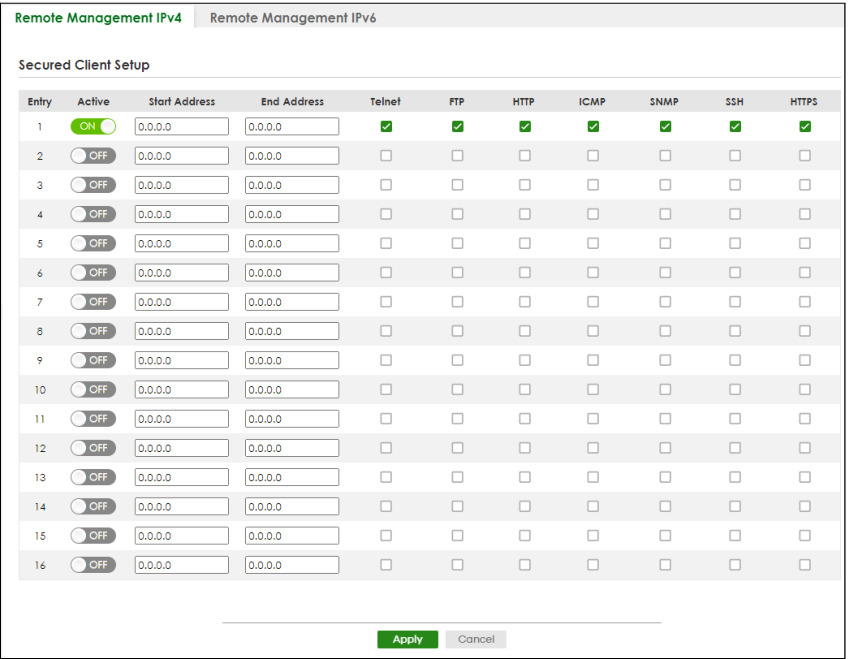
The following table describes the labels in this screen.
label | Description |
|---|---|
Entry | This is the client set index number. A “client set” is a group of one or more “trusted computers” from which an administrator may use a service to manage the Switch. |
Active | Enable the switch button to activate this secured client set. Clear the checkbox if you wish to temporarily disable the set without deleting it. |
Start Address End Address | Configure the IPv4 address range of trusted computers from which you can manage this Switch. The Switch checks if the client IPv4 address of a computer requesting a service or protocol matches the range set here. The Switch immediately disconnects the session if it does not match. |
Telnet / FTP / HTTP / ICMP / SNMP / SSH / HTTPS | Select services that may be used for managing the Switch from the specified trusted computers. |
Apply | Click Apply to save your changes to the Switch’s run-time memory. The Switch loses these changes if it is turned off or loses power, so use the Save link on the top navigation panel to save your changes to the non-volatile memory when you are done configuring. |
Cancel | Click Cancel to begin configuring this screen afresh. |
Remote Management (IPv6)
Use this screen to specify a group of one or more “trusted computers using IPv6 addresses” from which an administrator may use a service to manage the Switch.
Click SECURITY > Access Control > Remote Management IPv6 to view the screen as shown next.
SECURITY > Access Control > Remote Management IPv6
The following table describes the labels in this screen.
label | Description |
|---|---|
Entry | This is the client set index number. A “client set” is a group of one or more “trusted computers” from which an administrator may use a service to manage the Switch. |
Active | Enable the switch button to activate this secured client set. Clear the checkbox if you wish to temporarily disable the set without deleting it. |
Start Address End Address | Configure the IPv6 address range of trusted computers from which you can manage this Switch. The Switch checks if the client IPv6 address of a computer requesting a service or protocol matches the range set here. The Switch immediately disconnects the session if it does not match. |
Telnet / FTP / HTTP / ICMP / SNMP / SSH / HTTPS | Select services that may be used for managing the Switch from the specified trusted computers. |
Apply | Click Apply to save your changes to the Switch’s run-time memory. The Switch loses these changes if it is turned off or loses power, so use the Save link on the top navigation panel to save your changes to the non-volatile memory when you are done configuring. |
Cancel | Click Cancel to begin configuring this screen afresh. |
Account Security
Use this screen to encrypt all passwords configured in the Switch. This setting will affect how the password is shown (as plain text or encrypted text) in the configuration file saved in MAINTENANCE > Configuration > Save Configuration.
Password Encryption encrypts all passwords in the configuration file. However, if you want to show some passwords as plain text in the configuration file, select them as below:
• Authentication information configured for Authentication in the SECURITY > AAA > AAA Setup screen (Method 1/2 setting in the Login field).
• Authorization information configured for Authorization in the SECURITY > AAA > AAA Setup screen (Active/Console/Method setting in the Exec and Dot1x fields).
• Server information configured for Authentication Server in the SECURITY > AAA > RADIUS Server Setup screen (Mode/Timeout fields).
• System account information configured in the Switch (admin, user login name, and password).
• SNMP user account information configured in the SYSTEM > SNMP > SNMP User screen (password for SNMP user authentication in the Authentication field, and the password for the encryption method for SNMP communication in the Privacy field).
Click SECURITY > Access Control > Account Security to view the screen as shown next.
SECURITY > Access Control > Account Security
The following table describes the labels in this screen.
label | Description |
|---|---|
Account Security | |
Password Encryption | Select this checkbox to encrypt all passwords configured on the Switch. This displays the password as encrypted text, in a saved configuration file. Otherwise, the passwords configured on the Switch are displayed in plain text. |
Apply | Click Apply to save your changes for Account Security to the Switch’s run-time memory. The Switch loses these changes if it is turned off or loses power, so use the Save link on the top navigation panel to save your changes to the non-volatile memory when you are done configuring. |
Cancel | Click Cancel to begin configuring Account Security afresh. |
Display | |
AAA | Select which specific information to display in plain text, in the saved configuration file. • Authentication • Authorization • Server |
User | Select which user account information to display in plain text, in the saved configuration file. • System • SNMP |
Apply | Click Apply to save your changes for Display to the Switch’s run-time memory. The Switch loses these changes if it is turned off or loses power, so use the Save link on the top navigation panel to save your changes to the non-volatile memory when you are done configuring. |
Cancel | Click Cancel to begin configuring Display afresh. |
Technical Reference
This section provides technical background information on the topics discussed in this chapter.
SSH Overview
Unlike Telnet or FTP, which transmit data in clear text, SSH (Secure Shell) is a secure communication protocol that combines authentication and data encryption to provide secure encrypted communication between two hosts over an unsecured network.
SSH Communication Example
How SSH Works
The following table summarizes how a secure connection is established between two remote hosts.
How SSH Works
1 Host Identification
The SSH client sends a connection request to the SSH server. The server identifies itself with a host key. The client encrypts a randomly generated session key with the host key and server key and sends the result back to the server.
The client automatically saves any new server public keys. In subsequent connections, the server public key is checked against the saved version on the client computer.
2 Encryption Method
Once the identification is verified, both the client and server must agree on the type of encryption method to use.
3 Authentication and Data Transmission
After the identification is verified and data encryption activated, a secure tunnel is established between the client and the server. The client then sends its authentication information (user name and password) to the server to log in to the server.
SSH Implementation on the Switch
Your Switch supports SSH version 2 using RSA authentication and the AES encryption method. The SSH server is implemented on the Switch for remote management and file transfer on port 22. Only one SSH connection is allowed at a time.
Requirements for Using SSH
You must install an SSH client program on a client computer (Windows or Linux operating system) that is used to connect to the Switch over SSH.
Introduction to HTTPS
HTTPS (HyperText Transfer Protocol over Secure Socket Layer, or HTTP over SSL) is a web protocol that encrypts and decrypts web pages. Secure Socket Layer (SSL) is an application-level protocol that enables secure transactions of data by ensuring confidentiality (an unauthorized party cannot read the transferred data), authentication (one party can identify the other party) and data integrity (you know if data has been changed).
It relies upon certificates, public keys, and private keys.
HTTPS on the Switch is used so that you may securely access the Switch using the Web Configurator. The SSL protocol specifies that the SSL server (the Switch) must always authenticate itself to the SSL client (the computer which requests the HTTPS connection with the Switch), whereas the SSL client only should authenticate itself when the SSL server requires it to do so. Authenticating client certificates is optional and if selected means the SSL-client must send the Switch a certificate. You must apply for a certificate for the browser from a Certificate Authority (CA) that is a trusted CA on the Switch.
Please refer to the following figure.
1 HTTPS connection requests from an SSL-aware web browser go to port 443 (by default) on the Switch’s WS (web server).
2 HTTP connection requests from a web browser go to port 80 (by default) on the Switch’s WS (web server).
HTTPS Implementation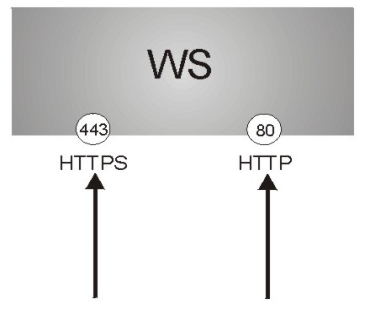
HTTPS Example
If you have not changed the default HTTPS port on the Switch, then in your browser enter “https://Switch IP Address/” as the web site address where “Switch IP Address” is the IP address or domain name of the Switch you wish to access.
Mozilla Firefox Warning Messages
When you attempt to access the Switch HTTPS server, a Your connection is not secure screen may display. If that is the case, click I Understand the Risks and then the Add Exception... button.
Security Alert (Mozilla Firefox)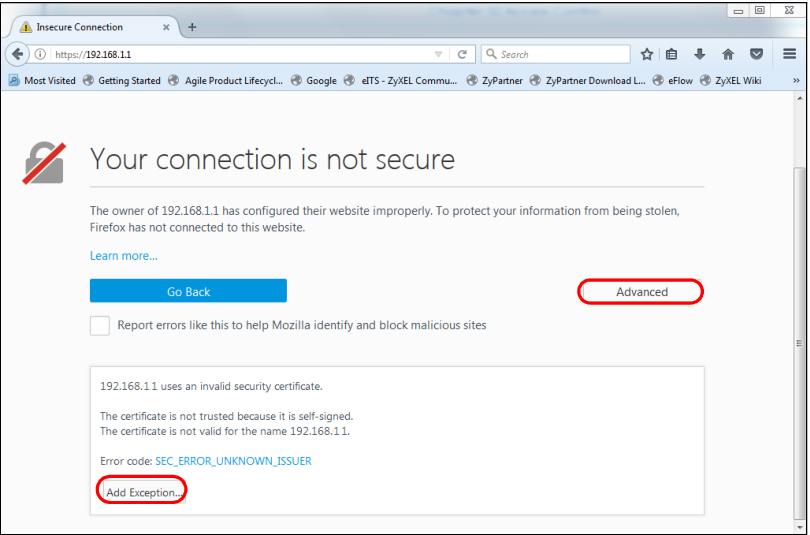
Confirm the HTTPS server URL matches. Click Confirm Security Exception to proceed to the Web Configurator login screen.
Security Alert (Mozilla Firefox)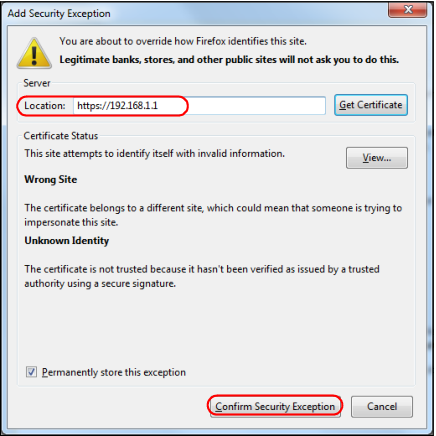
Google Chrome Warning Messages
When you attempt to access the Switch HTTPS server, a Your connection is not private screen may display. If that is the case, click Advanced and then Proceed to x.x.x.x (unsafe) to proceed to the Web Configurator login screen.
Security Alert (Google Chrome 99.0.4844.82)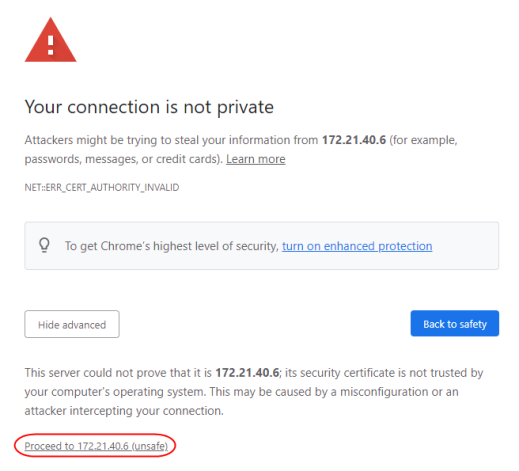
Main Settings
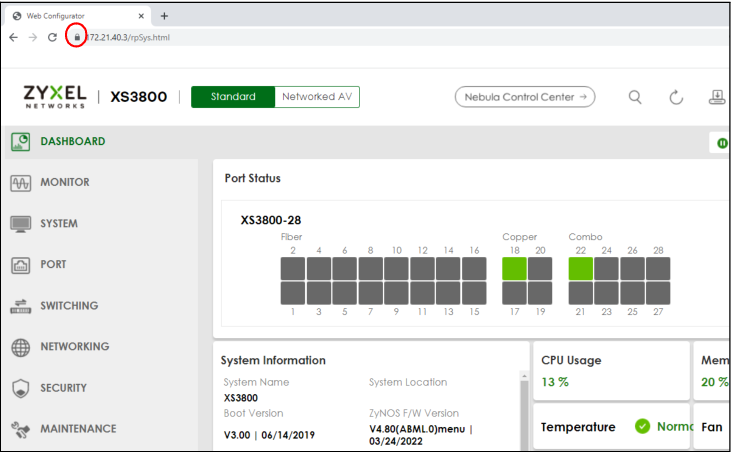
After you accept the certificate and enter the login user name and password, the Switch main screen appears. The lock displayed in the bottom right of the browser status bar or next to the website address denotes a secure connection.
Example: Lock Denoting a Secure Connection