DHCP Snooping
DHCP Snooping Overview
DHCP snooping filters unauthorized DHCP server packets. The Switch allows only the authorized DHCP server on a trusted port to assign IP addresses. Clients on your network will only receive DHCP packets from the authorized DHCP server.
The Switch also builds a DHCP snooping binding table dynamically by snooping DHCP packets (dynamic bindings). A DHCP snooping binding table contains the IP binding information the Switch learns from DHCP packets in your network. A binding contains these key attributes:
• MAC address
• VLAN ID
• IP address
• Port number
The following settings demonstrates DHCP snooping on the Switch.
• An authorized DHCP server (A) on a snooped VLAN from the trusted port (T)
• An unauthorized DHCP server (B) on a snooped VLAN from an untrusted port (UT)
• DHCP clients (C) on the untrusted ports (UT).
With DHCP snooping, the Switch blocks all DHCP server packets (DHCP OFFER/ACK) coming from the untrusted ports (UT). The Switch only forwards the DHCP server packets from the trusted port (T). This assures that DHCP clients on your network only receive IP addresses assigned by the authorized DHCP server (A).
DHCP Snooping Example Application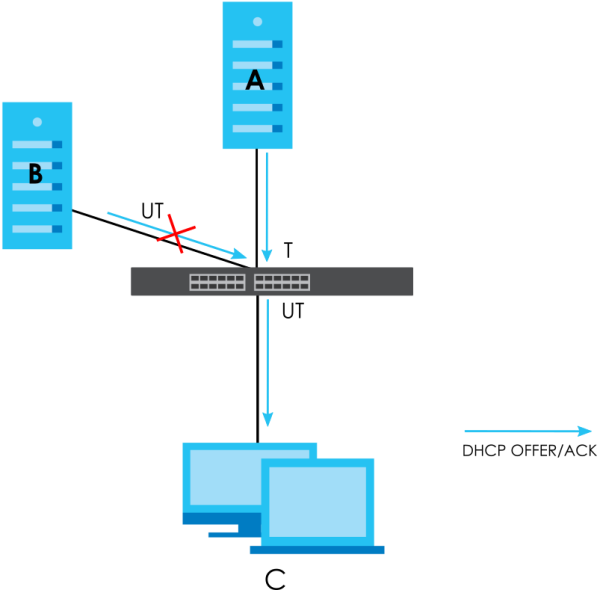
What You Can Do
• Use the DHCP Snooping Status screen (DHCP Snooping Status) to look at various statistics about the DHCP snooping database.
• Use this DHCP Snooping Setup screen (DHCP Snooping Setup) to enable DHCP snooping on the Switch (not on specific VLAN), specify the VLAN where the default DHCP server is located, and configure the DHCP snooping database.
• Use the DHCP Snooping Port Setup screen (DHCP Snooping Port Setup) to specify whether ports are trusted or untrusted ports for DHCP snooping.
• Use the DHCP Snooping VLAN Setup screen (DHCP Snooping VLAN Setup) to enable DHCP snooping on each VLAN and to specify whether or not the Switch adds DHCP relay agent option 82 information to DHCP requests that the Switch relays to a DHCP server for each VLAN.
• Use the DHCP Snooping VLAN Port Setup screen (DHCP Snooping VLAN Port Setup) to apply a different DHCP option 82 profile to certain ports in a VLAN.
DHCP Snooping Status
Use this screen to look at various statistics about the DHCP snooping database.
To open this screen, click SECURITY > DHCP Snooping > DHCP Snp. Status.
SECURITY > DHCP Snooping > DHCP Snp. Status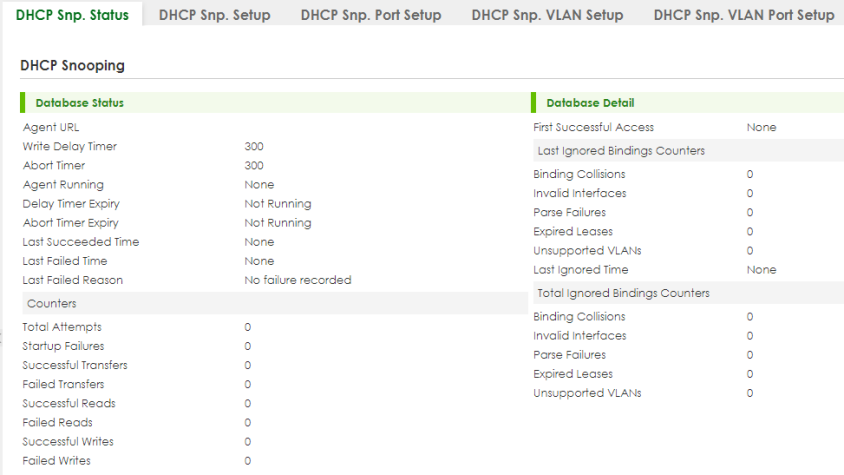
The following table describes the labels in this screen.
label | description |
|---|---|
Database Status This section displays the current settings for the DHCP snooping database. You can configure them in the SECURITY > DHCP Snooping > DHCP Snp. Setup screen. | |
Agent URL | This field displays the location of the DHCP snooping database. |
Write Delay Timer | This field displays how long (in seconds) the Switch tries to complete a specific update in the DHCP snooping database before it gives up. |
Abort Timer | This field displays how long (in seconds) the Switch waits to update the DHCP snooping database after the current bindings change. |
Agent Running | This field displays the status of the current update or access of the DHCP snooping database. None: The Switch is not accessing the DHCP snooping database. Read: The Switch is loading dynamic bindings from the DHCP snooping database. Write: The Switch is updating the DHCP snooping database. |
Delay Timer Expiry | This field displays how much longer (in seconds) the Switch tries to complete the current update before it gives up. It displays Not Running if the Switch is not updating the DHCP snooping database right now. |
Abort Timer Expiry | This field displays when (in seconds) the Switch is going to update the DHCP snooping database again. It displays Not Running if the current bindings have not changed since the last update. |
Last Succeeded Time | This field displays the last time the Switch updated the DHCP snooping database successfully. |
Last Failed Time | This field displays the last time the Switch updated the DHCP snooping database unsuccessfully. |
Last Failed Reason | This field displays the reason the Switch updated the DHCP snooping database unsuccessfully. |
Counters This section displays historical information about the number of times the Switch successfully or unsuccessfully read or updated the DHCP snooping database. | |
Total Attempts | This field displays the number of times the Switch has tried to access the DHCP snooping database for any reason. |
Startup Failures | This field displays the number of times the Switch could not create or read the DHCP snooping database when the Switch started up or a new URL is configured for the DHCP snooping database. |
Successful Transfers | This field displays the number of times the Switch read bindings from or updated the bindings in the DHCP snooping database successfully. |
Failed Transfers | This field displays the number of times the Switch was unable to read bindings from or update the bindings in the DHCP snooping database. |
Successful Reads | This field displays the number of times the Switch read bindings from the DHCP snooping database successfully. |
Failed Reads | This field displays the number of times the Switch was unable to read bindings from the DHCP snooping database. |
Successful Writes | This field displays the number of times the Switch updated the bindings in the DHCP snooping database successfully. |
Failed Writes | This field displays the number of times the Switch was unable to update the bindings in the DHCP snooping database. |
Database Detail | |
First Successful Access | This field displays the first time the Switch accessed the DHCP snooping database for any reason. |
Last Ignored Bindings Counters This section displays the number of times and the reasons the Switch ignored bindings the last time it read bindings from the DHCP binding database. You can clear these counters by restarting the Switch. | |
Binding Collisions | This field displays the number of bindings the Switch ignored because the Switch already had a binding with the same MAC address and VLAN ID. |
Invalid Interfaces | This field displays the number of bindings the Switch ignored because the port number was a trusted interface or does not exist anymore. |
Parse Failures | This field displays the number of bindings the Switch ignored because the Switch was unable to understand the binding in the DHCP binding database. |
Expired Leases | This field displays the number of bindings the Switch ignored because the lease time had already expired. |
Unsupported VLANs | This field displays the number of bindings the Switch ignored because the VLAN ID does not exist anymore. |
Last Ignored Time | This field displays the last time the Switch ignored any bindings for any reason from the DHCP binding database. |
Total Ignored Bindings Counters This section displays the reasons the Switch has ignored bindings any time it read bindings from the DHCP binding database. You can clear these counters by restarting the Switch. | |
Binding Collisions | This field displays the number of bindings the Switch has ignored because the Switch already had a binding with the same MAC address and VLAN ID. |
Invalid Interfaces | This field displays the number of bindings the Switch has ignored because the port number was a trusted interface or does not exist anymore. |
Parse Failures | This field displays the number of bindings the Switch has ignored because the Switch was unable to understand the binding in the DHCP binding database. |
Expired Leases | This field displays the number of bindings the Switch has ignored because the lease time had already expired. |
Unsupported VLANs | This field displays the number of bindings the Switch has ignored because the VLAN ID does not exist anymore. |
DHCP Snooping Setup
Use this screen to enable DHCP snooping on the Switch (not on specific VLAN), specify the VLAN where the default DHCP server is located, and configure the DHCP snooping database. The DHCP snooping database stores the current bindings on a secure, external TFTP server so that they are still available after a restart.
SECURITY > DHCP Snooping > DHCP Snp. Setup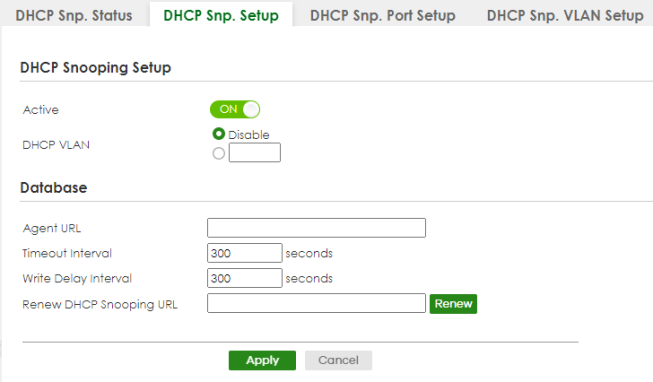
The following table describes the labels in this screen.
label | description |
|---|---|
DHCP Snooping Setup | |
Active | Enable the switch button to enable DHCP snooping on the Switch. You still have to enable DHCP snooping on specific VLAN and specify trusted ports. |
DHCP VLAN | Select a VLAN ID if you want the Switch to forward DHCP packets to DHCP servers on a specific VLAN. You can enable Option 82 Profile in the SECURITY > DHCP Snooping > DHCP Snp. VLAN Setup screen to help the DHCP servers distinguish between DHCP requests from different VLAN. Select Disable if you do not want the Switch to forward DHCP packets to a specific VLAN. |
Database If Timeout Interval is greater than Write Delay Interval, it is possible that the next update is scheduled to occur before the current update has finished successfully or timed out. In this case, the Switch waits to start the next update until it completes the current one. | |
Agent URL | Enter the location of the DHCP snooping database. The location should be expressed like this: tftp://{domain name or IP address}/directory, if applicable/file name; for example, tftp://192.168.10.1/database.txt. You can enter up to 256 printable ASCII characters except [ ? ], [ | ], [ ' ], [ " ] or [ , ]. |
Timeout Interval | Enter how long (10 – 65535 seconds) the Switch tries to complete a specific update in the DHCP snooping database before it gives up. |
Write Delay Interval | Enter how long (10 – 65535 seconds) the Switch waits to update the DHCP snooping database the first time the current bindings change after an update. Once the next update is scheduled, additional changes in current bindings are automatically included in the next update. |
Renew DHCP Snooping URL | Enter the location of a DHCP snooping database, and click Renew if you want the Switch to load it. You can use this to load dynamic bindings from a different DHCP snooping database than the one specified in Agent URL. When the Switch loads dynamic bindings from a DHCP snooping database, it does not discard the current dynamic bindings first. If there is a conflict, the Switch keeps the dynamic binding in volatile memory and updates the Binding Collisions counter in the DHCP Snooping Status screen (DHCP Snooping Status). |
Apply | Click Apply to save your changes to the Switch’s run-time memory. The Switch loses these changes if it is turned off or loses power, so use the Save link on the top navigation panel to save your changes to the non-volatile memory when you are done configuring. |
Cancel | Click this to reset the values in this screen to their last-saved values. |
DHCP Snooping Port Setup
Use this screen to specify whether ports are trusted or untrusted ports for DHCP snooping.
You can also specify the maximum number for DHCP packets that each port (trusted or untrusted) can receive each second.
To open this screen, click SECURITY > DHCP Snooping > DHCP Snp. Port Setup.
SECURITY > DHCP Snooping > DHCP Snp. Port Setup 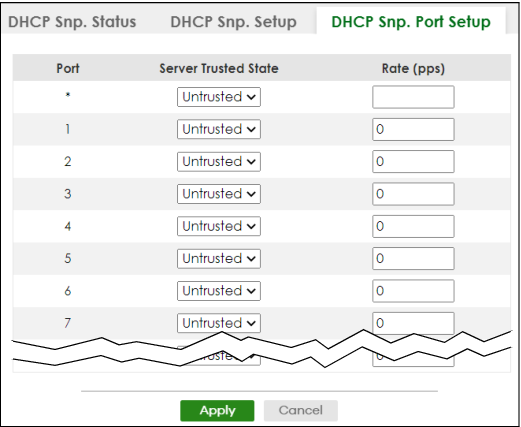
The following table describes the labels in this screen.
label | description |
|---|---|
* | Settings in this row apply to all ports. Use this row only if you want to make some settings the same for all ports. Use this row first to set the common settings and then make adjustments on a port-by-port basis. |
Server Trusted state | Select whether this port is a trusted port (Trusted) or an untrusted port (Untrusted). Trusted ports are connected to DHCP servers or other switches, and the Switch discards DHCP packets from trusted ports only if the rate at which DHCP packets arrive is too high. Untrusted ports are connected to subscribers, and the Switch discards DHCP packets from untrusted ports in the following situations: • The packet is a DHCP server packet (for example, OFFER, ACK, or NACK). • The source MAC address and source IP address in the packet do not match any of the current bindings. • The packet is a RELEASE or DECLINE packet, and the source MAC address and source port do not match any of the current bindings. • The rate at which DHCP packets arrive is too high. |
Rate (pps) | Specify the maximum number for DHCP packets (1 – 2048) that the Switch receives from each port each second. The Switch discards any additional DHCP packets. Enter 0 to disable this limit, which is recommended for trusted ports. |
Apply | Click Apply to save your changes to the Switch’s run-time memory. The Switch loses these changes if it is turned off or loses power, so use the Save link on the top navigation panel to save your changes to the non-volatile memory when you are done configuring. |
Cancel | Click this to reset the values in this screen to their last-saved values. |
DHCP Snooping VLAN Setup
Use this screen to enable DHCP snooping on each VLAN and to specify whether or not the Switch adds DHCP relay agent option 82 information to DHCP requests that the Switch relays to a DHCP server for each VLAN.
To open this screen, click SECURITY > DHCP Snooping > DHCP Snp. VLAN Setup.
SECURITY > DHCP Snooping > DHCP Snp. VLAN Setup 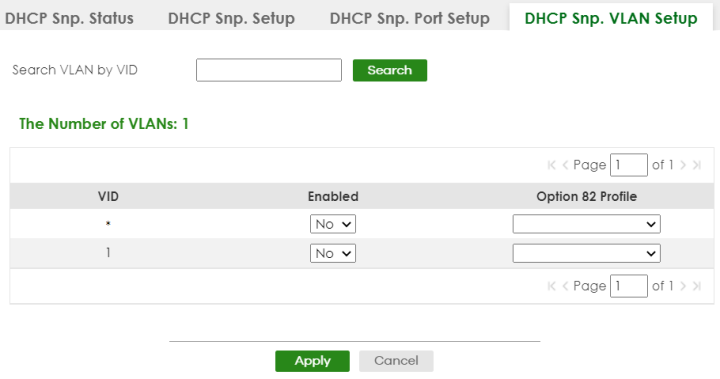
The following table describes the labels in this screen.
label | description |
|---|---|
Search VLAN by VID | Enter the VLAN ID you want to manage. Use a comma (,) to separate individual VLANs or a hyphen (-) to indicates a range of VLANs. For example, “3,4” or “3-9”. |
Search | Click this to display the specified range of VLANs in the section below. |
The Number of VLANs | This displays the number of VLAN search results. |
VID | This field displays the VLAN ID of each VLAN in the range specified above. If you configure the * VLAN, the settings are applied to all VLANs. |
Enabled | Select Yes to enable DHCP snooping on the VLAN. You still have to enable DHCP snooping on the Switch and specify trusted ports. |
Option 82 Profile | Select a pre-defined DHCP option 82 profile that the Switch applies to all ports in the specified VLANs. The Switch adds the information (such as slot number, port number, VLAN ID and/or system name) specified in the profile to DHCP requests that it broadcasts to the DHCP VLAN, if specified, or VLAN. You can specify the DHCP VLAN in the SECURITY > DHCP Snooping > DHCP Snp. Setup screen. |
Apply | Click Apply to save your changes to the Switch’s run-time memory. The Switch loses these changes if it is turned off or loses power, so use the Save link on the top navigation panel to save your changes to the non-volatile memory when you are done configuring. |
Cancel | Click this to reset the values in this screen to their last-saved values. |
DHCP Snooping VLAN Port Setup
Use this screen to apply a different DHCP option 82 profile to certain ports in a VLAN.
To open this screen, click SECURITY > DHCP Snooping > DHCP Snp. VLAN Port Setup.
SECURITY > DHCP Snooping > DHCP Snp. VLAN Port Setup
The following table describes the labels in this screen.
label | description |
|---|---|
Index | This field displays a sequential number for each entry. |
VID | This field displays the VLAN to which the ports belongs. |
Port | This field displays the ports to which the Switch applies the settings. |
Profile Name | This field displays the DHCP option 82 profile that the Switch applies to the ports. |
Add/Edit | Click Add/Edit to add a new entry or edit a selected one. |
Delete | Click Delete to remove the selected entries. |
Add/EDIT DHCP Snooping VLAN Ports
Use this screen to apply a different DHCP option 82 profile to certain ports in a VLAN.
Click Add/Edit, or select an entry and click Add/Edit in the SECURITY > DHCP Snooping > DHCP Snp. VLAN Port Setup screen to display this screen.
SECURITY > DHCP Snooping > DHCP Snp. VLAN Port Setup > Add/Edit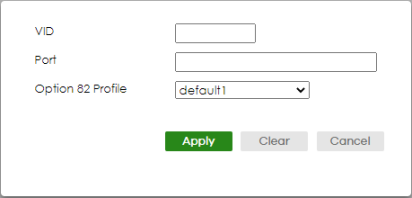
The following table describes the labels in this screen.
label | description |
|---|---|
VID | Enter the ID number of the VLAN you want to configure here. |
Option 82 Profile | Select a pre-defined DHCP option 82 profile that the Switch applies to the specified ports in this VLAN. The Switch adds the information (such as slot number, port number, VLAN ID and/or system name) specified in the profile to DHCP requests that it broadcasts to the DHCP VLAN, if specified, or VLAN. You can specify the DHCP VLAN in the SECURITY > DHCP Snooping > DHCP Snp. Setup screen. |
Apply | Click Apply to save your changes to the Switch’s run-time memory. The Switch loses these changes if it is turned off or loses power, so use the Save link on the top navigation panel to save your changes to the non-volatile memory when you are done configuring. |
Clear | Click Clear to clear the fields to the factory defaults. |
Cancel | Click Cancel to not save the configuration you make and return to the last screen. |
Technical Reference
This section provides technical background information on the topics discussed in this chapter.
DHCP Snooping Overview
Use DHCP snooping to filter unauthorized DHCP packets on the network and to build the binding table dynamically. This can prevent clients from getting IP addresses from unauthorized DHCP servers.
Trusted vs. Untrusted Ports
Every port is either a trusted port or an untrusted port for DHCP snooping. This setting is independent of the trusted or untrusted setting for ARP inspection. You can also specify the maximum number for DHCP packets that each port (trusted or untrusted) can receive each second.
Trusted ports are connected to DHCP servers or other switches. The Switch discards DHCP packets from trusted ports only if the rate at which DHCP packets arrive is too high. The Switch learns dynamic bindings from trusted ports.
Untrusted ports are connected to subscribers. The Switch discards DHCP packets from untrusted ports in the following situations:
• The packet is a DHCP server packet (for example, OFFER, ACK, or NACK).
• The rate at which DHCP packets arrive is too high.
DHCP Snooping Database
The Switch stores the binding table in volatile memory. If the Switch restarts, it loads static bindings from permanent memory but loses the dynamic bindings, in which case the devices in the network have to send DHCP requests again. As a result, it is recommended you configure the DHCP snooping database.
The DHCP snooping database maintains the dynamic bindings for DHCP snooping and ARP inspection in a file on an external TFTP server. If you set up the DHCP snooping database, the Switch can reload the dynamic bindings from the DHCP snooping database after the Switch restarts.
You can configure the name and location of the file on the external TFTP server. The file has the following format:
DHCP Snooping Database File Format
<initial-checksum> TYPE DHCP-SNOOPING VERSION 1 BEGIN <binding-1> <checksum-1> <binding-2> <checksum-1-2> ... ... <binding-n> <checksum-1-2-..-n> END |
The <initial-checksum> helps distinguish between the bindings in the latest update and the bindings from previous updates. Each binding consists of 72 bytes, a space, and another checksum that is used to validate the binding when it is read. If the calculated checksum is not equal to the checksum in the file, that binding and all others after it are ignored.
DHCP Relay Option 82 Information
The Switch can add information to DHCP requests that it does not discard. This provides the DHCP server more information about the source of the requests. The Switch can add the following information:
• Slot ID (1 byte), port ID (1 byte), and source VLAN ID (2 bytes)
• System name (up to 32 bytes)
This information is stored in an Agent Information field in the option 82 field of the DHCP headers of client DHCP request frames.
When the DHCP server responds, the Switch removes the information in the Agent Information field before forwarding the response to the original source.
You can configure this setting for each source VLAN. This setting is independent of the DHCP relay settings.
Configuring DHCP Snooping
Follow these steps to configure DHCP snooping on the Switch.
1 Enable DHCP snooping on the Switch.
2 Enable DHCP snooping on each VLAN, and configure DHCP relay option 82.
3 Configure trusted and untrusted ports, and specify the maximum number of DHCP packets that each port can receive per second.
4 Configure static bindings.