Error-Disable
Error-Disable Overview
This chapter shows you how to configure the rate limit for control packets on a port, and set the Switch to take an action (such as to shut down a port or stop sending packets) on a port when the Switch detects a pre-configured error. It also shows you how to configure the Switch to automatically undo the action after the error is gone.
CPU Protection Overview
Switches exchange protocol control packets in a network to get the latest networking information. If a switch receives large numbers of control packets, such as ARP, BPDU or IGMP packets, which are to be processed by the CPU, the CPU may become overloaded and be unable to handle regular tasks properly.
The CPU protection feature allows you to limit the rate of ARP, BPDU and IGMP packets to be delivered to the CPU on a port. This enhances the CPU efficiency and protects against potential DoS attacks or errors from other networks. You then can choose to drop control packets that exceed the specified rate limit or disable a port on which the packets are received.
Error-Disable Recovery Overview
Some features, such as loop guard or CPU protection, allow the Switch to shut down a port or discard specific packets on a port when an error is detected on the port. For example, if the Switch detects that packets sent out the ports loop back to the Switch, the Switch can shut down the ports automatically. After that, you need to enable the ports or allow the packets on a port manually through the Web Configurator or the commands. With error-disable recovery, you can set the disabled ports to become active or start receiving the packets again after the time interval you specify.
What You Can Do
• Use the Errdisable Status screen (Error-Disable Status) to view whether the Switch detected that control packets exceeded the rate limit configured for a port or a port is disabled according to the feature requirements and what action you configure, and related information.
• Use the CPU Protection screen (CPU Protection Setup) to limit the maximum number of control packets (ARP, BPDU and/or IGMP) that the Switch can receive or transmit on a port.
• Use the Errdisable Detect screen (Error-Disable Detect Setup) to have the Switch detect whether the control packets exceed the rate limit configured for a port and configure the action to take once the limit is exceeded.
• Use the Errdisable Recovery screen (Error-Disable Recovery Setup) to set the Switch to automatically undo an action after the error is gone.
Error-Disable Status
Use this screen to view whether the Switch detected that control packets exceeded the rate limit configured for a port or a port is disabled according to the feature requirements and what action you configure, and related information. Click SECURITY > Errdisable > Errdisable Status to display the screen as shown.
SECURITY > Errdisable > Errdisable Status 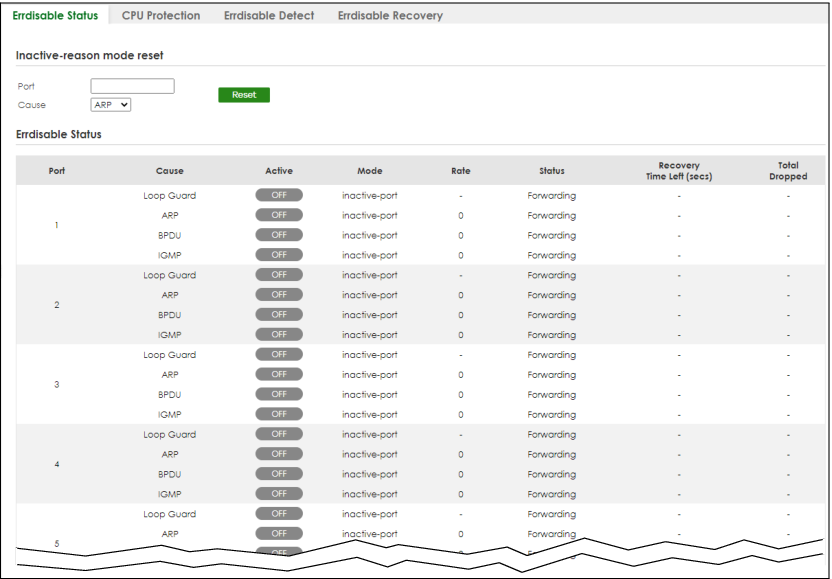
SECURITY > Errdisable > Errdisable Status (Cloud Mode)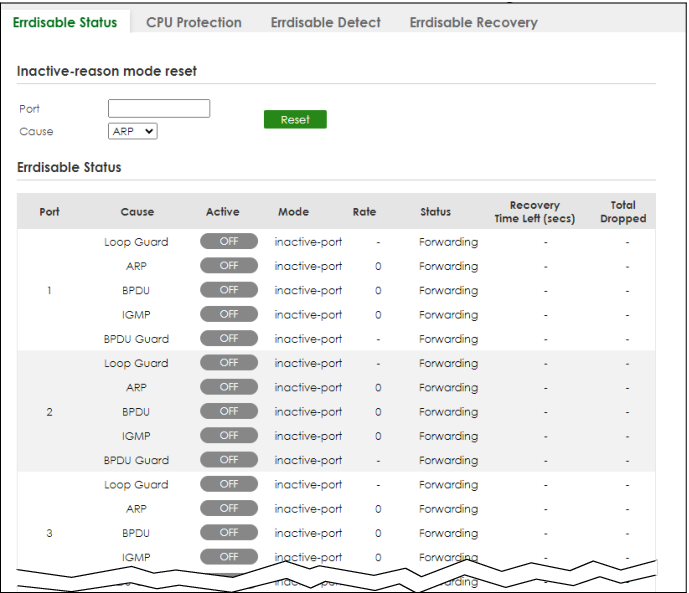
The following table describes the labels in this screen.
label | description |
|---|---|
Inactive-reason mode reset | |
Port | Enter the number of the ports (separated by a comma) on which you want to reset inactive-reason status. |
Cause | Select the cause of inactive-reason mode you want to reset here. |
Reset | Click to reset the specified ports to handle ARP, BPDU or IGMP packets instead of ignoring them, if the ports is in inactive-reason mode. |
Errdisable Status | |
Port | This is the number of the port on which you want to configure Errdisable Status. |
Cause | This displays the type of the control packet received on the port or the feature enabled on the port and causing the Switch to take the specified action. |
Active | This field displays whether the control packets (ARP, BPDU, and/or IGMP) on the port is being detected or not. It also shows whether loop guard is enabled on the port. |
Mode | This field shows the action that the Switch takes for the cause. • inactive-port – The Switch disables the port. • inactive-reason – The Switch drops all the specified control packets (such as BPDU) on the port. • rate-limitation – The Switch drops the additional control packets the ports has to handle in every one second. |
Rate | This field displays how many control packets this port can receive or transmit per second. It can be adjusted in CPU Protection. 0 means no rate limit. |
Status | This field displays the errdisable status. • Forwarding: The Switch is forwarding packets. Rate-limitation mode is always in Forwarding status. • Err-disable: The Switch disables the port on which the control packets are received (inactive-port) or drops specified control packets on the port (inactive-reason). |
Recovery Time Left (secs) | This field displays the time (seconds) left before the ports becomes active of Errdisable Recovery. |
Total Dropped | This field displays the total packet number dropped by this port where the packet rate exceeds the rate of mode rate-limitation. |
CPU Protection Setup
Use this screen to limit the maximum number of control packets (ARP, BPDU and/or IGMP) that the Switch can receive or transmit on a port. Click SECURITY > Errdisable > CPU Protection to display the screen as shown.
SECURITY > Errdisable > CPU Protection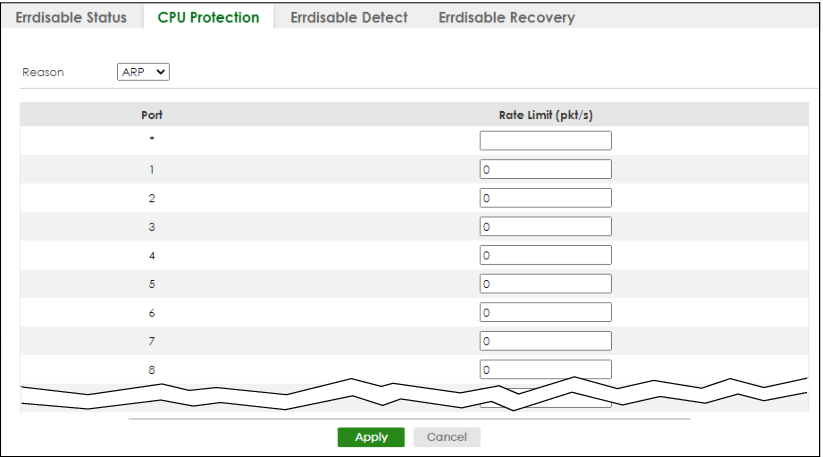
SECURITY > Errdisable > CPU ProtectionThe following table describes the labels in this screen.
label | description |
|---|---|
Reason | Select the type of control packet you want to configure here. |
Port | This field displays the port number. |
* | Use this row to make the setting the same for all ports. Use this row first and then make adjustments to each port if necessary. Changes in this row are copied to all the ports as soon as you make them. |
Rate Limit (pkt/s) | Enter a number from 0 to 256 to specify how many control packets this port can receive or transmit per second. 0 means no rate limit. You can configure the action that the Switch takes when the limit is exceeded. |
Apply | Click Apply to save your changes to the Switch’s run-time memory. The Switch loses these changes if it is turned off or loses power, so use the Save link on the top navigation panel to save your changes to the non-volatile memory when you are done configuring. |
Cancel | Click Cancel to begin configuring this screen afresh. |
Error-Disable Detect Setup
Use this screen to have the Switch detect whether the control packets exceed the rate limit configured for a port and configure the action to take once the limit is exceeded. Click SECURITY > Errdisable > Errdisable Detect to display the screen as shown.
SECURITY > Errdisable > Errdisable Detect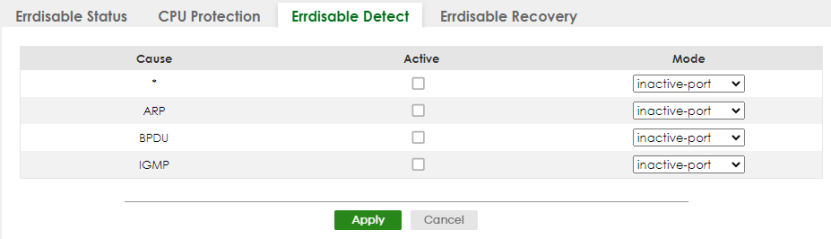
The following table describes the labels in this screen.
label | description |
|---|---|
Cause | This field displays the types of control packet that may cause CPU overload. |
* | Use this row to make the setting the same for all entries. Use this row first and then make adjustments to each entry if necessary. Changes in this row are copied to all the entries as soon as you make them. |
Active | Select this option to have the Switch detect if the configured rate limit for a specific control packet is exceeded and take the action selected below. |
Mode | Select the action that the Switch takes when the number of control packets exceed the rate limit on a port, set in the SECURITY > Errdisable > CPU Protection screen. • inactive-port – The Switch disables the port on which the control packets are received. • inactive-reason – The Switch drops all the specified control packets (such as BPDU) on the port. • rate-limitation – The Switch drops the additional control packets the ports has to handle in every one second. |
Apply | Click Apply to save your changes to the Switch’s run-time memory. The Switch loses these changes if it is turned off or loses power, so use the Save link on the top navigation panel to save your changes to the non-volatile memory when you are done configuring. |
Cancel | Click Cancel to begin configuring this screen afresh. |
Error-Disable Recovery Setup
Use this screen to configure the Switch to automatically undo an action after the error is gone. Click SECURITY > Errdisable > Errdisable Recovery to display the screen as shown.
SECURITY > Errdisable > Errdisable Recovery 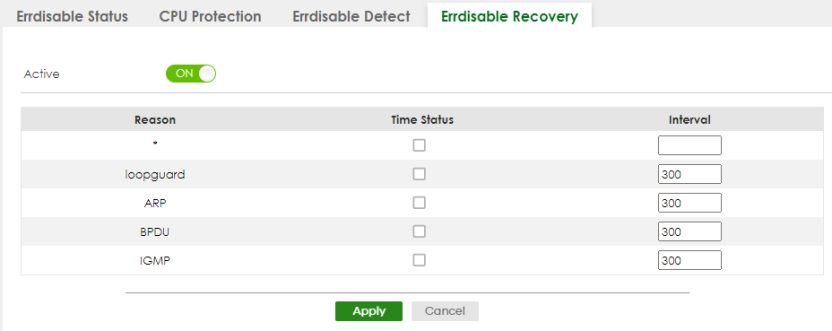
SECURITY > Errdisable > Errdisable Recovery (Cloud Mode)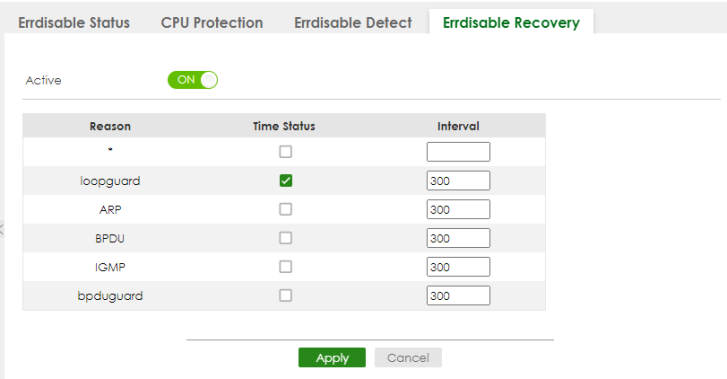
The following table describes the labels in this screen.
label | description |
|---|---|
Active | Enable the switch button to turn on the error-disable recovery function on the Switch. |
Reason | This field displays the supported features that allow the Switch to shut down a port or discard packets on a port according to the feature requirements and what action you configure. |
* | Use this row to make the setting the same for all entries. Use this row first and then make adjustments to each entry if necessary. Changes in this row are copied to all the entries as soon as you make them. |
Time Status | Select this checkbox to allow the Switch to wait for the specified time interval to activate a port or allow specific packets on a port, after the error was gone. Clear the checkbox to turn off this rule. |
Interval | Enter the number of seconds (from 30 to 2592000) for the time interval. |
Apply | Click Apply to save your changes to the Switch’s run-time memory. The Switch loses these changes if it is turned off or loses power, so use the Save link on the top navigation panel to save your changes to the non-volatile memory when you are done configuring. |
Cancel | Click Cancel to begin configuring this screen afresh. |