Bandwidth Control
Bandwidth Control Overview
This chapter shows you how you can cap the maximum bandwidth using the Bandwidth Control screen.
Bandwidth control means defining a maximum allowable bandwidth for incoming and/or out-going traffic flows on a port.
What You Can Do
Use the Bandwidth Control screen (Bandwidth Control Setup) to limit the bandwidth for traffic going through the Switch.
Bandwidth Control Setup
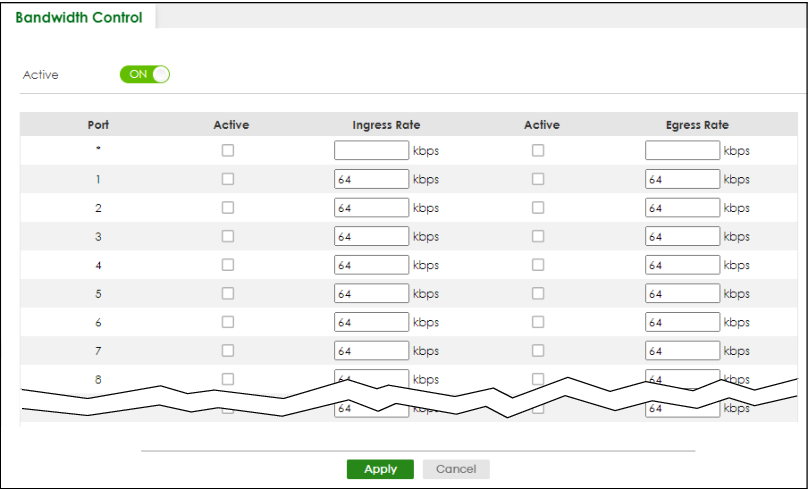
Click SWITCHING > QoS > Bandwidth Control in the navigation panel to bring up the screen as shown next.
SWITCHING > QoS > Bandwidth Control

The following table describes the related labels in this screen.
label | description |
|---|---|
Active | Enable the switch button to enable bandwidth control on the Switch. |
Port | This field displays the port number. |
* | Settings in this row apply to all ports. Use this row only if you want to make some settings the same for all ports. Use this row first to set the common settings and then make adjustments on a port-by-port basis. |
Active | Select this checkbox to activate ingress rate limits on this port. |
Ingress Rate | Specify the maximum bandwidth allowed in kilobits per second (Kbps) for the incoming traffic flow on a port. |
Active | Select this checkbox to activate egress rate limits on this port. |
Egress Rate | Specify the maximum bandwidth allowed in kilobits per second (Kbps) for the out-going traffic flow on a port. |
Apply | Click Apply to save your changes to the Switch’s run-time memory. The Switch loses these changes if it is turned off or loses power, so use the Save link on the top navigation panel to save your changes to the non-volatile memory when you are done configuring. |
Cancel | Click Cancel to reset the fields. |