IPv6
IPv6 Overview
This chapter introduces the IPv6 screens.
What You Can Do
• Use the IPv6 Link-Local Address Setup screen (IPv6 Link-Local Address Setup) to view and configure IPv6 link-local addresses.
• Use the IPv6 Global Address Setup screen (IPv6 Global Address Setup) to view and configure IPv6 global addresses.
• Use the IPv6 Neighbor Discovery Setup screen (IPv6 Neighbor Discovery Setup) to view and configure neighbor discovery settings on each interface.
• Use the IPv6 Router Discovery Setup screen (IPv6 Router Discovery Setup) to view and configure router discovery settings on each interface.
• Use the IPv6 Prefix Setup screen (IPv6 Prefix Setup) to configure the Switch’s IPv6 prefix list for each interface.
• Use the IPv6 Neighbor Setup screen (IPv6 Neighbor Setup) to configure static IPv6 neighbor entries in the Switch’s IPv6 neighbor table.
• Use theDHCPv6 Client Setup screen (DHCPv6 Client Setup) to configure the Switch’s DHCP settings when it is acting as a DHCPv6 client.
IPv6 Status
Click SYSTEM > IPv6 > IPv6 Status in the navigation panel to display the IPv6 status screen as shown next.
SYSTEM > IPv6 > IPv6 Status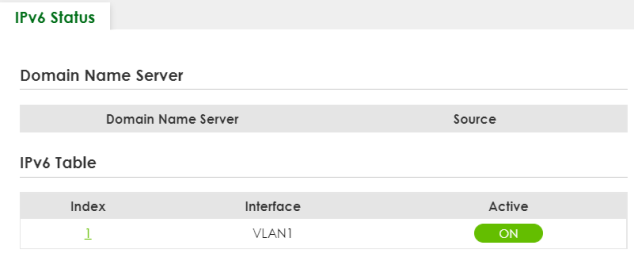
The following table describes the labels in this screen.
label | description |
|---|---|
Domain Name Server | |
Domain Name Server | This field displays the IP address of the DNS server. |
Source | This field displays whether the DNS server address is configured manually (Static) or obtained automatically using DHCPv6. |
IPv6 Table | |
Index | This field displays the index number of an IPv6 interface. Click on an index number to view more interface details. |
Interface | This is the name of the IPv6 interface you created. |
Active | This field displays whether the IPv6 interface is activated or not. |
IPv6 Interface Status Details
Use this screen to view a specific IPv6 interface status and detailed information. Click an interface index number in the SYSTEM > IPv6 > IPv6 Status screen. The following screen opens.
SYSTEM > IPv6 > IPv6 Status > IPv6 Interface Details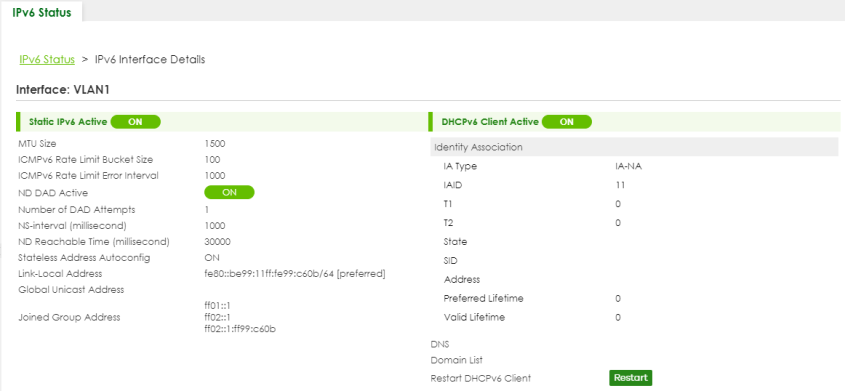
The following table describes the labels in this screen.
label | description |
|---|---|
Static IPv6 Active This field displays whether the IPv6 interface is activated or not. | |
MTU Size | This field displays the Maximum Transmission Unit (MTU) size for IPv6 packets on this interface. |
ICMPv6 Rate Limit Bucket Size | This field displays the maximum number of ICMPv6 error messages which are allowed to transmit in a given time interval. If the bucket is full, subsequent error messages are suppressed. |
ICMPv6 Rate Limit Error Interval | This field displays the time period (in milliseconds) during which ICMPv6 error messages of up to the bucket size can be transmitted. 0 means no limit. |
ND DAD Active | This field displays whether Neighbor Discovery (ND) Duplicate Address Detection (DAD) is enabled on the interface. |
Number of DAD Attempts | This field displays the number of consecutive neighbor solicitations the Switch sends for this interface. |
NS-Interval (millisecond) | This field displays the time interval (in milliseconds) at which neighbor solicitations are re-sent for this interface. |
ND Reachable Time (millisecond) | This field displays how long (in milliseconds) a neighbor is considered reachable for this interface. |
Link-Local Address | This field displays the Switch’s link-local IP address and prefix generated by the interface. It also shows whether the IP address is preferred, which means it is a valid address and can be used as a sender or receiver address. |
Global Unicast Address | This field displays the Switch’s global unicast address to identify this interface. |
Joined Group Address | This field displays the IPv6 multicast addresses of groups the Switch’s interface joins. |
DHCPv6 Client Active This field displays whether the Switch acts as a DHCPv6 client to get an IPv6 address from a DHCPv6 server. | |
Identity Association An Identity Association (IA) is a collection of addresses assigned to a DHCP client, through which the server and client can manage a set of related IP addresses. Each IA must be associated with exactly one interface. | |
IA Type | The IA type is the type of address in the IA. Each IA holds one type of address. IA_NA means an identity association for non-temporary addresses and IA_TA is an identity association for temporary addresses. |
IAID | Each IA consists of a unique IAID and associated IP information. |
T1 | This field displays the DHCPv6 T1 timer. After T1, the Switch sends the DHCPv6 server a Renew message. An IA_NA option contains the T1 and T2 fields, but an IA_TA option does not. The DHCPv6 server uses T1 and T2 to control the time at which the client contacts with the server to extend the lifetimes on any addresses in the IA_NA before the lifetimes expire. |
T2 | This field displays the DHCPv6 T2 timer. If the time T2 is reached and the server does not respond, the Switch sends a Rebind message to any available server. |
State | This field displays the state of the TA. It shows Active when the Switch obtains addresses from a DHCpv6 server and the TA is created. Renew when the TA’s address lifetime expires and the Switch sends out a Renew message. Rebind when the Switch does not receive a response from the original DHCPv6 server and sends out a Rebind message to another DHCPv6 server. |
SID | This field displays the DHCPv6 server’s unique ID. |
Address | This field displays the Switch’s global address which is assigned by the DHCPv6 server. |
Preferred Lifetime | This field displays how long (in seconds) that the global address remains preferred. |
Valid Lifetime | This field displays how long (in seconds) that the global address is valid. |
DNS | This field displays the DNS server address assigned by the DHCPv6 server. |
Domain List | This field displays the address record when the Switch queries the DNS server to resolve domain names. |
Restart DHCPv6 Client | Click Restart to send a new DHCP request to the DHCPv6 server and update the IPv6 address and DNS information for this interface. |
IPv6 Global Setup
Use this screen to configure the global IPv6 settings. Click SYSTEM > IPv6 > IPv6 Global Setup to display the screen as shown next.
SYSTEM > IPv6 > IPv6 Global Setup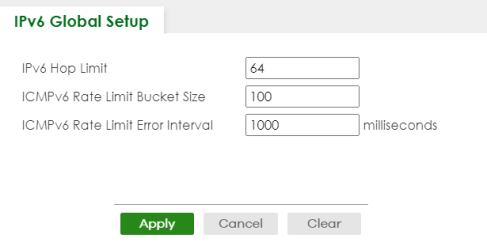
The following table describes the labels in this screen.
label | description |
|---|---|
IPv6 Hop Limit | Specify the maximum number of hops (from 1 to 255) in router advertisements. This is the maximum number of hops on which an IPv6 packet is allowed to transmit before it is discarded by an IPv6 router, which is similar to the TTL field in IPv4. |
ICMPv6 Rate Limit Bucket Size | Specify the maximum number of ICMPv6 error messages (from 1 to 200) which are allowed to transmit in a given time interval. If the bucket is full, subsequent error messages are suppressed. |
ICMPv6 Rate Limit Error Interval | Specify the time period (from 0 to 2147483647 milliseconds) during which ICMPv6 error messages of up to the bucket size can be transmitted. 0 means no limit. |
Apply | Click Apply to save your changes to the Switch’s run-time memory. The Switch loses these changes if it is turned off or loses power, so use the Save link on the top navigation panel to save your changes to the non-volatile memory when you are done configuring. |
Cancel | Click Cancel to begin configuring this screen afresh. |
Clear | Click Clear to reset the fields to the factory defaults. |
IPv6 Interface Setup
Use this screen to view and configure an IPv6 interface you create in the SYSTEM > Interface Setup screen. Click SYSTEM > IPv6 > IPv6 Interface Setup to display the screen as shown next.
SYSTEM > IPv6 > IPv6 Interface Setup
The following table describes the labels in this screen.
label | description |
|---|---|
Index | This is the interface index number. |
Interface | This is the name of the IPv6 interface you created. |
Active | This field displays whether the IPv6 interface is activated or not. |
Select an entry’s checkbox to select a specific entry. | |
Edit | Click Edit to edit the selected interface. |
Edit an IPv6 Interface
Use this screen to turn on or off an IPv6 interface you create in the SYSTEM > Interface Setup screen. Select an entry and click Edit in the SYSTEM > IPv6 > IPv6 Interface Setup screen to display the screen as shown next.
SYSTEM > IPv6 > IPv6 Interface Setup > Edit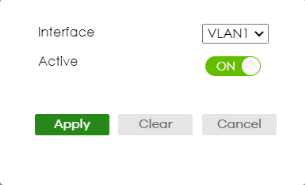
The following table describes the labels in this screen.
label | description |
|---|---|
Interface | Select the IPv6 interface you want to configure. |
Active | Enable the switch button to enable the interface. |
Apply | Click Apply to save your changes to the Switch’s run-time memory. The Switch loses these changes if it is turned off or loses power, so use the Save link on the top navigation panel to save your changes to the non-volatile memory when you are done configuring. |
Clear | Click Clear to clear the fields to the factory defaults. |
Cancel | Click Cancel to not save the configuration you make and return to the last screen. |
IPv6 Link-Local Address Setup
A link-local address uniquely identifies a device on the local network (the LAN). It is similar to a “private IP address” in IPv4. You can have the same link-local address on multiple interfaces on a device. A link-local unicast address has a predefined prefix of fe80::/10.
Use this screen to view and configure the interface’s link-local address and default gateway. Click SYSTEM > IPv6 > IPv6 Addressing > IPv6 Link-Local Address Setup to display the screen as shown next.
SYSTEM > IPv6 > IPv6 Addressing > IPv6 Link-Local Address Setup
The following table describes the labels in this screen.
label | description |
|---|---|
Index | This is the interface index number. |
Interface | This is the name of the IPv6 interface you created. |
IPv6 Link-Local Address | This is the static IPv6 link-local address for the interface. |
IPv6 Default Gateway | This is the default gateway IPv6 address for the interface. |
Select an entry’s checkbox to select a specific entry. | |
Edit | Click Edit to edit the selected entry. |
Edit an IPv6 Link-Local Address
Use this screen to configure the link-local address and default gateway of an IPv6 interface you create in the SYSTEM > Interface Setup screen. Select an entry and click Edit in the SYSTEM > IPv6 > IPv6 Addressing > IPv6 Link-Local Address Setup screen to display this screen.
SYSTEM > IPv6 > IPv6 Addressing > IPv6 Link-Local Address Setup > Edit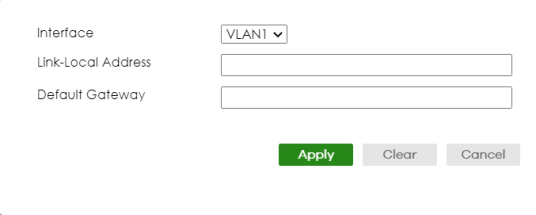
The following table describes the labels in this screen.
label | description |
|---|---|
Interface | Select the IPv6 interface you want to configure. |
Link-Local Address | Manually configure a static IPv6 link-local address for the interface. |
Default Gateway | Set the default gateway IPv6 address for the interface. When an interface cannot find a routing information for a frame’s destination, it forwards the packet to the default gateway. |
Apply | Click Apply to save your changes to the Switch’s run-time memory. The Switch loses these changes if it is turned off or loses power, so use the Save link on the top navigation panel to save your changes to the non-volatile memory when you are done configuring. |
Clear | Click Clear to clear the fields to the factory defaults. |
Cancel | Click Cancel to not save the configuration you make and return to the last screen. |
IPv6 Global Address Setup
Use this screen to view and configure the interface’s IPv6 global address. Click SYSTEM > IPv6 Addressing > IPv6 Global Address Setup to display the screen as shown next.
SYSTEM > IPv6 > IPv6 Addressing > IPv6 Global Address Setup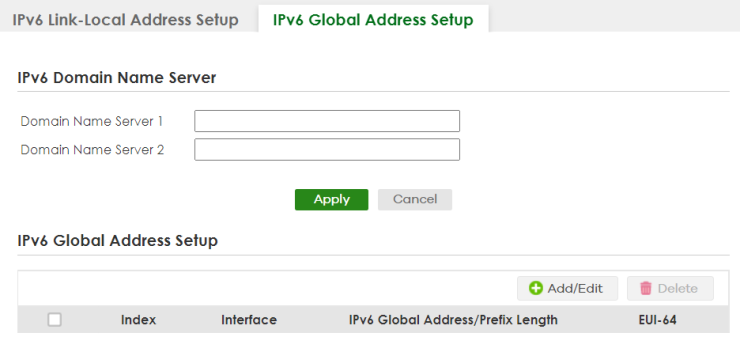
The following table describes the labels in this screen.
label | description |
|---|---|
IPv6 Domain Name Server | |
Domain Name Server 1/2 | Enter a domain name server IPv6 address in order to be able to use a domain name instead of an IP address. |
Apply | Click Apply to save your changes to the Switch’s run-time memory. The Switch loses these changes if it is turned off or loses power, so use the Save link on the top navigation panel to save your changes to the non-volatile memory when you are done configuring. |
Cancel | Click this to reset the Domain Name Server values in this screen to their last-saved values. |
IPv6 Global Address Setup | |
Index | This is the interface index number. |
Interface | This is the name of the IPv6 interface you created. |
IPv6 Global Address/Prefix Length | This field displays the IPv6 global address and prefix length for the interface. |
EUI-64 | This shows whether the interface ID of the global address is generated using the EUI-64 format. |
Select an entry’s checkbox to select a specific entry. Otherwise, select the checkbox in the table heading row to select all entries. | |
Add/Edit | Click Add/Edit to add a new entry or edit a selected one. |
Delete | Click Delete to remove the selected entries. |
Add/Edit an IPv6 Global Address
Use this screen to configure the interface’s IPv6 global address. Click Add/Edit, or select an entry and click Add/Edit in the SYSTEM > IPv6 Addressing > IPv6 Global Address Setup screen to display this screen.
SYSTEM > IPv6 > IPv6 Addressing > IPv6 Global Address Setup > Add/Edit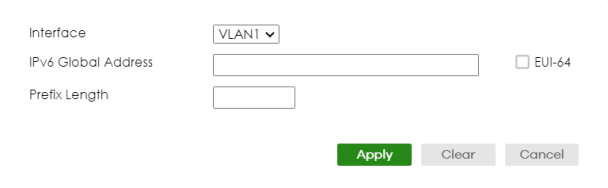
The following table describes the labels in this screen.
label | description |
|---|---|
Interface | Select the IPv6 interface you want to configure. |
IPv6 Global Address | Manually configure a static IPv6 global address for the interface. |
Prefix Length | Specify an IPv6 prefix length that specifies how many most significant bits (start from the left) in the address compose the network address. |
EUI-64 | Select this option to have the interface ID be generated automatically using the EUI-64 format. |
Apply | Click Apply to save your changes to the Switch’s run-time memory. The Switch loses these changes if it is turned off or loses power, so use the Save link on the top navigation panel to save your changes to the non-volatile memory when you are done configuring. |
Clear | Click Clear to clear the fields to the factory defaults. |
Cancel | Click Cancel to not save the configuration you make and return to the last screen. |
IPv6 Neighbor Discovery Setup
Use this screen to configure neighbor discovery settings for each interface. Click SYSTEM > IPv6 > IPv6 Neighbor Discovery > IPv6 Neighbor Discovery Setup to display the screen as shown next.
SYSTEM > IPv6 > IPv6 Neighbor Discovery > IPv6 Neighbor Discovery Setup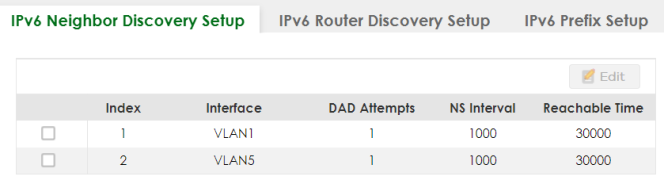
The following table describes the labels in this screen.
label | description |
|---|---|
Index | This is the interface index number. |
Interface | This is the name of the IPv6 interface you created. |
DAD Attempts | This field displays the number of consecutive neighbor solicitations the Switch sends for this interface. |
NS Interval | This field displays the time interval (in milliseconds) at which neighbor solicitations are re-sent for this interface. |
Reachable Time | This field displays how long (in milliseconds) a neighbor is considered reachable for this interface. |
Select an entry’s checkbox to select a specific entry. | |
Edit | Click Edit to edit the selected entry. |
Edit an IPv6 Neighbor Discovery
Use this screen to configure neighbor discovery settings for each interface. Select an entry and click Edit in the SYSTEM > IPv6 > IPv6 Neighbor Discovery > IPv6 Neighbor Discovery Setup screen to display this screen.
SYSTEM > IPv6 > IPv6 Neighbor Discovery > IPv6 Neighbor Discovery Setup > Edit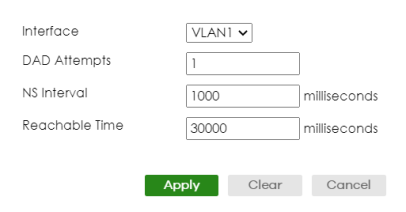
The following table describes the labels in this screen.
label | description |
|---|---|
Interface | Select the IPv6 interface you want to configure. |
DAD Attempts | The Switch uses Duplicate Address Detection (DAD) with neighbor solicitation and advertisement messages to check whether an IPv6 address is already in use before assigning it to an interface. Specify the number of consecutive neighbor solicitations (from 0 to 600) the Switch sends for this interface. Enter 0 to turn off DAD. |
NS Interval | Specify the time interval (from 1000 to 3600000 milliseconds) at which neighbor solicitations are re-sent for this interface. |
Reachable Time | Specify how long (from 1000 to 3600000 milliseconds) a neighbor is considered reachable for this interface. |
Apply | Click Apply to save your changes to the Switch’s run-time memory. The Switch loses these changes if it is turned off or loses power, so use the Save link on the top navigation panel to save your changes to the non-volatile memory when you are done configuring. |
Clear | Click Clear to clear the fields to the factory defaults. |
Cancel | Click Cancel to not save the configuration you make and return to the last screen. |
IPv6 Router Discovery Setup
Use this screen to configure router discovery settings for each interface. Click SYSTEM > IPv6 > IPv6 Neighbor Discovery > IPv6 Router Discovery Setup to display the screen as shown next.
SYSTEM > IPv6 > IPv6 Neighbor Discovery > IPv6 Router Discovery Setup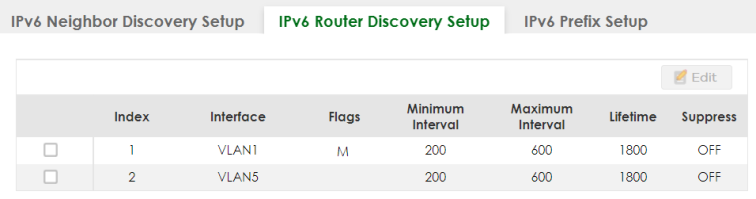
The following table describes the labels in this screen.
label | description |
|---|---|
Index | This is the interface index number. |
Interface | This is the name of the IPv6 interface you created. |
Flags | This field displays whether IPv6 hosts use DHCPv6 to obtain IPv6 stateful addresses (M) and/or additional configuration settings (O). |
Minimum Interval | This field displays the minimum time interval at which the Switch sends router advertisements for this interface. |
Maximum Interval | This field displays the maximum time interval at which the Switch sends router advertisements for this interface. |
Lifetime | This field displays how long the router in router advertisements can be used as a default router for this interface. |
Suppress | The Switch sends router advertisements and responses when Suppress is OFF. |
Select an entry’s checkbox to select a specific entry. | |
Edit | Click Edit to edit the selected entry. |
Edit IPv6 Router Discovery
Use this screen to configure router discovery settings for each interface. Select an entry and click Edit in the SYSTEM > IPv6 > IPv6 Neighbor Discovery > IPv6 Router Discovery Setup screen to display the screen as shown next.
SYSTEM > IPv6 > IPv6 Neighbor Discovery > IPv6 Router Discovery Setup > Edit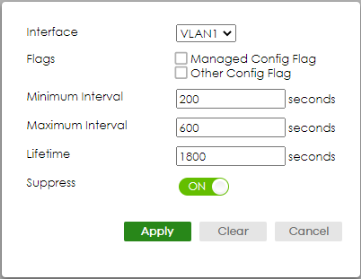
The following table describes the labels in this screen.
label | description |
|---|---|
Interface | Select the IPv6 interface you want to configure. |
Flags | Select the Managed Config Flag option to have the Switch set the “managed address configuration” flag (the M flag) to 1 in IPv6 router advertisements, which means IPv6 hosts use DHCPv6 to obtain IPv6 stateful addresses. De-select the option to set the flag to 0 and the host will not use DHCPv6 to obtain IPv6 stateful addresses. Select the Other Config Flag option to have the Switch set the “Other stateful configuration” flag (the O flag) to 1 in IPv6 router advertisements, which means IPv6 hosts use DHCPv6 to obtain additional configuration settings, such as DNS information. De-select the option to set the flag to 0 and the host will not use DHCPv6 to obtain additional configuration settings. |
Minimum Interval | Specify the minimum time interval (from 3 to 1350 seconds) at which the Switch sends router advertisements for this interface. |
Maximum Interval | Specify the maximum time interval (from 4 to 1800 seconds) at which the Switch sends router advertisements for this interface. |
Lifetime | Specify how long (from 0 to 9000 seconds) the router in router advertisements can be used as a default router for this interface. |
Suppress | Enable the switch button to set the Switch to not send router advertisements and responses to router solicitations on this interface. |
Apply | Click Apply to save your changes to the Switch’s run-time memory. The Switch loses these changes if it is turned off or loses power, so use the Save link on the top navigation panel to save your changes to the non-volatile memory when you are done configuring. |
Clear | Click Clear to clear the fields to the factory defaults. |
Cancel | Click Cancel to not save the configuration you make and return to the last screen. |
IPv6 Prefix Setup
Use this screen to configure the Switch’s IPv6 prefix list for each interface. Click SYSTEM > IPv6 > IPv6 Neighbor Discovery > IPv6 Prefix Setup to display the screen as shown next.
SYSTEM > IPv6 > IPv6 Neighbor Discovery > IPv6 Prefix Setup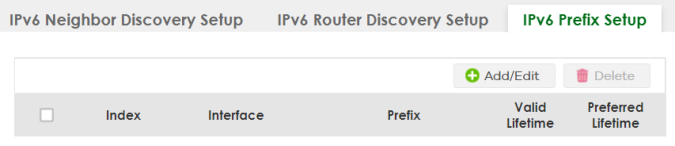
The following table describes the labels in this screen.
label | description |
|---|---|
Index | This is the interface index number. |
Interface | This is the name of the IPv6 interface you created. |
Prefix | This field displays the IPv6 prefix and prefix length that the Switch includes in router advertisements for this interface. |
Valid Lifetime | This field displays the IPv6 prefix valid lifetime. |
Preferred Lifetime | This field displays the preferred lifetime of an IPv6 address generated from the prefix. |
Select an entry’s checkbox to select a specific entry. Otherwise, select the checkbox in the table heading row to select all entries. | |
Add/Edit | Click Add/Edit to add a new entry or edit a selected one. |
Delete | Click Delete to remove the selected entries. |
Add/Edit IPv6 Prefix
Use this screen to configure the Switch’s IPv6 prefix list for each interface. Click Add/Edit, or select an entry and click Add/Edit in the SYSTEM > IPv6 > IPv6 Neighbor Discovery > IPv6 Prefix Setup screen to display this screen.
SYSTEM > IPv6 > IPv6 Neighbor Discovery > IPv6 Prefix Setup > Add/Edit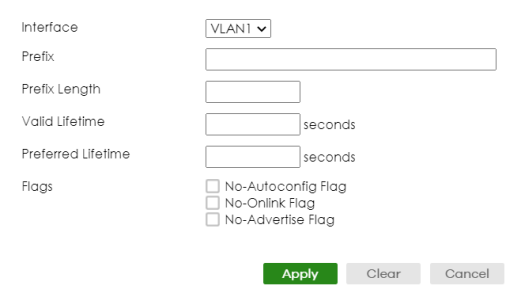
The following table describes the labels in this screen.
label | description |
|---|---|
Interface | Select the IPv6 interface you want to configure. |
Prefix | Set the IPv6 prefix that the Switch includes in router advertisements for this interface. |
Prefix Length | Set the prefix length that the Switch includes in router advertisements for this interface. |
Valid Lifetime | Specify how long (from 0 to 4294967295 seconds) the prefix is valid for on-link determination. |
Preferred Lifetime | Specify how long (from 0 to 4294967295 seconds) that addresses generated from the prefix remain preferred. The preferred lifetime cannot exceed the valid lifetime. |
Flags | Select No-Autoconfig Flag to not allow IPv6 hosts to use this prefix. Select No-Onlink Flag to not allow the specified prefix to be used for on-link determination. Select No-Advertise Flag to set the Switch to not include the specified IPv6 prefix, prefix length in router advertisements for this interface. |
Apply | Click Apply to save your changes to the Switch’s run-time memory. The Switch loses these changes if it is turned off or loses power, so use the Save link on the top navigation panel to save your changes to the non-volatile memory when you are done configuring. |
Clear | Click Clear to clear the fields to the factory defaults. |
Cancel | Click Cancel to not save the configuration you make and return to the last screen. |
IPv6 Neighbor Setup
Use this screen to view and configure static IPv6 neighbor entries in the Switch’s IPv6 neighbor table to store the neighbor information permanently. Click SYSTEM > IPv6 > IPv6 Neighbor Setup to display the screen as shown next.
SYSTEM > IPv6 > IPv6 Neighbor Setup
The following table describes the labels in this screen.
label | description |
|---|---|
Index | This is the interface index number. |
Interface | This is the name of the IPv6 interface you created. |
Neighbor Address | This field displays the IPv6 address of the neighboring device which can be reached through the interface. |
MAC | This field displays the MAC address of the neighboring device which can be reached through the interface. |
Select an entry’s checkbox to select a specific entry. Otherwise, select the checkbox in the table heading row to select all entries. | |
Add/Edit | Click Add/Edit to add a new entry or edit a selected one. |
Delete | Click Delete to remove the selected entries. |
Add/Edit IPv6 Neighbor
Use this screen to create a static IPv6 neighbor entry. Click Add/Edit, or select an entry and click Add/Edit in the SYSTEM > IPv6 > IPv6 Neighbor Setup screen to display this screen.
SYSTEM > IPv6 > IPv6 Neighbor Setup > Add/Edit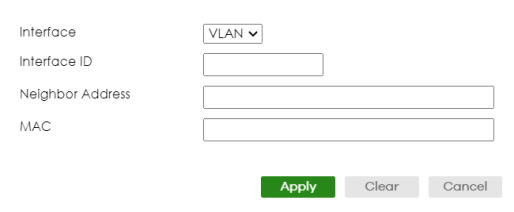
The following table describes the labels in this screen.
label | description |
|---|---|
Interface | Select the type of IPv6 interface for which you want to configure. The Switch supports the VLAN interface type for IPv6 at the time of writing. |
Interface ID | Specify a unique identification number (from 1 to 4094) for the interface. A static IPv6 neighbor entry displays in the MONITOR > IPv6 Neighbor Table screen only when the interface ID is also created in the SYSTEM > Interface Setup screen. To have IPv6 function properly, you should configure a static VLAN with the same ID number in the SWITCHING > VLAN screens. |
Neighbor Address | Specify the IPv6 address of the neighboring device which can be reached through the interface. |
MAC | Specify the MAC address of the neighboring device which can be reached through the interface. |
Apply | Click Apply to save your changes to the Switch’s run-time memory. The Switch loses these changes if it is turned off or loses power, so use the Save link on the top navigation panel to save your changes to the non-volatile memory when you are done configuring. |
Clear | Click Clear to clear the fields to the factory defaults. |
Cancel | Click Cancel to not save the configuration you make and return to the last screen. |
DHCPv6 Client Setup
Use this screen to configure the Switch’s DHCP settings when it is acting as a DHCPv6 client. Click SYSTEM > IPv6 > DHCPv6 Client Setup to display the screen as shown next.
SYSTEM > IPv6 > DHCPv6 Client Setup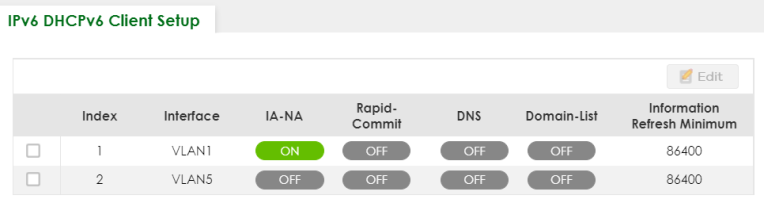
The following table describes the labels in this screen.
label | description |
|---|---|
Index | This is the interface index number. |
Interface | This is the name of the IPv6 interface you created. |
IA-NA | This field displays whether the Switch obtains a non-temporary IP address from the DHCPv6 server. |
Rapid-Commit | This field displays whether the Switch obtains information from the DHCPv6 server by a rapid two-message exchange. |
DNS | This field displays whether the Switch obtains DNS server IPv6 addresses from the DHCPv6 server. |
Domain-List | This field displays whether the Switch obtains a list of domain names from the DHCP server. |
Information Refresh Minimum | This field displays the time interval (in seconds) at which the Switch exchanges other configuration information with a DHCPv6 server again. |
Select an entry’s checkbox to select a specific entry. | |
Edit | Click Edit to edit the selected entry. |
Edit DHCPv6 Client
Use this screen to configure the Switch’s DHCP settings when it is acting as a DHCPv6 client. Select an entry and click Edit in the SYSTEM > IPv6 > DHCPv6 Client Setup screen to display this screen.
SYSTEM > IPv6 > DHCPv6 Client Setup > Edit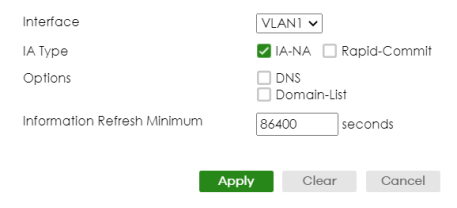
The following table describes the labels in this screen.
label | description |
|---|---|
Interface | Select the IPv6 interface you want to configure. |
IA Type | Select IA-NA to set the Switch to get a non-temporary IP address from the DHCPv6 server for this interface. Optionally, you can also select Rapid-Commit to have the Switch send its DHCPv6 Solicit message with a Rapid Commit option to obtain information from the DHCPv6 server by a rapid two-message exchange. The Switch discards any Reply messages that do not include a Rapid Commit option. The DHCPv6 server should also support the Rapid Commit option to have it work well. |
Options | Select DNS to have the Switch obtain DNS server IPv6 addresses and/or select Domain-List to have the Switch obtain a list of domain names from the DHCP server. |
Information Refresh Minimum | Specify the time interval (from 600 to 4294967295 seconds) at which the Switch exchanges other configuration information with a DHCPv6 server again. |
Apply | Click Apply to save your changes to the Switch’s run-time memory. The Switch loses these changes if it is turned off or loses power, so use the Save link on the top navigation panel to save your changes to the non-volatile memory when you are done configuring. |
Clear | Click Clear to clear the fields to the factory defaults. |
Cancel | Click Cancel to not save the configuration you make and return to the last screen. |