SNMP
SNMP Overview
This chapter introduces the SNMP screens and shows you how to setup SNMP settings for management.
What You Can Do
• Use the SNMP User screen (Configure SNMP User) to create SNMP users for authentication with managers using SNMP v3 and associate them to SNMP groups.
• Use the SNMP Trap Group screen (SNMP Trap Group) to specify the types of SNMP traps that should be sent to each SNMP manager.
• Use the SNMP Trap Port screen (Enable or Disable Sending of SNMP Traps on a Port) to enable/disable sending SNMP traps on a port.
Configure SNMP
Use this screen to configure your SNMP settings.
Click SYSTEM > SNMP to view the screen as shown.
SYSTEM > SNMP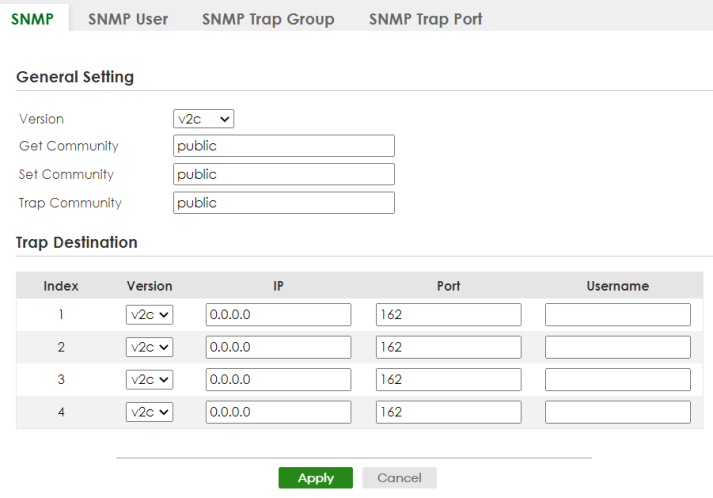
The following table describes the labels in this screen.
LABEL | Description |
|---|---|
General Setting Use this section to specify the SNMP version and community (password) values. | |
Version | Select the SNMP version for the Switch. The SNMP version on the Switch must match the version on the SNMP manager. Choose SNMP version 2c (v2c), SNMP version 3 (v3) or both (v3v2c). SNMP version 2c is backwards compatible with SNMP version 1. |
Get Community | Enter the Get Community string, which is the password for the incoming Get- and GetNext- requests from the management station. The Get Community string is only used by SNMP managers using SNMP version 2c or lower. |
Set Community | Enter the Set Community string, which is the password for incoming Set- requests from the management station. The Set Community string is only used by SNMP managers using SNMP version 2c or lower. |
Trap Community | Enter the Trap Community string, which is the password sent with each trap to the SNMP manager. The Trap Community string is only used by SNMP managers using SNMP version 2c or lower. |
Trap Destination Use this section to configure where to send SNMP traps from the Switch. | |
Index | This is the index of a trap destination. |
Version | Specify the version of the SNMP trap messages. |
IP | Enter the IP addresses of up to four managers to send your SNMP traps to. |
Port | Enter the port number upon which the manager listens for SNMP traps. |
Username | Enter the user name to be sent to the SNMP manager along with the SNMP v3 trap. This user name must match an existing account on the Switch (configured in the SYSTEM > SNMP > SNMP User screen). |
Apply | Click Apply to save your changes to the Switch’s run-time memory. The Switch loses these changes if it is turned off or loses power, so use the Save link on the top navigation panel to save your changes to the non-volatile memory when you are done configuring. |
Cancel | Click Cancel to begin configuring this screen afresh. |
Configure SNMP User
Use this screen to create SNMP users for authentication with managers using SNMP v3 and associate them to SNMP groups. An SNMP user is an SNMP manager. Click SYSTEM > SNMP > SNMP User to view the screen as shown.
SYSTEM > SNMP > SNMP User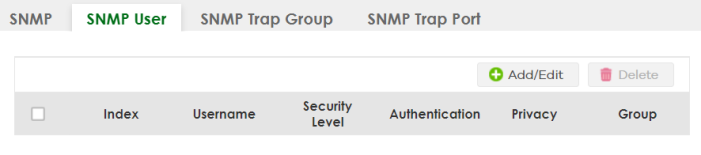
The following table describes the labels in this screen.
LABEL | Description |
|---|---|
Index | This is a read-only number identifying a login account on the Switch. |
Username | This field displays the user name of a login account on the Switch. |
Security Level | This field displays whether you want to implement authentication and/or encryption for SNMP communication with this user. |
Authentication | This field displays the authentication algorithm used for SNMP communication with this user. |
Privacy | This field displays the encryption method used for SNMP communication with this user. |
Group | This field displays the SNMP group to which this user belongs. |
Select an entry’s checkbox to select a specific entry. Otherwise, select the checkbox in the table heading row to select all entries. | |
Add/Edit | Click Add/Edit to add a new entry or edit a selected one. |
Delete | Click Delete to remove the selected entries. |
Add/Edit SNMP User
Use this screen to create SNMP users for authentication with managers using SNMP v3 and associate them to SNMP groups. An SNMP user is an SNMP manager. Click Add/Edit, or select an entry and click Add/Edit in the SYSTEM > SNMP > SNMP User screen to view the screen.
SYSTEM > SNMP > SNMP User > Add/Edit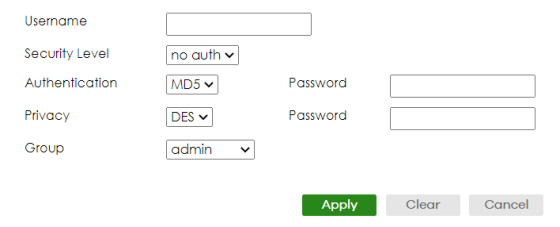
The following table describes the labels in this screen.
LABEL | Description |
|---|---|
Username | Specify the user name (up to 32 printable ASCII characters) of a login account on the Switch. The string should not contain [ ? ], [ | ], [ ' ], [ " ] or [ , ]. |
Security Level | Select whether you want to implement authentication and/or encryption for SNMP communication from this user. Choose: • no auth – to use the user name as the password string to send to the SNMP manager. This is equivalent to the Get, Set and Trap Community in SNMP v2c. This is the lowest security level. • auth – to implement an authentication algorithm for SNMP messages sent by this user. • priv – to implement authentication and encryption for SNMP messages sent by this user. This is the highest security level. |
Authentication | Select an authentication algorithm. MD5 (Message Digest 5) and SHA (Secure Hash Algorithm) are hash algorithms used to authenticate SNMP data. SHA authentication is generally considered stronger than MD5, but is slower. |
Password | Enter the password of up to 32 printable ASCII characters (except [ ? ], [ | ], [ ' ], [ " ], [ space ], or [ , ]) for SNMP user authentication. |
Privacy | Specify the encryption method for SNMP communication from this user. You can choose one of the following: • DES – Data Encryption Standard is a widely used (but breakable) method of data encryption. It applies a 56-bit key to each 64-bit block of data. • AES – Advanced Encryption Standard is another method for data encryption that also uses a secret key. AES applies a 128-bit key to 128-bit blocks of data. |
Password | Enter the password of up to 32 printable ASCII characters (except [ ? ], [ | ], [ ' ], [ " ], [ space ], or [ , ]) for encrypting SNMP packets. |
Group | SNMP v3 adopts the concept of View-based Access Control Model (VACM) group. SNMP managers in one group are assigned common access rights to MIBs. Specify in which SNMP group this user is. admin – Members of this group can perform all types of system configuration, including the management of administrator accounts. read-write – Members of this group have read and write rights, meaning that the user can create and edit the MIBs on the Switch, except the user account and AAA configuration. read-only – Members of this group have read rights only, meaning the user can collect information from the Switch. |
Apply | Click Apply to save your changes to the Switch’s run-time memory. The Switch loses these changes if it is turned off or loses power, so use the Save link on the top navigation panel to save your changes to the non-volatile memory when you are done configuring. |
Clear | Click Clear to clear the fields to the factory defaults. |
Cancel | Click Cancel to not save the configuration you make and return to the last screen. |
SNMP Trap Group
Use this screen to specify the types of SNMP traps that should be sent to each SNMP manager. Click SYSTEM > SNMP > SNMP Trap Group to view the screen as shown.
SYSTEM > SNMP > SNMP Trap Group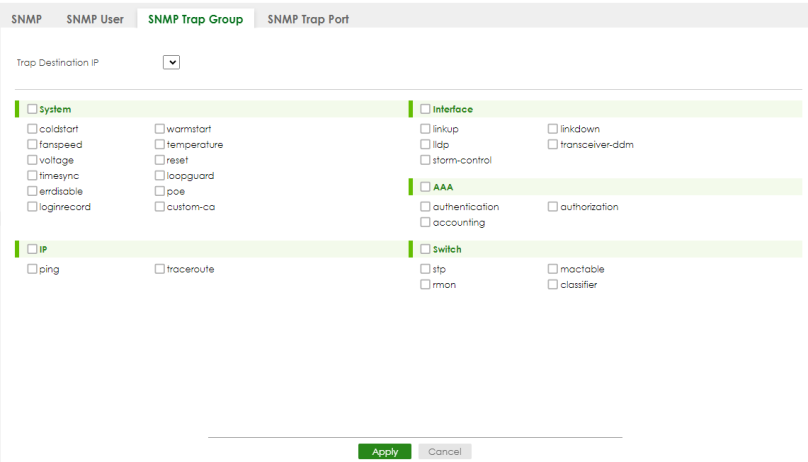
The following table describes the labels in this screen.
LABEL | Description |
|---|---|
Trap Destination IP | Select one of your configured trap destination IP addresses. These are the IP addresses of the SNMP managers. You must first configure a trap destination IP address in the SYSTEM > SNMP > SNMP screen. Use the rest of the screen to select which traps the Switch sends to that SNMP manager. |
Options | Select the individual SNMP traps that the Switch is to send to the SNMP station. The traps are grouped by category. Selecting a category in the heading row automatically selects all of the SNMP traps under that category. Clear the checkboxes for individual traps that you do not want the Switch to send to the SNMP station. Clearing a category’s checkbox automatically clears all of the category’s trap checkboxes (the Switch only sends traps from selected categories). |
Apply | Click Apply to save your changes to the Switch’s run-time memory. The Switch loses these changes if it is turned off or loses power, so use the Save link on the top navigation panel to save your changes to the non-volatile memory when you are done configuring. |
Cancel | Click Cancel to begin configuring this screen afresh. |
Enable or Disable Sending of SNMP Traps on a Port
Click SYSTEM > SNMP > SNMP Trap Port to view the screen as shown. Use this screen to set whether a trap received on the ports would be sent to the SNMP manager.
SYSTEM > SNMP > SNMP Trap Port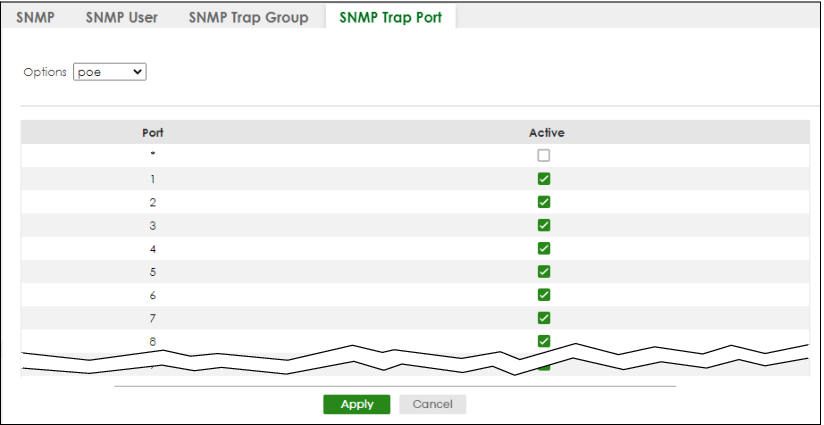
The following table describes the labels in this screen.
LABEL | Description |
|---|---|
Options | Select the trap type you want to configure here. |
Port | This field displays a port number. |
* | Settings in this row apply to all ports. Use this row only if you want to make some of the settings the same for all ports. Use this row first to set the common settings and then make adjustments on a port-by-port basis. Changes in this row are copied to all the ports as soon as you make them. |
Active | Select this checkbox to enable the trap type of SNMP traps on this port. The Switch sends the related traps received on this port to the SNMP manager. Clear this checkbox to disable the sending of SNMP traps on this port. |
Apply | Click Apply to save your changes to the Switch’s run-time memory. The Switch loses these changes if it is turned off or loses power, so use the Save link on the top navigation panel to save your changes to the non-volatile memory when you are done configuring. |
Cancel | Click Cancel to begin configuring this screen afresh. |
Technical Reference
This section provides technical background information on the topics discussed in this chapter.
About SNMP
Simple Network Management Protocol (SNMP) is an application layer protocol used to manage and monitor TCP/IP-based devices. SNMP is used to exchange management information between the network management system (NMS) and a network element (NE). A manager station can manage and monitor the Switch through the network through SNMP version 1 (SNMPv1), SNMP version 2c or SNMP version 3. The next figure illustrates an SNMP management operation. SNMP is only available if TCP/IP is configured.
SNMP Management Model 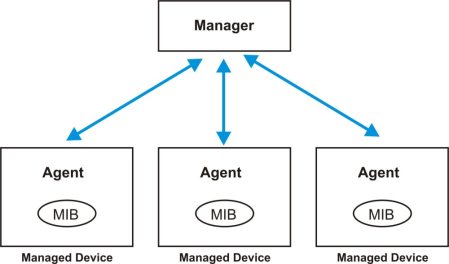
An SNMP managed network consists of two main components: agents and a manager.
An agent is a management software module that resides in a managed Switch (the Switch). An agent translates the local management information from the managed Switch into a form compatible with SNMP. The manager is the console through which network administrators perform network management functions. It executes applications that control and monitor managed devices.
The managed devices contain object variables or managed objects that define each piece of information to be collected about a Switch. Examples of variables include number of packets received, node port status, and so on. A Management Information Base (MIB) is a collection of managed objects. SNMP allows a manager and agents to communicate for the purpose of accessing these objects.
SNMP itself is a simple request or response protocol based on the manager or agent model. The manager issues a request and the agent returns responses using the following protocol operations:
LABEL | DESCRIPTION |
|---|---|
Get | Allows the manager to retrieve an object variable from the agent. |
GetNext | Allows the manager to retrieve the next object variable from a table or list within an agent. In SNMPv1, when a manager wants to retrieve all elements of a table from an agent, it initiates a Get operation, followed by a series of GetNext operations. |
Set | Allows the manager to set values for object variables within an agent. |
Trap | Used by the agent to inform the manager of some events. |
SNMP v3 and Security
SNMP v3 enhances security for SNMP management. SNMP managers can be required to authenticate with agents before conducting SNMP management sessions.
Security can be further enhanced by encrypting the SNMP messages sent from the managers. Encryption protects the contents of the SNMP messages. When the contents of the SNMP messages are encrypted, only the intended recipients can read them.
Supported MIBs
A MIB is a collection of managed objects that is organized according to hierarchy. The objects define the attributes of the managed device, which includes the names, status, access rights, and data types. Each object can be addressed through an object identifier (OID).
MIBs let administrators collect statistics and monitor status and performance. The Switch uses standard public (RFC-defined) MIBs for standard functionality
To view a list of standard MIBs supported by your Switch, see the product datasheet at www.zyxel.com (Support > Download Library > Datasheet).
SNMP Traps
The Switch sends traps to an SNMP manager when an event occurs. The following tables outline the SNMP traps by category.
Option | object label | object id | description |
|---|---|---|---|
coldstart | coldStart | 1.3.6.1.6.3.1.1.5.1 | This trap is sent when the Switch is turned on. |
warmstart | warmStart | 1.3.6.1.6.3.1.1.5.2 | This trap is sent when the Switch restarts. |
Option | object label | object id | description |
|---|---|---|---|
linkup | linkUp | 1.3.6.1.6.3.1.1.5.4 | This trap is sent when the Ethernet link is up. |
linkdown | linkDown | 1.3.6.1.6.3.1.1.5.3 | This trap is sent when the Ethernet link is down. |
lldp | lldpRemTablesChange | 1.0.8802.1.1.2.0.0.1 | The trap is sent when entries in the remote database have any updates. Link Layer Discovery Protocol (LLDP), defined as IEEE 802.1ab, enables LAN devices that support LLDP to exchange their configured settings. This helps eliminate configuration mismatch issues. |
Option | object label | object id | description |
|---|
Option | object label | object id | description |
|---|---|---|---|
ping | pingProbeFailed | 1.3.6.1.2.1.80.0.1 | This trap is sent when a single ping probe fails. |
pingTestFailed | 1.3.6.1.2.1.80.0.2 | This trap is sent when a ping test (consisting of a series of ping probes) fails. | |
pingTestCompleted | 1.3.6.1.2.1.80.0.3 | This trap is sent when a ping test is completed. | |
traceroute | traceRouteTestFailed | 1.3.6.1.2.1.81.0.2 | This trap is sent when a traceroute test fails. |
traceRouteTestCompleted | 1.3.6.1.2.1.81.0.3 | This trap is sent when a traceroute test is completed. |
Option | object label | object id | description |
|---|---|---|---|
rmon | RmonRisingAlarm | 1.3.6.1.2.1.16.0.1 | This trap is sent when a variable goes over the RMON "rising" threshold. |
RmonFallingAlarm | 1.3.6.1.2.1.16.0.2 | This trap is sent when the variable falls below the RMON "falling" threshold. |