Syslog Setup
Syslog Overview
This chapter explains the Syslog screens.
The syslog protocol allows devices to send event notification messages across an IP network to syslog servers that collect the event messages. A syslog-enabled device can generate a syslog message and send it to a syslog server.
Syslog is defined in RFC 3164. The RFC defines the packet format, content and system log related information of syslog messages. Each syslog message has a facility and severity level. The syslog facility identifies a file in the syslog server. Refer to the documentation of your syslog program for details. The following table describes the syslog severity levels.
code | severity |
|---|---|
0 | Emergency: The system is unusable. |
1 | Alert: Action must be taken immediately. |
2 | Critical: The system condition is critical. |
3 | Error: There is an error condition on the system. |
4 | Warning: There is a warning condition on the system. |
5 | Notice: There is a normal but significant condition on the system. |
6 | Informational: The syslog contains an informational message. |
7 | Debug: The message is intended for debug-level purposes. |
What You Can Do
Use the Syslog Setup screen (Syslog Setup) to configure the device’s system logging settings and configure a list of external syslog servers.
Syslog Setup
The syslog feature sends logs to an external syslog server. Use this screen to configure the device’s system logging settings and configure a list of external syslog servers.
Click SYSTEM > Syslog Setup in the navigation panel to display this screen.
SYSTEM > Syslog Setup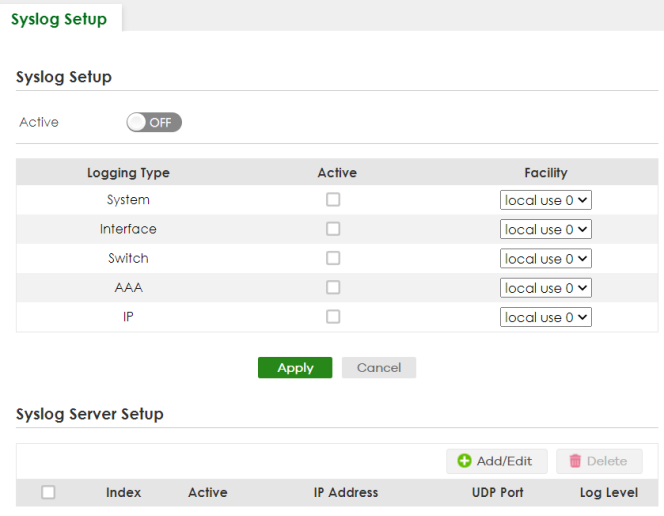
The following table describes the labels in this screen.
label | description |
|---|---|
Syslog Setup | |
Active | Enable the switch button to turn on syslog (system logging) and then configure the syslog setting. |
Logging Type | This column displays the names of the categories of logs that the device can generate. |
Active | Select this option to set the device to generate logs for the corresponding category. |
Facility | The log facility allows you to send logs to different files in the syslog server. Refer to the documentation of your syslog program for more details. |
Apply | Click Apply to save your changes to the Switch’s run-time memory. The Switch loses these changes if it is turned off or loses power, so use the Save link on the top navigation panel to save your changes to the non-volatile memory when you are done configuring. |
Cancel | Click Cancel to begin configuring this screen afresh. |
Syslog Server Setup | |
Index | This is the index number of a syslog server entry. |
Active | This field displays if the device is activated to send logs to the syslog server. |
IP Address | This field displays the IP address of the syslog server. |
UDP Port | This field displays the port of the syslog server. |
Log Level | This field displays the severity level of the logs that the device is to send to this syslog server. |
Select an entry’s checkbox to select a specific entry. Otherwise, select the checkbox in the table heading row to select all entries. | |
Add/Edit | Click Add/Edit to add a new entry or edit a selected one. |
Delete | Click Delete to remove the selected entries. |
Add/Edit a Syslog Server
Use this screen to configure an external syslog server.
Click Add/Edit, or select an entry and click Add/Edit in the SYSTEM > Syslog Setup screen to display this screen.
SYSTEM > Syslog Setup > Add/Edit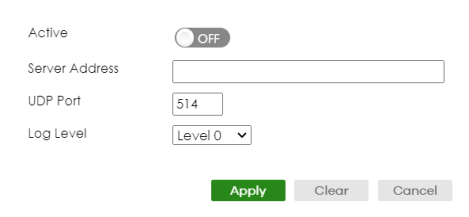
The following table describes the labels in this screen.
label | description |
|---|---|
Active | Enable the switch button to have the device send logs to this syslog server. Clear the checkbox if you want to create a syslog server entry but not have the device send logs to it (you can edit the entry later). |
Server Address | Enter the IPv4 or IPv6 address of the syslog server. |
UDP Port | The default syslog server port is 514. If your syslog server uses a different port, configure the one it uses here. |
Log Level | Select the severity levels of the logs that you want the device to send to this syslog server. The lower the number, the more critical the logs are. |
Apply | Click Apply to save your changes to the Switch’s run-time memory. The Switch loses these changes if it is turned off or loses power, so use the Save link on the top navigation panel to save your changes to the non-volatile memory when you are done configuring. |
Clear | Click Clear to clear the fields to the factory defaults. |
Cancel | Click Cancel to not save the configuration you make and return to the last screen. |