Time Range
Time Range Overview
You can set up one-time and recurring schedules for time-oriented features, such as PoE and classifier. The UAG supports one-time and recurring schedules. One-time schedules are effective only once, while recurring schedules usually repeat. Both types of schedules are based on the current date and time in the Switch.
The time range can be configured in two ways – Absolute and Periodic. Absolute is a fixed time range with a start and end time. Periodic is recurrence of a time range and does not have an end time.
What You Can Do
Use the Time Range screen (Configure a Time Range) to view or define a schedule on the Switch.
Configure a Time Range
Click SYSTEM > Time Range in the navigation panel to display the screen as shown.
SYSTEM > Time Range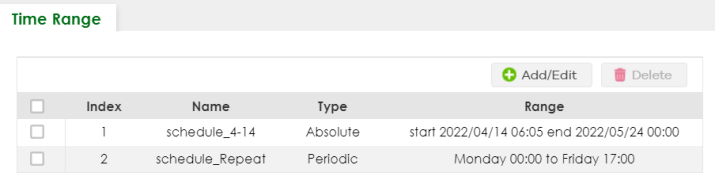
The following table describes the labels in this screen.
label | description |
|---|---|
Select an entry’s checkbox to select a specific entry. Otherwise, select the checkbox in the table heading row to select all entries. | |
Index | This field displays the index number of the rule. |
Name | This field displays the descriptive name for this rule. This is for identification purpose only. You can enter up to 32 printable ASCII characters except [ ? ], [ | ], [ ' ], [ " ] or [ , ]. |
Type | This displays the schedule type of the time range rule. Absolute An one-time schedule. One-time schedules begin on a specific start date and time and end on a specific stop date and time. One-time schedules are useful for long holidays and vacation periods. Periodic A recurring schedule. Recurring schedules begin at a specific start time and end at a specific stop time on selected days of the week (Sunday, Monday, Tuesday, Wednesday, Thursday, Friday, and Saturday). Recurring schedules are useful for defining the workday and off-work hours. |
Range | This field displays the time periods to which this schedule applies. |
Add/Edit | Click Add/Edit to add a new schedule rule or edit a selected one. |
Delete | Click Delete to remove the selected rules. |
Add/Edit Time Range
This screen allows you to create a new time range or edit an existing one.
To access this screen, click the Add/Edit button or select an entry from the list and click the Add/Edit button.
SYSTEM > Time Range > Add/Edit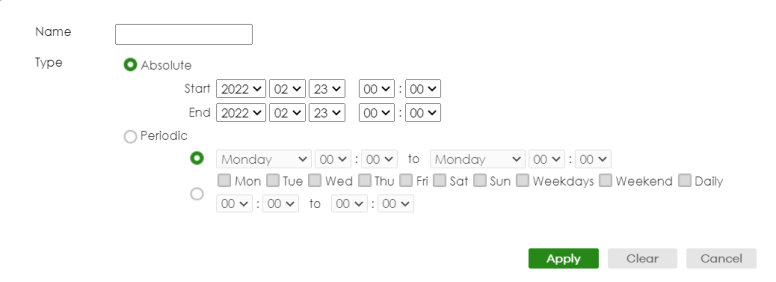
The following table describes the labels in this screen.
label | description |
|---|---|
Name | Enter a descriptive name for this rule for identifying purposes. The string should not contain [ ? ], [ | ], [ ' ], [ " ] or [ , ]. |
Type | Select Absolute to create a one-time schedule. One-time schedules begin on a specific start date and time and end on a specific stop date and time. One-time schedules are useful for long holidays and vacation periods. Alternatively, select Periodic to create a recurring schedule. Recurring schedules begin at a specific start time and end at a specific stop time on selected days of the week (Sunday, Monday, Tuesday, Wednesday, Thursday, Friday, and Saturday). Recurring schedules are useful for defining the workday and off-work hours. |
Absolute | This section is available only when you set Type to Absolute. |
Start | Specify the year, month, day, hour and minute when the schedule begins. |
End | Specify the year, month, day, hour and minute when the schedule ends. |
Periodic | This section is available only when you set Type to Periodic. Select the first option if you want to define a recurring schedule for a consecutive time period. You then select the day of the week, hour and minute when the schedule begins and ends respectively. Select the second option if you want to define a recurring schedule for multiple non-consecutive time periods. You need to select each day of the week the recurring schedule is effective. You also need to specify the hour and minute when the schedule begins and ends each day. The schedule begins and ends in the same day. |
Apply | Click Apply to save your changes to the Switch’s run-time memory. The Switch loses these changes if it is turned off or loses power, so use the Save link on the top navigation panel to save your changes to the non-volatile memory when you are done configuring. |
Clear | Click Clear to clear the fields to the factory defaults. |
Cancel | Click Cancel to not save the configuration you make and return to the last screen. |