Monitor
Use the Monitor menus to check Nebula Device event log messages and summary report for Nebula Devices in the selected site.
Event Log
Use this screen to view WiFi Nebula Device log messages. You can enter the Nebula Device name or a key word, select one or multiple event types, or specify a date/time or even a time range to display only the log messages related to it.
Click Site-wide > Monitor > Access points > Event log to access this screen.
Site-wide > Monitor > Access points > Event log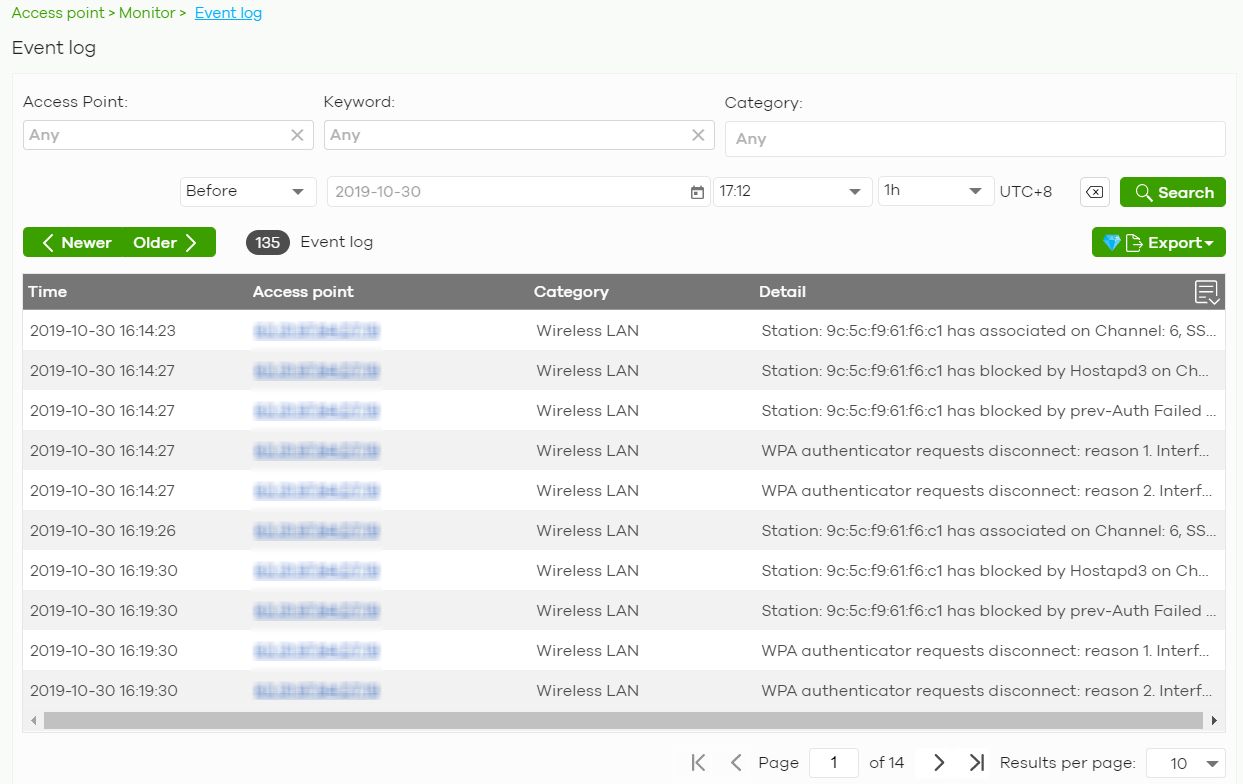
Vouchers
A voucher is a unique printable code that allows a user to authenticate with a WiFi network for a limited period of time. A user connects to the WiFi network’s SSID and then enters the code in a captive portal. After a successful login, the expiry time of the voucher starts counting down.
Vouchers are useful in situations where you want to give individual users time-limited WiFi access. For example: A customer can purchase a voucher for 2 hours of Internet access in a hotel or coffee shop.
Using Vouchers
1 Go to Site-wide > Configure > WiFi SSID, and create a dedicated SSID for voucher-based WiFi access. For example, “Hotel_Guest_Network”.
For details on configuring SSIDs, see Section 12.3.1 on page 538.
For details on configuring SSIDs, see Section 12.3.1 on page 538.
2 Go to Site-wide > Configure > WiFi SSID, select the SSID, and then under Sign-in method select Voucher.
For details, see Section 12.3.2 on page 540.
For details, see Section 12.3.2 on page 540.
3 Go to Site-wide > Monitor > Access points > Vouchers > Settings to configure how the vouchers will look when printed.
For details, see Voucher Settings Screen.
For details, see Voucher Settings Screen.
4 Go to Site-wide > Monitor > Access points > Vouchers, and then click Create to create one or more vouchers.
Vouchers Screen
This screen allows you to create and manage vouchers for WiFi network authentication.
Click Site-wide > Monitor > Access points > Vouchers to access this screen.
Site-wide > Monitor > Access points > Vouchers
The following table describes the labels in this screen.
Label | Description |
|---|---|
Reset | Select one or more vouchers and then click this button to reset the vouchers back to their original states. Each voucher’s status is set to Unused and time remaining is reset to the time configured in Duration. |
Delete | Select one or more vouchers and then click this button to delete the vouchers. |
Print | Select one or more vouchers and then click this button to print the vouchers. You can modify how vouchers look when printed at Site-wide > Configure > General settings. |
Search | Use this field to search for vouchers, by voucher code, duration, and/or status. |
Create | Click this button to create one or more vouchers. For details, see Create Vouchers Screen. |
Export | Click this button to export the voucher table and all information in it to a CSV or XML file. |
Voucher | This displays the voucher’s unique authentication code. |
Comments | This displays information about the voucher. |
Duration | This displays how long the voucher is valid from when it is activated, in hours. |
Remaining | This displays how much time is left before the voucher expires. NCC only starts counting this time after the voucher has been activated. |
Expire in | This displays the date and time that the voucher will expire. |
Status | This displays the current status of the voucher: Unused: The voucher has not yet been used for authentication. Active: A user has used the voucher for authentication. NCC has started counting down the duration. Expire: The voucher has reached the end of its duration period and can no longer be used. Delete: The voucher is unused and has reached the time set under Purge after (days). |
Created | This displays the date and time that the voucher was created. |
Create Vouchers Screen
Use this screen to create one or more new vouchers.
Site-wide > Monitor > Access points > Vouchers > Create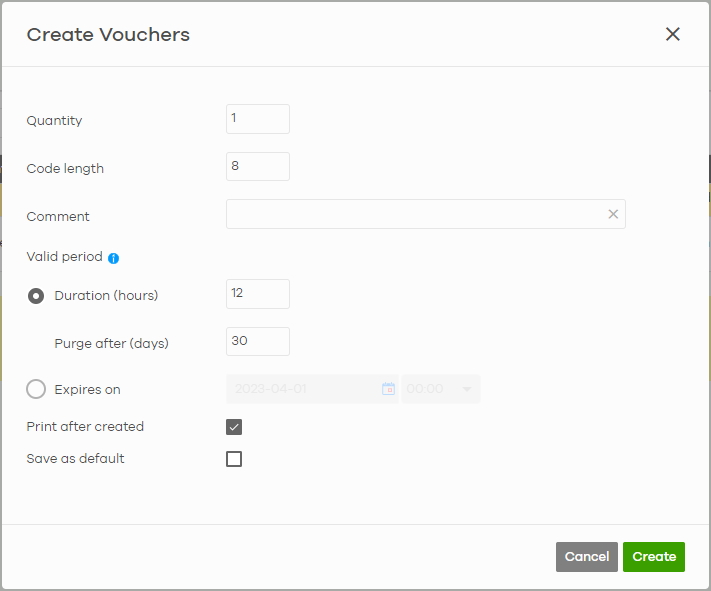
The following table describes the labels in this screen.
Label | Description |
|---|---|
Quantity | Sets the number of vouchers you want to create. The valid range for this setting is 1 – 999. |
Code length | Sets the length of the unique code on each voucher. The valid range for this setting is 6 – 10. |
Comment | Enter information about the voucher that might be useful for other administrators. |
Valid period | There are two ways to set your voucher’s validity. |
Duration (hours) | Sets how long the voucher is valid after it has been activated, in hours. The valid range for this setting is 1 – 72. |
Purge after (days) | Sets how long a non-activated voucher is valid for, in days. The valid range for this setting is 1 – 180. |
Expires on | Sets the date and time for the expiration of this voucher. |
Print after created | Select this to print the vouchers immediately after clicking Create. |
Save as default | Click this to make the settings on this page the default settings for new vouchers. |
Voucher Settings Screen
Use this screen to change the voucher settings for the Nebula Device. Click Site-wide > Monitor > Access points > Voucher > Settings to access this screen.
Site-wide > Monitor > Access points > Voucher > Settings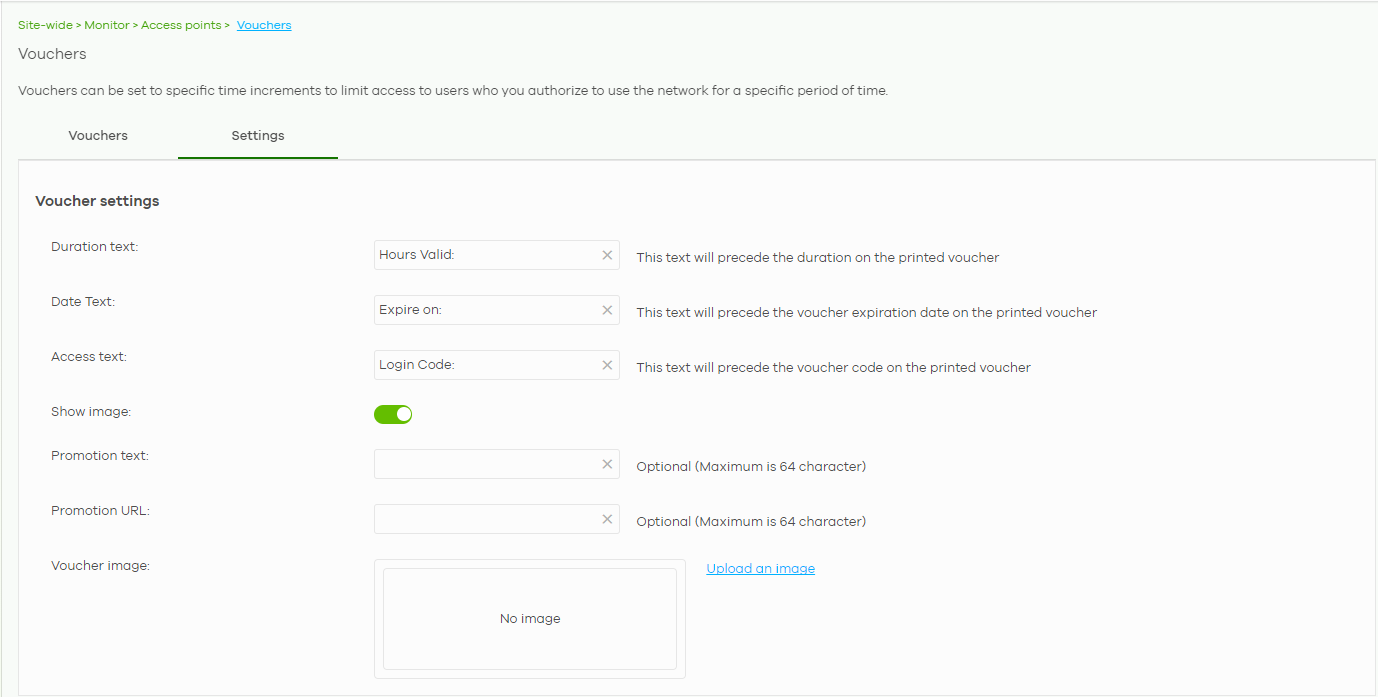
The following table describes the labels in this screen.
Label | Description |
|---|---|
Voucher settings | Use these settings to configure how WiFi network authentication vouchers for this site look when printed. 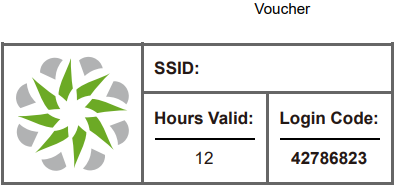 For more information on vouchers, see Vouchers. |
Duration text | Sets the text that precedes the duration on the voucher. The text must consist of 1 – 16 characters. |
Date text | Sets the text that precedes the expiration date on the voucher. The text must consist of 1 – 16 characters. |
Access text | Sets the text that precedes the voucher code on the voucher. The text must consist of 1 – 16 characters. |
Show image | Sets whether to display an image at the top-left of the voucher. This image is optional. |
Promotion text | Sets the promotional text on the voucher. This text is optional. The text must consist of 1 – 64 characters. |
Promotion URL | Sets the promotional URL on the voucher. This URL is optional. The URL is displayed as a QR code on the voucher. |
Voucher image | This shows the uploaded image that will be displayed at the top-left of the voucher. |
Upload an image | Click this button to upload an image from your local computer. The Choose File button appears. Click this button to locate the PNG (preferred for its transparency) / JPEG/GIF image file. The maximum image file size is 200 KB. |
Replace this image | Click this button to change the uploaded image. |
Remove this image | Click this button to delete the uploaded image. |
Wireless Health
This screen lets you monitor the health of WiFi networks for your Nebula Devices and connected WiFi clients.
You can improve WiFi network performance by doing the following:
• Enable DCS (Dynamic Channel Selection) to select a radio channel with least interference
• Enable client steering to use a stronger WiFi signal
• Change channel bandwidth to reduce radio interference from other WiFi devices
Click Site-wide > Monitor > Access points > Wireless health to access this screen.
Site-wide > Monitor > Access points > Wireless health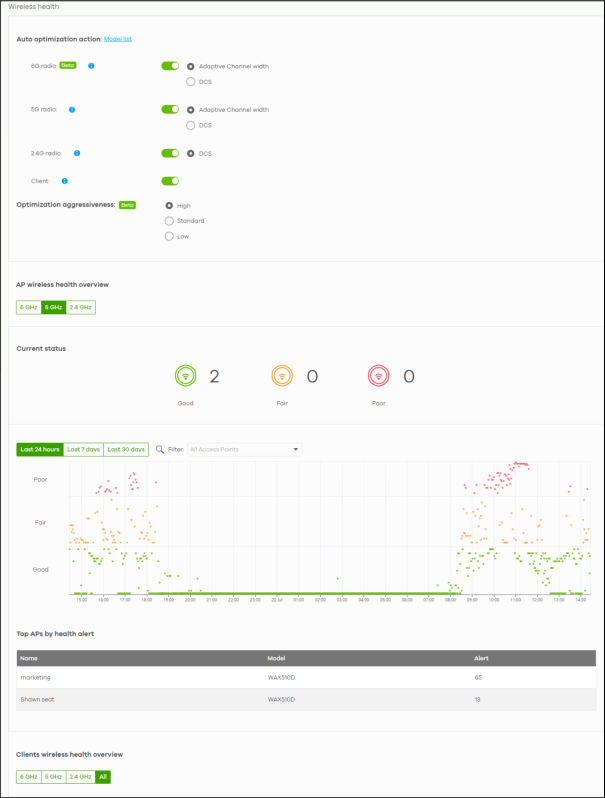
The following table describes the labels in this screen.
Label | Description |
|---|---|
Auto optimization action | |
6G radio | Select ON to enable and specify how the Nebula Device improves the WiFi network performance. Otherwise, select OFF to disable it. • Adaptive channel width – select this option to have the Nebula Device change the channel bandwidth from 160 MHz to 80 MHz to reduce the radio interference with other WiFi devices. If adaptive channel width does not improve WiFi performance then the Nebula Device also performs Dynamic Channel Selection (DCS). • DCS (Dynamic Channel Selection) – select this option to have the Nebula Device scan and choose a radio channel that has least interference. |
5G radio | Select ON to enable and specify how the Nebula Device improves the WiFi network performance. Otherwise, select OFF to disable it. • Adaptive channel width – select this option to have the Nebula Device change the channel bandwidth from 80 MHz to 20 MHz to reduce the radio interference with other WiFi devices. If adaptive channel width does not improve WiFi performance then the Nebula Device also performs Dynamic Channel Selection (DCS). • DCS (Dynamic Channel Selection) – select this option to have the Nebula Device scan and choose a radio channel that has least interference. |
2.4G radio | Select ON to enable the Nebula Device to improve the WiFi network performance. Otherwise, select OFF to disable it. • DCS (Dynamic Channel Selection) – select this option to have the Nebula Device scan and choose a radio channel that has least interference. |
Client | Select ON to have the Nebula Device try to steer the WiFi clients in poor health to a Nebula Device or SSID with a strong signal. Client steering to improve the signal strength is done every 30 minutes. Otherwise, select OFF to disable steering. |
Optimization aggressiveness | The Nebula Device optimizes the WiFi network performance by doing the following:. • Change the channel bandwidth from 160 MHz to 80 MHz, or 80 MHz to 20 MHz to reduce radio interference from other wireless devices (Adaptive Channel Width). • Select a radio channel with least interference (DCS, Dynamic Channel Selection). • Direct clients to an AP with a stronger WiFi signal. There might be some disruption to the client’s WiFi connections while the Nebula Device is optimizing the WiFi network. To minimize disruption, you can decide to optimize the WiFi network only when the WiFi network is below a certain level of busyness. Low, Standard, and High stand for different levels of busyness. The busyness level you select decides when the Nebula Device takes action to optimize the WiFi network. Low: Only perform WiFi network optimization action when the WiFi network traffic is below Low. Standard: Only perform WiFi network optimization action when the WiFi network traffic is Low. High: Only perform WiFi network optimization action when the WiFi network traffic is Standard, or Low. |
AP wireless health overview Move the cursor over the information icon to view the supported Nebula Device model list. | |
Current status | This shows the number of supported Nebula Devices that are currently online, using the specified frequency band that are in Good, Fair or Poor wireless health threshold as detected by Nebula. |
y-axis | The y-axis represents the state of wireless health. |
x-axis | The x-axis shows the time period over which the Nebula Device health state is recorded. |
Top APs by health alert | |
Name | This shows the descriptive name of the Nebula Device. |
Model | This shows the model number of the Nebula Device. |
Alert | This shows how many times the Nebula Device is in a poor state of wireless health. The NCC generates a log when the Nebula Device is in poor wireless health. You can view the log messages in the Site-wide > Monitor > Access points > Event log screen. |
Clients wireless health overview | |
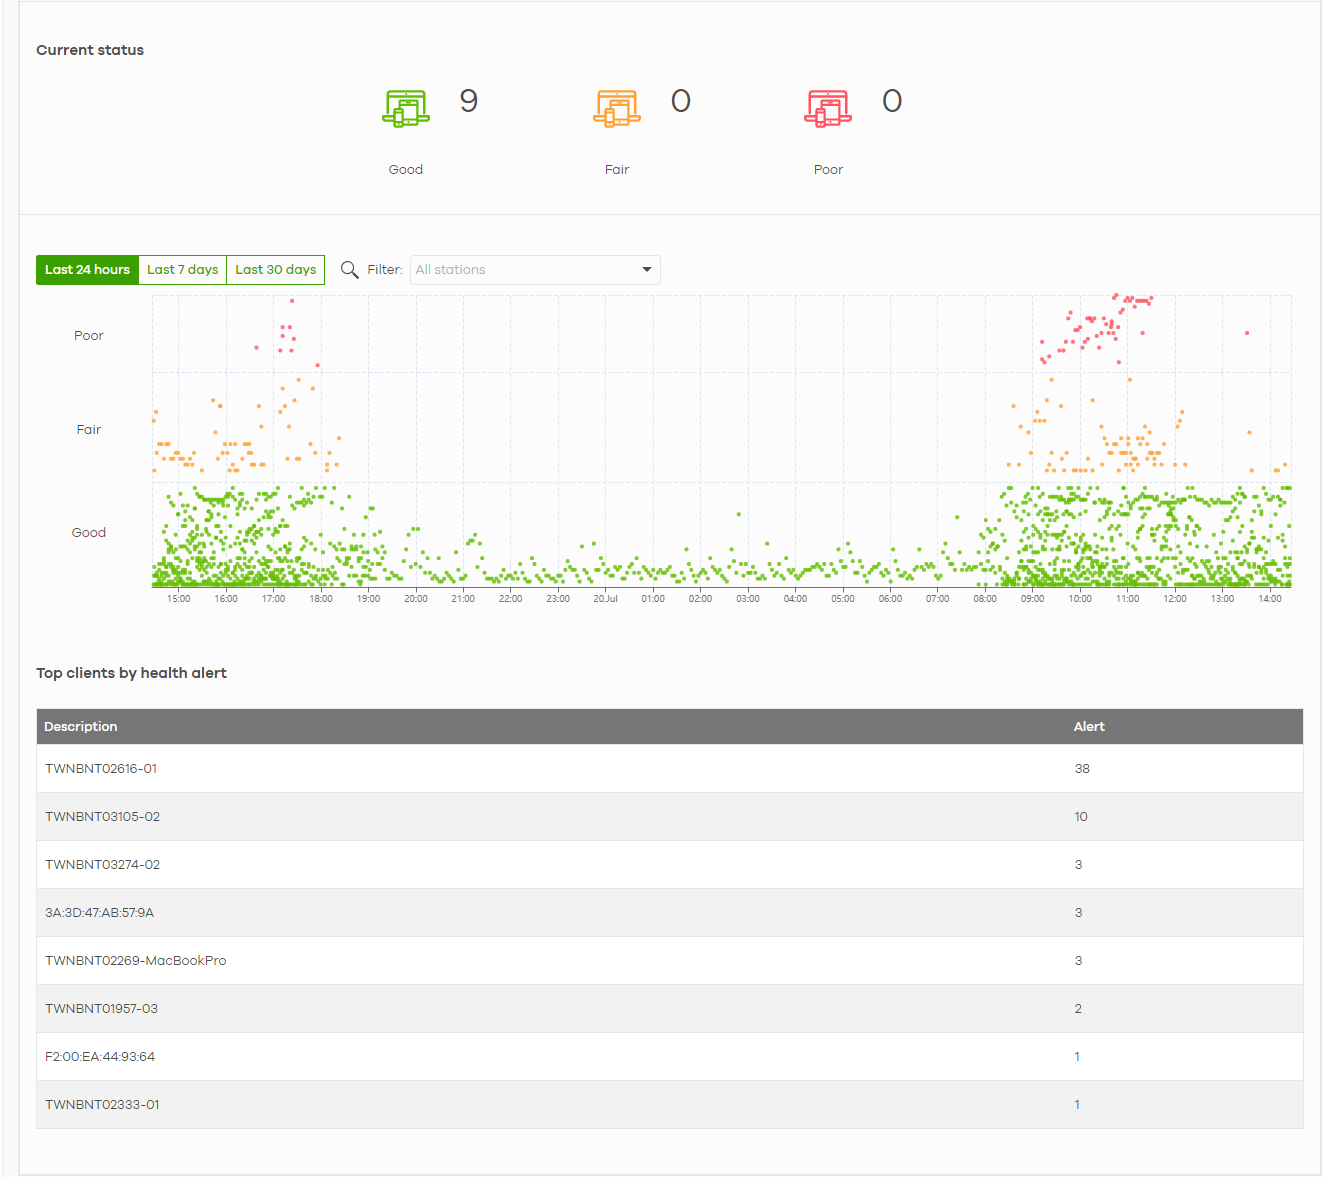
Current status | This shows the number of connected WiFi clients that are currently online, using the specified frequency band and in Good, Fair or Poor wireless health threshold as detected by Nebula. |
Client health | Select to view the health of all WiFi clients which are connected to the supported Nebula Devices using the 6 GHz, 5 GHz or 2.4 GHz band. You can select to view the health report for the past day, week or month, as well as filter the WiFi station to view. |
y-axis | The y-axis represents the state of wireless health. |
x-axis | The x-axis shows the time period over which the client health state is recorded. |
Top clients by health alert | |
Description | This shows the descriptive name of the client. |
Alert | This shows how many times the client is in a poor state of wireless health. The NCC generates a log when the client is in poor wireless health. You can view the log messages in the Site-wide > Monitor > Access points > Event log screen. |
Summary Report
This screen displays network statistics for Nebula Devices of the selected site, such as bandwidth usage, top clients and/or top SSIDs.
Click Site-wide > Monitor > Access points > Summary report to access this screen.
Site-wide > Monitor > Access points > Summary report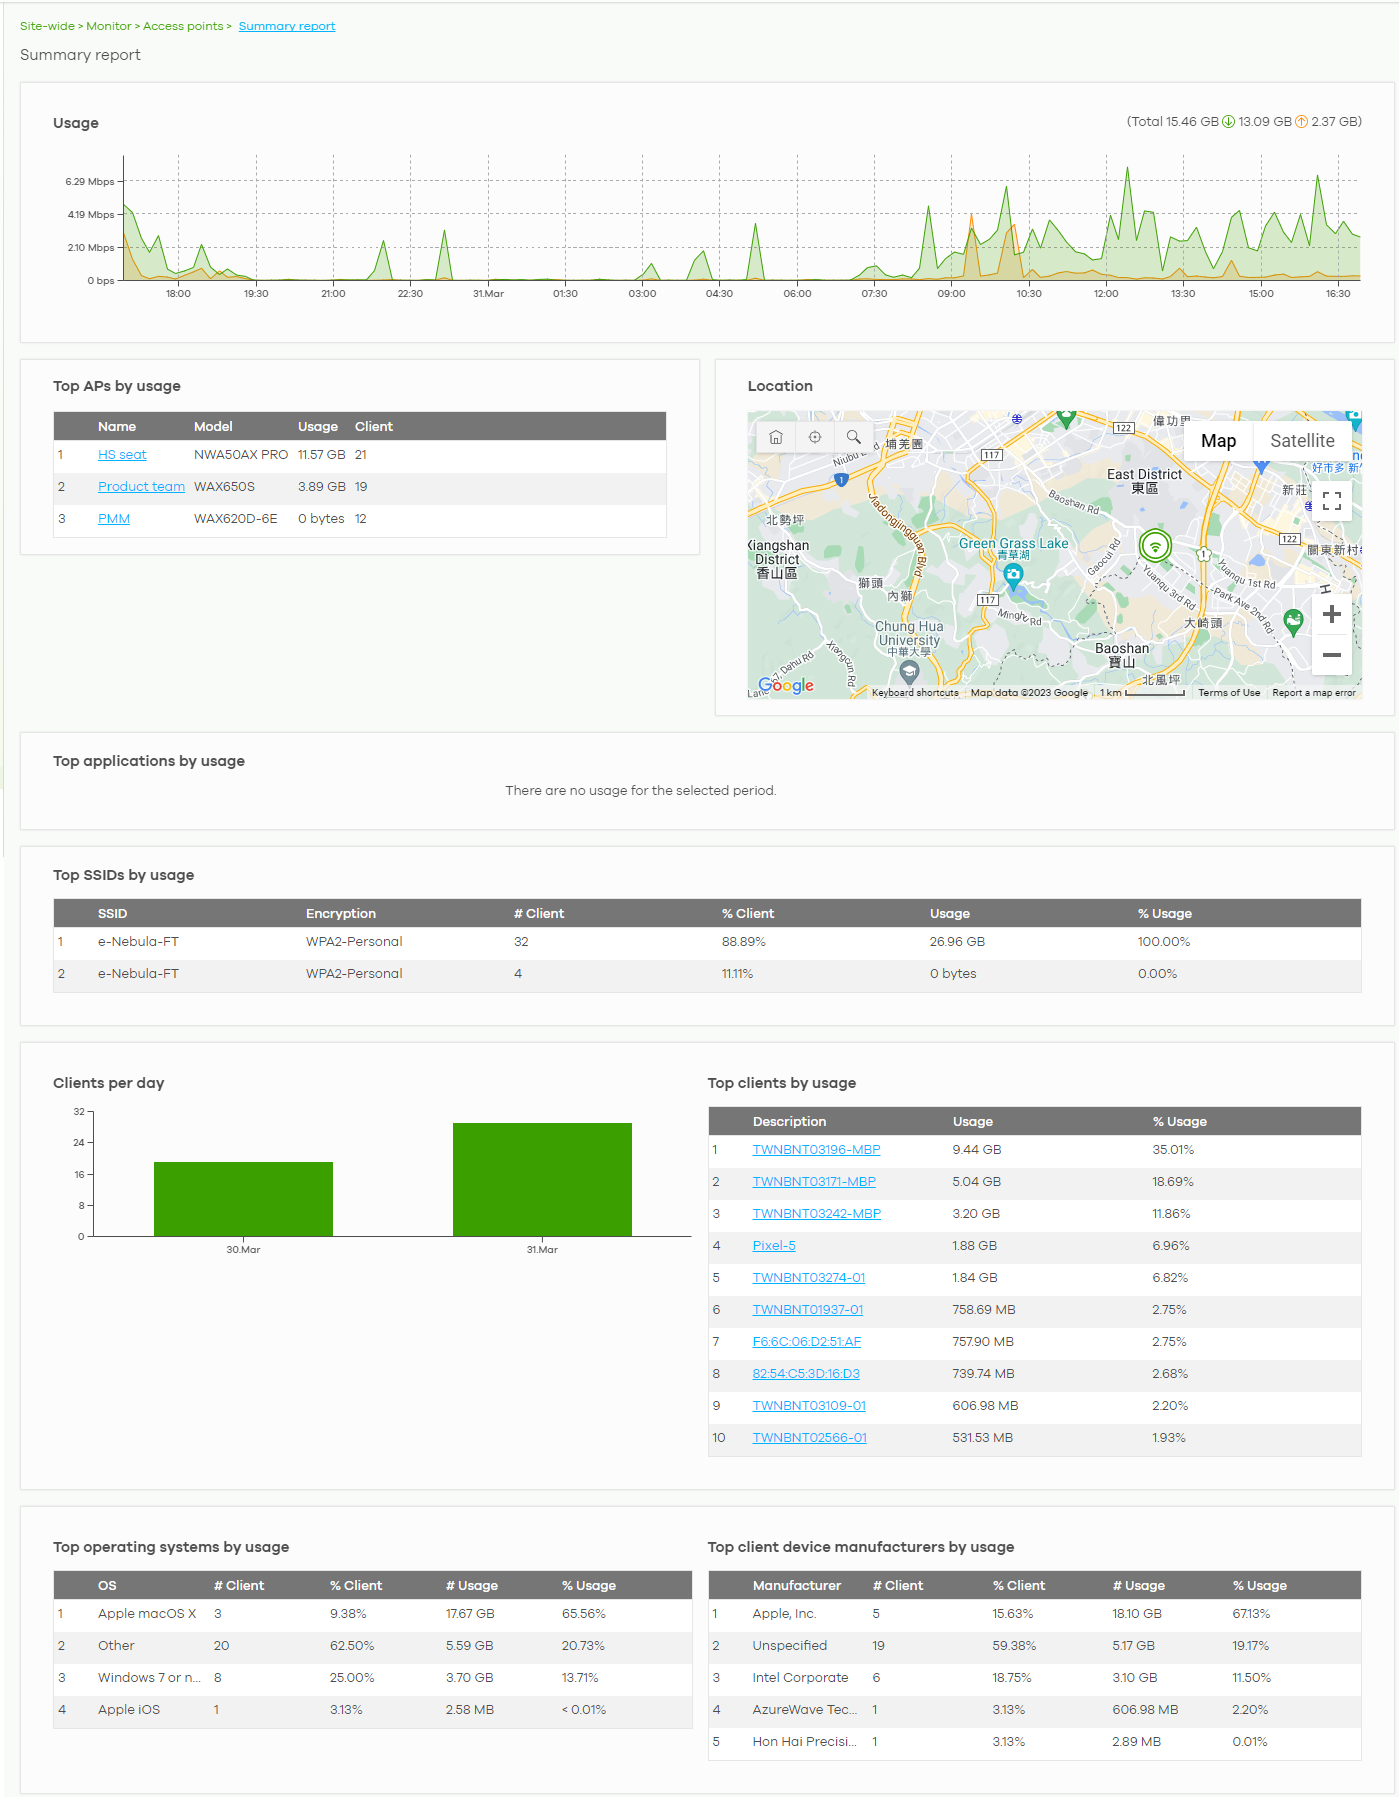
The following table describes the labels in this screen.
Label | Description |
|---|---|
Summary report | |
Usage | |
y-axis | The y-axis shows the transmission speed of data sent on this port in megabits per second (Mbps). |
x-axis | The x-axis shows the time period over which the traffic flow occurred. |
Top APs by usage | |
# | This shows the ranking of the Nebula Device. |
Name | This shows the descriptive name of the Nebula Device. |
Model | This shows the model number of the Nebula Device. |
Usage | This shows the amount of data transmitted or received by the Nebula Device. |
Client | This shows how many clients are currently connecting to the Nebula Device. |
Location This shows the location of the Nebula access points on the map. | |
Top applications by usage | |
# | This shows the ranking of the application. |
Application | This shows the application name. |
Category | This shows the category of the application, for example email, file sharing. |
Usage | This shows the amount of data consumed by the application. |
% Usage | This shows the percentage of usage for the application. |
Top SSIDs by usage | |
# | This shows the ranking of the SSID. |
SSID | This shows the SSID network name. |
Encryption | This shows the encryption method used by the SSID network. |
# Client | This shows how many WiFi clients are connecting to this SSID. |
% Client | This shows what percentage of associated WiFi clients are connecting to this SSID. |
Usage | This shows the total amount of data transmitted or received by clients connecting to this SSID. |
% Usage | This shows the percentage of usage for the clients connecting to this SSID. |
Clients per day | |
y-axis | The y-axis represents the number of clients. |
x-axis | The x-axis represents the date. |
Top clients by usage | |
# | This shows the ranking of the client. |
Description | This shows the descriptive name or MAC address of the client. |
Usage | This shows the total amount of data transmitted and received by the client. |
% Usage | This shows the percentage of usage for the client. |
Top operating systems by usage | |
# | This shows the ranking of the operating system. |
OS | This shows the operating system of the client device. |
# Client | This shows how many client devices use this operating system. |
% Client | This shows the percentage of top client devices which use this operating system. |
# Usage | This shows the amount of data consumed by the client device on which this operating system is running. |
% Usage | This shows the percentage of usage for top client devices which use this operating system. |
Top client device manufacturers by usage | |
# | This shows the ranking of the manufacturer. |
Manufacturer | This shows the manufacturer name of the client device. |
# Client | This shows how many client devices are made by the manufacturer. |
% Client | This shows the percentage of top client devices which are made by the manufacturer. |
# Usage | This shows the amount of data consumed by the client device. |
% Usage | This shows the percentage of usage for the client device. |