Dashboard
Dashboard
The Dashboard screen displays when you log into the PoE12-3PD or click the icon at the top left of the Web Configurator. The Dashboard screen displays general device information, port status, system information, and NCC status.
Dashboard 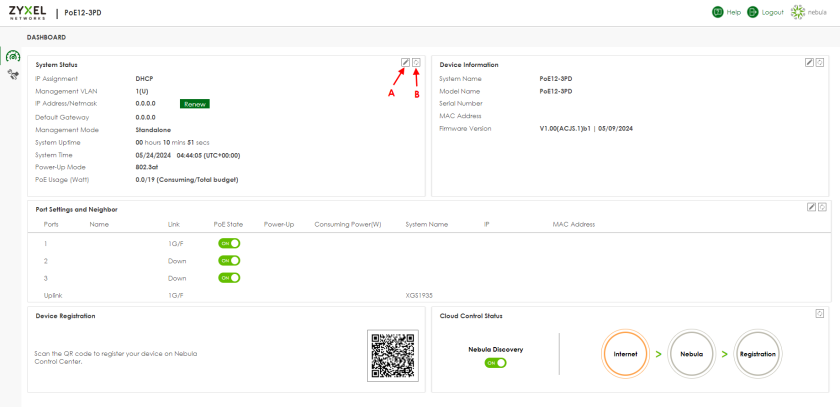
The following table describes the labels in this screen.
label | description |
|---|---|
Edit (A) | Click this to edit the settings. See Edit Dashboard for more information. |
Refresh (B) | Click this to update the widget’s information immediately. |
System Status | |
IP Assignment | This field displays how the PoE12-3PD gets its IP address. Static - The PoE12-3PD has a static IP address. DHCP - The PoE12-3PD gets its IP address from a DHCP server. Click the Renew button to update the DHCP IP address. |
Management VLAN | This field displays: • The VLAN the PoE12-3PD used to manage network. By default, the management VLAN is 1. • Whether a port is participating in a VLAN. A port’s tagged VLAN ID is displayed after T. A port’s untagged VLAN ID is displayed after U. |
IP Address | The PoE12-3PD needs an IP address for it to be managed over the network. The factory default IP address is 192.168.1.1. This field displays the PoE12-3PD’s current IP address. |
Default Gateway | The field displays the gateway that allows you to send or receive data traffic to or from a different network than the one the PoE12-3PD is on. |
Management Mode | This field displays whether the PoE12-3PD is being managed by NCC. • Standalone: When working in standalone mode, the PoE12-3PD is configured mainly with its built-in Web Configurator. The PoE12-3PD is in standalone mode by default. • Cloud: You can manage and monitor the PoE12-3PD through the NCC. It offers many features to better manage and monitor not just the Zyxel Device, but your network as a whole. See NCC Management on how to switch your PoE12-3PD to Cloud mode. |
System Uptime | This field displays how long the PoE12-3PD has been running since it last restarted or was turned on. |
System Time | This field displays the current date and time. The format is mm/dd/yyyy hh:mm:ss (UTC + hh:mm). |
Power-Up Mode | This field displays the IEEE PoE standard of the power received from the UPLINK port. This affects the available PoE usage for PDs. See PoE Standards of PoE12-3PD Ports to see more information on PoE standard of the ports. |
PoE Usage (Watt) | This field displays the amount of power the PoE12-3PD is currently supplying to the connected PoE-enabled devices and the total power the PoE12-3PD can provide to the connected PDs. |
Device Information | |
System Name | This field displays the name used to identify the PoE12-3PD on the network. |
Model Name | This field displays the model name of the PoE12-3PD. |
Serial Number | This field displays the serial number of the PoE12-3PD. |
MAC Address | This field displays the MAC address of the PoE12-3PD. |
Firmware Version | This field displays the version number and date of the firmware the PoE12-3PD is currently running. |
Port Settings and Neighbor | |
Ports | This identifies the Ethernet port on the PoE12-3PD. |
Name | This field displays the name you assigned to this port. |
Link | This field displays the current link speed (either 10M for 10 Mbps, 100M for 100 Mbps, or 1G for 1 Gbps) and duplex mode (F for full duplex or H for half) for each connected port. It displays Down for non-connected ports. |
PoE State | Slide the switch to the right to enable supplying PoE power to the PD. |
Power-Up | This field displays the IEEE PoE standard of the supplying power of each port. |
Consuming Power (W) | This field displays the amount of power the PoE12-3PD is currently supplying to the connected PDs. |
System Name | This field displays the system name of the connected device. |
IP | This field displays the IP address of the connected device |
MAC Address | This field displays the MAC address of the connected device. |
Device Registration | Scan the QR code to go to the Nebula Mobile app and register your PoE12-3PD with NCC. |
Cloud Control Status | This field displays: • The PoE12-3PD Internet connection status. • The connection status between the PoE12-3PD and NCC. • The PoE12-3PD registration status on NCC. Mouse over the circles to display detailed information. To pass your PoE12-3PD management to NCC, first make sure your PoE12-3PD is connected to the Internet. Then go to NCC and register your PoE12-3PD.  All circles will gray out if you disable Nebula Discovery. 1. Internet Green - The PoE12-3PD is connected to the Internet. Orange - The PoE12-3PD is not connected to the Internet. 2. Nebula Green - The PoE12-3PD is connected to NCC. Orange - The PoE12-3PD is not connected to NCC. 3. Registration Green - The PoE12-3PD is registered on NCC. Gray - The PoE12-3PD is not registered on NCC. |
Nebula Discovery | Slide the switch to the right to enable NCC discovery on the PoE12-3PD. The PoE12-3PD will connect to NCC and change to the NCC management mode if it: • is connected to the Internet. • has been registered on NCC. |
Edit Dashboard
This section describes how to configure the settings in the Dashboard screen.
Network
To access this screen, click the Edit icon under the System Status section.
Dashboard > Edit System Status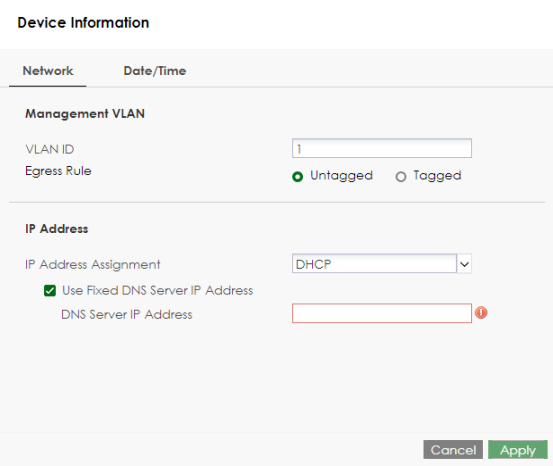
The following table describes the labels in this screen.
label | description |
|---|---|
Management VLAN | |
VLAN ID | Enter a VLAN ID between 1 and 4090 for your PoE12-3PD to join. The default VLAN ID is 1. Your PC needs to be in the same VLAN group as the PoE12-3PD in order to access the Web Configurator. |
Egress Rule | Select to tag or untag outgoing data for the management VLAN. • Untagged • Tagged |
IP Address | |
IP Address Assignment | Select how the PoE12-3PD gets its IP address. DHCP - Select this if there is a DHCP server that can assign the PoE12-3PD an IP address, subnet mask, a default gateway IP address and a domain name server IP address automatically. Static - Select this if you do not have a DHCP server or if you wish to assign static IP address information to the PoE12-3PD. You need to fill in the following fields when you select this option. |
Use Fixed DNS Server IP Address | Select this to specify an IP address for the Domain Name System (DNS) Server. |
IP Address | Enter the IP address of your PoE12-3PD in dotted decimal notation. |
Subnet Mask | Enter the IP subnet mask in dotted decimal notation, for example, 255.255.255.0. |
Gateway | Enter the default gateway of the PoE12-3PD. |
DNS Server IP Address | Enter a specific IP address for the DNS Server. |
Cancel | Click this to reset the fields to the previous configuration. |
Apply | Click this to save your changes to the PoE12-3PD. |
Date/Time
For effective scheduling and logging, the PoE12-3PD system time must be accurate. The PoE12-3PD has a software mechanism to set the time manually or get the current time and date from an external server.
To access this screen, click the Edit icon under the System Status section and click Date/Time.
Dashboard > Edit System Status > Date/Time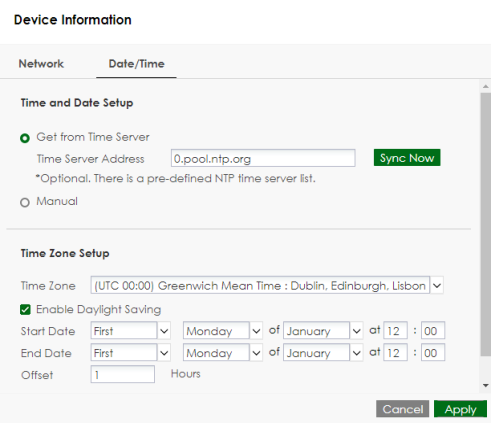
The following table describes the labels in this screen.
label | description |
|---|---|
Time and Date Setup | |
Get from time server | Select this to have the PoE12-3PD get the time from the time server. The PoE12-3PD requests time and date settings from the time server under the following circumstances. • When the PoE12-3PD starts up. • When you click Apply after selecting Get from time server in this screen. • 24-hour intervals after starting up. |
Time Server Address | Enter the IP address or URL of your time server. Check with your ISP/network administrator if you are unsure of this information. |
Sync Now | Click this button to have the PoE12-3PD get the time and date from a time server (see the Time Server Address field). This also saves your changes (except the daylight saving settings). |
Manual | Select this to enter or select the time and date manually. When you enter the time and date settings manually, the PoE12-3PD uses the new settings once you click Apply. |
New Time (hh:mm:ss) | This field displays the last updated time from the time server or the last time configured manually. When you set Time and Date Setup to Manual, enter the new time in this field and then click Apply. |
New Date (yyyy-mm-dd) | This field displays the last updated date from the time server or the last date configured manually. When you set Time and Date Setup to Manual, enter the new date in this field and then click Apply. |
Time Zone Setup | |
Time Zone | Choose the timezone of the PoE12-3PD’s location. This will set the time difference between your timezone and Coordinated Universal Time (UTC). |
Enable Daylight Saving | Daylight savings is a period from late spring to early fall when many countries set their clocks ahead of normal local time by one hour to give more daytime light in the evening. Select this option if your country observes Daylight Saving Time. |
Start Date | Configure the day and time when Daylight Saving Time starts if you selected Enable Daylight Saving. The at field uses the 24 hour format. Here are a couple of examples: Daylight Saving Time starts in most parts of the United States on the second Sunday of March. Each time zone in the United States starts using Daylight Saving Time at 2 A.M. local time. So in the United States you would select Second, Sunday, March and type 2 in the at field. Daylight Saving Time starts in the European Union on the last Sunday of March. All of the time zones in the European Union start using Daylight Saving Time at the same moment (1 A.M. UTC). So in the European Union you would select Last, Sunday, March. The time you type in the at field depends on your time zone. In Germany for instance, you would type 2 because Germany's time zone is one hour ahead of UTC (UTC+1). |
End Date | Configure the day and time when Daylight Saving Time ends if you selected Enable Daylight Saving. The at field uses the 24 hour format. Here are a couple of examples: Daylight Saving Time ends in the United States on the first Sunday of November. Each time zone in the United States stops using Daylight Saving Time at 2 A.M. local time. So in the United States you would select First, Sunday, November and type 2 in the at field. Daylight Saving Time ends in the European Union on the last Sunday of October. All of the time zones in the European Union stop using Daylight Saving Time at the same moment (1 A.M. UTC). So in the European Union you would select Last, Sunday, October. The time you type in the at field depends on your time zone. In Germany for instance, you would type 2 because Germany's time zone is one hour ahead of UTC (UTC+1). |
Offset | Specify how much the clock changes when daylight saving begins and ends. Enter a number from 1 to 5.5 (by 0.5 increments). For example, if you set this field to 3.5, a log occurred at 6 P.M. in local official time will appear as if it had occurred at 9:30 P.M. |
Cancel | Click this to reset the fields to the previous configuration. |
Apply | Click this to save your changes to the PoE12-3PD. |
Pre-defined NTP Time Servers List
When you turn on the PoE12-3PD for the first time, the PoE12-3PD then attempts to synchronize with one of the following pre-defined list of Network Time Protocol (NTP) time servers in order from the first one until it is successful.
time.windows.com |
time.apple.com |
time.cloudflare.com |
The PoE12-3PD continues to use the pre-defined list of NTP time servers if you do not specify a time server or it cannot synchronize with the time server you specified.
Device Setting
To access this screen, click the Edit icon under the Device Information section.
Dashboard > Edit Device Information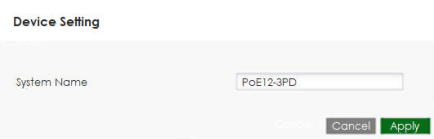
The following table describes the labels in this screen.
label | description |
|---|---|
System Name | Enter a system name for the PoE12-3PD. |
Cancel | Click this to reset the fields to the previous configuration. |
Apply | Click this to save your changes to the PoE12-3PD. |
Port Settings
To access this screen, click the Edit icon under the Port Settings and Neighbor section.
Dashboard > Edit Port Settings and Neighbor 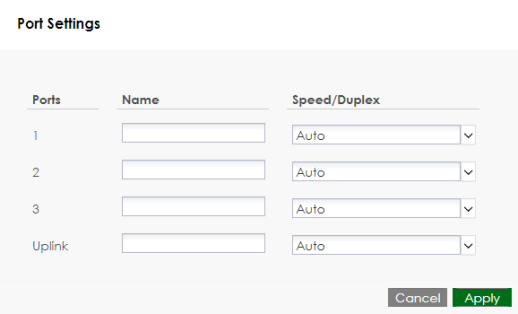
The following table describes the labels in this screen.
label | description |
|---|---|
Ports | This displays the Ethernet ports on the PoE12-3PD. |
Name | Enter a name for the port. |
Speed/Duplex | Select the link speed and duplex mode for the port. |
Cancel | Click this to reset the fields to the previous configuration. |
Apply | Click this to save your changes to the PoE12-3PD. |