Introduction
Overview
The PoE12-3PD is a 4-port PoE extender that extends Gigabit data and IEEE 802.3at/802.3af PoE (Power over Ethernet) through standard 100-meter (328 feet) Cat5e cables.
The PoE12-3PD is installed between a PoE switch or PoE injector and the Powered Devices (PDs). The PoE12-3PD is powered by a PoE switch or PoE injector through the UPLINK port over an Ethernet cable. The PoE12-3PD transmits PoE power and data to PDs not within reach of a power outlet through ports 1-3 and can be up to 100 meters from the PoE switch.
features | PoE12-3PD |
|---|---|
Number of 10 Mbps/100 Mbps/1 Gbps PoE ports | 4 |
Reset button | Yes |
Wall mounting | Yes |
Pole mounting | Yes |
Power over Ethernet (PoE) Example Application
The following example figure shows a PoE12-3PD supplying IEEE 802.3at PoE power and Internet traffic to PDs such as an AP, an IP camera, or an IP phone.
PoE Example Application 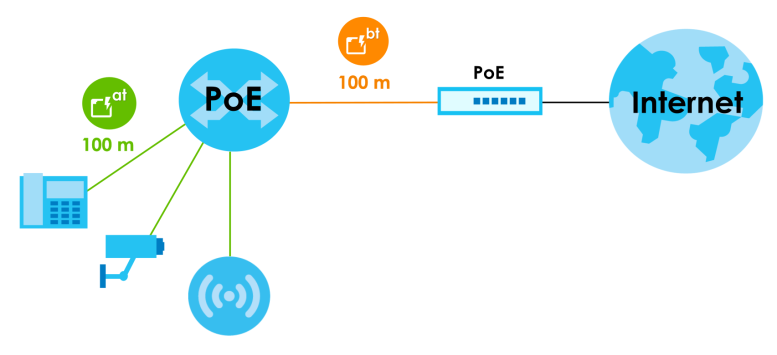
Features
The following are the essential features of the PoE12-3PD.
• Supports IEEE 802.3 10Base-T Ethernet, IEEE 802.3u 100Base-Tx Ethernet, IEEE 802.3ab 1000Base-T Ethernet.
• 10 Mbps / 100 Mbps /1 Gbps Ethernet RJ-45 ports.
• The UPLINK port supports IEEE 802.3bt PoE standard. The ports 1-3 support IEEE 802.3at and IEEE 802.3af PoE standard.
• Supports IEEE 802.3x flow control.
• Supports up to 2K MAC addresses.
•
Power over Ethernet (PoE)
The PoE12-3PD provides a source of power through its Ethernet ports. Each device that receives power through an Ethernet port is a Powered Device (PD). The PoE12-3PD can adjust the power supplied to each PD according to the PoE standard the PD supports.
The following are the PoE standards for PoE12-3PD:
• IEEE 802.3af Power over Ethernet / PoE
• IEEE 802.3at Power over Ethernet / PoE+
• IEEE 802.3bt Power over Ethernet / PoE++
The following table describes the PoE12-3PD’s PoE information.
PORTS | pOe StandardS | pOe POWER BUDGET |
|---|---|---|
Port 1 / Port 2 / Port 3 | IEEE 802.3af IEEE 802.3at | The PoE power budget depends on the PoE standard the uplink PoE switch or PoE injector supports: • 802.3af - 7 Watts • 802.3at - 19 Watts • 802.3bt - 45 Watts |
UPLINK Port | IEEE 802.3af IEEE 802.3at IEEE 802.3bt |
pOe features | pOe | pOe+ | POe++ |
|---|---|---|---|
IEEE Standard | IEEE 802.3af | IEEE 802.3at | IEEE 802.3bt |
PoE Type | Type 1 | Type 2 | Type 3 |
PoE12-3PD Port Power | |||
IEEE Power Classification | Class 0, 1, 2, 3 | Class 4 | Class 5, 6 |
Maximum Power Per Port | 15.4 Watts | 30 Watts | 60 Watts |
Port Voltage Range | 44-57V | 50-57V | 50-57V |
Cables | |||
Twisted Pairs Used | 2-pair | 2-pair | 4-pair |
Supported Ethernet Cables | Cat3/24 AWG or better | Cat5 or better/24 AWG or better | Cat5 or better/24 AWG or better |
How to Manage your PoE12-3PD
You can use the following way to manage your PoE12-3PD.
• Nebula Control Center Web Portal: Use the NCC web portal to monitor your PoE12-3PD. You can register your PoE12-3PD to a site and organization using the NCC web portal. See NCC Web Portal for more information.
• Nebula Mobile App: Use the Nebula mobile app to monitor your PoE12-3PD. You can register your PoE12-3PD to a site and organization using the Nebula Mobile app. Download the Nebula Mobile app at Apple Store or Google Play. See Nebula Mobile App for more information.
• ZON Utility: Zyxel One Network (ZON) Utility is a utility tool that assists you to set up and maintain network devices in a simple and efficient way. You can download the ZON Utility at www.zyxel.com and install it on your computer (Windows operating system). See ZON Utility for more information.
• Web Configurator: This is recommended for everyday management of PoE12-3PD using a supported web browser. See Dashboard for more information.
Management MethodS | When to use it |
|---|---|
Nebula Mobile App | Registration, monitoring and basic management |
NCC Web Portal | Registration, monitoring and basic management |
ZON Utility | Monitoring and basic management |
PoE12-3PD Web Configurator | Advanced management |
NCC Management
You can manage the PoE12-3PD with the Nebula Control Center (NCC). The NCC is a cloud-based network management system that allows you to remotely monitor the Zyxel Nebula Security Appliances (SA), Ethernet Switches (S), PoE12-3PD (PoE) and Access Points (AP).
NCC Example Network Topology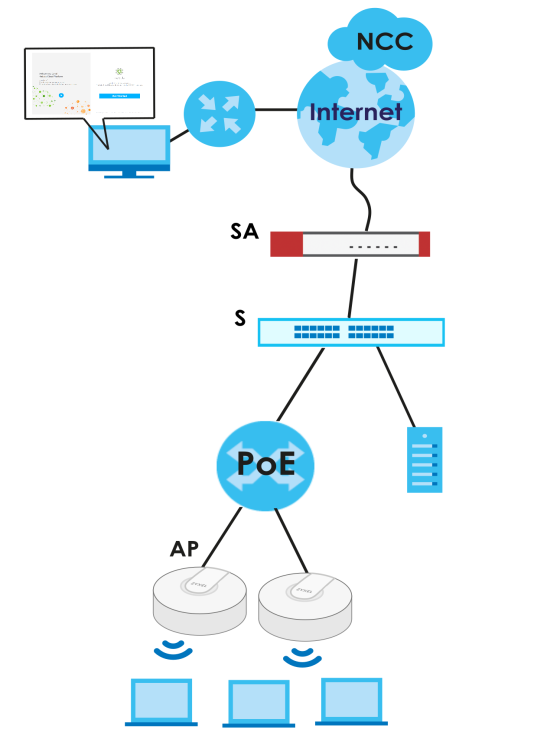
You need to create a Zyxel Account to log into the NCC first. You can access the NCC through the NCC web portal through a web browser on your computer or the Nebula Mobile app on your smartphone.
For advanced configurations, use the PoE12-3PD Web Configurator.
See the NCC User’s Guide for how to monitor the PoE12-3PD using Nebula.
The PoE12-3PD goes into Cloud mode automatically after it can access the Nebula web portal and is successfully registered there. Its login password and settings are then overwritten with what you have configured in the Nebula web portal. To access the Web Configurator when the PoE12-3PD is in Cloud mode, use the Local credentials password to login.
modeS | access | login user name | login password | login ip address/URL/Domain name |
|---|---|---|---|---|
Cloud mode | NCC Portal | Zyxel Account email | Zyxel Account password | |
Web Configurator (Local GUI) | admin | Local credentials password | https://DHCP-assigned IP OR a configured static IP address | |
Standalone mode | Web Configurator | admin | 1234 | https://DHCP-assigned IP OR https://192.168.1.1 |
NCC Web Portal
To have NCC monitor the PoE12-3PD, you must first register it at the Nebula web portal at https://nebula.zyxel.com, and ensure that Nebula Discovery is enabled in Dashboard in the PoE12-3PD Web Configurator.
From Standalone to NCC Management
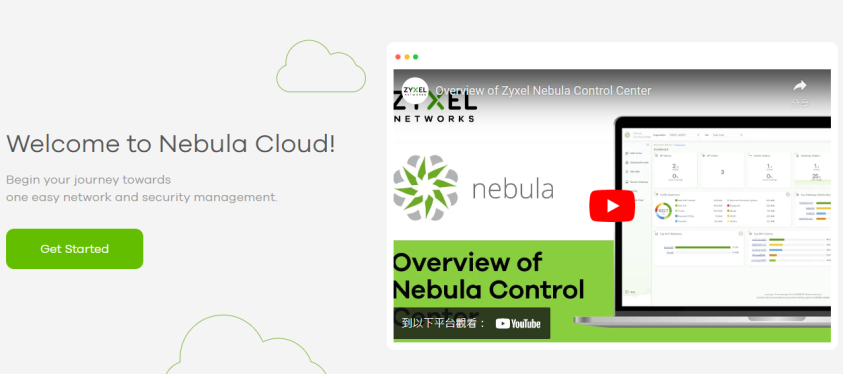
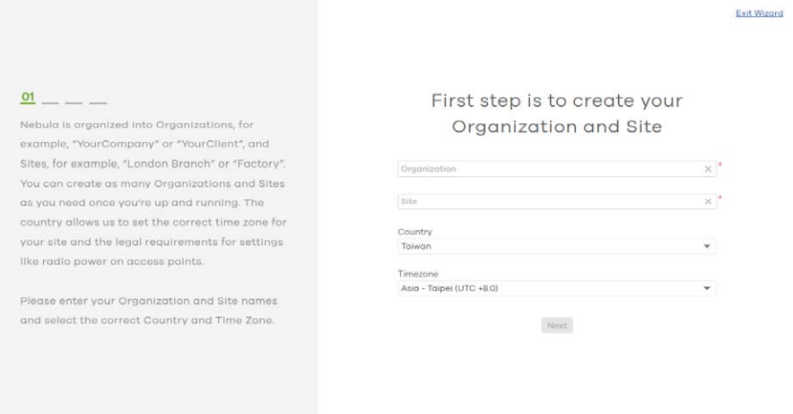
2 The login screen displays. Enter your Zyxel Account information to log in. If you do not have one, click Create account. You will be redirected to another screen where you can sign up for a Zyxel account.
3 Click Create organization to create an organization and a site (using the Nebula setup wizard), or select an existing site.
4 If you are creating the first organization under your account, click Let’s Start to begin.
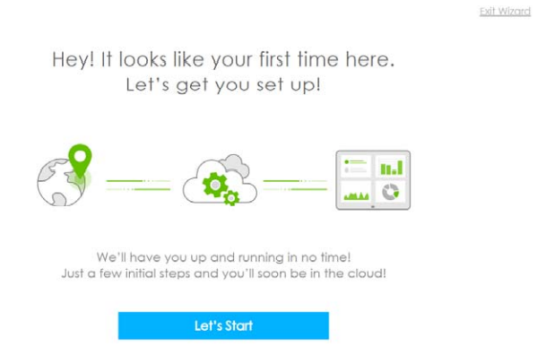
5 Enter a descriptive name for your organization and site. Both names must consist of 1 to 64 characters.
6 Select the time zone of your location. This will set the time difference between your time zone and Coordinated Universal Time (UTC).
7 Click Next to continue.
8 Enter your PoE12-3PD MAC address and serial number. Enter a descriptive name for your PoE12-3PD.
9 Click the +Add button to register and add the PoE12-3PD to the site. You can register multiple PoE12-3PD at a time.
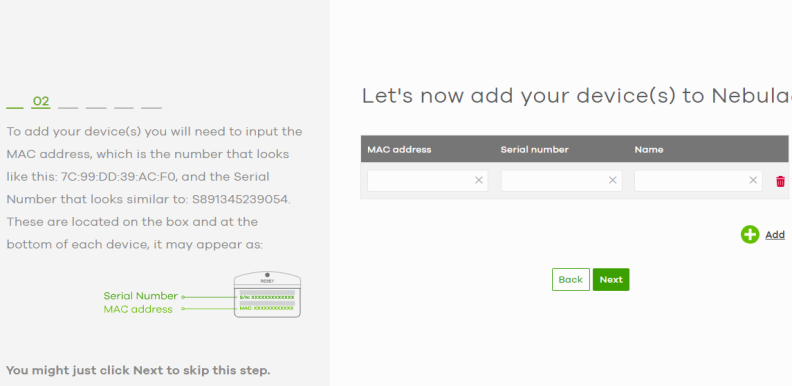
10 Click Next to proceed to setting up your WiFi network and guest WiFi network.
 Your default Web Configurator login password will be changed when you register your PoE12-3PD at NCC. Make sure to check the changed password and change it to your preferred one before logging in the Web Configurator. The password must be at least 4 characters long, including one letter and one number. [ ? ], [ | ], [ ' ], [ " ], [ , ] or [ space ] are not allowed.
From NCC Management to Standalone
To return to direct management standalone mode, remove (unregister) the PoE12-3PD from the inventory in the Nebula web portal.
When you change the PoE12-3PD’s management mode from Cloud mode to standalone mode, the PoE12-3PD will restore its factory-default settings.To unregister the PoE12-3PD:
1 Go to the Nebula Control Center (https://nebula.zyxel.com).
2 Go to the Organization-wide > License & inventory > Devices screen.
3 Select the PoE12-3PD you want to remove (unregister) from the organization.
4 Click Actions, then click Remove from organization.
Nebula Mobile App
1 Download and open the Zyxel Nebula Mobile app in your mobile device. Click Start on the first page. Click Create account to create a Zyxel Account or enter your existing account information to log in.
2 Create an organization and site, or select an existing site using the Zyxel Nebula Mobile app.
3 Select a site and scan the PoE12-3PD QR code or manually enter the information to add it to the site. You can find the QR code:
• On the device label
• On the box
• In the Web Configurator at Dashboard
See LEDs for more information about the Cloud mode LED or Dashboard for more information about the Management Mode field in the Dashboard screen to see if the PoE12-3PD goes into the Cloud mode successfully.
ZON Utility
ZON Utility (Zyxel One Network) is a program designed to help you deploy and manage a network more efficiently. It detects devices automatically and allows you to do basic settings on devices in the network without having to be near it.
The ZON Utility issues requests via Zyxel Discovery Protocol (ZDP) and in response to the query, the device responds back with basic information including IP address, firmware version, location, system and model name in the same broadcast domain. The information is then displayed in the ZON Utility screen and you can perform tasks like basic configuration of the devices and batch firmware upgrade in it. You can download the ZON Utility at www.zyxel.com and install it on your computer (Windows operating system).
Requirements
Before installing the ZON Utility on your computer, please make sure it meets the requirements listed below.
Operating System
At the time of writing, the ZON Utility is compatible with:
• Windows 7 (both 32-bit / 64-bit versions)
• Windows 8 (both 32-bit / 64-bit versions)
• Windows 8.1 (both 32-bit / 64-bit versions)
• Windows 10 (both 32-bit / 64-bit versions)
• Windows 11 (64-bit version)
To check for your Windows operating system version, right-click on My Computer > Properties on your computer. You should see this information in the General tab.It is suggested that you install Npcap, the packet capture library for Windows operating systems, and remove WinPcap or any other installed packet capture tools before you install the ZON utility.Hardware
Here are the minimum hardware requirements to use the ZON Utility on your computer.
• Core i3 processor
• 2 GB RAM
• 100 MB free hard disk
• WXGA (Wide XGA 1280x800)
Run the ZON Utility
1 Double-click the ZON Utility to run it.
2 Select a network adapter to which your supported devices are connected.
Network Adapter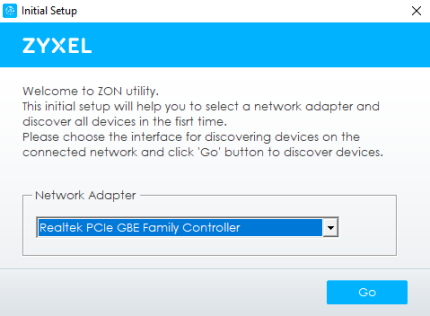
3 Click the Go button for the ZON Utility to discover all supported devices in your network.
Discovery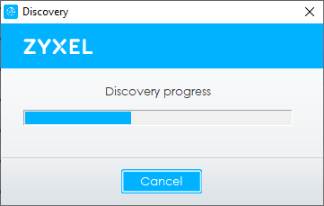
4 The ZON Utility screen shows the devices discovered.
ZON Utility Screen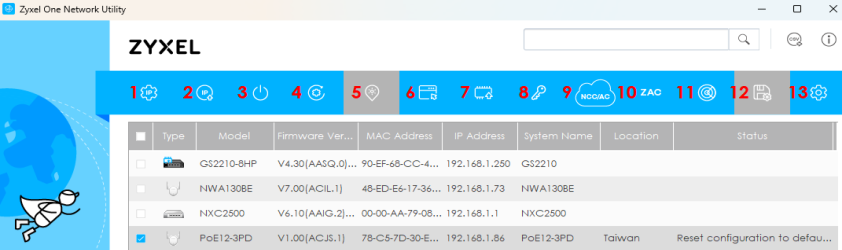
5 Select a device and then use the icons to perform actions. Some functions may not be available for your devices.
You must know the selected device admin password before taking actions on the device using the ZON Utility icons. If the selected device is being managed or has been managed by the NCC, check Local credentials in the NCC's Site-wide > Configure > Site settings screen for the selected device's current password.Password Prompt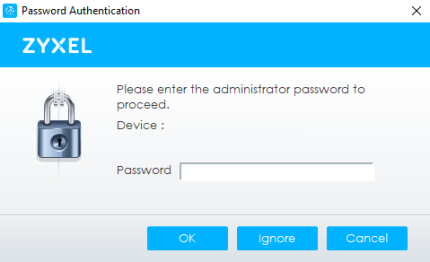
The following table describes the icons numbered from left to right in the ZON Utility screen.
icon | DESCRIPTION |
|---|---|
1 IP Configuration | Change the selected device’s IP address. |
2 Renew IP Address | Update a DHCP-assigned dynamic IP address. |
3 Reboot Device | Use this icon to restart the selected device(s). This may be useful when troubleshooting or upgrading new firmware. |
4 Reset Configuration to Default | Use this icon to reload the factory-default configuration file. This means that you will lose all previous configurations. |
5 Locator LED | Use this icon to locate the selected device by causing its Locator LED to blink. |
6 Web GUI | Use this to access the selected device Web Configurator from your browser. You will need a username and password to log in. |
7 Firmware Upgrade | Use this icon to upgrade new firmware to selected device(s) of the same model. Make sure you have downloaded the firmware from the Zyxel website to your computer and unzipped it in advance. The ZON only supports a standalone mode AP for the firmware upgrade, it does not support to upgrade the firmware for a managed mode AP. |
8 Change Password | Use this icon to change the admin password of the selected device. You must know the current admin password before changing to a new one. |
9 Configure NCC Discovery | The option is available if the selected device supports Nebula Control Center (NCC) discovery. You must have Internet access to use this feature. Use this icon on the selected device to enable or disable the Nebula Control Center (NCC) discovery feature. If the feature is enabled, the selected device will try to connect to the NCC. If the selected device has successfully connected to the NCC and is registered on the NCC, it will change to the Nebula cloud mode. |
9 Configure Controller Discovery and NCC Discovery | The option is available if the selected device supports AP controller discovery or Nebula Control Center (NCC) discovery. You must have Internet access to use this feature. Use this icon on the selected device to enable or disable the: • AP controller discovery feature • Nebula Control Center (NCC) discovery feature If the feature is enabled, the selected device will try to connect to the AP controller/NCC. If the selected device has successfully connected to an AP controller, it will change to the AP controller managed mode. If the selected device has successfully connected to the NCC and is registered on the NCC, it will change to the Nebula cloud mode. |
10 ZAC | Use this icon to run the Zyxel AP Configurator of the selected AP. |
11 Clear and Rescan | Use this icon to clear the list and discover all devices on the connected network again. |
12 Save Configuration | Use this icon to save configuration changes to permanent memory on a selected device. |
13 Settings | Use this icon to select a network adapter for the computer on which the ZON utility is installed, and the utility language. |
The following table describes the fields in the ZON Utility main screen.
label | description |
|---|---|
Type | This field displays an icon of the kind of device discovered. |
Model | This field displays the model name of the discovered device. |
Firmware Version | This field displays the firmware version of the discovered device. |
MAC Address | This field displays the MAC address of the discovered device. |
IP Address | This field displays the IP address of an internal interface on the discovered device that first received an ZDP discovery request from the ZON utility. |
System Name | This field displays the system name of the discovered device. |
Location | This field displays where the discovered device is. |
Status | This field displays whether changes to the discovered device have been done successfully. As the PoE12-3PD does not support IP Configuration, Renew IP address and Flash Locator LED, this field displays “Update failed”, “Not support Renew IP address” and “Not support Flash Locator LED” respectively. |
NCC Discovery | This field displays if the discovered device supports the Nebula Control Center (NCC) discovery feature. If the feature is enabled, the selected device will try to connect to the NCC. If the selected device has successfully connected to the NCC and is registered on the NCC, it will change to the Nebula cloud mode. |
Controller Discovery | This field displays if the discovered device supports the: • AP controller discovery feature. • Nebula Control Center (NCC) discovery feature. If the feature is enabled, the selected device will try to connect to the AP controller/NCC. If the selected device has successfully connected to an AP controller, it will change to the AP controller managed mode. If the selected device has successfully connected to the NCC and is registered on the NCC, it will change to the Nebula cloud mode. |
Serial Number | Enter the admin password of the discovered device to display its serial number. |
Hardware Version | This field displays the hardware version of the discovered device. |
IPv6 Address | This field displays the IPv6 address of an internal interface on the discovered device that first received an ZDP discovery request from the ZON utility. |
If you want to check the supported models and firmware versions later, you can click the Show information about ZON icon in the upper right hand corner of the screen. Then select the Supported model and firmware version link. If your device is not listed here, see the device release notes for ZON Utility support. The release notes are in the firmware zip file on the Zyxel web site.
ZON Utility Screen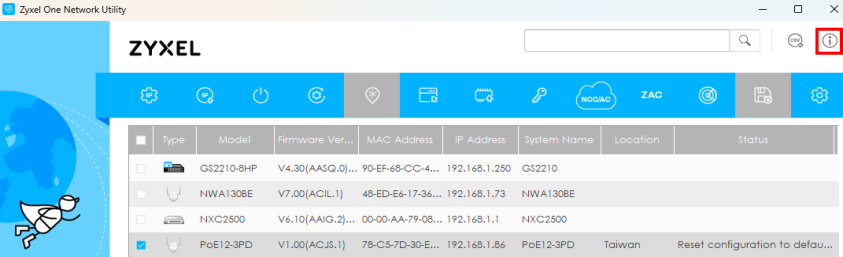
Good Habits for Managing the PoE12-3PD
Do the following things regularly to make the PoE12-3PD more secure and to manage the PoE12-3PD more effectively.
• Change the password. Use a password that is not easy to guess and that consists of different types of characters, such as numbers and letters.