Configure
Use the Configure menus to configure interface addressing, firewall, site-to-site VPN, captive portal, traffic shaping, authentication server and other gateway settings for the Nebula Device of the selected site.
Interface
Use this screen to configure network interfaces on the Nebula Device. An interface consists of a port group, a VLAN ID, and an IP address, plus other configuration settings.
To access this screen, click Site-wide > Configure > Security router > Interface.
Site-wide > Configure > Security router > Interface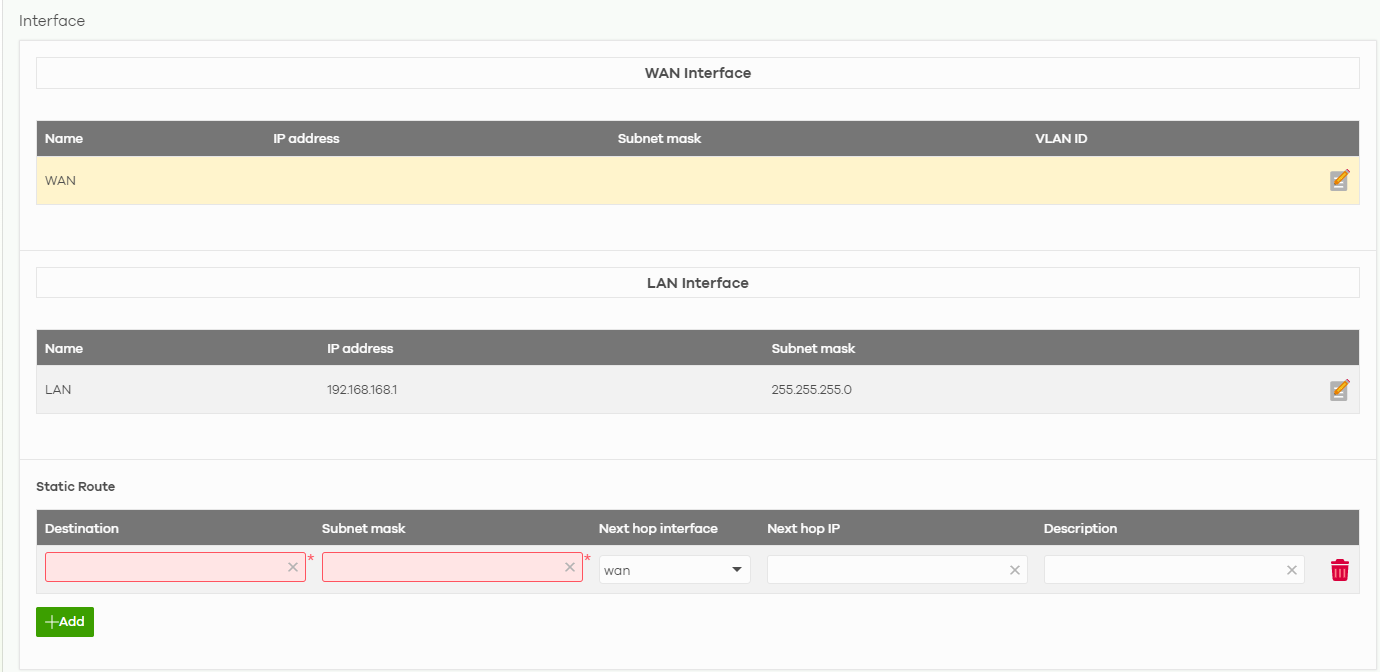

The following table describes the labels in this screen.
Label | Description |
|---|---|
WAN Interface | |
Name | This field is read-only. |
IP address | This shows the IP address for this interface. |
Subnet mask | This shows the subnet mask of this interface in dot decimal notation. The subnet mask indicates what part of the IP address is the same for all computers in the network. |
VLAN ID | This shows the VLAN ID. This 12-bit number uniquely identifies each VLAN. Allowed values are 2 – 4094. (0, 1 and 4095 are reserved.) |
 | Click the edit icon to modify the interface. |
LAN Interface | |
Name | This field is read-only if you are editing an existing LAN interface. Specify a name for the interface. The format of interface names is strict. Each name consists of 2 – 4 letters (interface type), followed by a number (x). For most interfaces, x is limited by the maximum number of the type of interface. For VLAN interfaces, x is defined by the number you enter in the VLAN name field. For example, VLAN interfaces are vlan0, vlan1, vlan2, and so on. |
IP address | This is the IP address for this interface. |
Subnet mask | This is the subnet mask of this interface in dot decimal notation. The subnet mask indicates what part of the IP address is the same for all computers in the network. |
 | Click the edit icon to modify it. |
Static Route | |
Destination | Enter the destination IP address. |
Subnet mask | Enter an IP subnet mask. The route applies to all IP addresses in the subnet. |
Next hop interface | Select the interface you want to send all traffic to. |
Next hop IP | Enter the IP address of the next-hop gateway. |
Description | This is the descriptive name of the static route. |
 | Click this icon to modify a static route. |
 | Click this icon to remove a static route. |
Add | Click this button to create a new static route. |
WAN Interface Configuration
Click the Edit button in the WAN Interface section to open the Security router > Configure > Interface > WAN interface configuration screen.
Site-wide > Configure > Security router > Interface > WAN interface configuration

The following table describes the labels in this screen.
label | description |
|---|---|
Interface properties | |
Interface name | Specify a name for the WAN interface. |
SNAT | Select this to enable SNAT. When enabled, the Nebula Device rewrites the source address of packets being sent from this interface to the interface's IP address. |
VLAN | Select On to enable the VLAN feature on the WAN interface. Otherwise, select Off. |
VLAN ID | Enter the VLAN ID. This 12-bit number uniquely identifies each VLAN. Allowed values are 2 – 4094. (0, 1 and 4095 are reserved.) |
Type | Select the type of interface to create. DHCP: The interface will automatically get an IP address and other network settings from a DHCP server. Static: You must manually configure an IP address and other network settings for the interface. PPPoE: The interface will authenticate with an Internet Service Provider, and then automatically get an IP address from the ISP's DHCP server. You can use this type of interface to connect to a DSL modem. PPPoE with static IP: Assign a static IP address to the WAN interface and your WAN interface is getting an Internet connection from a PPPoE server. |
IP address assignment | These fields are displayed if you select Static. |
IP address | Enter the static IP address of this interface. |
Subnet mask | Enter the subnet mask for this interface’s IP address. |
Default gateway | Enter the IP address of the Nebula Device through which this interface sends traffic. |
First DNS server | Enter a DNS server's IP address. The Domain Name System (DNS) maps a domain name to an IP address and vice versa. The Nebula Device uses the first and second DNS servers, in that order to resolve domain names for VPN, DDNS and the time server. Leave the field blank if you do not want to configure DNS servers. |
Second DNS server | Enter the IP address of another DNS server. This field is optional. |
These fields are displayed if you selected PPPoE or PPPoE with static IP. | |
Username | Enter the user name provided by your ISP. You can use up to 31 alphanumeric characters and the underscore. Spaces are not allowed. |
Password | Enter the password provided by your ISP. You can use up to 64 alphanumeric characters and the underscore. Spaces are not allowed. |
IP address assignment | |
IP address | Enter the static IP address of this interface. |
DNS server | Enter a DNS server's IP address. The Domain Name System (DNS) maps a domain name to an IP address and vice versa. The Nebula Device uses the first and second DNS servers, in that order to resolve domain names for VPN, DDNS and the time server. Leave the field blank if you do not want to configure DNS servers. |
ADVANCED OPTIONS | |
Connection trigger | Select when to have the Nebula Device establish the PPP connection. Auto connect – select this to not let the connection time out. On demand – select this to automatically bring up the connection when the Nebula Device receives packets destined for the Internet. |
PPPoE passthrough | Select this to allow up to ten hosts on the LAN to use PPPoE client software on their computers to connect to the ISP through the Nebula Device. Each host can have a separate account and a public WAN IP address. PPPoE passthrough is an alternative to NAT for application where NAT is not appropriate. Disable PPPoE passthrough if you do not need to allow hosts on the LAN to use PPPoE client software on their computers to connect to the ISP. |
IGMP proxy | Select this to allow the Nebula Device to act as an IGMP proxy for hosts connected on the IGMP downstream interface. |
Cancel | Click Cancel to exit this screen without saving. |
OK | Click OK to save your changes. |
LAN Interface Configuration
Click the Add button or click the Edit button in the LAN interface section to open the Site-wide > Configure > Security router > Interface > LAN interface configuration screen.
Site-wide > Configure > Security router > Interface > LAN interface configuration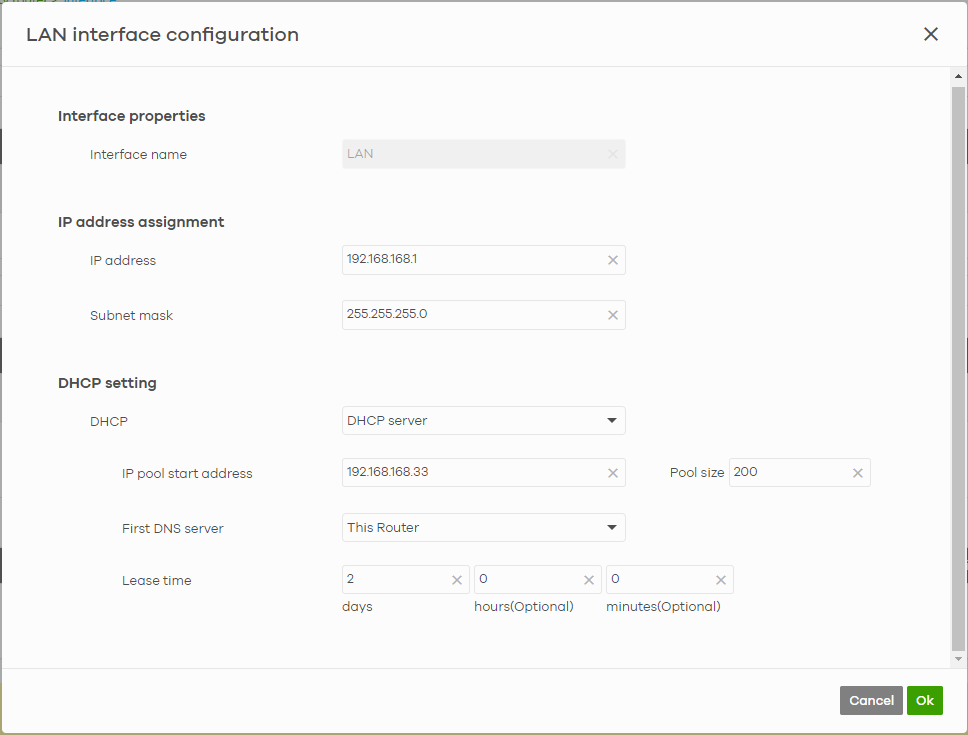

The following table describes the labels in this screen.
label | description |
|---|---|
Interface properties | |
Interface name | Specify a name for the LAN interface. |
IP address assignment | |
IP address | Enter the IP address for this interface. |
Subnet mask | Enter the subnet mask of this interface in dot decimal notation. The subnet mask indicates what part of the IP address is the same for all computers in the network. |
DHCP setting DHCP | Select what type of DHCP service the Nebula Device provides to the network. Choices are: None – the Nebula Device does not provide any DHCP services. There is already a DHCP server on the network. DHCP relay – the Nebula Device routes DHCP requests to one or more DHCP servers you specify. The DHCP servers may be on another network. DHCP server – the Nebula Device assigns IP addresses and provides subnet mask, gateway, and DNS server information to the network. The Nebula Device is the DHCP server for the network. |
This field appear if the Nebula Device is a DHCP Relay. | |
DHCP server | Enter the IP address of a DHCP server for the network. |
These fields appear if the Nebula Device is a DHCP Server. | |
IP pool start address | Enter the IP address from which the Nebula Device begins allocating IP addresses. If you want to assign a static IP address to a specific computer, use the Static DHCP Table. If this field is blank, the Pool Size must also be blank. In this case, the Nebula Device can assign every IP address allowed by the interface’s IP address and subnet mask, except for the first address (network address), last address (broadcast address) and the interface’s IP address. |
First DNS Server | Specify the IP addresses of up to two DNS servers for the DHCP clients to use. Use one of the following ways to specify these IP addresses. Custom Defined – enter a static IP address. From ISP – select the DNS server that another interface received from its DHCP server. This Router – the DHCP clients use the IP address of this interface and the Nebula Device works as a DNS relay. |
Second DNS Server | Enter the IP address of another DNS server. This field is optional. |
Lease Time | Specify how long each computer can use the information (especially the IP address) before it has to request the information again. days, hours, and minutes (Optional) – enter how long IP addresses are valid. |
Cancel | Click Cancel to exit this screen without saving. |
OK | Click OK to save your changes. |
Threat Management
Use this screen to enable the threat management categories such as:
• Ransomware and malware prevention that protects LAN clients from accessing or downloading harmful web contents.
• Intrusion blocker that prevents personal data theft in your network.
• Dark Web blocker that prevents unauthorized access from TOR proxies to the LAN clients.
• Stop mail fraud and phishing that blocks access by your LAN clients to phishing websites and SPAM URLs.
• Ads blocker that prevents access to websites containing annoying advertisements with links to harmful programs.
• VPN proxy blocker that prevents LAN clients connected to the Nebula Device from sending personal data to a cybercriminal’s VPN gateway.
You can also configure the following:
• Up to 50 exception list, using the Nebula Device connected client device’s name or IP address
• Up to 50 allowed domain name list
• Up to 50 blocked domain name list.
Click Site-wide > Configure > Security router > Threat management to access this screen.
Site-wide > Configure > Security router > Threat management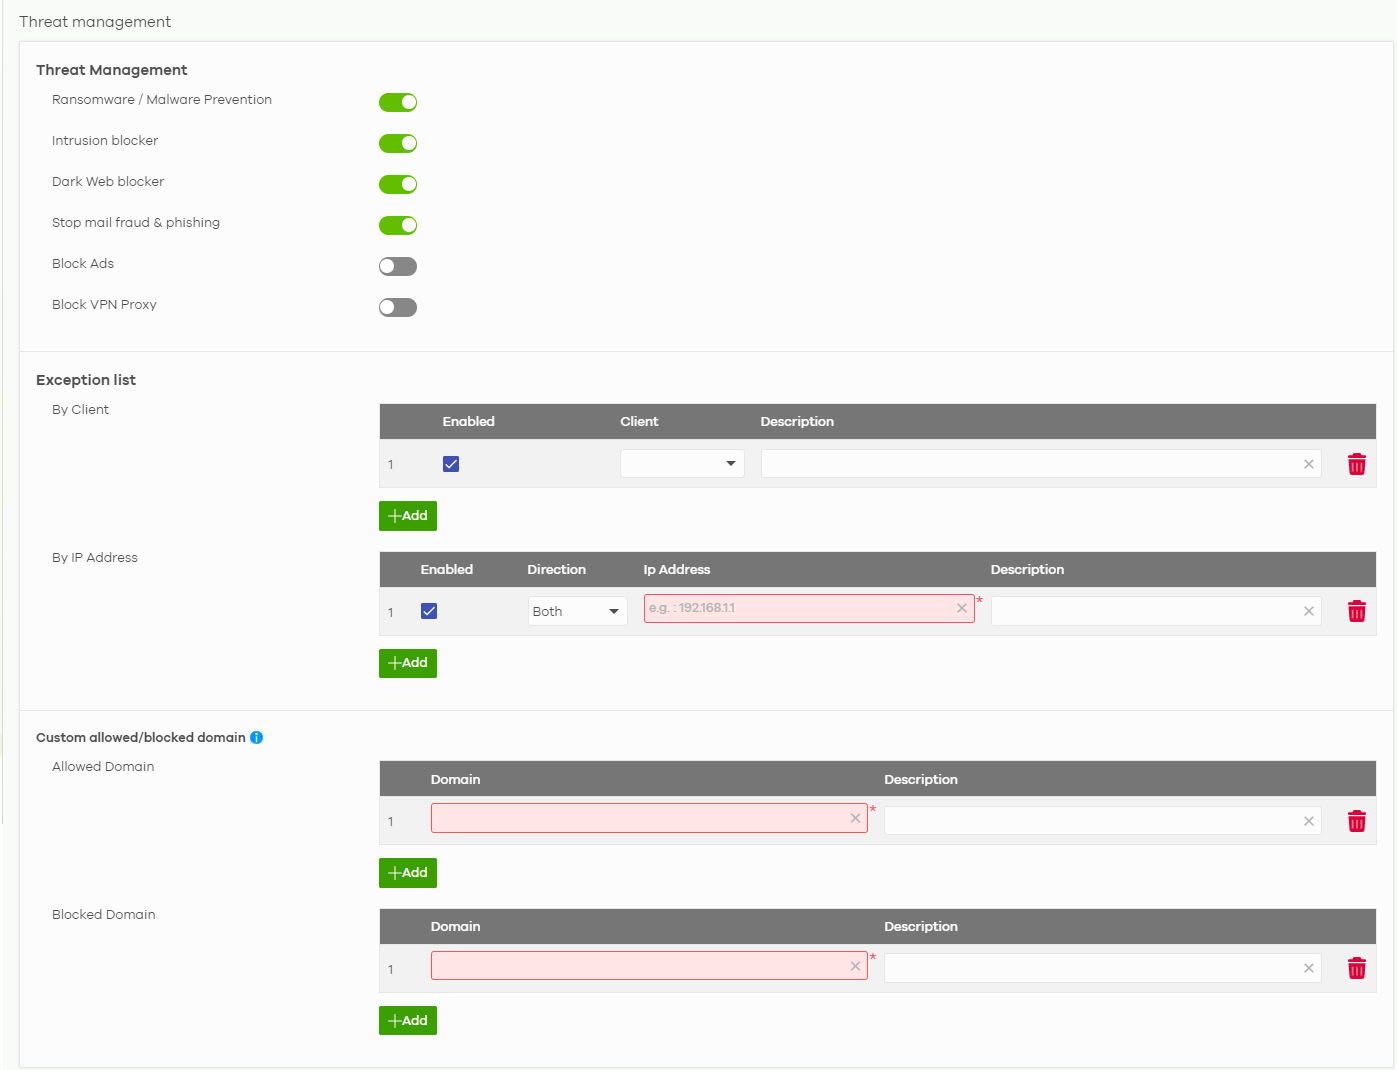

The following table describes the labels in this screen.
Label | Description |
|---|---|
Threat management | |
Ransomware / Malware | Ransomware and malware prevention protects the LAN clients connected to the Nebula Device from accessing or downloading harmful web content. These contents may contain files that could harm your operating system and personal files. Click the switch to enable ransomware/malware protection on the Nebula Device. |
Intrusion blocker | Intrusion blocker prevents cybercriminals from harming, spying, or stealing personal data in your network. Click the switch to enable intrusion blocker protection on the Nebula Device. |
Dark Web blocker | The Dark Web is an anonymous network accessed by browsers such as TOR. The purpose of the Dark Web is to enable anonymous access to content and prevent the identification of both the request and destination. The dark web blocker prevents unauthorized access from TOR proxies to the LAN clients connected to the Nebula Device. Click the switch to enable dark web blocker protection on the browsers of LAN clients connected to the Nebula Device. |
Stop mail fraud & phishing | Mail fraud and phishing sites protection blocks access by your LAN clients to phishing websites and spam URLs. Click the switch to enable mail fraud and phishing protection on the browsers of LAN clients connected to the Nebula Device. |
Block Ads | Ad blocking or ad filtering prevents exposure to websites containing advertisements with links to harmful programs. Click the switch to enable ads blocker protection on the browsers of LAN clients connected to the Nebula Device. |
Block VPN Proxy | VPN proxy blocker prevents the LAN clients connected to the Nebula Device from sending personal data to a cybercriminal’s VPN gateway. Click the switch to enable VPN proxy blocker protection on the browsers of LAN clients connected to the Nebula Device. |
Exception list | Both wired and WiFi LAN clients connected to the Nebula Device in this list will bypass the threat management category check. |
By Client | Enabled – Select this option to turn on this client exception profile. This allows both wired and WiFi LAN clients connected to the Nebula Device to bypass the threat management category check. Select the Client from the drop-down list. See WiFi Client Details and Wired Client Details for more information on WiFi and wired clients. Enter a Description of the allowed client. You can use alphanumeric and ()+/:=?!*#@$_%- characters, and it can be up to 512 characters long. |
 | Click this icon to remove the client exception profile. |
Add | Click this to create a client exception profile. |
By IP Address | Enabled – Select this option to turn on this IPv4 address exception profile. This allows the client with this IPv4 address to bypass the threat management category check. Direction – Select Both to allow incoming/outgoing packets to/from the Nebula Device that match this IPv4 address. Select Source to allow incoming packets to the Nebula Device that match this IPv4 address. Select Destination to allow outgoing packets from the Nebula Device that match this IPv4 address. Add the IP Address that the Nebula Device will allow incoming and/or outgoing packets. Enter a description of the allowed IPv4 address. The description can be up to 512 characters long. |
 | Click this icon to remove the IPv4 address exception profile. |
Add | Click this icon to create an IPv4 address exception profile. |
Custom allowed/blocked domain | Create a list of host names to allow access to, or block access to, regardless of their content rating. |
Allowed Domain | If you want to access any site, regardless of their content rating, add them to this list. Domain – Enter the host name, such as www.good-site.com into this text field. Do not enter the complete URL of the site – that is, do not include “http://”. All sub-domains are allowed. For example, entering “zyxel.com” also allows “www.zyxel.com”, “partner.zyxel.com”, “press.zyxel.com”, and so on. You can also enter just a top level domain. For example, enter .com to allow all .com domains. Use up to 127 characters (0–9 a–z). The casing does not matter. Enter a Description of the allowed domain. You can use alphanumeric and ()+/:=?!*#@$_%- characters, and it can be up to 60 characters long. Click Add to create a domain name profile. |
Blocked Domain | If you want to block specific sites, regardless of their content rating, add them to this list. Domain – Enter the host name, such as www.bad-site.com into this text field. Do not enter the complete URL of the site – that is, do not include “http://”. All sub-domains are also blocked. For example, entering “bad-site.com” also blocks “www.badsite.com”, “partner.bad-site.com”, “press.bad-site.com”, and so on. You can also enter just a top level domain. For example, enter .com to block all .com domains. Enter a Description of the blocked domain. You can use alphanumeric and ()+/:=?!*#@$_%- characters, and it can be up to 60 characters long. Click Add to create a domain name profile. |
Traffic Management
Application management allows you to manage the use of various applications on the network. Content Filtering allows you to control access to specific web sites or web content.
Click Site-wide > Configure > Security router > Traffic management to access this screen. Use this screen to control application usage and configure content filtering.
Site-wide > Configure > Security router > Traffic management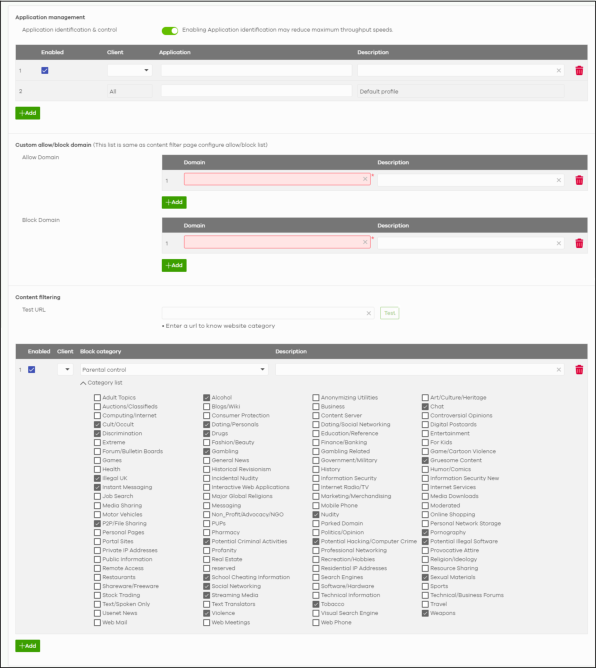

The following table describes the labels in this screen.
Label | Description |
|---|---|
Application management | |
Application identification & control | Click this to enable the Nebula Device to control usage of applications for a client or all clients. When disabled: • the Security router network applications widget in the Site-wide > Dashboard screen will show Application monitor disabled • the Site-wide > Applications usage screen will show Application identification is turned off. |
Enabled | Select the check box to turn on the rule. Otherwise, clear the check box to turn off the rule. |
Client | Select All or select a client to apply the rule. |
Application | Select All or select an application to apply the rule. |
Description | Enter a description for this profile. The description can be up to 512 characters long. |
 | Click this icon to remove the entry. |
Add | Click this button to create up to five application management profiles. |
Custom allow/block domain | |
Allowed Domain | Sites that you want to allow access to, regardless of their content rating, can be allowed by adding them to this list. Domain – Enter host names such as www.good-site.com into this text field. Do not enter the complete URL of the site – that is, do not include “http://”. All sub-domains are allowed. For example, entering “zyxel.com” also allows “www.zyxel.com”, “partner.zyxel.com”, “press.zyxel.com”, and so on. You can also enter just a top level domain. For example, enter .com to allow all .com domains. Use up to 127 characters (0–9 a–z). The casing does not matter. Enter a Description of the allowed domain. The description can be up to 60 characters long. Click Add to create a domain name profile. |
Blocked Domain | Sites that you want to block access to, regardless of their content rating, can be blocked by adding them to this list. Domain – Enter host names such as www.bad-site.com into this text field. Do not enter the complete URL of the site – that is, do not include “http://”. All sub-domains are also blocked. For example, entering “bad-site.com” also blocks “www.badsite.com”, “partner.bad-site.com”, “press.bad-site.com”, and so on. You can also enter just a top level domain. For example, enter .com to block all .com domains. Enter a Description of the blocked domain. The description can be up to 60 characters long. Click Add to create a domain name profile. |
Content filtering | |
Test URL | You can check which category a web page belongs to. Enter a web site URL in the text box. When the content filter is active, you should see the web page’s category. The query fails if the content filter is not active. Content Filtering can query a category by full URL string (for example, http://www.google.com/picture/index.htm), but HTTPS Domain Filter can only query a category by domain name ('www.google.com'), so the category may be different in the query result. URL to test displays both results in the test. |
Enabled | Select the check box to turn on the rule. Otherwise, clear the check box to turn off the rule. |
Client | Select All or select a client to apply the rule. |
Block category | Select the block category. Choices are Parental control, Productivity and Custom. |
Description | Enter a description for this profile. You can use alphanumeric and ()+/:=?!*#@$_%- characters, and it can be up to 512 characters long. |
Category list | Click to display or hide the category list. These are categories of web pages based on their content. Select categories in this section to control access to specific types of Internet content. |
 | Click this icon to remove the entry. |
Add | Click this button to create up to five application categories and set actions for specific applications within the category. |
Firewall
By default, a LAN user can initiate a session from within the LAN and the Nebula Device allows the response. However, the Nebula Device blocks incoming traffic initiated from the WAN and destined for the LAN. Use this screen to configure firewall rules for outbound traffic.
In addition, this screen allows you to create new NAT rules and edit/delete existing NAT rules.
Click Site-wide > Configure > Security router > Firewall to access this screen.
Site-wide > Configure > Security router > Firewall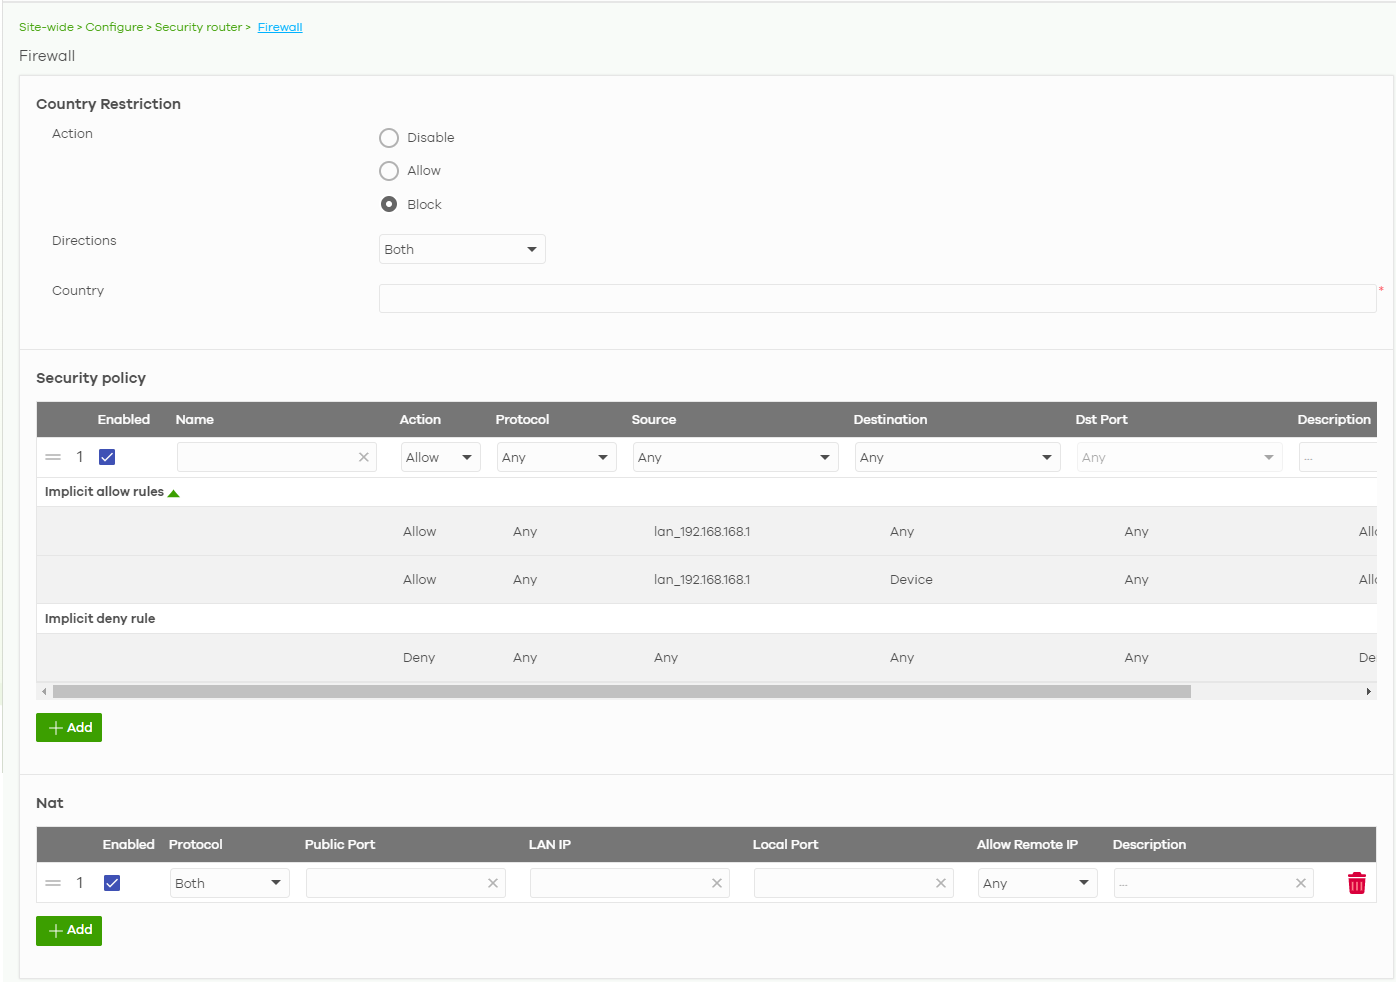

The following table describes the labels in this screen.
Label | Description |
|---|---|
Country Restriction | |
Action | Choose one of the following actions: • Disable: Select this to hide the Country Restriction settings. • Allow: Select this to allow packets from the selected countries IP address in the Country field. Dropping of packets from countries not in the Allow list will occur. • Block: Select this to drop packets from the selected countries IP address in the Country field. |
Directions | Select Both to allow incoming/outgoing packets to apply the firewall rules. Select Incoming to apply the firewall rules on incoming packets. Select Outgoing to apply the firewall rules on outgoing packets. |
Country | Select up to 10 countries or regions to apply the firewall rules configured in this screen. |
Security policy | |
 | Click the icon of a rule and drag the rule up or down to change the order. |
Enabled | Select the check box to turn on the rule. Otherwise, clear the check box to turn off the rule. |
Name | Enter the name of the security policy. |
Action | Select what the Nebula Device is to do with packets that match this rule. Select Deny to silently discard the packets without sending a TCP reset packet or an ICMP destination-unreachable message to the sender. Select Allow to permit the passage of the packets. |
Protocol | Select the IP protocol to which this rule applies. Choices are: ICMP, TCP, UDP, TCP and UDP and Any. |
Source | Specify the source IP addresses (LAN interface / country) to which this rule applies. You can add a CIDR, or enter a new IP address by clicking Customize IP. Enter Any to apply the rule to all IP addresses. |
Destination | Specify the destination IP addresses (LAN interface / country) or subnet to which this rule applies. You can add a CIDR, or enter a new IP address by clicking Customize IP. Enter Any to apply the rule to all IP addresses. |
Dst Port | Specify the destination ports to which this rule applies. By default, Any applies the rule to all ports. |
Description | Enter a descriptive name of up to 60 printable ASCII characters for the rule. |
 | Click this icon to remove the rule. |
Implicit allow rules | This shows the system generated Allow rules. • LAN interface / remote access VPN to Any • LAN interface / remote access VPN to Nebula Device |
Implicit deny rule | This shows the system generated Deny rule. • Any to Any |
Add | Click this button to create a new rule. |
NAT – Virtual server | |
 | Click the icon of a rule and drag the rule up or down to change the order. |
Enabled | Select the check box to turn on the rule. Otherwise, clear the check box to turn off the rule. |
Protocol | Select the IP protocol to which this rule applies. Choices are: TCP, UDP, and Both. |
Public Port | Enter the translated destination port or range of translated destination ports if this NAT rule forwards the packet. |
LAN IP | Specify to which translated destination IP address this NAT rule forwards packets. |
Local Port | Enter the original destination port or range of destination ports this NAT rule supports. |
Allow Remote IPs | Specify the remote IP addresses that are allowed to access the public IP address. Select Any to allow all IP addresses. |
Description | Enter the descriptive name of the policy of up to 60 printable ASCII characters. |
 | Click this icon to remove the profile. |
Add | Click this button to create a new schedule profile. |
Site-to-Site VPN
A virtual private network (VPN) provides secure communications between sites without the expense of leased site-to-site lines. Use this screen to configure VPN rules.
Click Site-wide > Configure > Security router > Site-to-Site VPN to access this screen.
Site-wide > Configure > Security router > Site-to-Site VPN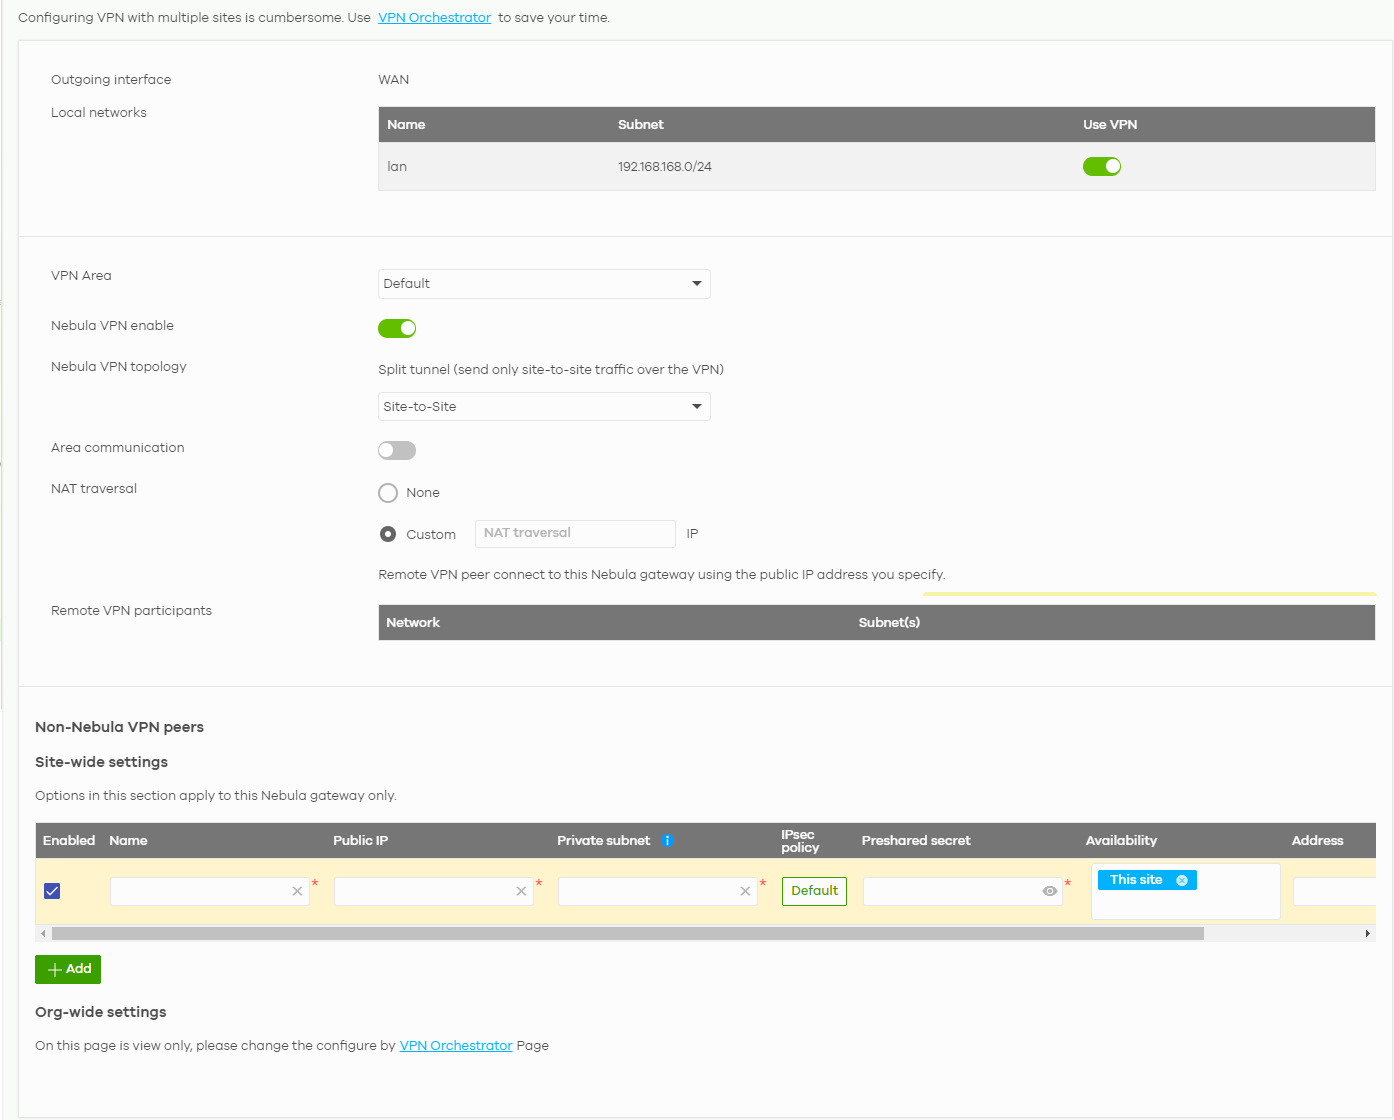

The following table describes the labels in this screen.
Label | Description |
|---|---|
Outgoing Interface | This displays WAN as the interface to which the VPN connection is going. |
Local network | This shows the local network behind the Nebula Device. |
Name | This shows the network name. |
Subnet | This shows the IP address and subnet mask of the computer on the network. |
Use VPN | Select ON to allow the computers on the network to use the VPN tunnel. Otherwise, select OFF. |
VPN Area | Select the VPN area of the site. For details, see VPN Areas. |
Nebula VPN enable | Click this to enable or disable site-to-site VPN on the site’s Nebula Device. If you disable this setting, the site will leave the VPN area. |
Nebula VPN Topology | Click this to select a topology for the VPN area. For details on topologies, see Topology Overview. Select disable to disable VPN connections for all sites in the VPN area. |
Area communication | Enable this to allow the site to communicate with sites in different VPN areas within the organization. |
NAT traversal | If the Nebula Device is behind a NAT router, select Custom to enter the public IP address or Auto or the domain name that is configured and mapped to the Nebula Device on the NAT router. |
Remote VPN participants | This shows all sites within the VPN area. |
Non-Nebula VPN peers | Configure this section to add a non-Nebula gateway to the VPN area. |
+ Add | Click this button to add a non-Nebula gateway to the VPN area. |
Enabled | Select the check box to enable VPN connections to the non-Nebula gateway. |
Name | Enter the name of the non-Nebula gateway. |
Public IP | Enter the public IPv4 address or FQDN of the non-Nebula gateway. |
Private subnet | Enter the IP subnet that will be used for VPN connections. The IP range must be reachable from other devices in the VPN area. |
IPSec policy | Click to select a pre-defined policy or have a custom one. See IPsec Policy for detailed information. |
Preshared secret | Enter a pre-shared key (password). The Nebula Device and peer gateway use the key to identify each other when they negotiate the IKE SA. |
Availability | Select which sites the non-Nebula gateway can connect to in the VPN area. Select All sites to allow the non-Nebula gateway to connect to any site in the VPN area. Select This site and the non-Nebula gateway can only connect to the Nebula Device in this site. |
Address | Enter the address (physical location) of the device. |
 | Click this icon to remove the non-Nebula gateway. |
Add | Click this button to create a new non-Nebula gateway. |
IPsec Policy
Click the Default button in the Non-Nebula VPN peers section of the Site-wide > Configure > Security router > Site-to-Site VPN screen to access this screen.
Site-wide > Configure > Security router > Site-to-Site VPN: IPsec Policy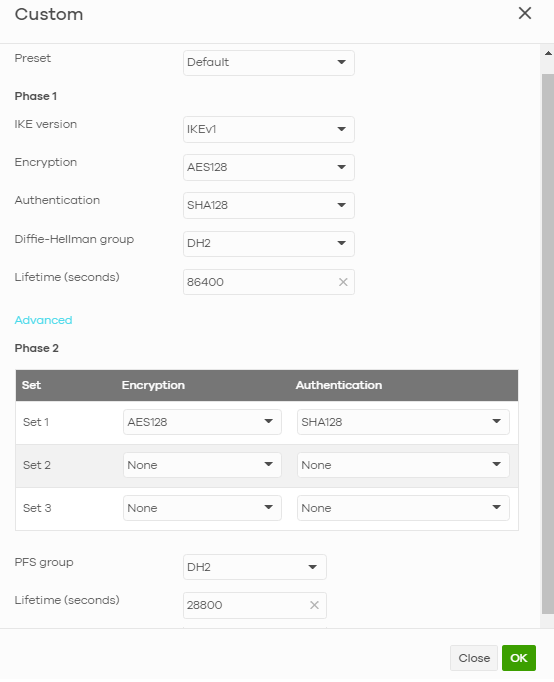

The following table describes the labels in this screen.
label | description |
|---|---|
Preset | Select a pre-defined IPSec policy, or select Custom to configure the policy settings yourself. |
Phase1 | IPSec VPN consists of two phases: Phase 1 (Authentication) and Phase 2 (Key Exchange). A phase 1 exchange establishes an IKE SA (Security Association). |
IKE version | Select IKEv1 or IKEv2. IKEv1 and IKEv2 applies to IPv4 traffic only. IKE (Internet Key Exchange) is a protocol used in setting up security associations that allows two parties to send data securely. |
Encryption | Select which key size and encryption algorithm to use in the IKE SA. Choices are: DES – a 56-bit key with the DES encryption algorithm 3DES – a 168-bit key with the DES encryption algorithm AES128 – a 128-bit key with the AES encryption algorithm AES192 – a 192-bit key with the AES encryption algorithm AES256 – a 256-bit key with the AES encryption algorithm The Nebula Device and the remote IPSec router must use the same key size and encryption algorithm. Longer keys require more processing power, resulting in increased latency and decreased throughput. |
Authentication | Select which hash algorithm to use to authenticate packet data in the IKE SA. Choices are SHA128, SHA256, SHA512 and MD5. SHA is generally considered stronger than MD5, but it is also slower. The remote IPSec router must use the same authentication algorithm. |
Diffie-Hellman group | Select which Diffie-Hellman key group (DHx) you want to use for encryption keys. Choices are: DH1 – use a 768-bit random number Modular Exponential (MODP) DH group DH2 – use a 1024-bit random number MODP DH5 – use a 1536-bit random number MODP DH14 – use a 2048-bit random number MODP DH19 – use a 256-bit random number elliptic curve group DH20 – use a 384-bit random number elliptic curve group DH21 – use a 521-bit random number elliptic curve group DH28 – use a 256-bit random number elliptic curve group DH29 – use a 384-bit random number elliptic curve group DH30 – use a 512-bit random number elliptic curve group Both routers must use the same DH key group. |
Lifetime (seconds) | Enter the maximum number of seconds the IKE SA can last. When this time has passed, the Nebula Device and remote IPSec router have to update the encryption and authentication keys and re-negotiate the IKE SA. This does not affect any existing IPSec SAs, however. |
Advanced | Click this to display a greater or lesser number of configuration fields. |
Mode | Set the negotiation mode. Main encrypts the Nebula Device’s and remote IPSec router’s identities but takes more time to establish the IKE SA. Aggressive is faster but does not encrypt the identities. |
Local ID | Enter an identifier used to identify the Nebula Device during authentication. This can be an IP address or hostname. |
Peer ID | Enter an identifier used to identify the remote IPSec router during authentication. This can be an IP address or hostname. |
Phase2 | Phase 2 uses the SA that was established in phase 1 to negotiate SAs for IPSec. |
Encryption | Select which key size and encryption algorithm to use in the IPSec SA. Choices are: (None) – no encryption key or algorithm DES – a 56-bit key with the DES encryption algorithm 3DES – a 168-bit key with the DES encryption algorithm AES128 – a 128-bit key with the AES encryption algorithm AES192 – a 192-bit key with the AES encryption algorithm AES256 – a 256-bit key with the AES encryption algorithm The Nebula Device and the remote IPSec router must both have at least one proposal that uses the same encryption and the same key. Longer keys are more secure, but require more processing power, resulting in increased latency and decreased throughput. |
PFS group | Select whether or not you want to enable Perfect Forward Secrecy (PFS) and, if you do, which Diffie-Hellman key group to use for encryption. Choices are: None – disable PFS DH1 – use a 768-bit random number Modular Exponential (MODP) DH group DH2 – use a 1024-bit random number MODP DH5 – use a 1536-bit random number MODP DH14 – use a 2048-bit random number MODP DH19 – use a 256-bit random number elliptic curve group DH20 – use a 384-bit random number elliptic curve group DH21 – use a 521-bit random number elliptic curve group DH28 – use a 256-bit random number elliptic curve group DH29 – use a 384-bit random number elliptic curve group DH30 – use a 512-bit random number elliptic curve group PFS changes the root key that is used to generate encryption keys for each IPSec SA. Both routers must use the same DH key group. PFS is ignored in initial IKEv2 authentication but is used when re-authenticating. |
Lifetime (seconds) | Enter the maximum number of seconds the IPSec SA can last. Shorter life times provide better security. The Nebula Device automatically negotiates a new IPSec SA before the current one expires, if there are users who are accessing remote resources. |
Close | Click this button to exit this screen without saving. |
OK | Click this button to save your changes and close the screen. |
SSID Advanced Settings
Use this screen to configure WiFi security, band selection, assisted roaming and U-APSD (Unscheduled automatic power save delivery) settings for the SSID profiles.
Click Site-wide > Configure > Security router > SSID advanced settings to access this screen. NCC will redirect to the Site-wide > Configure > Access points > SSID advanced settings screen.
Site-Wide > Configure > Access points > SSID advanced settings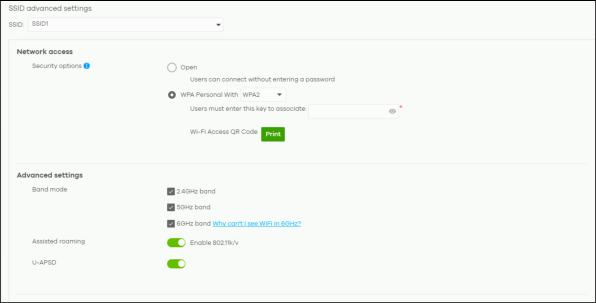

The following table describes the labels in this screen.
Label | Description |
|---|---|
SSID advanced settings | Select the SSID profile to which the settings you configure here is applied. |
Network access | |
Security options | Select Open to allow any client to associate this network without any data encryption or authentication. Select WPA Personal With (WPA2/WPA3) and enter a pre-shared key from 8 to 64 case-sensitive keyboard characters to enable WPA2/3-PSK data encryption. Upon selecting WPA Personal With WPA3, Nebula Devices that do not support it will revert to WPA2. Click Print to display the QR code that includes the password for quick access. You can save the QR code as PDF. |
Advanced settings | |
Band mode | Select to have the SSID use either 2.4GHz band, 5GHz band, or 6GHz band only. |
Assisted roaming | Select to turn on or off IEEE 802.11k/v assisted roaming on the Nebula Device. When the connected clients request 802.11k neighbor lists, the Nebula Device will response with a list of neighbor Nebula Devices that can be candidates for roaming. When the 802.11v capable clients are using the 2.4 GHz band, the Nebula Device can send 802.11v messages to steer clients to the 5 GHz band. |
U-APSD | Select to turn on or off Automatic Power Save Delivery. This helps increase battery life for battery-powered WiFi clients connected to the Nebula Device. |
Radio Settings
Use this screen to configure global radio settings for the Nebula Device in the site. Click Site-wide > Configure > Security router > Radio settings to access this screen. NCC will redirect to the Site-wide > Configure > Access points > Radio settings screen.
Site-wide > Configure > Access points > Radio settings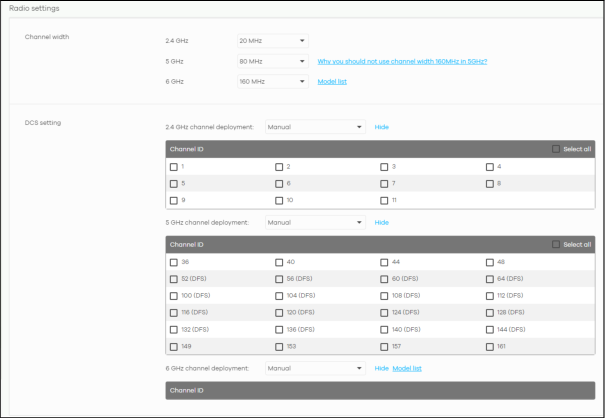

The following table describes the labels in this screen.
Label | Description |
|---|---|
Channel width | Select the wireless channel bandwidth you want the Nebula Device to use. A standard 20 MHz channel offers transfer speeds of up to 144 Mbps (2.4 GHz) or 217 Mbps (5 GHz) whereas a 40 MHz channel uses two standard channels and offers speeds of up to 300 Mbps (2.4 GHz) or 450 Mbps (5 GHz). An IEEE 802.11ac-specific 80 MHz channel offers speeds of up to 1.3 Gbps. 40 MHz (channel bonding or dual channel) bonds two adjacent radio channels to increase throughput. An 80 MHz channel consists of two adjacent 40 MHz channels. The WiFi clients must also support 40 MHz or 80 MHz. It is often better to use the 20 MHz setting in a location where the environment hinders the WiFi signal. |
DCS setting | |
2.4 GHz channel deployment | Select All available channels to allow channel-hopping to have the Nebula Device automatically select the best channel. Select Manual to select the individual channels the Nebula Device switches between. |
5 GHz channel deployment | Select how you want to specify the channels the Nebula Device switches between for 5 GHz operation. Select All available channels to have the Nebula Device automatically select the best channel. Select Manual to select the individual channels the Nebula Device switches between. |
6 GHz channel deployment | Select how you want to specify the channels the Nebula Device switches between for 6 GHz operation. Select All available channels to have the Nebula Device automatically select the best channel. Select Manual to select the individual channels the Nebula Device switches between. |
Router Settings
Use this screen to configure DNS settings.
Click Site-wide > Configure > Security router > Router settings to access this screen.
Site-wide > Configure > Security router > Router settings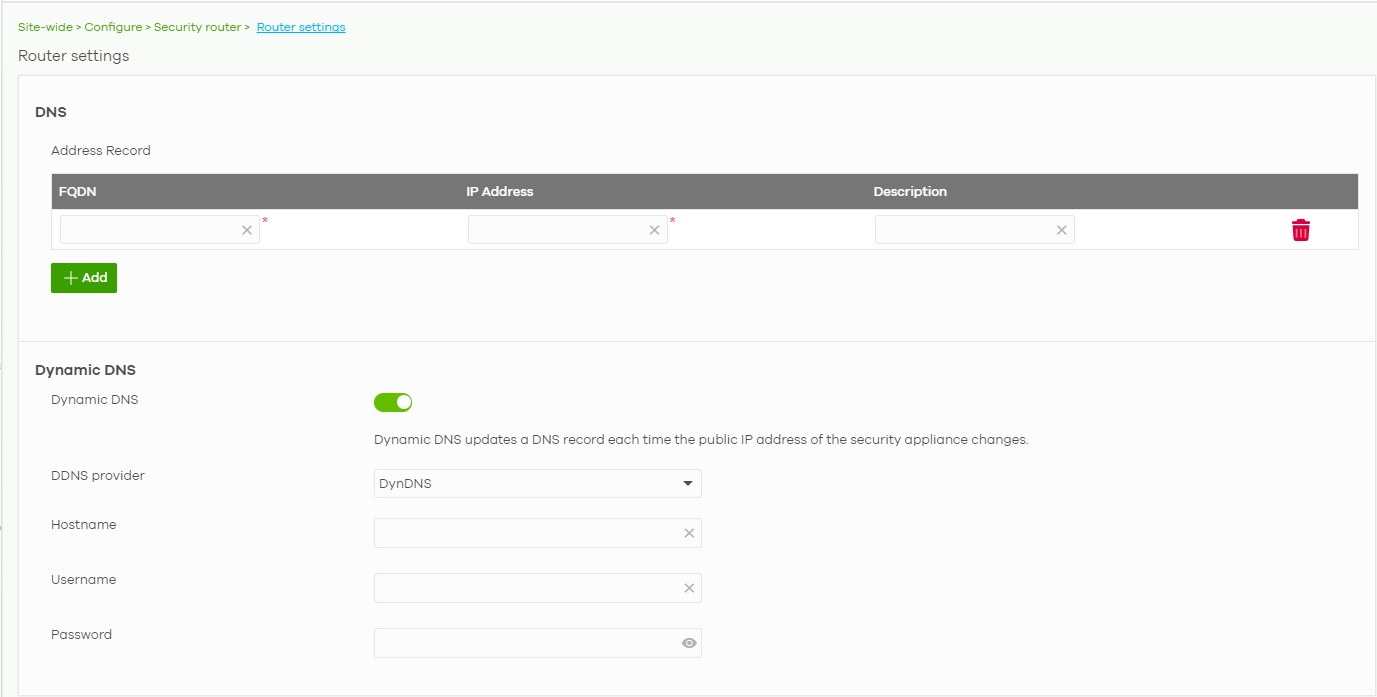

The following table describes the labels in this screen.
Label | Description |
|---|---|
DNS | |
Address Record | This record specifies the mapping of a Fully-Qualified Domain Name (FQDN) to an IP address. An FQDN consists of a host and domain name. For example, www.zyxel.com.tw is a fully qualified domain name, where “www” is the host, “zyxel” is the third-level domain, “com” is the second-level domain, and “tw” is the top level domain. |
FQDN | Enter a host’s fully qualified domain name. Use "*." as a prefix in the FQDN for a wildcard domain name (for example, *.example.com). |
IP Address | Enter the host’s IP address. |
Description | Enter the descriptive name of the DNS record of up to 60 printable ASCII characters. |
 | Click this icon to remove the entry. |
Add | Click this button to create a new entry. |
Dynamic DNS | |
Dynamic DNS | Click On to use dynamic DNS. Otherwise, select Off to disable it. |
DDNS provider | Select your Dynamic DNS service provider from the drop-down list box. If you select User customize, create your own DDNS service. |
Hostname | Enter the domain name you registered. |
Username | Enter the user name used when you registered your domain name. |
Password | Enter the password provided by the DDNS provider. |