Configure
Use the Configure menus to configure interface addressing, firewall, site-to-site VPN, captive portal, traffic shaping, authentication server and other gateway settings for the Nebula Device of the selected site.
Port
Use this screen to configure port groups on the Nebula Device. To access this screen, click Firewall > Configure > Port.
Site-wide > Configure > Firewall > Port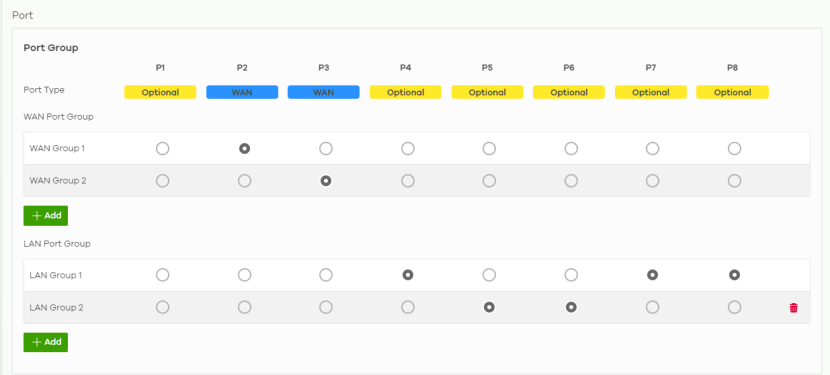
The following table describes the labels in this screen.
Label | Description |
|---|---|
Port Group | Port groups create a hardware connection between physical ports at the layer-2 (data link, MAC address) level. The physical LAN Ethernet ports, for example P1, P2, P3, are shown at the top of the screen. The port groups are shown at the left of the screen. Use the radio buttons to select which ports are in each port group. For example, to add port P3 to LAN Group 1, select P3’s radio button in the LAN Group 1 row. |
Port Type | This shows whether the port is a WAN port or a LAN port. Optional means the port can be assigned as either WAN or LAN, by adding it to a WAN or LAN group. |
WAN Port Group | |
WAN Group 1 | This shows the name of the WAN port group. |
 | Click this icon to remove a WAN port group. |
Add | Click this button to create a new WAN port group. |
LAN Port Group | |
LAN Group 1 | This shows the name of the LAN port group. |
 | Click this icon to remove a LAN port group. |
Add | Click this button to create a new LAN port group. |
Close | Click Close to exit this screen without saving. |
OK | Click OK to save your changes. |
Interface
Use this screen to configure network interfaces on the Nebula Device. An interface consists of a port group, a VLAN ID, and an IP address, plus other configuration settings.
To access this screen, click Site-wide > Configure > Firewall > Interface.
Site-wide > Configure > Firewall > Interface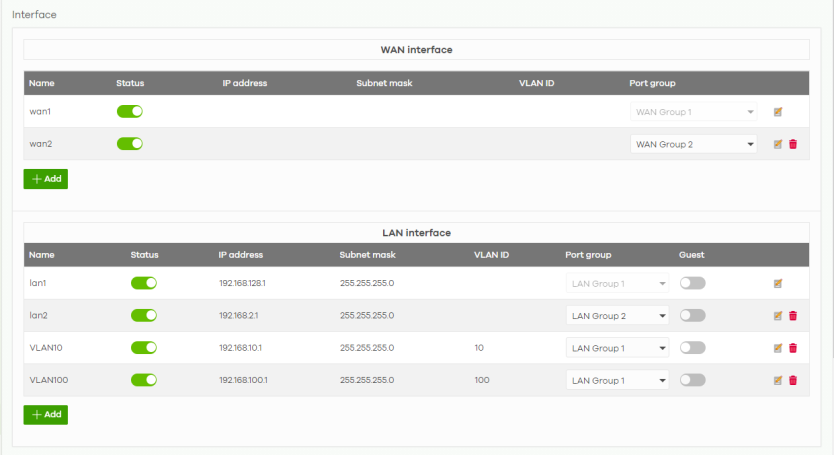
The following table describes the labels in this screen.
Label | Description |
|---|---|
WAN Interface | |
Name | This field is read-only if you are editing an existing WAN interface. Specify a name for the interface. The format of interface names is strict. Each name consists of 2 – 4 letters (interface type), followed by a number (x). For most interfaces, x is limited by the maximum number of the type of interface. For VLAN interfaces, x is defined by the number you enter in the VLAN name field. For example, VLAN interfaces are vlan0, vlan1, vlan2, and so on. |
Status | Select this to activate the selected WAN interface. |
IP address | This shows the IP address for this interface. |
Subnet mask | This shows the subnet mask of this interface in dot decimal notation. The subnet mask indicates what part of the IP address is the same for all computers in the network. |
VLAN ID | This shows the VLAN ID. This 12-bit number uniquely identifies each VLAN. Allowed values are 1 – 4094. (0 and 4095 are reserved.) |
Port group | Select the name of the port group to which you want the interface (network) to belong. |
 | Click the edit icon to modify the interface. |
 | Click the remove icon to delete the interface. |
Add | Click this button to create a virtual WAN interface, which associates a VLAN with a WAN port group. |
LAN Interface | |
Name | This field is read-only if you are editing an existing LAN interface. Specify a name for the interface. The format of interface names is strict. Each name consists of 2 – 4 letters (interface type), followed by a number (x). For most interfaces, x is limited by the maximum number of the type of interface. For VLAN interfaces, x is defined by the number you enter in the VLAN name field. For example, VLAN interfaces are vlan0, vlan1, vlan2, and so on. |
Status | Select this to activate the LAN interface. |
IP address | This is the IP address for this interface. |
Subnet mask | This is the subnet mask of this interface in dot decimal notation. The subnet mask indicates what part of the IP address is the same for all computers in the network. |
VLAN ID | This is the VLAN ID. This 12-bit number uniquely identifies each VLAN. Allowed values are 1 – 4094. (0 and 4095 are reserved.) |
Port group | Select the name of the port group to which you want the interface (network) to belong. |
Guest | Click the switch to the right to configure this interface as a Guest interface. Client devices connected to this Guest interface have Internet access but cannot access a non-guest interface. Alternatively, click the switch to the left to disable Internet access for client devices connected to this Guest interface. |
 | Click the edit icon to modify it. |
 | Click the remove icon to delete it. |
Add | Click this button to create a virtual LAN interface, which associates a VLAN with a LAN port group. |
WAN Interface Configuration
Click the Add button or click the Edit button in the WAN Interface section to open the Site-wide > Configure > Firewall > Interface > WAN interface configuration screen.
Site-wide > Configure > Firewall > Interface > WAN interface configuration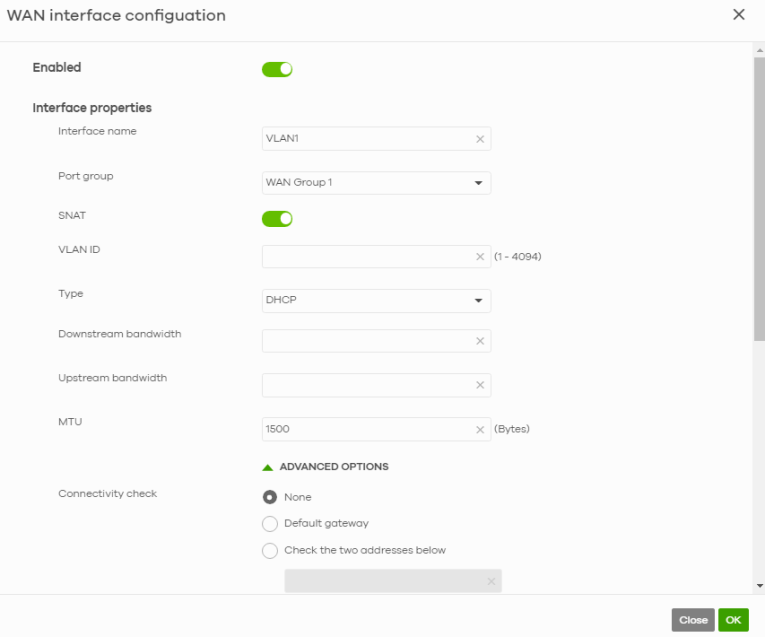
The following table describes the labels in this screen.
label | description |
|---|---|
Enable | Select this to enable the WAN interface. |
Interface properties | |
Interface name | Specify a name for the WAN interface. |
Port group | Select the name of the port group to which you want the interface (network) to belong. |
SNAT | Select this to enable SNAT. When enabled, the Nebula Device rewrites the source address of packets being sent from this interface to the interface's IP address. |
VLAN ID | Enter the VLAN ID. This 12-bit number uniquely identifies each VLAN. Allowed values are 1 – 4094. (0 and 4095 are reserved.) |
Type | Select the type of interface to create. DHCP: The interface will automatically get an IP address and other network settings from a DHCP server. Static: You must manually configure an IP address and other network settings for the interface. PPPoE: The interface will authenticate with an Internet Service Provider, and then automatically get an IP address from the ISP's DHCP server. You can use this type of interface to connect to a DSL modem. PPPoE with static IP: Assign a static IP address to the WAN interface and your WAN interface is getting an Internet connection from a PPPoE server. |
IP address assignment | These fields are displayed if you select Static. |
IP address | Enter the static IP address of this interface. |
Subnet mask | Enter the subnet mask for this interface’s IP address. |
Default gateway | Enter the IP address of the Nebula Device through which this interface sends traffic. |
First DNS server | Enter a DNS server's IP address. The Domain Name System (DNS) maps a domain name to an IP address and vice versa. The Nebula Device uses the first and second DNS servers, in that order to resolve domain names for VPN, DDNS and the time server. Leave the field blank if you do not want to configure DNS servers. |
Second DNS server | Enter the IP address of another DNS server. This field is optional. |
These fields are displayed if you selected PPPoE or PPPoE with static IP. | |
Authentication Type | Select an authentication protocol for outgoing connection requests. Options are: • Chap/PAP – The Nebula Device accepts either CHAP or PAP when requested by the remote node. • Chap – The Nebula Device accepts CHAP only. • PAP – The Nebula Device accepts PAP only. • MSCHAP – The Nebula Device accepts MSCHAP only. • MSCHAP-V2 – The Nebula Device accepts MSCHAP-V2 only. |
Username | Enter the user name provided by your ISP. You can use up to 31 alphanumeric characters and the underscore. Spaces are not allowed. |
Password | Enter the password provided by your ISP. You can use up to 64 alphanumeric characters and the underscore. Spaces are not allowed. |
Retype password | Enter the password again to confirm it. |
Downstream bandwidth | Enter the downstream bandwidth of the WAN connection. This value is used for WAN load balancing by algorithms such as weighed round robin. |
Upstream bandwidth | Enter the upstream bandwidth of the WAN connection. This value is used for WAN load balancing by algorithms such as weighed round robin. |
MTU | Maximum Transmission Unit. Enter the maximum size of each data packet, in bytes, that can move through this interface. If a larger packet arrives, the Nebula Device divides it into smaller fragments. Allowed values are 576 – 1500. |
ADVANCED OPTIONS | |
Connectivity check | The interface can periodically check whether it can connect to its default gateway (Default gateway), or to two user-specified servers (Check the two addresses below). If the check fails, the interface's status changes to Down. You specify how often the interface checks the connection, how long to wait for a response before the attempt is a failure, and how many consecutive failures are required before the Nebula Device stops routing to the gateway. |
Probe Succeeds When | This field applies when you select Check the two addresses and specify two domain names or IP addresses for the connectivity check. Select any one if you want the check to pass if at least one of the domain names or IP addresses responds. Select all if you want the check to pass only if both domain names or IP addresses respond. |
Proxy ARP | Proxy ARP (RFC 1027) allows the Nebula Device to answer external interface ARP requests on behalf of a device on its internal interface. Click Add new to add the IP address or IP range of devices that the interface will answer proxy ARP requests for. |
IP Address | Enter a single IPv4 address, an IPv4 CIDR (for example, 192.168.1.1/24) or an IPv4 Range (for example, 192.168.1.2–192.168.1.100). The Nebula Device answers external ARP requests if they match one of these target IP addresses. For example, if the IPv4 address is 192.168.1.5, then the Nebula Device will answer ARP requests coming from the WAN only if it contains 192.168.1.5 as the target IP address. |
 | Click the remove icon to delete the proxy ARP IP address. |
MAC address Setting | Have the interface use either the factory-assigned default MAC address, or a manually specified MAC address. |
DHCP client mode | Choices are Auto, Unicast and Broadcast. |
DHCP option 60 | DHCP Option 60 is used by the Security Firewall for identification to the DHCP server using the VCI (Vendor Class Identifier) on the DHCP server. The Nebula Device adds it in the initial DHCP discovery message that a DHCP client broadcasts in search of an IP address. The DHCP server can assign different IP addresses or options to clients with the specific VCI or reject the request from clients without the specific VCI. Enter a string using up to 63 of these characters [a–z A–Z 0–9 !\"#$%&\'()*+,-./:;<=>?@\[\\\]^_`{}] to identify this Nebula Device to the DHCP server. For example, Zyxel-TW. |
IGMP proxy | Select this to allow the Nebula Device to act as an IGMP proxy for hosts connected on the IGMP downstream interface. |
IGMP Upstream | Enable IGMP Upstream on the interface which connects to a router running IGMP that is closer to the multicast server. |
IGMP Downstream | Enable IGMP Downstream on the interface which connects to the multicast hosts. |
Close | Click Close to exit this screen without saving. |
OK | Click OK to save your changes. |
LAN Interface Configuration
Click the Add button or click the Edit button in the LAN interface section to open the Site-wide > Configure > Firewall > Interface > LAN interface configuration screen.
Site-wide > Configure > Firewall > Interface > LAN interface configuration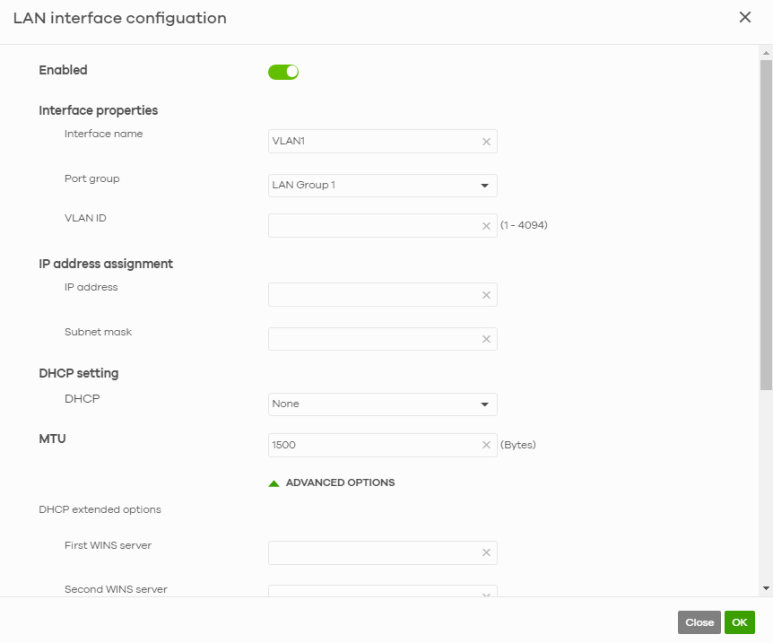
The following table describes the labels in this screen.
label | description |
|---|---|
Enable | Select this to enable the LAN interface. |
Interface properties | |
Interface name | Specify a name for the LAN interface. |
Port group | Select the name of the port group to which you want the interface (network) to belong. |
VLAN ID | Enter the VLAN ID. This 12-bit number uniquely identifies each VLAN. Allowed values are 1 – 4094. (0 and 4095 are reserved.) |
IP address assignment | |
IP address | Enter the IP address for this interface. |
Subnet mask | Enter the subnet mask of this interface in dot decimal notation. The subnet mask indicates what part of the IP address is the same for all computers in the network. |
DHCP setting | Select what type of DHCP service the Nebula Device provides to the network. Choices are: None – the Nebula Device does not provide any DHCP services. There is already a DHCP server on the network. DHCP Relay – the Nebula Device routes DHCP requests to one or more DHCP servers you specify. The DHCP servers may be on another network. DHCP Server – the Nebula Device assigns IP addresses and provides subnet mask, gateway, and DNS server information to the network. The Nebula Device is the DHCP server for the network. |
These fields appear if the Nebula Device is a DHCP Relay. | |
DHCP server 1 | Enter the IP address of a DHCP server for the network. |
DHCP server 2 | This field is optional. Enter the IP address of another DHCP server for the network. |
These fields appear if the Nebula Device is a DHCP Server. | |
IP pool start address | Enter the IP address from which the Nebula Device begins allocating IP addresses. If you want to assign a static IP address to a specific computer, use the Static DHCP Table. If this field is blank, the Pool Size must also be blank. In this case, the Nebula Device can assign every IP address allowed by the interface’s IP address and subnet mask, except for the first address (network address), last address (broadcast address) and the interface’s IP address. |
First DNS Server, Second DNS Server, Third DNS Server | Specify the IP addresses of up to three DNS servers for the DHCP clients to use. Use one of the following ways to specify these IP addresses. Custom Defined – enter a static IP address. From ISP – select the DNS server that another interface received from its DHCP server. This Gateway – the DHCP clients use the IP address of this interface and the Nebula Device works as a DNS relay. |
Lease Time | Specify how long each computer can use the information (especially the IP address) before it has to request the information again. Choices are: infinite – select this if IP addresses never expire. days, hours, and minutes (Optional) – select this to enter how long IP addresses are valid. |
Static DHCP table | Configure a list of static IP addresses the Nebula Device assigns to computers connected to the interface. Otherwise, the Nebula Device assigns an IP address dynamically using the interface’s IP Pool Start Address and Pool Size. |
IP address | Enter the IP address to assign to a device with this entry’s MAC address. |
MAC | Enter the MAC address to which to assign this entry’s IP address. |
Description | Enter a description to help identify this static DHCP entry. You can use alphanumeric and ()+/:=?!*#@$_%– characters, and it can be up to 60 characters long. |
 | Select an entry in this table and click this to delete it. This will also remove the client information on the Site-wide > Clients > Client list screen. |
Add New | Click this to create an entry in the Static DHCP table. This will also add the client reserve IP policy on the Site-wide > Clients > Client list. |
MTU | Maximum Transmission Unit. Enter the maximum size of each data packet, in bytes, that can move through this interface. If a larger packet arrives, the Nebula Device divides it into smaller fragments. Allowed values are 576 – 1500. Usually, this value is 1500. |
ADVANCED OPTIONS | |
DHCP extended options | This table is available if you select ADVANCED OPTIONS. Configure this table if you want to send more information to DHCP clients through DHCP packets. Click Add new to create an entry in this table. See Section 7.3.2.3 on page 189 for detailed information. |
First WINS server Second WINS server | Enter the IP address of the WINS (Windows Internet Naming Service) server that you want to send to the DHCP clients. The WINS server keeps a mapping table of the computer names on your network and the IP addresses that they are currently using. |
PXE server | PXE (Preboot eXecution Environment) allows a client computer to use the network to boot up and install an operating system through a PXE-capable Network Interface Card (NIC). PXE is available for computers on internal interfaces to allow them to boot up using boot software on a PXE server. The Nebula Device acts as an intermediary between the PXE server and the computers that need boot software. The PXE server must have a public IPv4 address. You must enable DHCP server on the Nebula Device so that it can receive information from the PXE server. |
PXE Boot loader file | A boot loader is a computer program that loads the operating system for the computer. Enter the exact file name of the boot loader software file, including filename extension, that is on the PXE server. If the wrong filename is entered, then the client computers cannot boot. |
Default gateway | If you set this interface to DHCP server, you can select to use either the interface’s IP address or another IP address as the default router. This default router will become the DHCP clients’ default gateway. |
IGMP proxy | Select this to allow the Nebula Device to act as an IGMP proxy for hosts connected on the IGMP downstream interface. |
IGMP Upstream | Enable IGMP Upstream on the interface which connects to a router running IGMP that is closer to the multicast server. |
IGMP Downstream | Enable IGMP Downstream on the interface which connects to the multicast hosts. |
Close | Click Close to exit this screen without saving. |
OK | Click OK to save your changes. |
DHCP Option
Click the Add new button in the DHCP extended options section to open the Site-wide > Configure > Firewall > Interface > LAN interface configuration: DHCP option screen.
Site-wide > Configure > Firewall > Interface: LAN interface configuration: DHCP option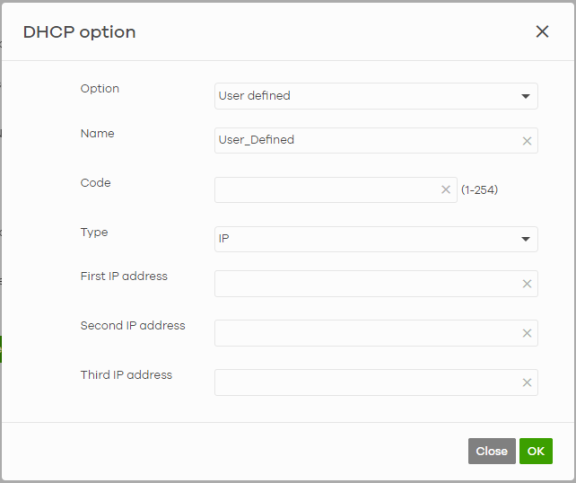
The following table describes the labels in this screen.
label | description |
|---|---|
Option | Select which DHCP option that you want to add in the DHCP packets sent through the interface. |
Name | This field displays the name of the selected DHCP option. If you selected User defined in the Option field, enter a descriptive name to identify the DHCP option. |
Code | This field displays the code number of the selected DHCP option. If you selected User defined in the Option field, enter a number for the option. This field is mandatory. |
Type | This is the type of the selected DHCP option. If you selected User defined in the Option field, select an appropriate type for the value that you will enter in the next field. Misconfiguration could result in interface lockout. |
Value | Enter the value for the selected DHCP option. For example, if you selected TFTP Server Name (66) and the type is TEXT, enter the DNS domain name of a TFTP server here. This field is mandatory. |
First/Second/Third IP address | If you selected User defined / Time/NTP/SIP/TFTP server / CAPWAP AC in the Option field, enter up to three IP addresses. |
Close | Click Close to exit this screen without saving. |
OK | Click OK to save your changes. |
Port and Interface
Use this screen to configure port groups and network interfaces on the Nebula Device. An interface consists of a port group, a VLAN ID, and an IP address, plus other configuration settings. To access this screen, click Firewall > Configure > Port and Interface.
Site-wide > Configure > Firewall > Port and Interface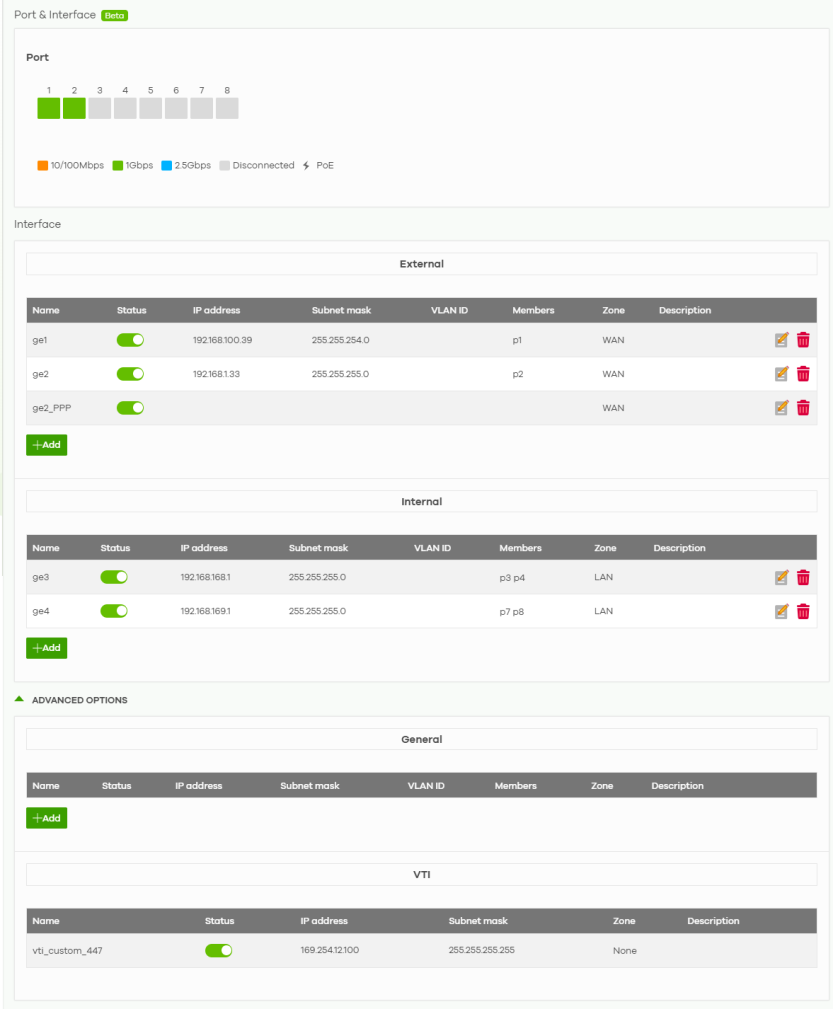
The following table describes the labels in this screen.
Label | Description |
|---|---|
Port | Move the pointer over a port to view the Nebula Device’s port details, such as Name, Status and Speed. If the port is supplying power to a node using Power over Ethernet (PoE), you can click Power reset to perform a power cycle on the port. This action temporarily disables PoE and then re-enables it, in order to reboot connected PoE devices. |
Interface External | |
Name | This field displays the name of the interface. |
Status | Click the switch to the right to enable this interface. |
IP address | This field displays the IP address for this interface. If this field is empty, the interface does not have an IP address yet or is configured as 'Unassigned'. |
Subnet mask | This field displays the subnet mask of this interface in dot decimal notation. The subnet mask indicates what part of the IP address is the same for all computers in the network. |
VLAN ID | This field displays the VLAN ID which is a 12-bit number that uniquely identifies each VLAN. |
Members | This field displays the port(s) the interface is using. |
Zone | This field displays the zone to which this interface belongs. An interface can only be in one zone. |
Description | This field displays the description of the interface. |
 | Select an entry and click Edit to open a screen where you can modify the entry’s settings. |
 | To remove a virtual interface, select it and click Remove. The Nebula Device confirms you want to remove it before doing so. To avoid losing connection between the Nebula Device and NCC, there must be at least one External interface. NCC will not allow you to remove the last External interface. |
Add | Click this to add a new entry. |
Internal | |
Name | This field displays the name of the interface. |
Status | Click the switch to the right to enable this interface. |
IP address | This field displays the IP address for this interface. If this field is empty, the interface does not have an IP address yet or is configured as 'Unassigned'. |
Subnet mask | This field displays the subnet mask of this interface in dot decimal notation. The subnet mask indicates what part of the IP address is the same for all computers in the network. |
VLAN ID | This field displays the VLAN ID which is a 12-bit number that uniquely identifies each VLAN. |
Members | This field displays the port(s) the interface is using. |
Zone | This field displays the zone to which this interface belongs. An interface can only be in one zone. |
Description | This field displays the description of the interface. |
 | Select an entry and click Edit to open a screen where you can modify the entry’s settings. |
 | To remove a virtual interface, select it and click Remove. The Nebula Device confirms you want to remove it before doing so. |
Add | Click this to add a new entry. |
ADVANCED OPTIONS | Click this to display a greater or lesser number of configuration fields. |
General | |
Name | This field displays the name of the interface. |
Status | Click the switch to the right to enable this interface. |
IP address | This field displays the IP address for this interface. If this field is empty, the interface does not have an IP address yet or is configured as 'Unassigned'. |
Subnet mask | This field displays the subnet mask of this interface in dot decimal notation. The subnet mask indicates what part of the IP address is the same for all computers in the network. |
VLAN ID | This field displays the VLAN ID which is a 12-bit number that uniquely identifies each VLAN. |
Members | This field displays the port(s) the interface is using. |
Zone | This field displays the zone to which this interface belongs. An interface can only be in one zone. |
Description | This field displays the description of the interface. |
 | Select an entry and click Edit to open a screen where you can modify the entry’s settings. |
 | To remove a virtual interface, select it and click Remove. The Nebula Device confirms you want to remove it before doing so. |
Add | Click this to add a new entry. |
VTI | |
Name | This field displays the name of the interface. |
Status | Click the switch to the right to enable this interface. |
IP address | This field displays the IP address for this interface. If this field is empty, the interface does not have an IP address yet or is configured as 'Unassigned'. |
Subnet mask | This field displays the subnet mask of this interface in dot decimal notation. The subnet mask indicates what part of the IP address is the same for all computers in the network. |
Zone | This field displays the zone to which this interface belongs. An interface can only be in one zone. |
Description | This field displays the description of the interface. |
External Interface Configuration
Click the Add button or click the Edit button in the External Interface section to open the Site-wide > Configure > Firewall > Port and Interface > External interface configuration screen.
Site-wide > Configure > Firewall > Port and Interface > External interface configuration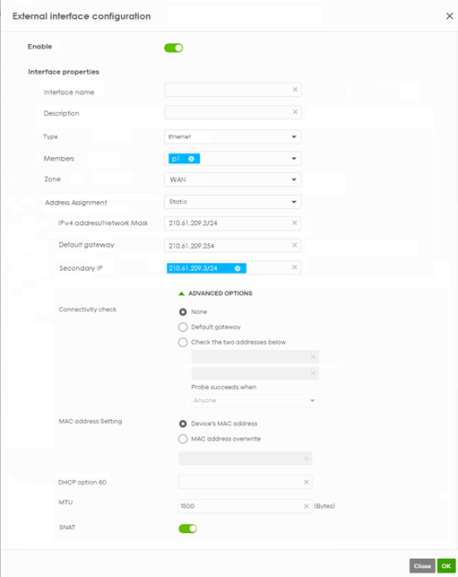
The following table describes the labels in this screen.
label | description |
|---|---|
Enable | Click this switch to the right to enable the interface. |
Interface properties | |
Interface name | Enter a name for the interface. You may use 2 to 30 single-byte characters, including 0-9a-zA-Z, underscores (_), or dashes (-), but the first character cannot be a number. This value is case-sensitive. |
Description | Enter a descriptive name for the interface. |
Type | Select the type of interface to create. DHCP: The interface will automatically get an IP address and other network settings from a DHCP server. Static: You must manually configure an IP address and other network settings for the interface. PPPoE: The interface will authenticate with an Internet Service Provider, and then automatically get an IP address from the ISP's DHCP server. You can use this type of interface to connect to a DSL modem. PPPoE with static IP: Assign a static IP address to the WAN interface and your WAN interface is getting an Internet connection from a PPPoE server. |
Members | Select the name of the port group to which you want the interface (network) to belong. |
Zone | Select the zone to which this interface belongs. An interface can only be in one zone. |
IP address assignment | These fields are displayed if you select Static. |
IPv4 address/Network Mask | Enter the static IP address of this interface and the subnet mask for this interface’s IP address. |
Default gateway | Enter the IP address of the Nebula Device through which this interface sends traffic. |
Secondary IP | Enter another IP address of the Nebula Device through which this interface sends traffic. This field is optional. |
These fields are displayed if you selected PPPoE or PPPoE with static IP. | |
Authentication Type | Select an authentication protocol for outgoing connection requests. Options are: • Chap/PAP – The Nebula Device accepts either CHAP or PAP when requested by the remote node. • Chap – The Nebula Device accepts CHAP only. • PAP – The Nebula Device accepts PAP only. • MSCHAP – The Nebula Device accepts MSCHAP only. • MSCHAP-V2 – The Nebula Device accepts MSCHAP-V2 only. |
Username | Enter the user name provided by your ISP. You can use 2 up to 64 alphanumeric characters and the underscore. ‘0-9a-zA-Z~`@#$%^&*()_+-={}[]|:”;’<>,.?/’ are allowed. |
Password | Enter the password provided by your ISP. You can use 1 up to 63 alphanumeric characters and the underscore. 0-9a-zA-Z~`@#$%^&*()_+-={}[]|\:’;’<>,./ are allowed. ‘?’ is not allowed. |
Retype password | Enter the password again to confirm it. |
Service name | Enter the service name from your service provider. PPPoE uses a service name to identify and reach the PPPoE server. You can use up to 30 single-byte characters, including 0-9a-zA-Z._- |
Compression | Select On to turn on stac compression. Select Off to turn off stac compression. Stac compression is data compression technique capable of compressing data by a factor of about four. |
User Idle Timeout | Enter the idle timeout in seconds that elapses before the router automatically disconnects from the PPPoE server. |
WAN IP | Enter the IP address of the WAN interface through which this connection will send traffic. |
Gateway IP | Enter the IP address of the router through which this WAN connection will send traffic. |
IP address | Enter the IP address for this interface. |
Subnet mask | Enter the subnet mask of this interface in dot decimal notation. The subnet mask indicates what part of the IP address is the same for all computers on the network. |
ADVANCED OPTIONS | |
Connectivity check | The interface can periodically check whether it can connect to its default gateway (Default gateway), or to two user-specified servers (Check the two addresses below). If the check fails, the interface's status changes to Down. You specify how often the interface checks the connection, how long to wait for a response before the attempt is a failure, and how many consecutive failures are required before the Nebula Device stops routing to the gateway. |
Probe succeeds when | This field applies when you select Check the two addresses and specify two domain names or IP addresses for the connectivity check. Select any one if you want the check to pass if at least one of the domain names or IP addresses responds. Select all if you want the check to pass only if both domain names or IP addresses respond. |
MAC address Setting | Have the interface use either the factory-assigned default MAC address, or a manually specified MAC address. |
DHCP option 60 | DHCP Option 60 is used by the Security Firewall for identification to the DHCP server using the VCI (Vendor Class Identifier) on the DHCP server. The Nebula Device adds it in the initial DHCP discovery message that a DHCP client broadcasts in search of an IP address. The DHCP server can assign different IP addresses or options to clients with the specific VCI or reject the request from clients without the specific VCI. Enter a string using up to 63 of these characters [a–z A–Z 0–9 !\"#$%&\'()*+,-./:;<=>?@\[\\\]^_`{}] to identify this Nebula Device to the DHCP server. For example, Zyxel-TW. |
MTU | Enter the number (Bytes) to allow the Nebula Device to act as an IGMP proxy for hosts connected on the IGMP downstream interface. |
SNAT | Click this switch to the right to enable SNAT. When enabled, the Nebula Device rewrites the source address of packets being sent from this interface to the interface's IP address. |
Close | Click Close to exit this screen without saving. |
OK | Click OK to save your changes. |
Internal Interface Configuration
Click the Add button or click the Edit button in the Internal interface section to open the Site-wide > Configure > Firewall > Port and Interface > Internal interface configuration screen.
Site-wide > Configure > Firewall > Port and Interface > Internal interface configuration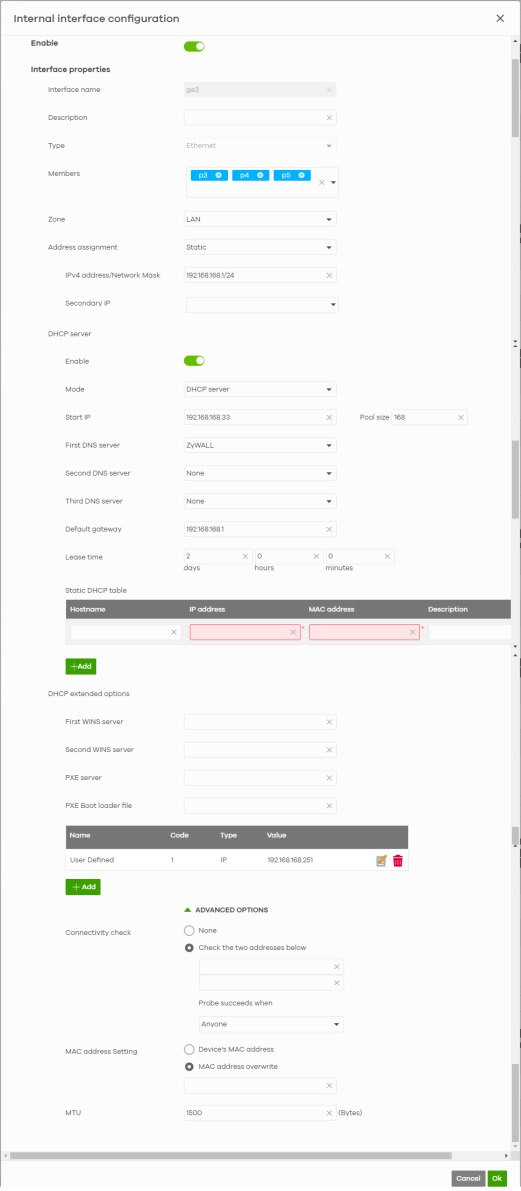
The following table describes the labels in this screen.
label | description |
|---|---|
Enable | Select this to enable the interface. |
Interface properties | |
Interface name | Specify a name for the interface. You may use 2 to 30 single-byte characters, including 0-9a-zA-Z, underscores (_), or dashes (-), but the first character cannot be a number. This value is case-sensitive. |
Description | Enter a descriptive name for the interface. |
Type | Select the type of interface to create. DHCP: The interface will automatically get an IP address and other network settings from a DHCP server. Static: You must manually configure an IP address and other network settings for the interface. PPPoE: The interface will authenticate with an Internet Service Provider, and then automatically get an IP address from the ISP's DHCP server. You can use this type of interface to connect to a DSL modem. PPPoE with static IP: Assign a static IP address to the WAN interface and your WAN interface is getting an Internet connection from a PPPoE server. |
Members | Select the name of the port group to which you want the interface (network) to belong. |
Zone | Select the zone to which this interface belongs. An interface can only be in one zone. |
Address assignment | These fields are displayed if you select Static. |
IPv4 address/Network mask | Enter the IP address and the subnet mask for this interface in dot decimal notation. The subnet mask indicates what part of the IP address is the same for all computers in the network. |
Secondary IP | Enter another IP address for this interface. This field is optional. |
These fields appear if the Nebula Device is a DHCP Relay. | |
DHCP server 1 | Enter the IP address of a DHCP server for the network. |
DHCP server 2 | This field is optional. Enter the IP address of another DHCP server for the network. |
These fields appear if the Nebula Device is a DHCP Server. | |
Enable | Click this switch to the right to enable the DHCP server. |
Mode | Select what type of DHCP service the Nebula Device provides to the network. Choices are: None – the Nebula Device does not provide any DHCP services. There is already a DHCP server on the network. DHCP Relay – the Nebula Device routes DHCP requests to one or more DHCP servers you specify. The DHCP servers may be on another network. DHCP Server – the Nebula Device assigns IP addresses and provides subnet mask, gateway, and DNS server information to the network. The Nebula Device is the DHCP server for the network. |
Start IP | Enter the IP address from which the Nebula Device begins allocating IP addresses. If you want to assign a static IP address to a specific computer, use the Static DHCP Table. If this field is blank, the Pool Size must also be blank. In this case, the Nebula Device can assign every IP address allowed by the interface’s IP address and subnet mask, except for the first address (network address), last address (broadcast address) and the interface’s IP address. |
First DNS Server, Second DNS Server, Third DNS Server | Specify the IP addresses of up to three DNS servers for the DHCP clients to use. Use one of the following ways to specify these IP addresses. Custom Defined – enter a static IP address. From ISP – select the DNS server that another interface received from its DHCP server. This Gateway – the DHCP clients use the IP address of this interface and the Nebula Device works as a DNS relay. |
Default gateway | If you set this interface to DHCP server, you can select to use either the interface’s IP address or another IP address as the default router. This default router will become the DHCP clients’ default gateway. |
Lease Time | Specify how long each computer can use the information (especially the IP address) before it has to request the information again. days, hours, and minutes – enter how long IP addresses are valid. |
Static DHCP table | Configure a list of static IP addresses the Nebula Device assigns to computers connected to the interface. Otherwise, the Nebula Device assigns an IP address dynamically using the interface’s IP Pool Start Address and Pool Size. |
Hostname | By default, the Nebula Device’s hostname is the MAC address. Enter a name to identify the Nebula Device. You can use up to 64 alphanumeric characters including period (.) and hyphen (-). Spaces are not allowed. |
IP address | This field displays the IP address currently assigned to a DHCP client or reserved for a specific MAC address. |
MAC address | Enter the MAC address to which to assign this entry’s IP address. |
Description | Enter a description to help identify this static DHCP entry. |
 | Select an entry in this table and click this to delete it. This will also remove the client information on the Site-wide > Clients > Client list screen. |
Add | Click this to create an entry in the Static DHCP table. This will also add the client reserve IP policy on the Site-wide > Clients > Client list. |
DHCP extended options | Configure this if you want to send more information to DHCP clients through DHCP packets. |
First WINS server Second WINS server | Enter the IP address of the WINS (Windows Internet Naming Service) server that you want to send to the DHCP clients. The WINS server keeps a mapping table of the computer names on your network and the IP addresses that they are currently using. |
PXE server | PXE (Preboot eXecution Environment) allows a client computer to use the network to boot up and install an operating system through a PXE-capable Network Interface Card (NIC). PXE is available for computers on internal interfaces to allow them to boot up using boot software on a PXE server. The Nebula Device acts as an intermediary between the PXE server and the computers that need boot software. The PXE server must have a public IPv4 address. You must enable DHCP server on the Nebula Device so that it can receive information from the PXE server. |
PXE Boot loader file | A boot loader is a computer program that loads the operating system for the computer. Enter the exact file name of the boot loader software file, including filename extension, that is on the PXE server. If the wrong filename is entered, then the client computers cannot boot. |
Name | This field displays the name of the selected DHCP option. Enter a descriptive name to identify the DHCP option. You may use 2 to 30 single-byte characters, including 0-9a-zA-Z, underscores (_), or dashes (-), but the first character cannot be a number. This value is case-sensitive. |
Code | This field displays the code number of the selected DHCP option. Enter a number for the option. This field is mandatory. |
Type | This is the type of the selected DHCP option. Select an appropriate type for the value that you will enter in the next field. Misconfiguration could result in interface lockout. |
Value | Enter the value for the selected DHCP option. For example, if you selected TFTP Server Name (66) and the type is TEXT, enter the DNS domain name of a TFTP server here. This field is mandatory. |
 | Select an entry and click Edit to open a screen where you can modify the entry’s settings. |
 | Select an entry in this table and click this to delete it. |
Add | Click this to create an entry in this table. |
ADVANCED OPTIONS | |
Connectivity check | Select Check the two addresses below to specify one or two domain names or IP addresses for the connectivity check. You can type an IPv4 address in one field and a domain name in the other. For example, type “192.168.1.2” in the top field and “www.zyxel.com” in the bottom field. Select Probe succeeds when to specify two domain names or IP addresses for the connectivity check. Select Anyone if you want the check to pass if at least one of the domain names or IP addresses responds. Select All if you want the check to pass only if both domain names or IP addresses respond. Otherwise, select None. |
MAC address setting | Select Device’s MAC address to have the interface use the factory-assigned default MAC address. By default, the Nebula Device uses the factory-assigned MAC address to identify itself. Select MAC address overwrite to have the interface use a different MAC address. Enter a MAC address in the format ‘xx:xx:xx:xx:xx:xx’ or ‘xx-xx-xx-xx-xx-xx’. Once it is successfully configured, the address will be copied to the configuration file. It will not change unless you change the setting or upload a different configuration file. |
MTU | Maximum Transmission Unit. Enter the maximum size of each data packet, in bytes, that can move through this interface. If a larger packet arrives, the Nebula Device divides it into smaller fragments. Allowed values are 576 – 1500. Usually, this value is 1500. |
Cancel | Click Cancel to exit this screen without saving. |
OK | Click OK to save your changes. |
General Interface Configuration
Click the Add button or click the Edit button in the General interface section to open the Site-wide > Configure > Firewall > Port and Interface > General interface configuration screen.
Site-wide > Configure > Firewall > Port and Interface > General interface configuration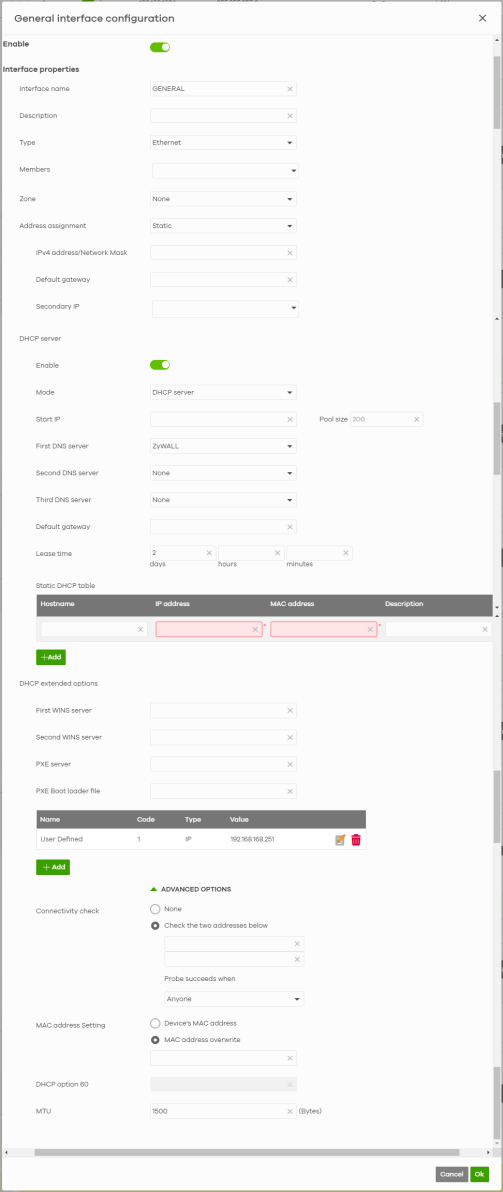
The following table describes the labels in this screen.
label | description |
|---|---|
Enable | Select this to enable the interface. |
Interface properties | |
Interface name | Specify a name for the interface. You may use 2 to 30 single-byte characters, including 0-9a-zA-Z, underscores (_), or dashes (-), but the first character cannot be a number. This value is case-sensitive. |
Description | Enter a descriptive name for the interface. |
Type | Select the type of interface to create. DHCP: The interface will automatically get an IP address and other network settings from a DHCP server. Static: You must manually configure an IP address and other network settings for the interface. PPPoE: The interface will authenticate with an Internet Service Provider, and then automatically get an IP address from the ISP's DHCP server. You can use this type of interface to connect to a DSL modem. PPPoE with static IP: Assign a static IP address to the WAN interface and your WAN interface is getting an Internet connection from a PPPoE server. |
Members | Select the name of the port group to which you want the interface (network) to belong. |
Zone | Select the zone to which this interface belongs. An interface can only be in one zone. |
Address assignment | These fields are displayed if you select Static. |
IPv4 address/Network mask | Enter the IP address and the subnet mask for this interface in dot decimal notation. The subnet mask indicates what part of the IP address is the same for all computers in the network. |
Default gateway | If you set this interface to DHCP server, you can select to use either the interface’s IP address or another IP address as the default router. This default router will become the DHCP clients’ default gateway. |
Secondary IP | Enter another IP address for this interface. This field is optional. |
These fields appear if the Nebula Device is a DHCP Relay. | |
DHCP server 1 | Enter the IP address of a DHCP server for the network. |
DHCP server 2 | This field is optional. Enter the IP address of another DHCP server for the network. |
These fields appear if the Nebula Device is a DHCP Server. | |
Enable | Click this switch to the right to enable the DHCP server. |
Mode | Select what type of DHCP service the Nebula Device provides to the network. Choices are: None – the Nebula Device does not provide any DHCP services. There is already a DHCP server on the network. DHCP Relay – the Nebula Device routes DHCP requests to one or more DHCP servers you specify. The DHCP servers may be on another network. DHCP Server – the Nebula Device assigns IP addresses and provides subnet mask, gateway, and DNS server information to the network. The Nebula Device is the DHCP server for the network. |
Start IP | Enter the IP address from which the Nebula Device begins allocating IP addresses. If you want to assign a static IP address to a specific computer, use the Static DHCP Table. If this field is blank, the Pool Size must also be blank. In this case, the Nebula Device can assign every IP address allowed by the interface’s IP address and subnet mask, except for the first address (network address), last address (broadcast address) and the interface’s IP address. |
First DNS Server, Second DNS Server, Third DNS Server | Specify the IP addresses of up to three DNS servers for the DHCP clients to use. Use one of the following ways to specify these IP addresses. Custom Defined – enter a static IP address. From ISP – select the DNS server that another interface received from its DHCP server. This Gateway – the DHCP clients use the IP address of this interface and the Nebula Device works as a DNS relay. |
Default gateway | If you set this interface to DHCP server, you can select to use either the interface’s IP address or another IP address as the default router. This default router will become the DHCP clients’ default gateway. |
Lease Time | Specify how long each computer can use the information (especially the IP address) before it has to request the information again. days, hours, and minutes – enter how long IP addresses are valid. |
Static DHCP table | Configure a list of static IP addresses the Nebula Device assigns to computers connected to the interface. Otherwise, the Nebula Device assigns an IP address dynamically using the interface’s IP Pool Start Address and Pool Size. |
Hostname | By default, the Nebula Device’s hostname is the MAC address. Enter a name to identify the Nebula Device. You can use up to 64 alphanumeric characters including period (.) and hyphen (-). Spaces are not allowed. |
IP address | Enter the IP address to assign to a device with this entry’s MAC address. |
MAC address | Enter the MAC address to which to assign this entry’s IP address. |
Description | Enter a description to help identify this static DHCP entry. |
 | Select an entry in this table and click this to delete it. This will also remove the client information on the Site-wide > Clients > Client list screen. |
Add | Click this to create an entry in the Static DHCP table. This will also add the client reserve IP policy on the Site-wide > Clients > Client list. |
DHCP extended options | Configure this if you want to send more information to DHCP clients through DHCP packets. |
First WINS server Second WINS server | Enter the IP address of the WINS (Windows Internet Naming Service) server that you want to send to the DHCP clients. The WINS server keeps a mapping table of the computer names on your network and the IP addresses that they are currently using. |
PXE server | PXE (Preboot eXecution Environment) allows a client computer to use the network to boot up and install an operating system through a PXE-capable Network Interface Card (NIC). PXE is available for computers on internal interfaces to allow them to boot up using boot software on a PXE server. The Nebula Device acts as an intermediary between the PXE server and the computers that need boot software. The PXE server must have a public IPv4 address. You must enable DHCP server on the Nebula Device so that it can receive information from the PXE server. |
PXE Boot loader file | A boot loader is a computer program that loads the operating system for the computer. Enter the exact file name of the boot loader software file, including filename extension, that is on the PXE server. If the wrong filename is entered, then the client computers cannot boot. |
Name | This field displays the name of the selected DHCP option. Enter a descriptive name to identify the DHCP option. You may use 2 to 30 single-byte characters, including 0-9a-zA-Z, underscores (_), or dashes (-), but the first character cannot be a number. This value is case-sensitive. |
Code | This field displays the code number of the selected DHCP option. Enter a number for the option. This field is mandatory. |
Type | This is the type of the selected DHCP option. Select an appropriate type for the value that you will enter in the next field. Misconfiguration could result in interface lockout. |
Value | Enter the value for the selected DHCP option. For example, if you selected TFTP Server Name (66) and the type is TEXT, enter the DNS domain name of a TFTP server here. This field is mandatory. |
 | Select an entry and click Edit to open a screen where you can modify the entry’s settings. |
 | Select an entry in this table and click this to delete it. |
Add | Click this to create an entry in this table. |
ADVANCED OPTIONS | |
Connectivity check | Select Check the two addresses below to specify one or two domain names or IP addresses for the connectivity check. You can type an IPv4 address in one field and a domain name in the other. For example, type “192.168.1.2” in the top field and “www.zyxel.com” in the bottom field. Select Probe succeeds when to specify two domain names or IP addresses for the connectivity check. Select Anyone if you want the check to pass if at least one of the domain names or IP addresses responds. Select All if you want the check to pass only if both domain names or IP addresses respond. Otherwise, select None. |
MAC address setting | Select Device’s MAC address to have the interface use the factory-assigned default MAC address. By default, the Nebula Device uses the factory-assigned MAC address to identify itself. Select MAC address overwrite to have the interface use a different MAC address. Enter a MAC address in the format ‘xx:xx:xx:xx:xx:xx’ or ‘xx-xx-xx-xx-xx-xx’. Once it is successfully configured, the address will be copied to the configuration file. It will not change unless you change the setting or upload a different configuration file. |
DHCP option 60 | DHCP Option 60 is used by the Nebula Device for identification to the DHCP server using the VCI (Vendor Class Identifier) on the DHCP server. The Nebula Device adds it in the initial DHCP discovery message that a DHCP client broadcasts in search of an IP address. The DHCP server can assign different IP addresses or options to clients with the specific VCI or reject the request from clients without the specific VCI. Type a string using up to 63 of these characters [a-zA-Z0-9!\"#$%&\'()*+,-./:;<=>?@\[\\\]^_`{}] to identify this Nebula Device to the DHCP server. For example, Zyxel-TW. |
MTU | Maximum Transmission Unit. Enter the maximum size of each data packet, in bytes, that can move through this interface. If a larger packet arrives, the Nebula Device divides it into smaller fragments. Allowed values are 576 – 1500. Usually, this value is 1500. |
Cancel | Click Cancel to exit this screen without saving. |
OK | Click OK to save your changes. |
Routing
Use policy routes and static routes to override the Nebula Device’s default routing behavior in order to send packets through the appropriate next-hop gateway, interface or VPN tunnel.
A policy route defines the matching criteria and the action to take when a packet meets the criteria. The action is taken only when all the criteria are met. Use this screen to configure policy routes.
Click Site-wide > Configure > Firewall > Routing: Policy Route/Traffic Shaping to access this screen.
Site-wide > Configure > Firewall > Routing: Policy Route/Traffic Shaping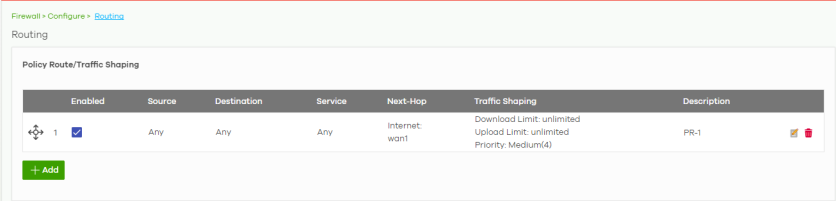
The following table describes the labels in this screen.
Label | Description |
|---|---|
 | Click the icon of a rule and drag the rule up or down to change the order. |
Enabled | Select the checkbox to turn on the rule. Otherwise, clear the checkbox to turn off the rule. |
Source | This shows the source IP addresses to which this rule applies. This could be an IP, CIDR, FQDN, or GEO IP (country) object. |
Destination | This shows the destination IP addresses to which this rule applies. This could be an IP, CIDR, FQDN, or GEO IP (country) object. |
Service | This is the name of the service object (port) or application. Any means all services. Select Protocol to specify a protocol by protocol ID number, as defined in the IPv4 header. For example, 1 = ICMP, 2 = IGMP. |
Next Hop | This is the next hop to which packets are directed. It helps forward packets to their destinations and can be a router, VPN tunnel, or outgoing interface. |
Traffic Shaping | This displays the maximum downstream and upstream bandwidth for traffic from an individual source IP address and the priority level. |
Description | This is the descriptive name of the policy. |
 | Click this icon to change the profile settings. |
 | Click this icon to remove the profile. |
Add | Click this button to create a new policy route. See Add an Application Patrol Profile for more information. |
Add/Edit Policy Route / Traffic Shaping Rule
Click the Add button or an edit icon in the Site-wide > Configure > Firewall > Routing: Policy Route/Traffic Shaping: Add/Edit screen to access this screen.
Site-wide > Configure > Firewall > Routing: Policy Route/Traffic Shaping: Add/Edit
The following table describes the labels in this screen.
Label | Description |
|---|---|
Matching Criteria | |
Description | Enter a descriptive name for the rule. |
Source | Specify the source IP addresses (LAN interface / country) to which this rule applies. You can add multiple IP, CIDR, GEO IP (country) objects or a single FQDN object by pressing ‘Enter’, or enter a new IP address by clicking Add. Select Any to apply the rule to all IP addresses. Multiple FQDNs are not supported. The IP FQDN does NOT support wildcards. |
Destination | Specify the destination IP addresses (LAN interface / country) or subnet to which this rule applies. You can add multiple IP, CIDR, GEO IP (country) objects or a single FQDN object by pressing ‘Enter’, or enter a new IP address by clicking Add. Select Any to apply the rule to all IP addresses. Multiple FQDNs are not supported. |
Service | Select a protocol to apply the policy route to. TCP, UDP, TCP & UDP, ICMP – Match packets from the specified network protocol, going to the optional destination port. Protocol – Match packets for the specified custom protocol. Enter the Protocol ID, 1 – 143 (1 for ICMP, 6 for TCP, 17 for UDP; the Service will automatically select ICMP / TCP / UDP respectively). Application – Match packets from the application. Otherwise, select Any. |
Policy Route | Select this to enable policy route. |
Type | Select Internet Traffic to route the matched packets through the specified outgoing interface to a gateway (which is connected to the interface). Select Intranet Traffic to route the matched packets to the next-hop router or Switch you specified in the Next-Hop field. Select VPN Traffic to route the matched packets through the VPN tunnel you specified in the Next-Hop field. |
Next-Hop | If you select Internet Traffic in the Type field, select the WAN interface to route the matched packets through the specified outgoing interface to a gateway connected to the interface. If you select Intranet Traffic in the Type field, enter the IP address of the next-hop router or Switch. If you select VPN Traffic in the Type field, select the remote VPN gateway’s site name. • Only the VPN gateway sites belonging to the same VPN Area that you set in Organization-wide > Organization-wide manage > VPN orchestrator will be available. See VPN Orchestrator Screen for more information). • Setting a Policy Route to force traffic over a VPN tunnel between a Security Firewall and Nebula Security Gateway (NSG) is not supported. Both front/back end Nebula Devices must be the same type. |
Traffic Shaping | Select this to restrict maximum downstream and upstream bandwidth for traffic in the policy route. |
Download Limit | Set the maximum downstream bandwidth for traffic that matches the policy. |
Upload limit | Set the maximum upstream bandwidth for traffic that matches the policy. |
Priority | Enter a number between 1 and 6 to set the priority for traffic that matches this policy. The lower the number, the higher the priority. Traffic with a higher priority is given bandwidth before traffic with a lower priority. |
Close | Click this button to exit this screen without saving. |
Create | Click this button to save your changes and close the screen. |
Static Route
Click the Add button in the Static Route section of the Site-wide > Configure > Firewall > Routing: Static Route screen to open the following screen.
Site-wide > Configure > Firewall > Routing: Static Route
The following table describes the labels in this screen.
Label | Description |
|---|---|
Subnet | Enter an IP subnet mask. The route applies to all IP addresses in the subnet. |
Next Hop Type | Select IP Address or Interface to specify if you want to send all traffic to the gateway or interface. |
Next Hop | Enter the IP address of the next-hop gateway. |
Metric (0–127) | Metric represents the “cost” of transmission for routing purposes. IP routing uses hop count as the measurement of cost, with a minimum of 1 for directly connected networks. Enter a number that approximates the cost for this link. The number need not be precise, but it must be 0 – 127. In practice, 2 or 3 is usually a good number. |
Description | This is the descriptive name of the static route. |
 | Click this icon to remove a static route. |
Add | Click this button to create a new static route. |
WAN Load Balancing
Go to Site-wide > Configure > Firewall > Routing: WAN Load Balancing to configure WAN load balancing.
By default, the Nebula Device adds all WAN interfaces to a load balancing group, and balances the traffic load between interfaces based on their respective weights (upload bandwidth). An interface with a larger weight gets more chances to transmit traffic than an interface with a smaller weight.
For example, if the weight ratio of WAN 1 and WAN 2 interfaces is 2:1, the Nebula Device chooses WAN 1 for two sessions’ traffic and WAN 2 for one session’s traffic in each round of three new sessions.
Site-wide > Configure > Firewall > Routing: WAN Load Balancing
The following table describes the labels in this section.
label | description |
|---|---|
Weight Round Robin | Displays the WAN interfaces that are in the WAN load balancing group. |
Backup interface | Select this to assign one WAN interface as the backup interface. The backup interface is removed from the WAN load balancing group, and handles all traffic if all load balancing interfaces are down. |
NAT
The NAT summary screen provides a summary of all NAT rules and their configuration. In addition, this screen allows you to create new NAT rules and edit and delete existing NAT rules.
To access this screen, click Site-wide > Configure > Firewall > NAT. The following screen appears, providing a summary of the existing NAT rules.
Site-wide > Configure > Firewall > NAT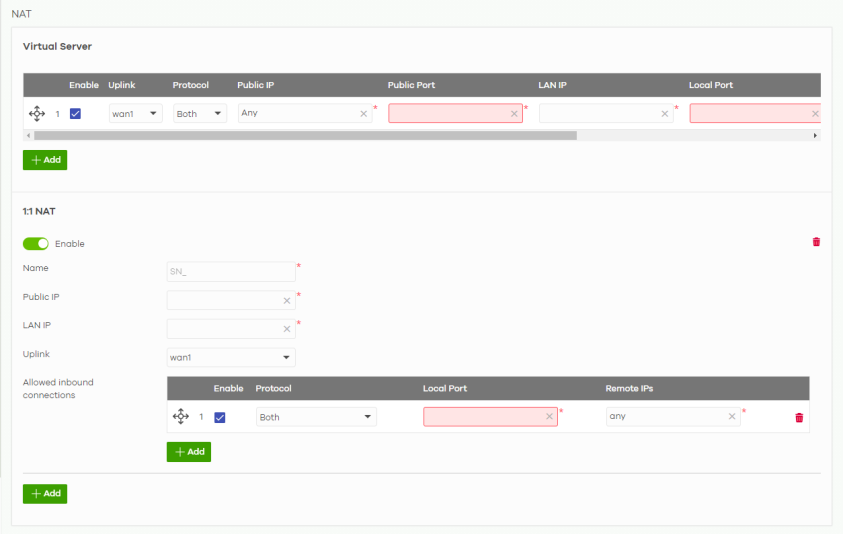
The following table describes the labels in this screen.
label | description |
|---|---|
Virtual Server | |
 | Click the icon of a rule and drag the rule up or down to change the order. |
Enable | Select the checkbox to turn on the rule. Otherwise, clear the checkbox to turn off the rule. |
Uplink | Select the interface of the Nebula Device on which packets for the NAT rule must be received. |
Protocol | Select the IP protocol to which this rule applies. Choices are: TCP, UDP, and Both. |
Public IP | Enter the destination IP address of the packets received by the interface specified in this NAT rule. |
Public Port | Enter the translated destination port or range of translated destination ports if this NAT rule forwards the packet. |
LAN IP | Specify to which translated destination IP address this NAT rule forwards packets. |
Local Port | Enter the original destination port or range of destination ports this NAT rule supports. |
Allow Remote IPs | Specify the remote IP addresses that are allowed to access the public IP address. You can add multiple IP, specify a range of IP addresses (CIDR), or GEO IP (country) objects. Select Any to allow all IP addresses. |
Description | This is the descriptive name of the policy. |
 | Click the remove icon to delete it. |
Add | Click this to create a new entry. |
1:1 NAT | |
Enable | Select this to turn on the rule. Otherwise, turn off the rule. |
Name | Enter the name of the NAT rule. The name is used to refer to the NAT rule. You may use 1 – 31 alphanumeric characters, underscores(_), or dashes (-). This value is case-sensitive. |
Public IP | Enter the destination IP address of the packets received by the interface specified in this NAT rule. |
LAN IP | Specify to which translated destination IP address this NAT rule forwards packets. |
Uplink | Select the interface of the Security Firewall on which packets for the NAT rule must be received. |
Allowed Inbound connections | |
 | Click the icon of a rule and drag the rule up or down to change the order. |
Enable | Select the checkbox to turn on the rule. Otherwise, clear the checkbox to turn off the rule. |
Protocol | Select the IP protocol to which this rule applies. Choices are: TCP, UDP, and Both. |
Local Port | Enter the original destination port or range of destination ports this NAT rule supports. |
Remote IPs | Specify the remote IP addresses that are allowed to access the public IP address. You can add multiple IP, specify a range of IP addresses (CIDR), or GEO IP (country) objects. Select Any to allow all IP addresses. |
 | Click the remove icon to delete it. |
Add | Click this to create a new entry. |
Site-to-Site VPN
A virtual private network (VPN) provides secure communications between sites without the expense of leased site-to-site lines. Use this screen to configure a VPN rule.
The following figure shows two routers (R1, R2) with NAT mode enabled. Site-to-site VPN between the two Firewall devices (F1, F2) is not allowed.
Two VPN Sites Behind NAT Example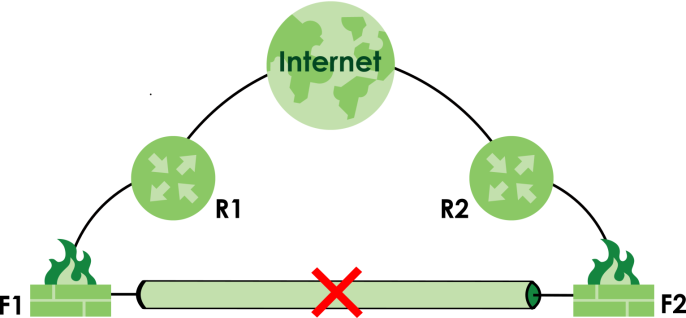
Click Site-wide > Configure > Firewall > Site-to-Site VPN to access this screen.
Site-wide > Configure > Firewall > Site-to-Site VPN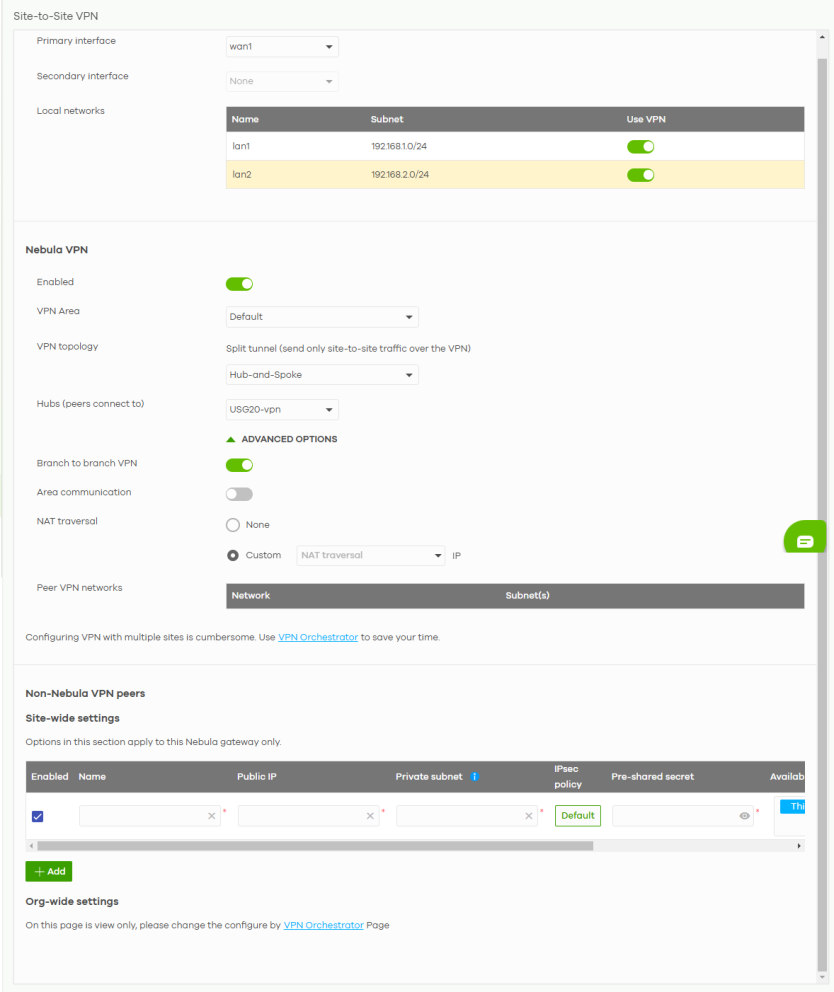
The following table describes the labels in this screen.
Label | Description |
|---|---|
Primary interface | Specify the primary WAN interface through which the Nebula Device forwards VPN traffic. |
Secondary interface | Specify the secondary WAN interface through which the Nebula Device forwards VPN traffic (if any). This is the backup interface for VPN failover use. |
Local networks | This shows the local networks behind the Nebula Device. |
Name | This shows the network name. |
Subnet | This shows the IP address and subnet mask of the computer on the network. |
Use VPN | Select ON to allow the computers on the network to use the VPN tunnel. Otherwise, select OFF. |
Nebula VPN Enabled | Click this to enable or disable site-to-site VPN on the site’s Nebula Device. If you disable this setting, the site will leave the VPN area. |
VPN Area | Select the VPN area of the site. For details, see VPN Areas. |
VPN Topology | Click this to select a topology for the VPN area. For details on topologies, see Topology Overview. Select disable to disable VPN connections for all sites in the VPN area. |
Hubs (peers to connect to) | This field displays the hub sites that the current site is connected to, when Topology is set to Hub-and-Spoke. You can configure hub sites at Organization-wide > Organization-wide manage > VPN orchestrator. |
Branch to branch VPN | Enable this to allow spoke sites to communicate with each other in the VPN area. When disabled, spoke sites can only communicate with hub sites. |
Area communication | Enable this to allow the site to communicate with sites in different VPN areas within the organization. |
NAT traversal | If the Nebula Device is behind a NAT router, select Custom to enter the public IP address or the domain name that is configured and mapped to the Nebula Device on the NAT router. |
Peer VPN networks | This shows all sites within the VPN area. |
Non-Nebula VPN peers Site-wide settings | Configure this section to add a non-Nebula gateway to the VPN area. |
+ Add | Click this button to add a non-Nebula gateway to the VPN area. |
Enabled | Select the checkbox to enable VPN connections to the non-Nebula gateway. |
Name | Enter the name of the non-Nebula gateway. |
Public IP | Enter the public IPv4 address or FQDN of the non-Nebula gateway. |
Private subnet | Enter the IP subnet that will be used for VPN connections. The IP range must be reachable from other devices in the VPN area. |
IPSec policy | Click to select a pre-defined policy or have a custom one. See Create a Content Filter Profile for detailed information. |
Pre-shared secret | Enter a pre-shared key (password). The Nebula Device and peer gateway use the key to identify each other when they negotiate the IKE SA. |
Availability | Select which sites the non-Nebula gateway can connect to in the VPN area. Select All sites to allow the non-Nebula gateway to connect to any site in the VPN area. Select This site and the non-Nebula gateway can only connect to the Nebula Device in this site. |
Address (physical location) | Enter the address (physical location) of the remote device. You can find this on the VPN Topology section on this screen. |
 | Click the remove icon to delete a non-Nebula gateway from the VPN area. |
IPsec Policy
Click the Default button in the Non-Nebula VPN peers section of the Site-wide > Configure > Firewall > Site-to-Site VPN screen to access this screen.
Site-wide > Configure > Firewall > Site-to-Site VPN: IPsec Policy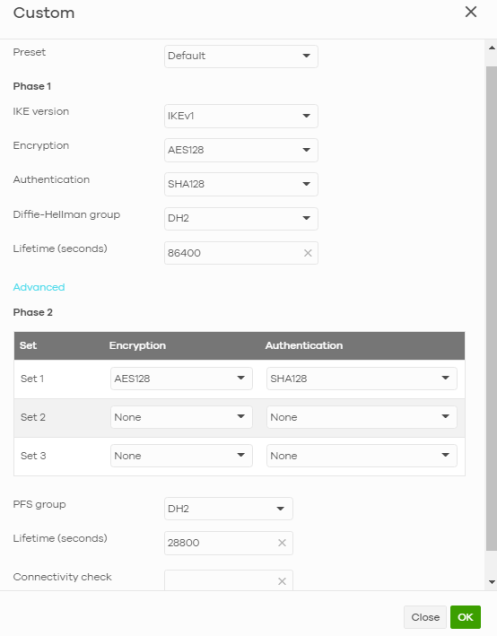
The following table describes the labels in this screen.
label | description |
|---|---|
Preset | Select a pre-defined IPSec policy, or select Custom to configure the policy settings yourself. |
Phase1 | IPSec VPN consists of two phases: Phase 1 (Authentication) and Phase 2 (Key Exchange). A phase 1 exchange establishes an IKE SA (Security Association). |
IKE version | Select IKEv1 or IKEv2. IKEv1 and IKEv2 applies to IPv4 traffic only. IKE (Internet Key Exchange) is a protocol used in setting up security associations that allows two parties to send data securely. |
Encryption | Select which key size and encryption algorithm to use in the IKE SA. Choices are: DES – a 56-bit key with the DES encryption algorithm 3DES – a 168-bit key with the DES encryption algorithm AES128 – a 128-bit key with the AES encryption algorithm AES192 – a 192-bit key with the AES encryption algorithm AES256 – a 256-bit key with the AES encryption algorithm The Nebula Device and the remote IPSec router must use the same key size and encryption algorithm. Longer keys require more processing power, resulting in increased latency and decreased throughput. |
Authentication | Select which hash algorithm to use to authenticate packet data in the IKE SA. Choices are SHA128, SHA256, SHA512 and MD5. SHA is generally considered stronger than MD5, but it is also slower. The remote IPSec router must use the same authentication algorithm. |
Diffie-Hellman group | Select which Diffie-Hellman key group (DHx) you want to use for encryption keys. Choices are: DH1 – use a 768-bit random number Modular Exponential (MODP) DH group DH2 – use a 1024-bit random number MODP DH5 – use a 1536-bit random number MODP DH14 – use a 2048-bit random number MODP DH19 – use a 256-bit random number elliptic curve group DH20 – use a 384-bit random number elliptic curve group DH21 – use a 521-bit random number elliptic curve group The longer the key, the more secure the encryption, but also the longer it takes to encrypt and decrypt information. Both routers must use the same DH key group. |
Lifetime (seconds) | Enter the maximum number of seconds the IKE SA can last. When this time has passed, the Nebula Device and remote IPSec router have to update the encryption and authentication keys and re-negotiate the IKE SA. This does not affect any existing IPSec SAs, however. |
Advanced | Click this to display a greater or lesser number of configuration fields. |
Mode | Set the negotiation mode. Main encrypts the Nebula Device’s and remote IPSec router’s identities but takes more time to establish the IKE SA. Aggressive is faster but does not encrypt the identities. |
Local ID | Enter an identifier used to identify the Nebula Device during authentication. This can be an IP address or hostname. |
Peer ID | Enter an identifier used to identify the remote IPSec router during authentication. This can be an IP address or hostname. |
Phase2 | Phase 2 uses the SA that was established in phase 1 to negotiate SAs for IPSec. |
Encryption | Select which key size and encryption algorithm to use in the IPSec SA. Choices are: (None) – no encryption key or algorithm DES – a 56-bit key with the DES encryption algorithm 3DES – a 168-bit key with the DES encryption algorithm AES128 – a 128-bit key with the AES encryption algorithm AES192 – a 192-bit key with the AES encryption algorithm AES256 – a 256-bit key with the AES encryption algorithm The Nebula Device and the remote IPSec router must both have at least one proposal that uses the same encryption and the same key. Longer keys are more secure, but require more processing power, resulting in increased latency and decreased throughput. |
PFS group | Select whether or not you want to enable Perfect Forward Secrecy (PFS) and, if you do, which Diffie-Hellman key group to use for encryption. Choices are: None – disable PFS DH1 – enable PFS and use a 768-bit random number DH2 – enable PFS and use a 1024-bit random number DH5 – enable PFS and use a 1536-bit random number DH14 – enable PFS and use a 2048-bit random number PFS changes the root key that is used to generate encryption keys for each IPSec SA. The longer the key, the more secure the encryption, but also the longer it takes to encrypt and decrypt information. Both routers must use the same DH key group. PFS is ignored in initial IKEv2 authentication but is used when re-authenticating. |
Lifetime (seconds) | Enter the maximum number of seconds the IPSec SA can last. Shorter life times provide better security. The Nebula Device automatically negotiates a new IPSec SA before the current one expires, if there are users who are accessing remote resources. |
Connectivity check | Enter an IP address that the Nebula Device can ping, to check whether the non-Nebula VPN peer gateway is available. |
Close | Click this button to exit this screen without saving. |
OK | Click this button to save your changes and close the screen. |
Remote Access VPN
Use this screen to configure the VPN client settings on the Nebula Device. This allows incoming VPN clients to connect to the Nebula Device in order to access the site’s network. The clients have dynamic IP addresses and are also known as dial-in users. Only the clients can initiate the VPN tunnel.
Click Site-wide > Configure > Firewall > Remote access VPN to access this screen.
Site-wide > Configure > Firewall > Remote access VPN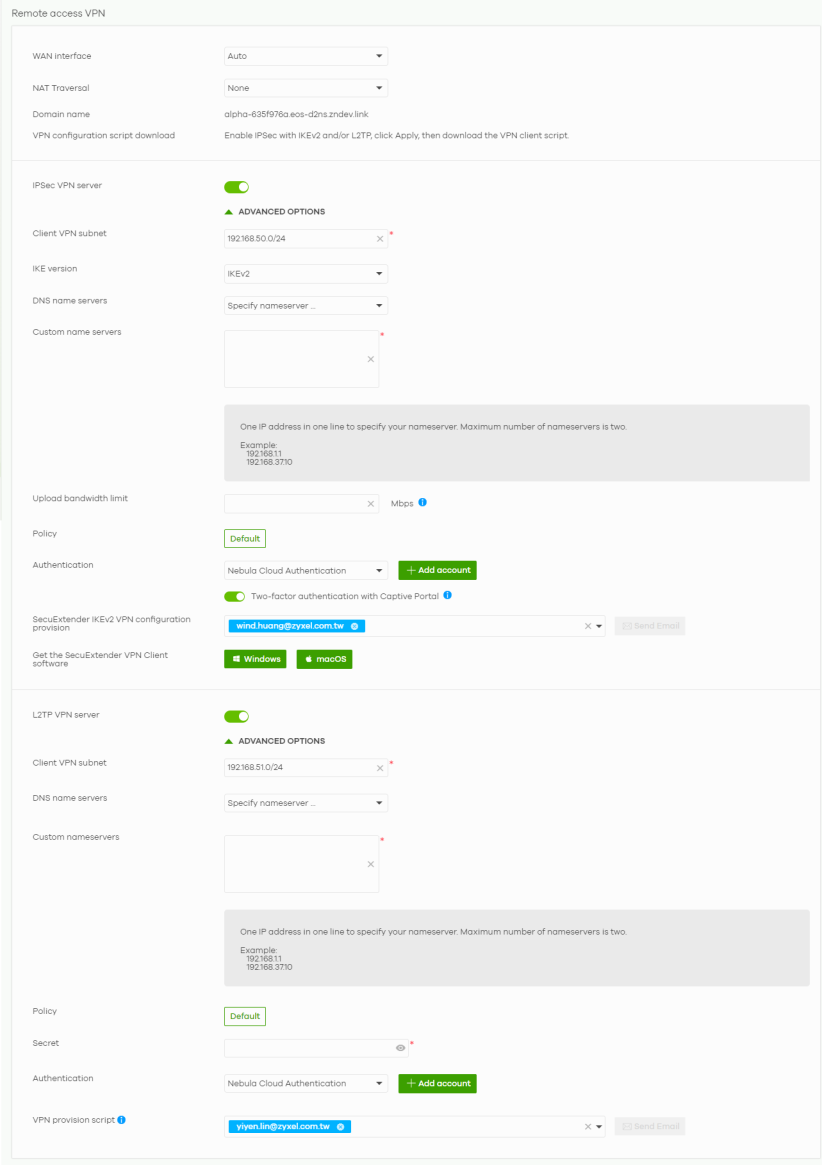
The following table describes the labels in this screen.
Label | Description |
|---|---|
WAN interface | Select the WAN interface which VPN users connect to. |
NAT Traversal | If the Nebula Device is behind a NAT router, select + Customize IP to enter the public IP address that is configured and mapped to the Nebula Device on the NAT router. Select None to map to the WAN IP of the Nebula Device. NCC automatically updates the DNS server when the WAN IP changes. Or, select Auto to allow NCC to detect automatically the public IP of your Nebula Device. NCC automatically selects another WAN interface when the selected WAN interface is down. NCC automatically updates the DNS server when the public IP changes. |
Domain name | This displays the domain name that maps to a WAN interface IP address. This field is available only when you select AUTO in the WAN interface field. |
VPN configuration script download | Click the Windows, iOS/macOS or Android (strongSwan) icon to download a ZIP file containing the VPN remote access configuration script. After unzipping, save the certificate (.crt) and script (.bat) files to the same folder in your computer. This field is available only when you enable IPSec VPN server with IKEv2 in IKE version field or L2TP VPN server and the Nebula Device is online. The Android (strongSwan) option is available only for IPSec VPN server with IKEv2 in IKE version field. |
IPSec VPN server | Select this to enable the IPsec VPN server. |
Client VPN subnet | Specify the IP addresses that the Nebula Device uses to assign to the VPN clients. The default subnet is 192.168.50.0/24. |
IKE version | Select IKEv1 or IKEv2. IKE (Internet Key Exchange) is a protocol used in setting up security associations that allows two parties to send data securely. |
DNS name servers | Specify the DNS servers to assign to the remote users. Or select Specify nameserver to enter a static IP address. |
Custom name servers | If you select Specify nameserver in the DNS name servers field, manually enter the DNS server IP addresses. |
Upload Bandwidth Limit | This field is available only if you select IKEv2 in IKE version. Enter the maximum traffic load between VPN clients, 1 – 100 Mbps. |
Policy | Configure custom VPN tunnel settings. For details, see Remote Access VPN > Custom VPN Policy. |
Authentication | Select how the Nebula Device authenticates a remote user before allowing access to the VPN tunnel. Click Create a cloud auth account to create a Nebula Cloud Authentication Server user account. This will automatically add the site where you create remote access VPN setup to the Organization-wide > Organization-wide manage > Cloud authentication > User screen and bypass two-factor authentication. |
Two-factor authentication with Captive Portal | Select this to require two-factor authentication for a user to access the Nebula Device through VPN. |
SecuExtender IKEv2 VPN configuration provision | Enter the email address to send new IKEv2 Remote Access VPN configuration file to VPN client. Then click Send Email. The VPN client needs to replace the IPSec VPN client configuration by importing the configuration file. |
Get the SecuExtender VPN Client software | Click the Windows or macOS icon to download the SecuExtender VPN client software. |
VPN configuration script download | Click the Windows, iOS/macOS or Android (strongSwan) icon to download a ZIP file containing the VPN remote access configuration script. After unzipping, save the certificate (.crt) and script (.bat) files to the same folder in your computer. This field is available only when you enable IPSec VPN server with IKEv2 in IKE version field or L2TP VPN server and the Nebula Device is online. The Android (strongSwan) option is available only for IPSec VPN server with IKEv2 in IKE version field. |
L2TP VPN server | Select this to enable the L2TP over IPSec VPN server. |
Client VPN subnet | Specify the IP addresses that the Nebula Device uses to assign to the VPN clients. The default L2TP VPN subnet is 192.168.51.0/24. This is the same for all the sites in your organization. |
DNS name servers | Specify the DNS servers to assign to the remote users. Or select Specify nameserver to enter a static IP address. |
Custom nameservers | If you select Specify nameserver in the DNS name servers field, manually enter the DNS server IP addresses. |
Policy | Configure custom VPN tunnel settings. For details, see Remote Access VPN > Custom VPN Policy. |
Secret | This field is available only if you select IKEv1 in IKE version. Enter the pre-shared key (password) which is used to set up the VPN tunnel. The password should be 8 – 32 characters. |
Authentication | Select how the Nebula Device authenticates a remote user before allowing access to the VPN tunnel. Click +Add account to create a Nebula Cloud Authentication Server user account. This will automatically add the site where you create remote access VPN setup to the Organization-wide > Organization-wide manage > Cloud authentication > User screen and bypass two-factor authentication. |
VPN provision script | Send an email to help automatically configure VPN settings on client devices so that the devices can remotely access this Nebula Device. The email contains two scripts; one for mac OS and iOS devices, and one for Windows 8 and Windows 10 devices. You can send the email to one or more email addresses. • If Authentication is set to Nebula Cloud Authentication, the default email address list contains all authorized VPN user email addresses and your email address. • If Authentication is set to AD and RADIUS Authentication, the default email address list contains your user email address. This field is available only when you select L2TP over IPSec client in the Client VPN server field. |
Remote Access VPN > Custom VPN Policy
Click Default in Site-wide > Configure > Firewall > Remote access VPN > Policy to open the following screen.
Site-wide > Configure > Firewall > Remote access VPN: Default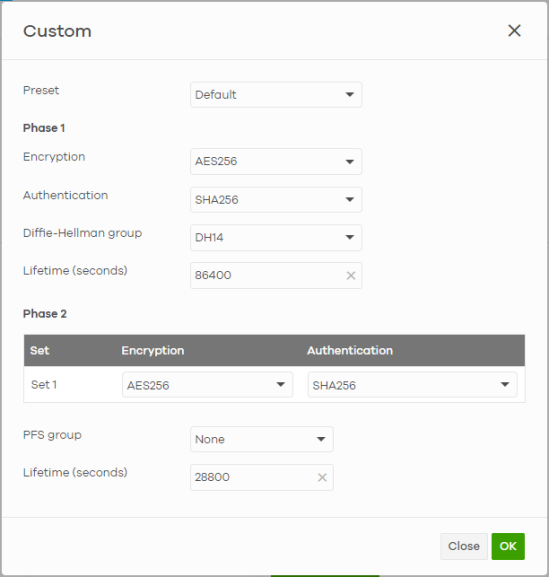
The following table describes the labels in this screen.
label | description |
|---|---|
Custom | |
Preset | Select a pre-defined IPSec policy, or select Custom to configure the policy settings yourself. |
Phase 1 | |
Encryption | Select which key size and encryption algorithm to use in the IPSec SA. Choices are: (None) – no encryption key or algorithm DES – a 56-bit key with the DES encryption algorithm 3DES – a 168-bit key with the DES encryption algorithm AES128 – a 128-bit key with the AES encryption algorithm AES192 – a 192-bit key with the AES encryption algorithm AES256 – a 256-bit key with the AES encryption algorithm The Nebula Device and the remote IPSec router must both have at least one proposal that use the same encryption and the same key. Longer keys are more secure, but require more processing power, resulting in increased latency and decreased throughput. |
Authentication | Select which hash algorithm to use to authenticate packet data in the IKE SA. Choices are SHA128, SHA256, SHA512 and MD5. SHA is generally considered stronger than MD5, but it is also slower. The remote IPSec router must use the same authentication algorithm. |
Diffie-Hellman group | Select the Diffie-Hellman key group (DHx) you want to use for encryption keys. Choices are: DH1 – use a 768-bit random number Modular Exponential (MODP) DH group DH2 – use a 1024-bit random number MODP DH5 – use a 1536-bit random number MODP DH14 – use a 2048-bit random number MODP DH19 – use a 256-bit random number elliptic curve group DH20 – use a 384-bit random number elliptic curve group DH21 – use a 521-bit random number elliptic curve group The longer the key, the more secure the encryption, but also the longer it takes to encrypt and decrypt information. Both routers must use the same DH key group. |
Lifetime (seconds) | Enter the maximum number of seconds the IPSec SA can last. Shorter life times provide better security. The Nebula Device automatically negotiates a new IPSec SA before the current one expires, if there are users who are accessing remote resources. |
Phase 2 | |
Set | This shows the index number of the IPSec policy. |
Encryption | Select which key size and encryption algorithm to use in the IPSec SA. Choices are: (None) – no encryption key or algorithm DES – a 56-bit key with the DES encryption algorithm 3DES – a 168-bit key with the DES encryption algorithm AES128 – a 128-bit key with the AES encryption algorithm AES192 – a 192-bit key with the AES encryption algorithm AES256 – a 256-bit key with the AES encryption algorithm The Nebula Device and the remote IPSec router must both have at least one proposal that use the same encryption and the same key. Longer keys are more secure, but require more processing power, resulting in increased latency and decreased throughput. |
Authentication | Select which hash algorithm to use to authenticate packet data in the IKE SA. Choices are None, SHA128, SHA256, SHA512 and MD5. SHA is generally considered stronger than MD5, but it is also slower. The remote IPSec router must use the same authentication algorithm. |
PFS group | Select whether or not you want to enable Perfect Forward Secrecy (PFS) and, if you do, which Diffie-Hellman key group to use for encryption. Choices are: None – disable PFS DH1 – enable PFS and use a 768-bit random number DH2 – enable PFS and use a 1024-bit random number DH5 – enable PFS and use a 1536-bit random number DH14 – enable PFS and use a 2048 bit random number PFS changes the root key that is used to generate encryption keys for each IPSec SA. The longer the key, the more secure the encryption, but also the longer it takes to encrypt and decrypt information. Both routers must use the same DH key group. PFS is ignored in initial IKEv2 authentication but is used when re-authenticating. |
Lifetime (seconds) | Enter the maximum number of seconds the IPSec SA can last. Shorter life times provide better security. The Security Firewall automatically negotiates a new IPSec SA before the current one expires, if there are users who are accessing remote resources. |
Close | Click this button to exit this screen without saving. |
OK | Click this button to save your changes and close the screen. |
Security Policy
By default, a LAN user can initiate a session from within the LAN and the Nebula Device allows the response. However, the Nebula Device blocks incoming traffic initiated from the WAN and destined for the LAN. Use this screen to configure firewall rules for outbound traffic, application patrol and content filter, schedule profiles and port forwarding rules for inbound traffic.
Click Site-wide > Configure > Firewall > Security policy to access this screen.
Site-wide > Configure > Firewall > Security policy
The following table describes the labels in this screen.
Label | Description |
|---|---|
Security policy | |
 | Click the icon of a rule and drag the rule up or down to change the order. |
Enabled | Select the checkbox to turn on the rule. Otherwise, clear the checkbox to turn off the rule. |
Name | Enter the name of the security policy. |
Action | Select what the Nebula Device is to do with packets that match this rule. Select Deny to silently discard the packets without sending a TCP reset packet or an ICMP destination-unreachable message to the sender. Select Allow to permit the passage of the packets. |
Application Patrol /Content Filtering Policy | Click the “+” to add an Application Patrol or Content Filter profile. The firewall takes the action set in the profile when traffic matches the profile’s policy. Application Patrol manages the use of various applications on the network. It manages general protocols (for example, HTTP and FTP) and instant messenger (IM), peer-to-peer (P2P), Voice over IP (VoIP), and streaming (RSTP) applications. You can even control the use of a particular application’s individual features (like text messaging, voice, video conferencing, and file transfers). See Add an Application Patrol Profile for how to create an Application Patrol profile. Content Filter controls access to specific web sites or web content. See Add a Content Filter Profile for how to create a Content Filter profile. |
Protocol | Select the IP protocol to which this rule applies. Choices are: ICMP, TCP, UDP, TCP and UDP and Any. |
Source | Specify the source IP addresses (LAN interface / country) to which this rule applies. You can add multiple IP, CIDR, FQDN, GEO IP (country) objects, or a single FQDN object by pressing ‘Enter’, or enter a new IP address by clicking Add. Enter any to apply the rule to all IP addresses. Multiple FQDNs are not supported. The IP FQDN does NOT support wildcards. |
Destination | Specify the destination IP addresses (LAN interface / country) or subnet to which this rule applies. You can add multiple IP, CIDR, GEO IP (country) objects or a single FQDN object by pressing ‘Enter’, or enter a new IP address by clicking Add. Enter any to apply the rule to all IP addresses. Multiple FQDNs are not supported. |
Dst Port | Specify the destination ports to which this rule applies. You can specify multiple ports by pressing ‘Enter’, or enter a new port by clicking Add. Enter any to apply the rule to all ports. |
User | Select the External User Group name configured in Site-wide > Configure > Firewall > Firewall settings. |
Schedule | Select the name of the schedule profile that the rule uses. Always means the rule is active at all times if enabled. |
Description | Enter a descriptive name of up to 60 printable ASCII characters for the rule. |
Log | Select whether to have the Nebula Device generate a log (ON) or not (OFF) when traffic matches the profile’s policy. |
 | Click this icon to remove the rule. |
Implicit allow rules | This shows the system generated Allow rules. • 1:1 NAT • NAT virtual server • LAN interface / remote access VPN to Any • Guest interface to WAN interface • LAN interface / remote access VPN to Nebula Device • Guest interface to Nebula Device TCP (TCP:443, 80, 53) • Guest interface to Nebula Device UDP (UDP:53) |
Implicit deny rule | This shows the system generated Deny rule. • Any to Any |
Add | Click this button to create a new rule. |
Anomaly Detection and Prevention | |
Enable Anomaly Detection and Prevention | Select this to enable traffic anomaly and protocol anomaly detection and prevention. |
Session Control | |
UDP Session Time Out | Set how many seconds the Nebula Device will allow a UDP session to remain idle (without UDP traffic) before closing it. |
Session per Host | Use this field to set a common limit to the number of concurrent NAT/Security Policy sessions each client computer can have. If only a few clients use peer to peer applications, you can raise this number to improve their performance. With heavy peer to peer application use, lower this number to ensure no single client uses too many of the available NAT sessions. |
Schedule profiles | |
Schedule name | This shows the name of the schedule profile and the number of the outbound rules that are using this schedule profile. |
 | Click this icon to change the profile settings. |
 | Click this icon to remove the profile. |
Add | Click this button to create a new schedule profile. See Create a New Schedule for more information. |
Add an Application Patrol Profile
Application patrol provides a convenient way to manage the use of various applications on the network. It manages general protocols (for example, HTTP and FTP) and instant messenger (IM), peer-to-peer (P2P), Voice over IP (VoIP), and streaming (RSTP) applications. You can even control the use of a particular application’s individual features (like text messaging, voice, video conferencing, and file transfers).
An application patrol profile is a group of categories of application patrol signatures. For each profile, you can specify the default action the Nebula Device takes once a packet matches a signature (forward, drop, or reject a service’s connections and/or create a log alert).
Click “+” in the Application Patrol/Content Filtering Policy field of the Site-wide > Configure > Firewall > Security policy screen to access this screen. Use the application patrol profile screens to customize action and log settings for a group of application patrol signatures.
Site-wide > Configure > Firewall > Security policy > Application patrol: Add an Application Profile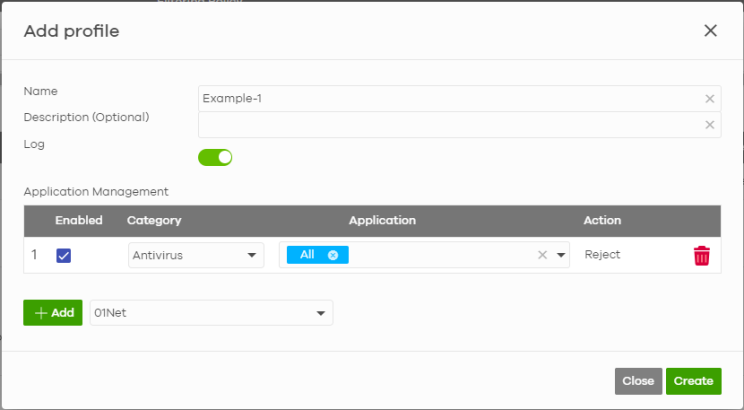
The following table describes the labels in this screen.
Label | Description |
|---|---|
Name | Enter a name for this profile for identification purposes [a-zA-Z0-9_-], up to 30 characters. |
Description (Optional) | Enter a description for this profile. |
Log | Select whether to have the Nebula Device generate a log (ON) or not (OFF) by default when traffic matches an application signature in this category. |
Application Management | |
Enabled | Select the checkbox to turn on the rule. Otherwise, clear the checkbox to turn off the rule. |
Category | Select an application category. |
Application | Select All or select an application within the category to apply the policy. |
Action | Select the default action for the applications selected in this category. Reject – the Nebula Device drops packets that matches these application signatures and sends notification to clients. Drop – the Nebula Device silently drops packets that matches these application signatures without sending notification to clients. Forward – the Nebula Device routes packets that matches these application signatures. |
 | Click this icon to remove the entry. |
Add | Click this button to create a new application category and set actions for specific applications within the category. |
Enter a name to search for relevant applications and click Add to create an entry. | |
Close | Click this button to exit this screen without saving. |
Create | Click this button to save your changes and close the screen. |
Add a Content Filter Profile
Click “+” in the Application Patrol/Content Filtering Policy section of the Site-wide > Configure > Firewall > Security policy screen to access this screen.
Site-wide > Configure > Firewall > Security policy > Content filtering: Create content filter profile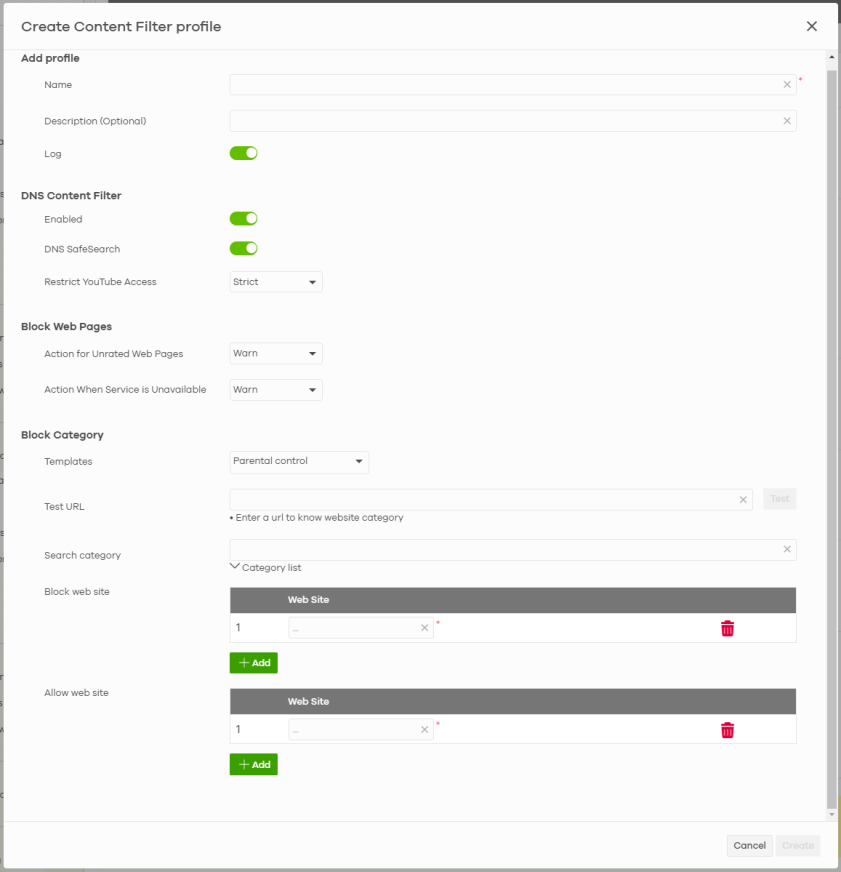
The following table describes the labels in this screen.
Label | Description |
|---|---|
Add profile | |
Name | Enter a name for this profile for identification purposes. Use up to 127 characters (0 – 9 a – z). The casing does not matter. |
Description (Optional) | Enter a description for this profile. |
Log | Select whether to have the Nebula Device generate a log (ON) or not (OFF) by default when traffic matches an application signature in this category. |
DNS Content Filter | |
Enabled | Select whether to enable DNS content filter, in addition to web content filtering. The DNS Content Filter allows the Nebula Device to block access to specific websites by inspecting DNS queries made by users on your network. Content Filter checks all DNS queries including DNS queries to remote DNS servers. |
DNS SafeSearch | Select On to enable content filter on the YouTube search engine. |
Restrict YouTube Access | Select Strict/Moderate to avoid explicit and inappropriate results. |
Block Web Pages | |
Action for Unrated Web Pages | Select Pass to allow users to access web pages that the external web filtering service has not categorized. Select Block to prevent users from accessing web pages that the external web filtering service has not categorized. When the external database content filtering blocks access to a web page, it displays the denied access message that you configured in the Content Filter General screen along with the category of the blocked web page. Select Warn to display a warning message before allowing users to access web pages that the external web filtering service has not categorized. |
Action When Service is Unavailable | Select Pass to allow users to access any requested web page if the external content filter database is unavailable. Select Block to block access to any requested web page if the external content filter database is unavailable. Select Warn to display a warning message before allowing users to access any requested web page if the external content filter database is unavailable. The following are possible causes for the external content filter server not being available: • There is no response from the external content filter server within the time period specified in the Content Filter Server Unavailable Timeout field. • The Nebula Device is not able to resolve the domain name of the external content filter database. • There is an error response from the external content filter database. This can be caused by an expired content filter registration (External content filter’s license key is invalid”). |
Block Category | |
Templates | Select the block category. Choices are Parental control, Productivity and Custom. |
Test URL | You can check which category a web page belongs to. Enter a web site URL in the text box, then click Test. When the content filter is active, you should see the web page’s category. The query fails if the content filter is not active. Content Filter can query a category by full URL string (for example, http://www.google.com/picture/index.htm), but HTTPS Domain Filter can only query a category by domain name ('www.google.com'), so the category may be different in the query result. URL to test displays both results in the test. |
Search category | Click to display or hide the category list. These are categories of web pages based on their content. Select categories in this section to control access to specific types of Internet content. |
Block web site | Sites that you want to block access to, regardless of their content rating, can be blocked by adding them to this list. Enter host names such as www.bad-site.com into this text field. Do not enter the complete URL of the site – that is, do not include “http://”. All sub-domains are also blocked. For example, entering “bad-site.com” also blocks “www.badsite.com”, “partner.bad-site.com”, “press.bad-site.com”, and so on. You can also enter just a top level domain. For example, enter .com to block all .com domains. Use up to 127 characters (0 – 9 a – z). The casing does not matter. |
Add | Click this button to create a new application category and set actions for specific applications within the category. |
 | Click this icon to remove the entry. |
Allow web site | Sites that you want to allow access to, regardless of their content rating, can be allowed by adding them to this list. Enter host names such as www.good-site.com into this text field. Do not enter the complete URL of the site – that is, do not include “http://”. All sub-domains are allowed. For example, entering “zyxel.com” also allows “www.zyxel.com”, “partner.zyxel.com”, “press.zyxel.com”, and so on. You can also enter just a top level domain. For example, enter .com to allow all .com domains. Use up to 127 characters (0 – 9 a – z). The casing does not matter. |
Add | Click this button to create a new application category and set actions for specific applications within the category. |
 | Click this icon to remove the entry. |
Cancel | Click this button to exit this screen without saving. |
Create | Click this button to save your changes and close the screen. |
Create a New Schedule
Click the Add button in the Schedule Profiles section of the Site-wide > Configure > Firewall > Security policy > Schedule profiles screen to access this screen.
Site-wide > Configure > Firewall > Security policy > Schedule profiles: Create new schedule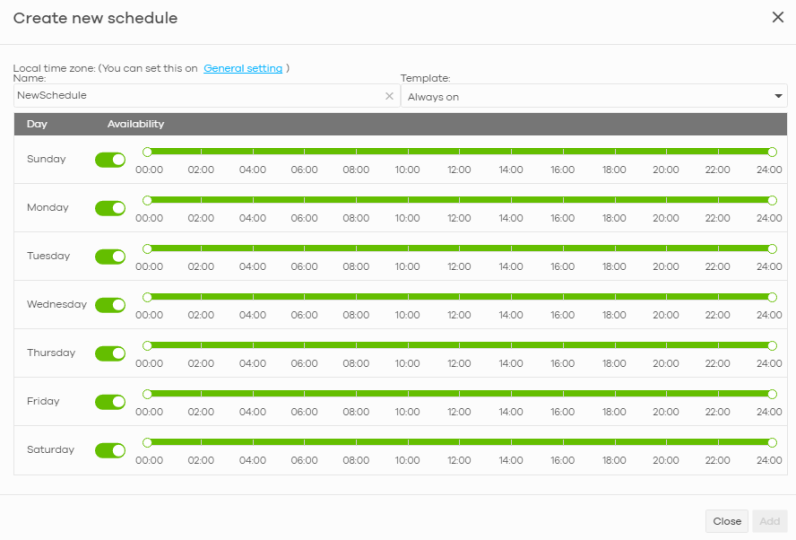
The following table describes the labels in this screen.
Label | Description |
|---|---|
Name | Enter a descriptive name for this schedule for identification purposes. |
Templates | Select a pre-defined schedule template or select Custom schedule and manually configure the day and time at which the associated firewall outbound rule is enabled. |
Day | This shows the day of the week. |
Availability | Click On to enable the associated rule at the specified time on this day. Otherwise, select Off to turn the associated rule off at the specified time on this day. Specify the hour and minute when the schedule begins and ends each day. |
Close | Click this button to exit this screen without saving. |
Add | Click this button to save your changes and close the screen. |
Security Service
Use this screen to enable or disable the features available in the security pack for your Nebula Device, such as content filter, Intrusion Detection and Prevention (IDP) and/or anti-virus. As to application patrol, go to the Firewall screen to configure it since you need to have a firewall rule for outbound traffic.
Content filter allows you to block access to specific web sites. It can also block access to specific categories of web site content. IDP can detect malicious or suspicious packets used in network-based intrusions and respond instantaneously. Anti-virus helps protect your connected network from virus/spy-ware infection.
For Security Firewall (USG FLEX / ATP Series)
This section describes the Security Service feature for USG FLEX / ATP Series. Click Site-wide > Configure > Firewall > Security service to access this screen.
Site-wide > Configure > Firewall > Security service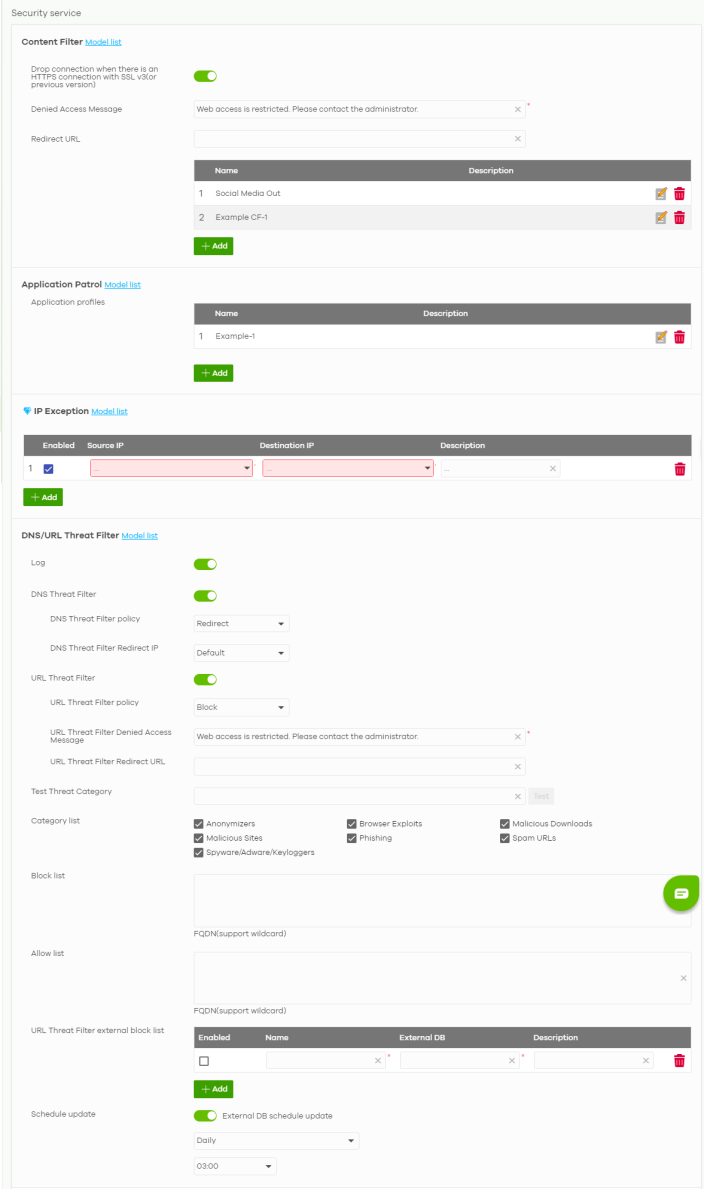
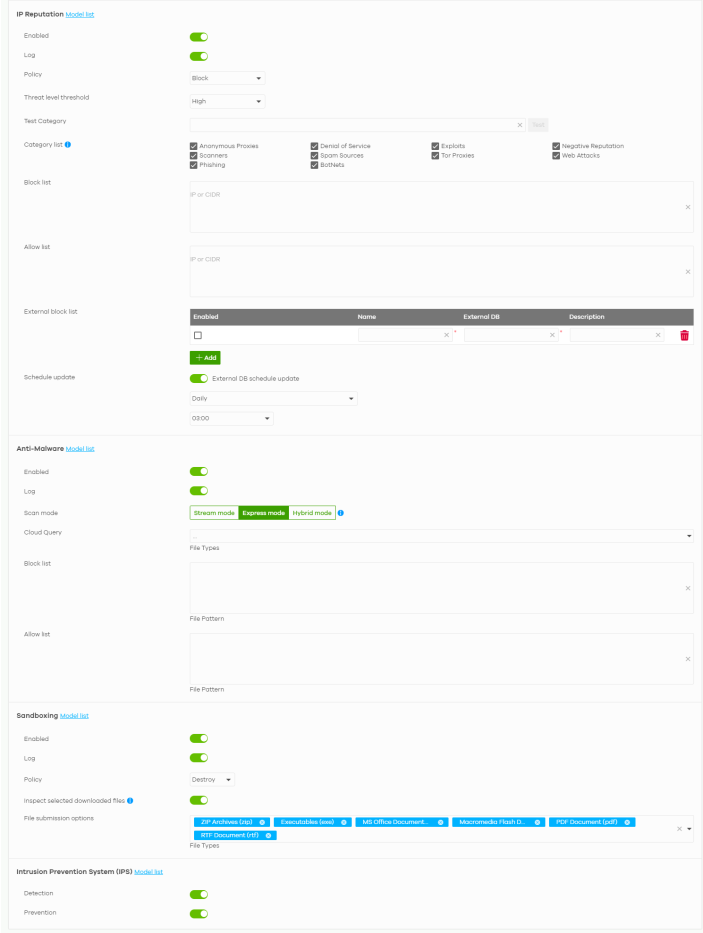
The following table describes the labels in this screen.
Label | Description |
|---|---|
Content Filter | |
Drop connection when there is an HTTPS connection with SSL V3 (or previous version) | Select On to have the Nebula Device block HTTPS web pages using SSL V3 or a previous version. |
Denied Access Message | Enter a message to be displayed when content filter blocks access to a web page. Use up to 127 characters (0–9 a–z A–Z;/?:@&=+$\.-_!~*'()%,”). For example, “Access to this web page is not allowed. Please contact the network administrator”. It is also possible to leave this field blank if you have a URL specified in the Redirect URL field. In this case if the content filter blocks access to a web page, the Nebula Device just opens the web page you specified without showing a denied access message. |
Redirect URL | Enter the URL of the web page to which you want to send users when their web access is blocked by content filter. The web page you specify here opens in a new frame below the denied access message. Use “http://” or “https://” followed by up to 262 characters (0–9 a–z A–Z;/?:@&=+$\.-_!~*'()%). For example, http://192.168.1.17/blocked access. |
Name | This shows the name of this content filter profile. |
Description | This shows the description for this profile. |
 | Click this icon to change the profile settings. |
 | Click this icon to remove the profile. |
Add | Click this to create a content filter profile. See Add a Content Filter Profile for more information. |
Application Patrol Application profiles | |
Name | This shows the name of this Application Patrol profile. |
Description | This shows the description for this profile. |
 | Click this icon to change the profile settings. |
 | Click this icon to remove the profile. |
Add | Click this to create an Application Patrol profile. See Add Application Patrol Profile for more information. |
IP Exception | |
Enabled | Select the checkbox to enable IP Exception. IP addresses listed here are not checked by security services. |
Source IP | This field displays the source IP address of incoming traffic. It displays any if there is no restriction on the source IP address. |
Destination IP | This field displays the destination IP address of incoming traffic. It displays any if there is no restriction on the destination IP address. |
Description | Enter a description for this profile. |
 | Click this icon to remove the entry. |
Add | Click this button to create a new entry. |
DNS/URL Threat Filter | DNS filtering inspects DNS queries made by clients on your network and compares the queries against a database of blocked or allowed Fully Qualified Domain Names (FQDNs). If a user attempts to connect to a suspect site, where the DNS query packet contains an FQDN with a bad reputation, then a DNS query is sent from the user’s computer and detected by the DNS Filter. The Nebula Device DNS filter will either drop the DNS query or reply to the user with a fake DNS response using the default dnsft.cloud.zyxel.com IP address (where the user will see a “Web Page Blocked!” page) or a custom IP address. When you enable the URL Threat filtering service, your Nebula Device downloads signature files that contain known URL Threat domain names and IP addresses. The Nebula Device will also access an external database, Cloud Query, that has millions of web sites categorized based on content. You can have the Nebula Device allow, block, warn and/or log access to web sites or hosts based on these signatures and categories. |
Log | Select whether to have the Nebula Device generate a log when the policy is matched to the criteria listed above. |
DNS Threat Filter | Select On to turn on the rule. Otherwise, select Off to turn off the rule. |
DNS Threat Filter Policy | Select Pass to have the Nebula Device allow the DNS query packet and not reply with a DNS reply packet containing a default or custom-defined IP address. Select Redirect to have the Nebula Device reply with a DNS reply packet containing a default or custom-defined IP address. |
DNS Threat Filter Redirect IP | Enter the IP address to have the Nebula Device reply with a DNS reply packet containing a default or custom-defined IP address when a DNS query packet contains an FQDN with a bad reputation. The default IP is the dnsft.cloud.zyxel.com IP address. If you select a custom-defined IP, then enter a valid IPv4 address in the text box. |
URL Threat Filter | Select On to turn on the rule. Otherwise, select Off to turn off the rule. |
URL Threat Filter Policy | Select Pass to allow users to access web pages that the external web filtering service has not categorized. Select Block to prevent users from accessing web pages that the external web filtering service has not categorized. When the external database content filter blocks access to a web page, it displays the denied access message that you configured in the Content Filter General screen along with the category of the blocked web page. Select Warn to display a warning message before allowing users to access web pages that the external web filtering service has not categorized. |
URL Threat Filter Denied Access Message | Enter a message to be displayed when content filter blocks access to a web page. Use up to 127 characters (0–9 a–z A–Z;/?:@&=+$\.-_!~*'()%,”). For example, “Access to this web page is not allowed. Please contact the network administrator”. It is also possible to leave this field blank if you have a URL specified in the Redirect URL field. In this case if the content filter blocks access to a web page, the Nebula Device just opens the web page you specified without showing a denied access message. |
URL Threat Filter Redirect URL | Enter the URL of the web page to which you want to send users when their web access is blocked by content filter. The web page you specify here opens in a new frame below the denied access message. Use “http://” or “https://” followed by up to 262 characters (0–9 a–z A–Z;/?:@&=+$\.-_!~*'()%). For example, http://192.168.1.17/blocked access. |
Test Threat Category | Enter a URL using http://domain or https://domain and click the Test button to check if the domain belongs to a URL threat category. |
Category List | These are categories of web pages based on their content. Select categories in this section to control access to specific types of Internet content. |
Block list | Sites that you want to block access to, regardless of their content rating, can be blocked by adding them to this list. Enter host names such as www.bad-site.com into this text field. Do not enter the complete URL of the site – that is, do not include “http://”. All sub-domains are also blocked. For example, entering “bad-site.com” also blocks “www.badsite.com”, “partner.bad-site.com”, “press.bad-site.com”, and so on. You can also enter just a top level domain. For example, enter .com to block all .com domains. Use up to 127 characters (0–9 a–z). The casing does not matter. |
Allow list | Sites that you want to allow access to, regardless of their content rating, can be allowed by adding them to this list. Enter host names such as www.good-site.com into this text field. Do not enter the complete URL of the site – that is, do not include “http://”. All sub-domains are allowed. For example, entering “zyxel.com” also allows “www.zyxel.com”, “partner.zyxel.com”, “press.zyxel.com”, and so on. You can also enter just a top level domain. For example, enter .com to allow all .com domains. Use up to 127 characters (0–9 a–z). The casing does not matter. |
URL Threat Filter external block list | The Nebula Device uses black list entries stored in a file on a web server that supports HTTP or HTTPS. The Nebula Device blocks incoming and outgoing packets from the black list entries in this file. |
Enabled | Select this to have the Nebula Device block the incoming packets that come from the listed addresses in the block list file on the server. |
Name | Enter an identifying name for the block list file. You can use alphanumeric and ()+/:=?!*#@$_%- characters, and it can be up to 60 characters long. |
External DB | Enter the exact file name, path and IP address of the server containing the block list file. The file type must be ‘txt’. For example, http://172.16.107.20/blacklist-files/myip-ebl.txt The server must be reachable from the Nebula Device. |
Description | Enter a description of the block list file. You can use alphanumeric and ()+/:=?!*#@$_%- characters, and it can be up to 60 characters long. |
 | Click this icon to remove the entry. |
Add | Click this button to create a new entry. |
Schedule update | The signatures for DNS Filter and URL Threat Filter are the same. These signatures are continually updated as new malware evolves. New signatures can be downloaded to the Nebula Device periodically if you have subscribed for the URL Threat filter signatures service. You need to create an account at myZyxel, register your Nebula Device and then subscribe for URL Threat filter service in order to be able to download new signatures from myZyxel. Select Daily to set the time of the day, or Weekly to set the day of the week and the time of the day. Schedule signature updates for a day and time when your network is least busy to minimize disruption to your network. |
IP Reputation | |
Enabled | Select this option to turn on IP blocking on the Nebula Device. |
Log | Select this option to create a log on the Nebula Device when the packet comes from an IPv4 address with bad reputation. |
Policy | Select Pass to have the Nebula Device allow the packet to go through. Select Block to have the Nebula Device deny the packets and send a TCP RST to both the sender and receiver when a packet comes from an IPv4 address with bad reputation. |
Threat level threshold | Select the threshold threat level to which the Nebula Device will take action (High, Medium and above, Low and above). The threat level is determined by the IP reputation engine. It grades IPv4 addresses. • High: an IPv4 address that scores 0 to 20 points. • Medium and above: an IPv4 address that scores 0 to 60 points. • Low and above: an IPv4 address that scores 0 to 80 points. For example, a score of “10” will cause the Nebula Device to take action whether you set the Threat level threshold at High, Medium and above, or Low and above. But a score of “61” will not cause the Nebula Device to take any action if you set the Threat level threshold at Medium and above. |
Test Category | Enter an IPv4 address of a website, and click the Test button to check if the website associates with suspicious activities that could pose a security threat to users or their computers. |
Category list | Select the categories of packets that come from the Internet and are known to pose a security threat to users or their computers. |
Block list | Sites that you want to block access to, regardless of their content rating, can be blocked by adding them to this list. Add the IPv4 addresses that the Nebula Device will block the incoming packets. |
Allow list | Sites that you want to allow access to, regardless of their content rating, can be allowed by adding them to this list. Add the IPv4 addresses that the Nebula Device will allow the incoming packets. |
External block list | |
Enabled | Select this checkbox to have the Nebula Device block the incoming packets that come from the listed addresses in the block list file on the server. |
Name | Enter the identifying name for the block list file. You can use alphanumeric and ()+/:=?!*#@$_%- characters, and it can be up to 60 characters long. |
External DB | Enter the file name, path and IP address of the server containing the block list file. For example, http://172.16.107.20/blacklist-files/myip-ebl.txt |
Description | Enter a description of the block list file. You can use alphanumeric and ()+/:=?!*#@$_%- characters, and it can be up to 60 characters long. |
 | Click this icon to remove the entry. |
Add | Click this button to create a new entry. |
Schedule update | New IP reputation signatures can be downloaded to the Nebula Device periodically if you have subscribed for the IP reputation signatures service.You need to create an account at Zyxel, register your Nebula Device and then subscribe for IP reputation service in order to be able to download new signatures from Zyxel. Select Daily to set the time of the day, or Weekly to set the day of the week and the time of the day. Schedule signature updates for a day and time when your network is least busy to minimize disruption to your network. |
Anti-Malware | |
Enabled | Select On to turn on the rule. Otherwise, select Off to turn off the rule. |
Log | Select whether to have the Nebula Device generate a log when the policy is matched to the criteria listed above. |
Scan Mode | |
Express Mode | In this mode you can define which types of files are scanned using the File Type For Scan fields. The Nebula Device then scans files by sending each file’s hash value to a cloud database using cloud query. This is the fastest scan mode. |
Stream Mode | In this mode the Nebula Device scans all files for viruses using its anti-malware signatures to detect known virus pattens. This is the deepest scan mode. |
Hybrid Mode (for ATP devices only) | In this mode you can define which types of files are scanned using the File Type For Scan fields. The Nebula Device then scans files by sending each file’s hash value to a cloud database using cloud query. It also scans files using anti-malware signatures, and Threat Intelligence Machine Learning. This mode combines Express Mode and Stream Mode to offer a balance of speed and security. |
File decompression (ZIP and RAR) | Select this checkbox to have the Nebula Device scan a compressed file (the file does not need to have a “zip” or “rar” file extension). The Nebula Device first decompresses the file and then scans the contents for malware. |
Destroy compressed files that could not be decompressed | When you select this checkbox, the Nebula Device deletes compressed files that use password encryption. Select this checkbox to have the Nebula Device delete any compressed files that it cannot decompress. The Nebula Device cannot decompress password protected files or a file within another compressed file. There are also limits to the number of compressed files that the Nebula Device can concurrently decompress. |
Cloud Query | Select the Cloud Query supported file types for the Nebula Device to scan for viruses. |
Block list | This field displays the file or encryption pattern of the entry. Enter an MD5 hash or file pattern that would cause the Nebula Device to log and modify this file. File patterns: •Use up to 80 characters. Alphanumeric characters, underscores (_), dashes (-), question marks (?) and asterisks (*) are allowed. •A question mark (?) lets a single character in the file name vary. For example, use “a?.zip” (without the quotation marks) to specify aa.zip, ab.zip and so on. •Wildcards (*) let multiple files match the pattern. For example, use “*a.zip” (without the quotation marks) to specify any file that ends with “a.zip”. A file named “testa.zip would match. There could be any number (of any type) of characters in front of the “a.zip” at the end and the file name would still match. A file named “test.zipa” for example would not match. •A * in the middle of a pattern has the Nebula Device check the beginning and end of the file name and ignore the middle. For example, with “abc*.zip”, any file starting with “abc” and ending in “.zip” matches, no matter how many characters are in between. •The whole file name has to match if you do not use a question mark or asterisk. •If you do not use a wildcard, the Security Firewall checks up to the first 80 characters of a file name. |
Allow list | Enter the file or encryption pattern for this entry. Enter an MD5 hash or file pattern to identify the names of files that the Nebula Device should not scan for viruses. File patterns: •Use up to 80 characters. Alphanumeric characters, underscores (_), dashes (-), question marks (?) and asterisks (*) are allowed. •A question mark (?) lets a single character in the file name vary. For example, use “a?.zip” (without the quotation marks) to specify aa.zip, ab.zip and so on. •Wildcards (*) let multiple files match the pattern. For example, use “*a.zip” (without the quotation marks) to specify any file that ends with “a.zip”. A file named “testa.zip would match. There could be any number (of any type) of characters in front of the “a.zip” at the end and the file name would still match. A file named “test.zipa” for example would not match. •A * in the middle of a pattern has the Nebula Device check the beginning and end of the file name and ignore the middle. For example, with “abc*.zip”, any file starting with “abc” and ending in “.zip” matches, no matter how many characters are in between. •The whole file name has to match if you do not use a question mark or asterisk. •If you do not use a wildcard, the Nebula Device checks up to the first 80 characters of a file name. |
Sandboxing | Sandboxing provides a safe environment to separate running programs from your network and host devices. Unknown or untrusted programs/codes are uploaded to the Defend Center and executed within an isolated virtual machine (VM) to monitor and analyze the zero-day malware and advanced persistent threats (APTs) that may evade the Nebula Device’s detection, such as anti-malware. Results of cloud sandboxing are sent from the server to the Nebula Device. |
Enabled | Select this option to turn on sandboxing on the Nebula Device |
Log | Enable this option to allow the Security Firewall to create a log when a suspicious file is detected. |
Policy | Specify whether the Nebula Device deletes (Destroy) or forwards (Allow) malicious files. Malicious files are files given a high score for malware characteristics by the Defend Center. |
Inspect selected downloaded files | Select this option to have the Nebula Device hold the downloaded file for up to 2 seconds if the downloaded file has never been inspected before. The Nebula Device will wait for the Defend Center’s result and forward the file in 2 seconds. Sandbox detection may take longer than 2 seconds, so infected files could still possibly be forwarded to the user. The scan result will be removed from the Nebula Device cache after the Nebula Device restarts. |
File submission options | Specify the type of files to be sent for sandbox inspection. |
Intrusion Prevention System (IPS) | |
Detection | Select On to enable Detection. |
Prevention | Select On to enable Prevention. |
Create a Content Filter Profile
Click the Add button in the Content Filter section of the Site-wide > Configure > Firewall > Security service screen to access this screen.
Site-wide > Configure > Firewall > Security service > Content Filter: Add/Edit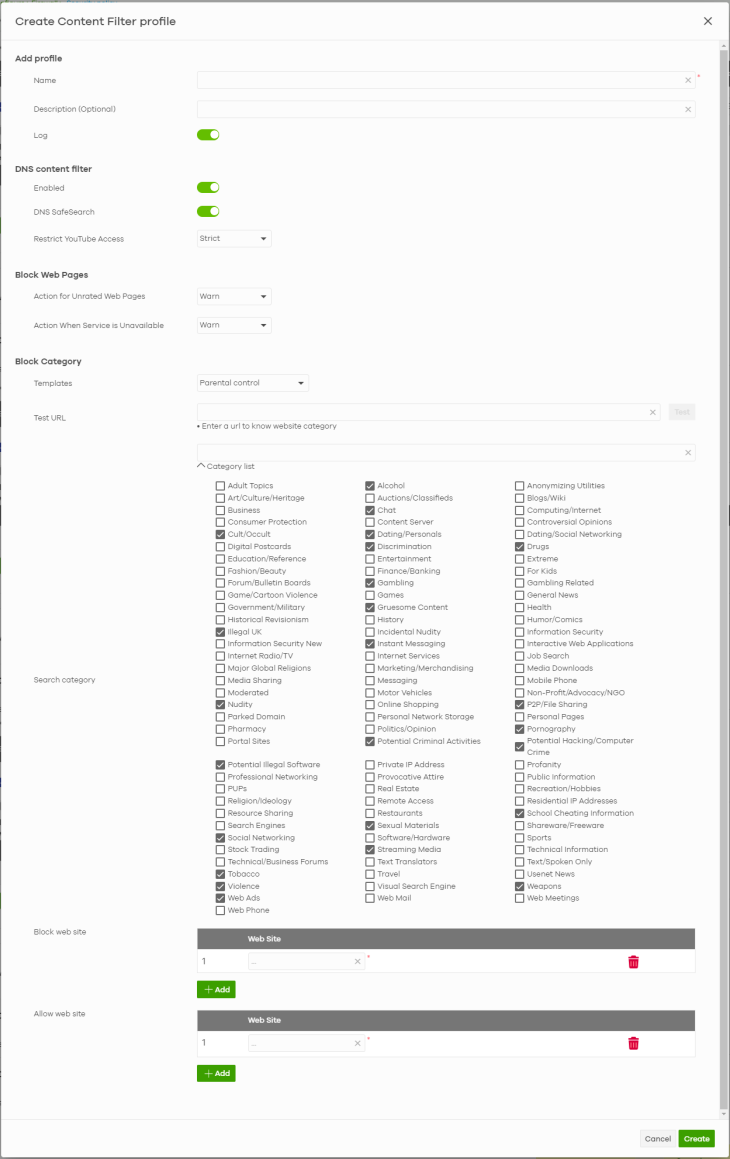
The following table describes the labels in this screen.
label | description |
|---|---|
Add profile | |
Name | Enter a name for this profile for identification purposes. Use up to 127 characters (0 – 9 a – z). The casing does not matter. |
Description (Optional) | Enter a description for this profile. |
Log | Select whether to have the Nebula Device generate a log (ON) or not (OFF) by default when traffic matches an application signature in this category. |
DNS content filter | Select this option to turn on DNS filtering on the Nebula Device. DNS filtering inspects DNS queries made by clients on your network and compares the queries against a database of blocked or allowed Fully Qualified Domain Names (FQDNs). The Nebula Device DNS content filter will either drop the DNS query or reply to the user with a fake DNS response. |
DNS SafeSearch | Select whether to enable content filter on the YouTube search engine. This allows you to avoid explicit and inappropriate results by selecting Strict/Moderate in the Restrict YouTube Access. |
Block Web Pages | |
Action for Unrated Web Pages | Select Pass to allow users to access web pages that the external web filtering service has not categorized. Select Block to prevent users from accessing web pages that the external web filtering service has not categorized. When the external database content filter blocks access to a web page, it displays the denied access message that you configured in the Content Filter General screen along with the category of the blocked web page. Select Warn to display a warning message before allowing users to access web pages that the external web filtering service has not categorized. |
Action when service is unavailable | Select Pass to allow users to access any requested web page if the external content filter database is unavailable. Select Block to block access to any requested web page if the external content filter database is unavailable. Select Warn to display a warning message before allowing users to access any requested web page if the external content filter database is unavailable. The following are possible causes for the external content filter server not being available: •There is no response from the external content filter server within the time period specified in the Content Filter Server Unavailable Timeout field. •The Nebula Device is not able to resolve the domain name of the external content filter database. •There is an error response from the external content filter database. This can be caused by an expired content filter registration (External content filter’s license key is invalid”). |
Block Category The Nebula Device prevents users from accessing web pages that match the categories that you select below. When external database content filter blocks access to a web page, it displays the denied access message that you configured in the Denied access message field along with the category of the blocked web page. | |
Templates | Web pages are classified into a category based on their content. You can choose a pre-defined template that has already selected certain categories. Alternatively, choose Custom and manually select categories in this section to control access to specific types of Internet content. |
Test URL | You can check which category a web page belongs to. Enter a web site URL in the text box, then click Test. When the content filter is active, you should see the web page’s category. The query fails if the content filter is not active. Content Filter can query a category by full URL string (for example, http://www.google.com/picture/index.htm), but HTTPS Domain Filter can only query a category by domain name ('www.google.com'), so the category may be different in the query result. Test URL displays both results in the test. |
Search Category | Specify your desired filter criteria to filter the list of categories. |
Category List | Click to display or hide the category list. These are categories of web pages based on their content. Select categories in this section to control access to specific types of Internet content. |
Block web site | Sites that you want to block access to, regardless of their content rating, can be blocked by adding them to this list. Enter host names such as www.bad-site.com into this text field. Do not enter the complete URL of the site – that is, do not include “http://”. All sub-domains are also blocked. For example, entering “bad-site.com” also blocks “www.badsite.com”, “partner.bad-site.com”, “press.bad-site.com”, and so on. You can also enter just a top level domain. For example, enter .com to block all .com domains. Use up to 127 characters (0–9 a–z). The casing does not matter. |
Add | Click this button to add a new entry. |
Allow web site | Sites that you want to allow access to, regardless of their content rating, can be allowed by adding them to this list. Enter host names such as www.good-site.com into this text field. Do not enter the complete URL of the site – that is, do not include “http://”. All sub-domains are allowed. For example, entering “zyxel.com” also allows “www.zyxel.com”, “partner.zyxel.com”, “press.zyxel.com”, and so on. You can also enter just a top level domain. For example, enter .com to allow all .com domains. Use up to 127 characters (0–9 a–z). The casing does not matter. |
Add | Click this button to add a new entry. |
 | Click this icon to remove the entry. |
Cancel | Click this button to exit this screen without saving. |
Create | Click this button to save your changes and close the screen. |
Add Application Patrol Profile
Click the Add button in the Application Patrol section of the Site-wide > Configure > Firewall > Security service screen to access this screen.
Site-wide > Configure > Firewall > Security service > Application Patrol: Add/Edit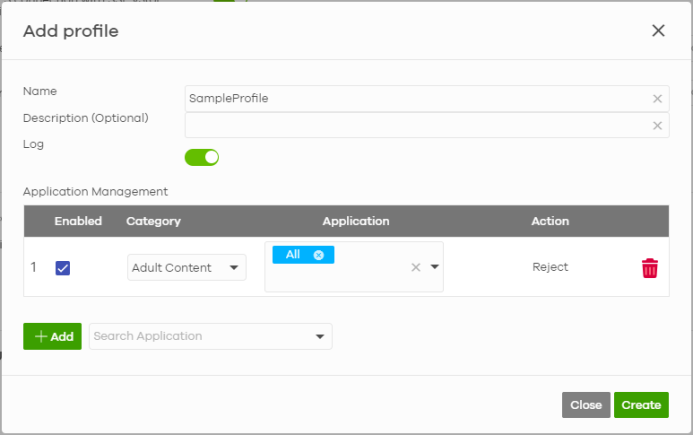
The following table describes the labels in this screen.
label | description |
|---|---|
Add profile | |
Name | Enter the name of the application patrol profile rule; use of up to 32 upper/lowercase letters. Space not allowed. |
Description (Optional) | Enter an optional description of the application patrol profile rule; use up to 255 keyboard characters. |
Log | Select whether to have the Nebula Device generate a log when the policy is matched to the criteria listed above. |
Application Management | |
Enabled | Select the checkbox to turn on the rule. Otherwise, clear the checkbox to turn off the rule. |
Category | Select an application category. |
Application | Select All or select an application within the category to apply the policy. |
Action | Displays the default action for the applications selected in this category. Reject – the Nebula Device drops packets that matches these application signatures and sends notification to clients. |
 | Click this icon to remove the entry. |
Add | Click this button to create a new application category and set actions for specific applications within the category. |
Search Application | Enter a name to search for relevant applications and click Add to create an entry. |
Close | Click this button to exit this screen without saving. |
Create | Click this button to save your changes and close the screen. |
For Security Firewall (USG FLEX H Series)
This section describes the Security Service feature for USG FLEX H Series only. Click Site-wide > Configure > Firewall > Security service to access this screen.
Site-wide > Configure > Firewall > Security service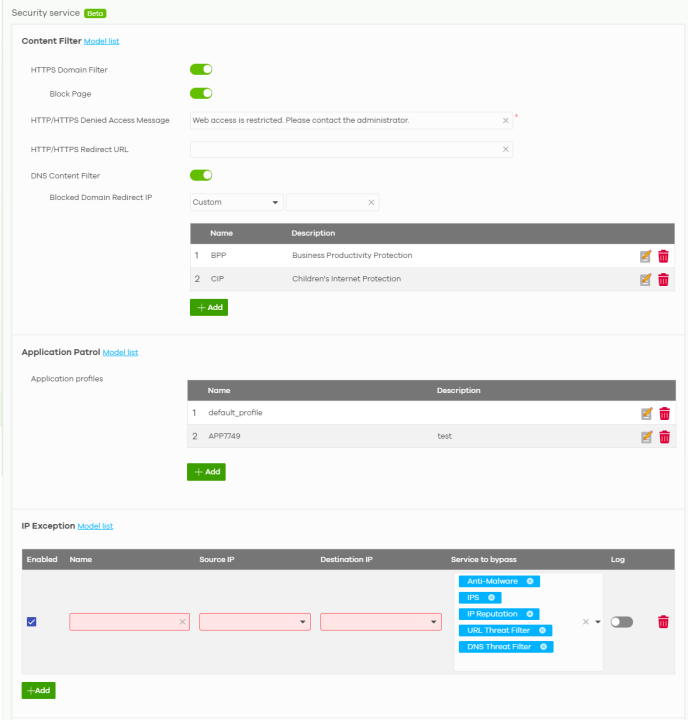
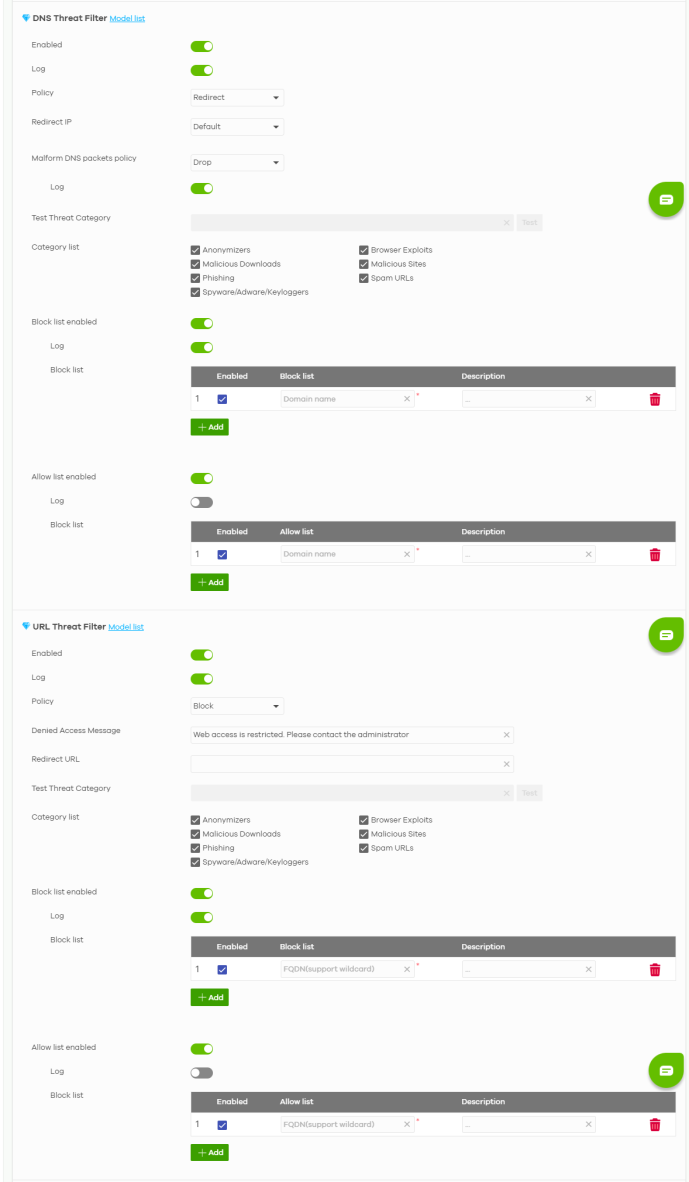
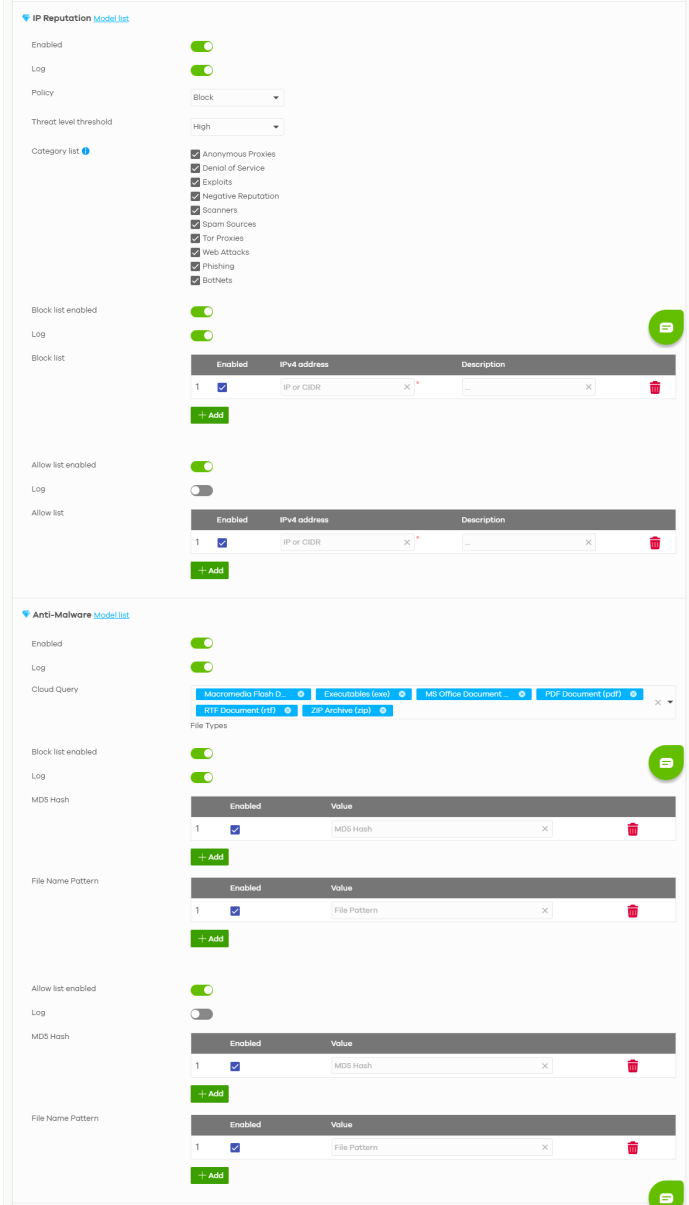
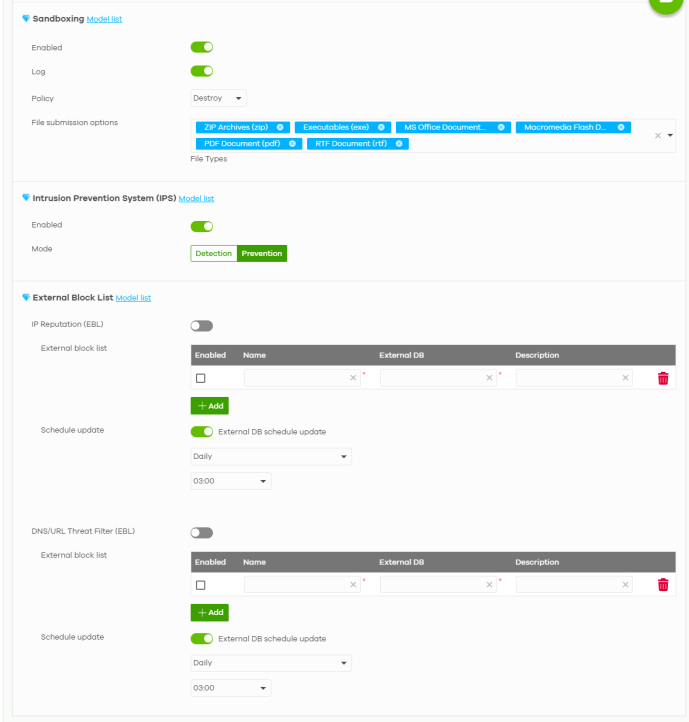
The following table describes the labels in this screen.
Label | Description |
|---|---|
Content Filter | |
HTTPS Domain Filter | Select On to have the Nebula Device filter HTTPS domains by querying a category by domain name (www.google.com). |
Block Page | Select On to have the Nebula Device block HTTPS web pages using SSL V3 or a previous version. |
HTTP/HTTPS Denied Access Message | Enter a message to be displayed when content filter blocks access to a web page. Use up to 127 characters (0–9 a–z A–Z;/?:@&=+$\.-_!~*'()%,”). For example, “Access to this web page is not allowed. Please contact the network administrator”. It is also possible to leave this field blank if you have a URL specified in the HTTP/HTTPS Redirect URL field. In this case if the content filter blocks access to a web page, the Nebula Device just opens the web page you specified without showing a denied access message. |
HTTP/HTTPS Redirect URL | Enter the URL of the web page to which you want to send users when their web access is blocked by content filter. The web page you specify here opens in a new frame below the denied access message. Use “http://” or “https://” followed by up to 262 characters (0–9 a–z A–Z;/?:@&=+$\.-_!~*'()%). For example, http://192.168.1.17/blocked access. |
DNS Content Filter | Select On to have the Nebula Device inspect DNS queries made by users on your network. |
Blocked Domain Redirect IP | This is the URL of the web page to which you want to send users when their web access is blocked by DNS content filtering. The web page you specify here opens in a new frame below the denied access message. Select default to send users to the default web page when their web access is blocked by DNS content filter. Select custom-defined to send users to the web page you set when their web access is blocked by DNS content filter. Use “http://” followed by up to 255 characters (0-9 a-z A-Z;/?:@&=+$\.-_!~*'()%) in quotes. For example, http://192.168.2.17/blocked access. |
Name | This shows the name of this content filter profile. |
Description | This shows the description for this profile. |
 | Click this icon to change the profile settings. |
 | Click this icon to remove the profile. |
Add | Click this to create a content filter profile. See Add a Content Filter Profile for more information. |
Application Patrol Application profiles | |
Name | This shows the name of this Application Patrol profile. |
Description | This shows the description for this profile. |
 | Click this icon to change the profile settings. |
 | Click this icon to remove the profile. |
Add | Click this to create an Application Patrol profile. See Add Application Patrol Profile for more information. |
IP Exception | |
Enabled | Select the checkbox to enable IP Exception. IP addresses listed here are not checked by security services. |
Name | This shows the name of this IP Exception profile. |
Source IP | This field displays the source IP address of incoming traffic. It displays any if there is no restriction on the source IP address. |
Destination IP | This field displays the destination IP address of incoming traffic. It displays any if there is no restriction on the destination IP address. |
Service to bypass | This field displays which services will not inspect matched packets. |
Log | Select On to allow the Nebula Device to generate a log when the incoming traffic is in the exception list. |
 | Click this icon to remove the entry. |
Add | Click this button to create a new entry. |
DNS Threat Filter | DNS filtering inspects DNS queries made by clients on your network and compares the queries against a database of blocked or allowed Fully Qualified Domain Names (FQDNs). If a user attempts to connect to a suspect site, where the DNS query packet contains an FQDN with a bad reputation, then a DNS query is sent from the user’s computer and detected by the DNS Filter. The Nebula Device DNS filter will either drop the DNS query or reply to the user with a fake DNS response using the default dnsft.cloud.zyxel.com IP address (where the user will see a “Web Page Blocked!” page) or a custom IP address. When you enable the URL Threat filtering service, your Nebula Device downloads signature files that contain known URL Threat domain names and IP addresses. The Nebula Device will also access an external database, Cloud Query, that has millions of web sites categorized based on content. You can have the Nebula Device allow, block, warn and/or log access to web sites or hosts based on these signatures and categories. |
Enabled | Select On to turn on the rule. Otherwise, select Off to turn off the rule. |
Log | Select whether to have the Nebula Device generate a log when the policy is matched to the criteria listed. |
Policy | Select Pass to have the Nebula Device allow the DNS query packet and not reply with a DNS reply packet containing a default or custom-defined IP address. Select Redirect to have the Nebula Device reply with a DNS reply packet containing a default or custom-defined IP address. |
Redirect IP | Enter the IP address to have the Nebula Device reply with a DNS reply packet containing a default or custom-defined IP address when a DNS query packet contains an FQDN with a bad reputation. The default IP is the dnsft.cloud.zyxel.com IP address. If you select a custom-defined IP, then enter a valid IPv4 address in the text box. |
Malform DNS packets policy | Set what action the Nebula Device takes when there is an abnormal DNS query packet. A DNS packet is defined as malformed when: • The number of entries in the question count field in the DNS header is 0 • An error occurs when parsing the domain name in the question field • The length of the domain name exceeds 255 characters. pass: Select this action to have the Nebula Device allow the DNS query packet through the Nebula Device. drop: Select this action to have the Nebula Device discard the abnormal DNS query packet. |
Log | Select whether to have the Nebula Device generate a log when there is an abnormal DNS query packet. |
Test Threat Category | Enter a URL using http://domain or https://domain and click the Test button to check if the domain belongs to a URL threat category. |
Category List | These are categories of web pages based on their content. Select categories in this section to control access to specific types of Internet content. |
Block list enabled | Select On to have the Nebula Device block the incoming packets that come from the listed addresses in the block list. |
Log | Select whether to have the Nebula Device generate a log when the policy is matched to the criteria listed. |
Block list Enabled | Select On to turn on an entry. |
Block list | Sites that you want to block access to, regardless of their content rating, can be blocked by adding them to this list. Enter host names such as www.bad-site.com into this text field. Do not enter the complete URL of the site – that is, do not include “http://”. All sub-domains are also blocked. For example, entering “bad-site.com” also blocks “www.badsite.com”, “partner.bad-site.com”, “press.bad-site.com”, and so on. You can also enter just a top level domain. For example, enter .com to block all .com domains. Use up to 127 characters (0–9 a–z). The casing does not matter. |
Description | Enter a description of the block entry. You can use 1 to 512 single-byte characters. |
 | Click this icon to remove the entry. |
Add | Click this button to create a new entry. |
Allow list enabled | Select On to have the Nebula Device allow the incoming packets that come from the listed addresses in the allow list. |
Log | Select whether to have the Nebula Device generate a log when the policy is matched to the criteria listed. |
Allow list Enabled | Select On to turn on an entry. |
Allow list | Sites that you want to allow access to, regardless of their content rating, can be allowed by adding them to this list. Enter host names such as www.good-site.com into this text field. Do not enter the complete URL of the site – that is, do not include “http://”. All sub-domains are allowed. For example, entering “zyxel.com” also allows “www.zyxel.com”, “partner.zyxel.com”, “press.zyxel.com”, and so on. You can also enter just a top level domain. For example, enter .com to allow all .com domains. Use up to 127 characters (0–9 a–z). The casing does not matter. |
Description | Enter a description of the allow entry. You can use 1 to 512 single-byte characters. |
 | Click this icon to remove the entry. |
Add | Click this button to create a new entry. |
URL Threat Filter Enabled | Select On to turn on the rule. Otherwise, select Off to turn off the rule. |
Log | Select whether to have the Nebula Device generate a log when the policy is matched to the criteria listed. |
Policy | Select Pass to allow users to access web pages that the external web filtering service has not categorized. Select Block to prevent users from accessing web pages that the external web filtering service has not categorized. When the external database content filter blocks access to a web page, it displays the denied access message that you configured in the Content Filter General screen along with the category of the blocked web page. |
Denied Access Message | Enter a message to be displayed when content filter blocks access to a web page. Use up to 127 characters (0–9 a–z A–Z;/?:@&=+$\.-_!~*'()%,”). For example, “Access to this web page is not allowed. Please contact the network administrator”. It is also possible to leave this field blank if you have a URL specified in the Redirect URL field. In this case if the content filter blocks access to a web page, the Nebula Device just opens the web page you specified without showing a denied access message. |
Redirect URL | Enter the URL of the web page to which you want to send users when their web access is blocked by content filter. The web page you specify here opens in a new frame below the denied access message. Use “http://” or “https://” followed by up to 262 characters (0–9 a–z A–Z;/?:@&=+$\.-_!~*'()%). For example, http://192.168.1.17/blocked access. |
Test Threat Category | Enter a URL using http://domain or https://domain and click the Test button to check if the domain belongs to a URL threat category. |
Category List | These are categories of web pages based on their content. Select categories in this section to control access to specific types of Internet content. |
Block list enabled | Select On to have the Nebula Device block the incoming packets that come from the listed addresses in the block list. |
Log | Select whether to have the Nebula Device generate a log when the policy is matched to the criteria listed. |
Block list Enabled | Select On to turn on an entry. |
Block list | Sites that you want to block access to, regardless of their content rating, can be blocked by adding them to this list. Enter host names such as www.bad-site.com into this text field. Do not enter the complete URL of the site – that is, do not include “http://”. All sub-domains are also blocked. For example, entering “bad-site.com” also blocks “www.badsite.com”, “partner.bad-site.com”, “press.bad-site.com”, and so on. You can also enter just a top level domain. For example, enter .com to block all .com domains. Use up to 127 characters (0–9 a–z). The casing does not matter. |
Description | Enter a description of the block entry. You can use 1 to 512 single-byte characters. |
 | Click this icon to remove the entry. |
Add | Click this button to create a new entry. |
Allow list enabled | Select On to have the Nebula Device allow the incoming packets that come from the listed addresses in the allow list. |
Log | Select whether to have the Nebula Device generate a log when the policy is matched to the criteria listed. |
Allow list Enabled | Select On to turn on an entry. |
Allow list | Sites that you want to allow access to, regardless of their content rating, can be allowed by adding them to this list. Enter host names such as www.good-site.com into this text field. Do not enter the complete URL of the site – that is, do not include “http://”. All sub-domains are allowed. For example, entering “zyxel.com” also allows “www.zyxel.com”, “partner.zyxel.com”, “press.zyxel.com”, and so on. You can also enter just a top level domain. For example, enter .com to allow all .com domains. Use up to 127 characters (0–9 a–z). The casing does not matter. |
IP Reputation | |
Enabled | Select this option to turn on IP blocking on the Nebula Device. |
Log | Select this option to create a log on the Nebula Device when the packet comes from an IPv4 address with bad reputation. |
Policy | Select Pass to have the Nebula Device allow the packet to go through. Select Block to have the Nebula Device deny the packets and send a TCP RST to both the sender and receiver when a packet comes from an IPv4 address with bad reputation. |
Threat level threshold | Select the threshold threat level to which the Nebula Device will take action (High, Medium and above, Low and above). The threat level is determined by the IP reputation engine. It grades IPv4 addresses. • High: an IPv4 address that scores 0 to 20 points. • Medium and above: an IPv4 address that scores 0 to 60 points. • Low and above: an IPv4 address that scores 0 to 80 points. For example, a score of “10” will cause the Nebula Device to take action whether you set the Threat level threshold at High, Medium and above, or Low and above. But a score of “61” will not cause the Nebula Device to take any action if you set the Threat level threshold at Medium and above. |
Category list | Select the categories of packets that come from the Internet and are known to pose a security threat to users or their computers. |
Block list enabled | Select On to have the Nebula Device block the incoming packets that come from the listed addresses in the block list. |
Log | Select whether to have the Nebula Device generate a log when the policy is matched to the criteria listed. |
Block list Enabled | Select On to turn on an entry. |
IPv4 address | Sites that you want to block access to, regardless of their content rating, can be blocked by adding them to this list. Add the IPv4 addresses that the Nebula Device will block the incoming packets. |
Description | Enter a description of the block entry. You can use 1 to 512 single-byte characters. |
 | Click this icon to remove the entry. |
Add | Click this button to create a new entry. |
Allow list enabled | Select On to have the Nebula Device allow the incoming packets that come from the listed addresses in the allow list. |
Log | Select whether to have the Nebula Device generate a log when the policy is matched to the criteria listed. |
Allow list Enabled | Select On to turn on an entry. |
IPv4 address | Sites that you want to allow access to, regardless of their content rating, can be allowed by adding them to this list. Add the IPv4 addresses that the Nebula Device will allow the incoming packets. |
Description | Enter a description of the allow entry. You can use 1 to 512 single-byte characters. |
 | Click this icon to remove the entry. |
Add | Click this button to create a new entry. |
Anti-Malware | |
Enabled | Select On to turn on the rule. Otherwise, select Off to turn off the rule. |
Log | Select whether to have the Nebula Device generate a log when the policy is matched to the criteria listed. |
Cloud Query | Select the Cloud Query supported file types for the Nebula Device to scan for viruses. |
Block list enabled | Select On to have the Nebula Device block the incoming packets that come from the listed addresses in the block list. |
Log | Select whether to have the Nebula Device generate a log when the policy is matched to the criteria listed. |
MD5 Hash Enabled | Select On to turn on an entry. |
Value | This field displays the encryption pattern of the entry. Enter an MD5 hash ([a-zA-Z0-9]* up to 32 characters maximum) that would cause the Nebula Device to log and modify this file. |
 | Click this icon to remove the entry. |
Add | Click this button to create a new entry. |
File Name Pattern Enabled | Select On to turn on an entry. |
Value | This field displays the file pattern of the entry. Enter a file pattern ([a-zA-Z0-9.?*_-] up to 80 characters maximum) that would cause the Nebula Device to log and modify this file. File patterns: •Use up to 80 characters. Alphanumeric characters, underscores (_), dashes (-), question marks (?) and asterisks (*) are allowed. •A question mark (?) lets a single character in the file name vary. For example, use “a?.zip” (without the quotation marks) to specify aa.zip, ab.zip and so on. •Wildcards (*) let multiple files match the pattern. For example, use “*a.zip” (without the quotation marks) to specify any file that ends with “a.zip”. A file named “testa.zip would match. There could be any number (of any type) of characters in front of the “a.zip” at the end and the file name would still match. A file named “test.zipa” for example would not match. •A * in the middle of a pattern has the Nebula Device check the beginning and end of the file name and ignore the middle. For example, with “abc*.zip”, any file starting with “abc” and ending in “.zip” matches, no matter how many characters are in between. •The whole file name has to match if you do not use a question mark or asterisk. •If you do not use a wildcard, the Security Firewall checks up to the first 80 characters of a file name. |
 | Click this icon to remove the entry. |
Add | Click this button to create a new entry. |
Allow list enabled | Select On to have the Nebula Device allow the incoming packets that come from the listed addresses in the allow list. |
Log | Select whether to have the Nebula Device generate a log when the policy is matched to the criteria listed. |
MD5 Hash Enabled | Select On to turn on an entry. |
Value | Enter the encryption pattern for this entry. Enter an MD5 hash ([a-zA-Z0-9]* up to 32 characters maximum) to identify the names of files that the Nebula Device should not scan for viruses. |
 | Click this icon to remove the entry. |
Add | Click this button to create a new entry. |
File Name Pattern Enabled | Select On to turn on an entry. |
Value | Enter the file pattern for this entry. Enter a file pattern ([a-zA-Z0-9.?*_-] up to 80 characters maximum) to identify the names of files that the Nebula Device should not scan for viruses. File patterns: •Use up to 80 characters. Alphanumeric characters, underscores (_), dashes (-), question marks (?) and asterisks (*) are allowed. •A question mark (?) lets a single character in the file name vary. For example, use “a?.zip” (without the quotation marks) to specify aa.zip, ab.zip and so on. •Wildcards (*) let multiple files match the pattern. For example, use “*a.zip” (without the quotation marks) to specify any file that ends with “a.zip”. A file named “testa.zip would match. There could be any number (of any type) of characters in front of the “a.zip” at the end and the file name would still match. A file named “test.zipa” for example would not match. •A * in the middle of a pattern has the Nebula Device check the beginning and end of the file name and ignore the middle. For example, with “abc*.zip”, any file starting with “abc” and ending in “.zip” matches, no matter how many characters are in between. •The whole file name has to match if you do not use a question mark or asterisk. •If you do not use a wildcard, the Nebula Device checks up to the first 80 characters of a file name. |
 | Click this icon to remove the entry. |
Add | Click this button to create a new entry. |
Sandboxing | Sandboxing provides a safe environment to separate running programs from your network and host devices. Unknown or untrusted programs/codes are uploaded to the Defend Center and executed within an isolated virtual machine (VM) to monitor and analyze the zero-day malware and advanced persistent threats (APTs) that may evade the Nebula Device’s detection, such as anti-malware. Results of cloud sandboxing are sent from the server to the Nebula Device. |
Enabled | Select this option to turn on sandboxing on the Nebula Device |
Log | Enable this option to allow the Security Firewall to create a log when a suspicious file is detected. |
Policy | Specify whether the Nebula Device deletes (Destroy) or forwards (Allow) malicious files. Malicious files are files given a high score for malware characteristics by the Defend Center. |
File submission options | Specify the type of files to be sent for sandbox inspection. |
Intrusion Prevention System (IPS) | |
Enabled | Select On to enable Detection or Prevention. |
Mode | Select Prevention to have the Nebula Device perform a user-specified action when a stream of data matches a malicious signature. Select Detection to have the Nebula Device only create a log message when a stream of data matches a malicious signature. |
External block list | |
IP Reputation (EBL) | Select this to have the Nebula Device block packets that come from the listed addresses in the block list file on the server. |
External block list | The Nebula Device uses black list entries stored in a file on a web server that supports HTTP or HTTPS. The Nebula Device blocks incoming and outgoing packets from the black list entries in this file. |
Enabled | Select this to have the Nebula Device block the incoming packets that come from the listed addresses in the block list file on the server. |
Name | Enter an identifying name for the block list file. You can use alphanumeric and ()+/:=?!*#@$_%- characters, and it can be up to 60 characters long. |
External DB | Enter the exact file name, path and IP address of the server containing the block list file. The file type must be ‘txt’. For example, http://172.16.107.20/blacklist-files/myip-ebl.txt The server must be reachable from the Nebula Device. |
Description | Enter a description of the block list file. You can use 1 to 512 single-byte characters. |
 | Click this icon to remove the entry. |
Add | Click this button to create a new entry, up to 4 maximum. |
Schedule update | The signatures for IP Reputation are continually updated as new malware evolves. New signatures can be downloaded to the Nebula Device periodically if you have subscribed for the IP Reputation signatures service. You need to create an account at myZyxel, register your Nebula Device and then subscribe for IP Reputation filter service in order to be able to download new signatures from myZyxel. Enable External DB schedule update to have the Nebula Device automatically check for new signatures regularly at the time and day specified. Select Daily to set the time of the day, or Weekly to set the day of the week and the time of the day. Schedule signature updates for a day and time when your network is least busy to minimize disruption to your network. |
DNS/URL Threat Filter (EBL) | Select this to have the Nebula Device block packets that come from the listed addresses in the block list file on the server. |
External block list | The Nebula Device uses black list entries stored in a file on a web server that supports HTTP or HTTPS. The Nebula Device blocks incoming and outgoing packets from the black list entries in this file. |
Enabled | Select this to have the Nebula Device block the incoming packets that come from the listed addresses in the block list file on the server. |
Name | Enter an identifying name for the block list file. You can use alphanumeric and ()+/:=?!*#@$_%- characters, and it can be up to 60 characters long. |
External DB | Enter the exact file name, path and IP address of the server containing the block list file. The file type must be ‘txt’. For example, http://172.16.107.20/blacklist-files/myip-ebl.txt The server must be reachable from the Nebula Device. |
Description | Enter a description of the block list file. You can use 1 to 512 single-byte characters. |
 | Click this icon to remove the entry. |
Add | Click this button to create a new entry. |
Schedule update | The signatures for DNS Filter and URL Threat Filter are the same. These signatures are continually updated as new malware evolves. New signatures can be downloaded to the Nebula Device periodically if you have subscribed for the URL Threat filter signatures service. You need to create an account at myZyxel, register your Nebula Device and then subscribe for URL Threat filter service in order to be able to download new signatures from myZyxel. Enable External DB schedule update to have the Nebula Device automatically check for new signatures regularly at the time and day specified. Select Daily to set the time of the day, or Weekly to set the day of the week and the time of the day. Schedule signature updates for a day and time when your network is least busy to minimize disruption to your network. |
Create a Content Filter Profile
Click the Add button in the Content Filter section of the Site-wide > Configure > Firewall > Security service screen to access this screen.
Site-wide > Configure > Firewall > Security service > Content Filter: Add/Edit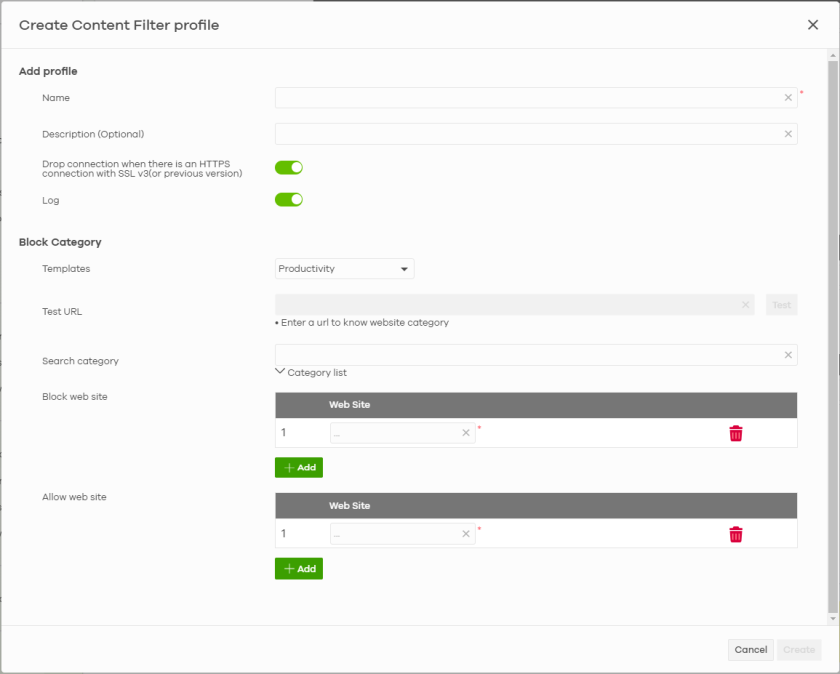
The following table describes the labels in this screen.
label | description |
|---|---|
Add profile | |
Name | Enter a name for this profile for identification purposes. Use up to 127 characters (0 – 9 a – z). The casing does not matter. |
Description (Optional) | Enter a description for this profile. |
Drop connection when there is an HTTPS connection with SSL V3 (or previous version) | Select On to have the Nebula Device block HTTPS web pages using SSL V3 or a previous version. |
Log | Select whether to have the Nebula Device generate a log (On) or not (Off) by default when traffic matches an application signature in this category. |
Block Category The Nebula Device prevents users from accessing web pages that match the categories that you select below. When external database content filter blocks access to a web page, it displays the denied access message that you configured in the Denied access message field along with the category of the blocked web page. | |
Templates | Web pages are classified into a category based on their content. You can choose a pre-defined template that has already selected certain categories. Alternatively, choose Custom and manually select categories in this section to control access to specific types of Internet content. |
Test URL | You can check which category a web page belongs to. Enter a web site URL in the text box, then click Test. When the content filter is active, you should see the web page’s category. The query fails if the content filter is not active. Content Filter can query a category by full URL string (for example, http://www.google.com/picture/index.htm), but HTTPS Domain Filter can only query a category by domain name ('www.google.com'), so the category may be different in the query result. Test URL displays both results in the test. |
Search Category | Specify your desired filter criteria to filter the list of categories. |
Category List | Click to display or hide the category list. These are categories of web pages based on their content. Select categories in this section to control access to specific types of Internet content. |
Block web site | Sites that you want to block access to, regardless of their content rating, can be blocked by adding them to this list. Enter host names such as www.bad-site.com into this text field. Do not enter the complete URL of the site – that is, do not include “http://”. All sub-domains are also blocked. For example, entering “bad-site.com” also blocks “www.badsite.com”, “partner.bad-site.com”, “press.bad-site.com”, and so on. You can also enter just a top level domain. For example, enter .com to block all .com domains. Use up to 127 characters (0–9 a–z). The casing does not matter. |
Add | Click this button to add a new entry. |
 | Click this icon to remove the entry. |
Allow web site | Sites that you want to allow access to, regardless of their content rating, can be allowed by adding them to this list. Enter host names such as www.good-site.com into this text field. Do not enter the complete URL of the site – that is, do not include “http://”. All sub-domains are allowed. For example, entering “zyxel.com” also allows “www.zyxel.com”, “partner.zyxel.com”, “press.zyxel.com”, and so on. You can also enter just a top level domain. For example, enter .com to allow all .com domains. Use up to 127 characters (0–9 a–z). The casing does not matter. |
Add | Click this button to add a new entry. |
 | Click this icon to remove the entry. |
Cancel | Click this button to exit this screen without saving. |
Create | Click this button to save your changes and close the screen. |
Add Application Patrol Profile
Click the Add button in the Application Patrol section of the Site-wide > Configure > Firewall > Security service screen to access this screen.
Site-wide > Configure > Firewall > Security service > Application Patrol: Add/Edit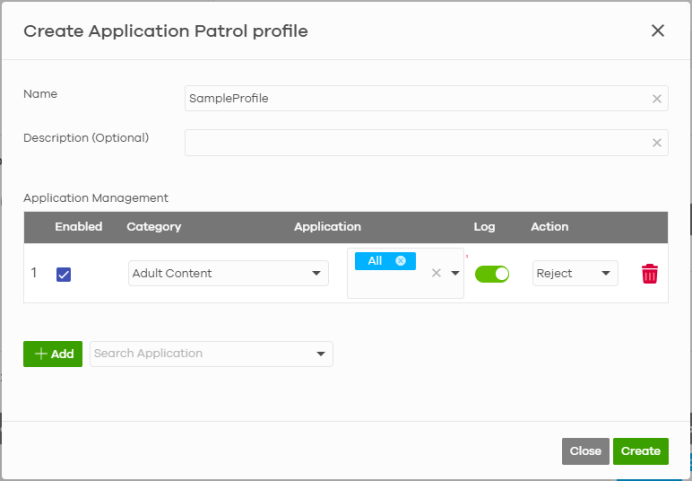
The following table describes the labels in this screen.
label | description |
|---|---|
Create Application Patrol profile | |
Name | Enter the name of the application patrol profile rule; use of up to 32 upper/lowercase letters. Space not allowed. |
Description (Optional) | Enter an optional description of the application patrol profile rule; use up to 255 keyboard characters. |
Application Management | |
Enabled | Select the checkbox to turn on the rule. Otherwise, clear the checkbox to turn off the rule. |
Category | Select an application category. |
Application | Select All or select an application within the category to apply the policy. |
Log | Select whether to have the Nebula Device generate a log when the policy is matched to the criteria listed above. |
Action | Displays the default action for the applications selected in this category. Forward – the Nebula Device routes packets that matches these signatures. Drop – the Nebula Device silently drops packets that matches these signatures without sending a notification to both the sender and receiver. Reject – the Nebula Device drops packets that matches these application signatures and sends notification to clients. |
 | Click this icon to remove the entry. |
Add | Click this button to create a new application category and set actions for specific applications within the category. |
Search Application | Enter a name to search for relevant applications and click Add to create an entry. |
Close | Click this button to exit this screen without saving. |
Create | Click this button to save your changes and close the screen. |
Object
Address objects can represent a single IP address or a range of IP addresses. Address groups are composed of address objects and other address groups. The sequence of members in the address group is not important.
Address objects and address groups are used in policy routes, security policies, application patrol, content filter, and VPN connection policies. For example, addresses are used to specify where content restrictions apply in content filter.
Zone Overview
Set up zones to configure network security and network policies in the Nebula Device. A zone is a group of interfaces and/or VPN tunnels. The Nebula Device uses zones instead of interfaces in many security and policy settings, such as Secure Policies rules, Security Service, and remote management.
Zones cannot overlap. Each Ethernet interface, VLAN interface, bridge interface, PPPoE/PPTP interface and VPN tunnel can be assigned to at most one zone. Virtual interfaces are automatically assigned to the same zone as the interface on which they run.
The Zone screen provides a summary of all zones. In addition, this screen allows you to add, edit, and remove zones. Click Site-wide > Configure > Firewall > Object > Zone to access this screen.
Site-wide > Configure > Firewall > Object > Zone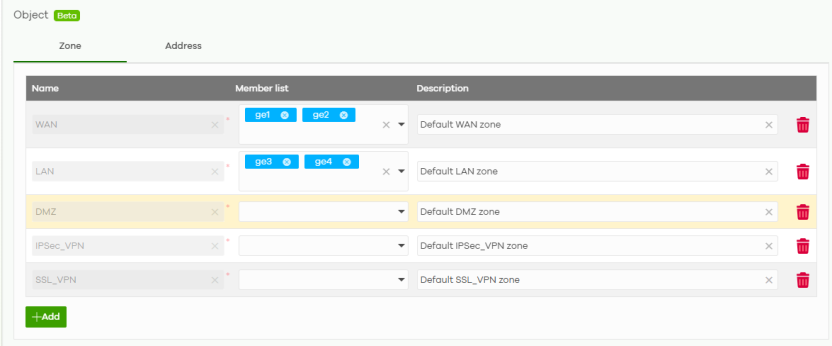
The following table describes the labels in this screen.
Label | Description |
|---|---|
Name | This field displays the name of the zone. For a system default zone, the name is read only. For a user-configured zone, enter the name used to refer to the zone. You may use 2 to 30 single-byte characters, including 0-9a-zA-Z_.-, but the first character cannot be a number. This value is case-sensitive. |
Member list | This field displays the names of the interfaces that belong to each zone. Select the interfaces and VPN tunnels that you want to add to the zone you are editing. |
Description | This field displays the description of the zone. Enter the description associated with the zone, if any. You can use 1 to 512 single-byte characters. |
Add | Click this to create a new, user-configured zone. |
 | To remove a zone, select it and click Remove. The Nebula Device confirms you want to remove it before doing so. |
IPv4 Address Overview
The Address screen is used to create, maintain, and remove addresses.
The Address screen provides a summary of all addresses and address groups in the Nebula Device. To access this screen, click Site-wide > Configure > Firewall > Object > Address.
Site-wide > Configure > Firewall > Object > Address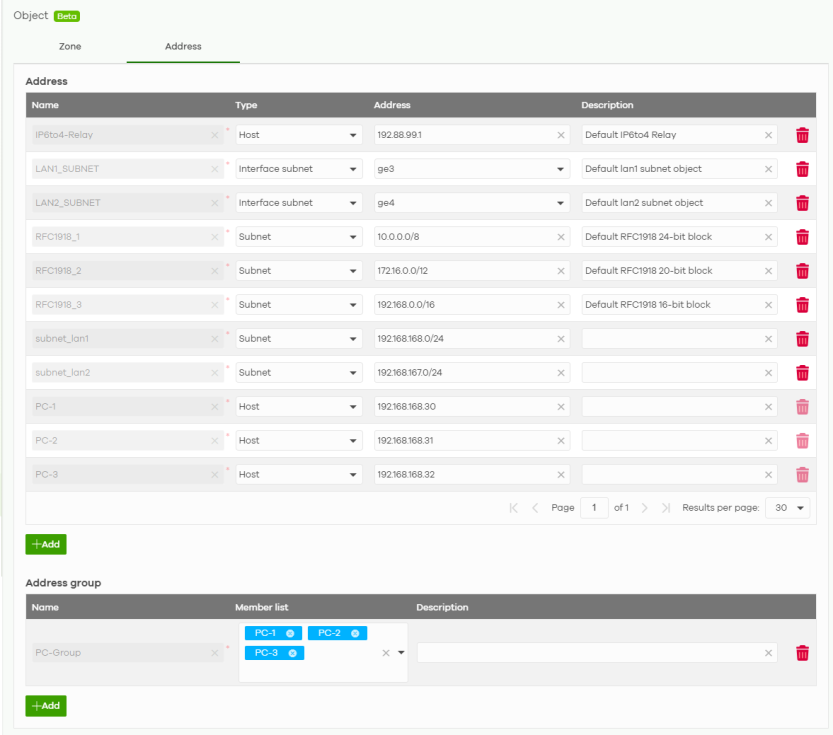
The following table describes the labels in this screen.
Label | Description |
|---|---|
Address | |
Name | This field displays the configured name of each address object. Enter a name used to refer to the address. You may use 2 to 30 single-byte characters, including 0-9a-zA-Z, underscores (_), or dashes (-), but the first character cannot be a number. This value is case-sensitive. |
Type | This field displays the type of each address object. “INTERFACE” means the object uses the settings of one of the Nebula Device’s interfaces. Select the type of address you want to create. • Host – the object uses an IPv4 address to define a host address. • Range – the object uses a range IPv4 address defined by a Starting IP address and an Ending IP address. • Subnet – the object uses a network address defined by a Network IPv4 address and Netmask subnet mask. • Interface IP – the object uses the IPv4 address of one of the Nebula Device’s interfaces. • Interface subnet – the object uses the subnet mask of one of the Nebula Device’s interfaces. • Interface gateway – the object uses the gateway IPv4 address of one of the Nebula Device’s interfaces. • Geography – the object uses the IPv4 addresses of a country to represent a country. • FQDN – the object uses the Fully Qualified Domain Name (FQDN) to represent a website. An FQDN consists of a host and domain name. For example, ‘www.zyxel.com.tw’ is a fully qualified domain name, where ‘www’ is the host, ‘zyxel’ is the third-level domain, ‘com’ is the second-level domain, and “tw” is the top level domain. |
Address | This field displays the IPv4 addresses represented by each address object. If the object’s settings are based on one of the Nebula Device’s interfaces, the name of the interface displays first followed by the object’s current address settings. |
Description | This field displays the description of the address. Enter the description associated with the address, if any. You can use 1 to 512 single-byte characters. |
Add | Click this to create a new address. |
 | To remove a user-configured address, select it and click Remove. The Nebula Device confirms you want to remove it before doing so. |
Address group | |
Name | This field displays the name of each address group. Enter a name used to refer to the address group. You may use 2 to 30 single-byte characters, including 0-9a-zA-Z, underscores (_), or dashes (-), but the first character cannot be a number. This value is case-sensitive. |
Member list | This field displays the names of the address and address group objects that have been added to the address group. The order of members is not important. Select items from this list that you want to be members. |
Description | This field displays the description of each address group, if any. Enter the description associated with the address group, if any. You can use 1 to 512 single-byte characters. |
Add | Click this to add a new entry. |
 | To remove an entry, select it and click Remove. The Nebula Device confirms you want to remove it before doing so. |
Captive Portal
Use this screen to configure captive portal settings for each interface. A captive portal can intercept network traffic until the user authenticates his or her connection, usually through a specifically designated login web page.
Click Site-wide > Configure > Firewall > Captive portal to access this screen.
Site-wide > Configure > Firewall > Captive portal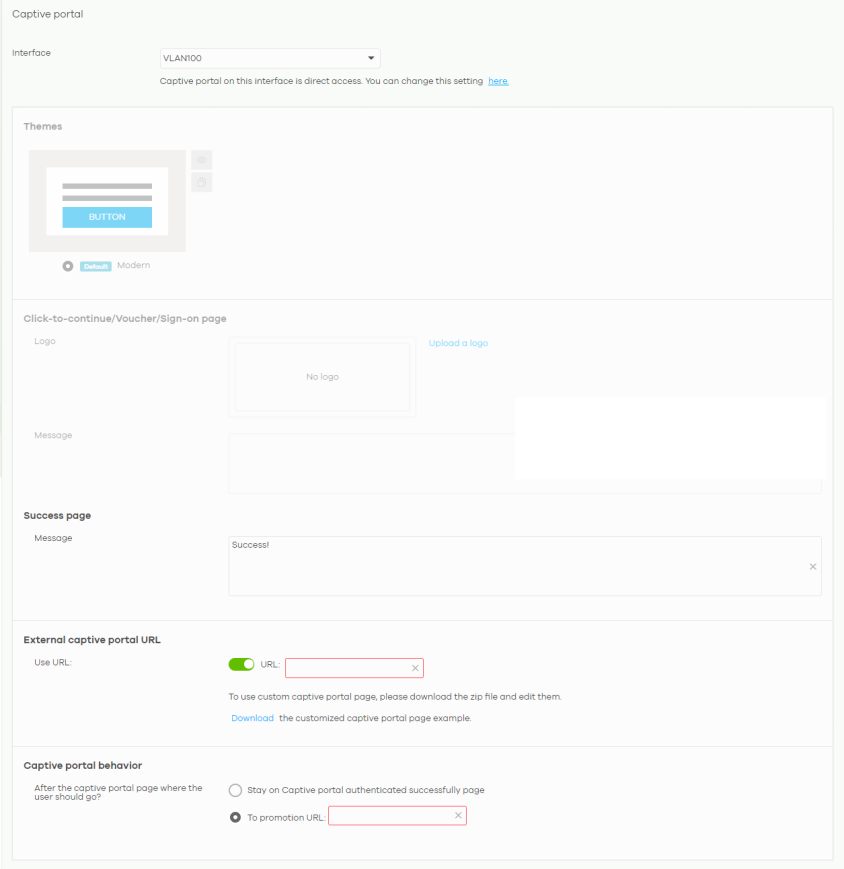
The following table describes the labels in this screen.
Label | Description |
|---|---|
Interface | Select the Nebula Device’s interface (network) to which the settings you configure here is applied. |
Themes | This section is not configurable when External captive portal URL is set to ON. • Click the Preview icon at the upper right of a theme image to display the portal page in a new frame. • Click the Copy icon to create a new custom theme (portal page). • Click the Edit icon of a custom theme to go to a screen, where you can view and configure the details of the custom portal pages. See Zone Overview. • Click the Remove icon to delete a custom theme. Select the theme you want to use on the specified interface. |
Click-to-continue/Sign-on page This section is not configurable when External captive portal URL is set to ON. | |
Logo | This shows the logo image that you uploaded for the customized login page. Click Upload a logo and specify the location and file name of the logo graphic or click Browse to locate it. You can use the following image file formats: GIF, PNG, or JPG. |
Message | Enter a note to display below the title. Use up to 1024 printable ASCII characters. Spaces are allowed. |
Success page | |
Message | Enter a note to display on the page that displays when a user logs in successfully. Use up to 1024 printable ASCII characters. Spaces are allowed. |
External captive portal URL | |
Use URL | Select On to use a custom login page from an external web portal instead of the one built into the NCC. You can configure the look and feel of the web portal page. Specify the login page’s URL; for example, http://IIS server IP Address/login.asp. The Internet Information Server (IIS) is the web server on which the web portal files are installed. |
Captive portal behavior | |
After the captive portal page where the user should go? | Select To promotion URL and specify the URL of the web site/page to which the user is redirected after a successful login. Otherwise, select Stay on Captive portal authenticated successfully page. |
Custom Theme Edit
Use this screen to check what the custom portal pages look like. You can also view and modify the CSS values of the selected HTML file. Click a custom login page’s Edit button in the Site-wide > Configure > Firewall > Captive portal screen to access this screen.
Site-wide > Configure > Firewall > Captive portal: Edit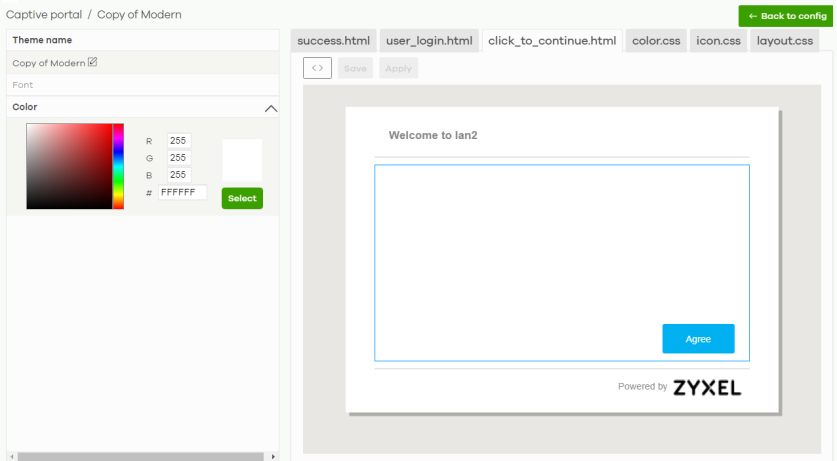
The following table describes the labels in this screen.
Label | Description |
|---|---|
Back to config | Click this button to return to the Captive portal screen. |
Theme name | This shows the name of the theme. Click the edit icon to change it. |
Font | Click the arrow to hide or display the configuration fields. To display this section and customize the font type and/or size, click an item with text in the preview of the selected custom portal page (HTML file). |
Color | Click the arrow to hide or display the configuration fields. Click an item in the preview of the selected custom portal page (HTML file) to display this section and customize its color, such as the color of the button, text, window’s background, links, borders, and so on. Select a color that you want to use and click the Select button. |
HTML/CSS | This shows the HTML file name of the portal page created for the selected custom theme. This also shows the name of the CSS files created for the selected custom theme. Click an HTML file to display the portal page. You can also change colors and modify the CSS values of the selected HTML file. |
 | Click this button to view and modify the CSS values of the selected HTML file. It is recommended that you do NOT change the script code to ensure proper operation of the portal page. |
 | Click this button to preview the portal page (the selected HTML file). |
Save | Click this button to save your settings for the selected HTML file to the NCC. |
Apply | Click this button to save your settings for the selected HTML file to the NCC and apply them to the Nebula Device in the site. |
Authentication Method
Use this screen to enable or disable web authentication on an interface.
Click Site-wide > Configure > Firewall > Authentication method to access this screen.
Site-wide > Configure > Firewall > Authentication method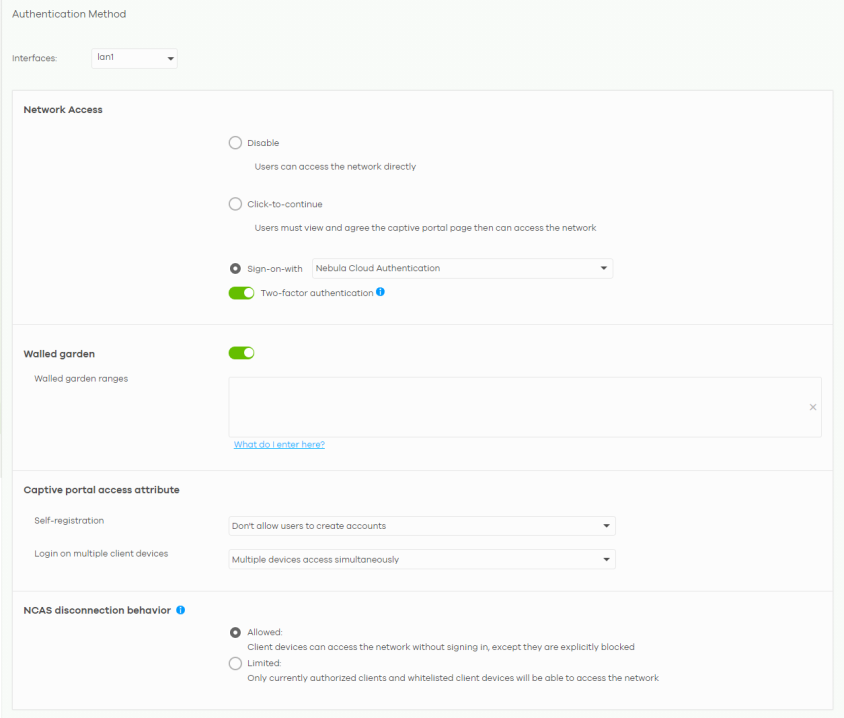
The following table describes the labels in this screen.
Label | Description |
|---|---|
Interfaces | Select the Nebula Device’s interface (network) to which the settings you configure here is applied. |
Network Access | Select Disable to turn off web authentication. Select Click-to-continue to block network traffic until a client agrees to the policy of user agreement. Select Sign-on with to block network traffic until a client authenticates with an external RADIUS or AD server through the specifically designated web portal page. Select Nebula Cloud Authentication or an authentication server that you have configured in the Site-wide > Configure > Firewall > Firewall settings screen (see Firewall Settings). Select Two-Factor Authentication to require that the user log in using both their password and a Google Authenticator code. To log in, users must have Two-Factor Authentication enabled on their account and have setup Google Authenticator on their mobile device. |
Walled garden | This field is not configurable if you set Network Access to Disable. Select to turn on or off the walled garden feature. With a walled garden, you can define one or more web site addresses that all users can access without logging in. These can be used for advertisements for example. |
Walled garden ranges | Specify walled garden web site links, which use a domain name or an IP address for web sites that all users are allowed to access without logging in. |
Captive portal access attribute | |
Self-registration | This field is available only when you select Sign-on with Nebula Cloud authentication in the Network Access field. Select Allow users to create accounts with auto authorized or Allow users to create accounts with manual authorized to display a link in the captive portal login page. The link directs users to a page where they can create an account before they authenticate with the NCC. For Allow users to create accounts with manual authorized, users cannot log in with the account until the account is authorized and granted access. For Allow users to create accounts with auto authorized, users can just use the registered account to log in without administrator approval. Select Don’t allow users to create accounts to not display a link for account creation in the captive portal login page. |
Login on multiple client devices | This field is available only when you select Sign-on with in the Network Access field. Select Multiple devices access simultaneously if you allow users to log in as many times as they want as long as they use different IP addresses. Select One device at a time if you do not allow users to have simultaneous logins. |
NCAS disconnection behavior | This field is available only when you select Sign-on with Nebula Cloud Authentication in the Network Access field. Select Allowed to allow any users to access the network without authentication when the NCAS (Nebula Cloud Authentication Server) is not reachable. Select Limited to allow only the currently connected users or the users in the white list to access the network. |
Wireless
This screen allows you to configure different SSID profiles for your Nebula Device. An SSID, or Service Set IDentifier, is the name of the WiFi network to which a WiFi client can connect. The SSID appears as readable text to any device capable of scanning for WiFi frequencies (such as the WiFi adapter in a laptop), and is displayed as the WiFi network name when a person makes a connection to it.
Click Site-wide > Configure > Firewall > Wireless to access this screen.
Site-wide > Configure > Firewall > Wireless
The following table describes the labels in this screen.
Label | Description |
|---|---|
SSID Settings | |
No. | This shows the SSID number. |
Name | This shows the SSID name as it appears to WiFi clients. |
Enabled | Click this to enable the SSID to be discoverable by WiFi clients. |
Authentication | |
WLAN Security | Select Open to allow any WiFi client to associate with this network without any data encryption nor authentication. Select WPA2-PSK to enable WPA2-PSK data encryption. |
Associate Key | Enter a pre-shared key from 8 to 64 case-sensitive keyboard characters to enable WPA2-PSK data encryption. |
Band | Select to have the SSID use either 2.4 GHz band only or the 5 GHz band only. If you select Concurrent operation (2.4 GHz and 5 GHz), the SSID uses both frequency bands. |
Outgoing Interface | Select the interface for outgoing traffic from the Nebula Device to the Internet. |
Radio Settings | |
Maximum output power | Enter the maximum output power of the radio (in dBm). |
Channel width | Select the WiFi channel bandwidth you want the Nebula Device to use. A standard 20 MHz channel offers transfer speeds of up to 144 Mbps (2.4 GHz) or 217 Mbps (5 GHz) whereas a 40 MHz channel uses two standard channels and offers speeds of up to 300 Mbps (2.4 GHz) or 450 Mbps (5 GHz). An IEEE 802.11ac-specific 80 MHz channel offers speeds of up to 1.3 Gbps. 40 MHz (channel bonding or dual channel) bonds two adjacent radio channels to increase throughput. An 80 MHz channel consists of two adjacent 40 MHz channels. The WiFi clients must also support 40 MHz or 80 MHz. It is often better to use the 20 MHz setting in a location where the environment hinders the WiFi signal. |
2.4 GHz channel deployment | Select Three-Channel Deployment to limit channel switching to channels 1, 6, and 11, the three channels that are sufficiently attenuated to have almost no impact on one another. In other words, this allows you to minimize channel interference by limiting channel-hopping to these three “safe” channels. Select Four-Channel Deployment to limit channel switching to four channels. Depending on the country domain, if the only allowable channels are 1 – 11 then the Nebula Device uses channels 1, 4, 7, 11 in this configuration; otherwise, the Nebula Device uses channels 1, 5, 9, 13 in this configuration. Four-Channel Deployment expands your pool of possible channels while keeping the channel interference to a minimum. Select Manual to choose the allowable channels 1 – 11. |
5 GHz channel deployment | Select how you want to specify the channels the Nebula Device switches between for 5 GHz operation. Select Auto to have the Nebula Device automatically select the best channel. Select Manual to choose from the allowable channels. |
Firewall Settings
Use this screen to configure DNS settings and external AD (Active Directory), RADIUS, or LDAP server that the Nebula Device can use for authenticating users.
AD (Active Directory) is a directory service that is both a directory and a protocol for controlling access to a network. The directory consists of a database specialized for fast information retrieval and filtering activities. You create and store user profile and login information on the external server.
This screen also lets you configure the addresses of walled garden web sites that users can access without logging into the Nebula Device. The settings in this screen apply to all networks (interfaces) on the Nebula Device. If you want to configure walled garden web site links for a specific interface, use the Authentication method screen.
Click Site-wide > Configure > Firewall > Firewall settings to access this screen.
Site-wide > Configure > Firewall > Firewall settings: DNS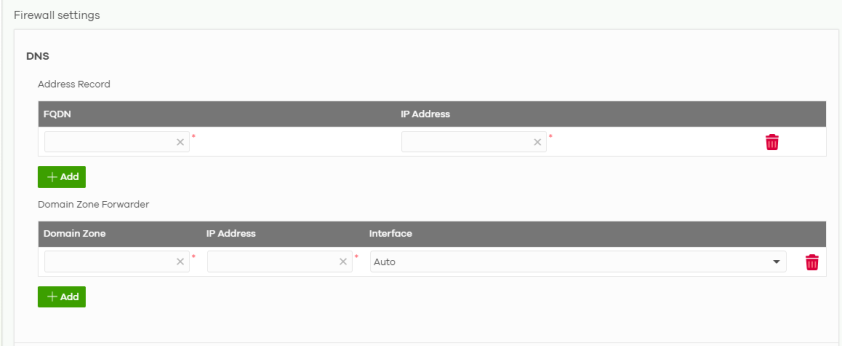
The following table describes the labels in this screen.
Label | Description |
|---|---|
DNS | |
Address Record | This record specifies the mapping of a Fully-Qualified Domain Name (FQDN) to an IPv4 address. An FQDN consists of a host and domain name. For example, www.zyxel.com.tw is a fully qualified domain name, where “www” is the host, “zyxel” is the third-level domain, “com” is the second-level domain, and “tw” is the top level domain. |
FQDN | This field is only available if the Address Type is FQDN, in which case this field cannot be blank. Enter the FQDN of the website that this address object represents. You can enter a wildcard in the first position. For example, ‘*.zyxel.com’. |
IP Address | Enter the host’s IPv4 address. |
 | Click this icon to remove the entry. |
Add | Click this button to create a new entry. |
Domain Zone Forwarder | This specifies a DNS server’s IP address. The Nebula Device can query the DNS server to resolve domain zones for features like VPN, DDNS and the time server. When the Nebula Device needs to resolve a domain zone, it checks it against the domain zone forwarder entries in the order that they appear in this list. |
Domain Zone | A domain is a fully qualified domain name without the host. For example, zyxel.com.tw is the domain zone for the www.zyxel.com.tw fully qualified domain name. Whenever the Nebula Device receives needs to resolve a zyxel.com.tw domain name, it can send a query to the recorded name server IP address. |
IP Address | Enter the DNS server's IP address. |
Interface | Select the interface through which the Nebula Device sends DNS queries to the specified DNS server. |
 | Click this icon to remove the entry. |
Add | Click this button to create a new entry. |
Dynamic DNS
Enable Dynamic DNS to open the Site-wide > Configure > Firewall > Firewall settings: Dynamic DNS screen.
Site-wide > Configure > Firewall > Firewall settings: Dynamic DNS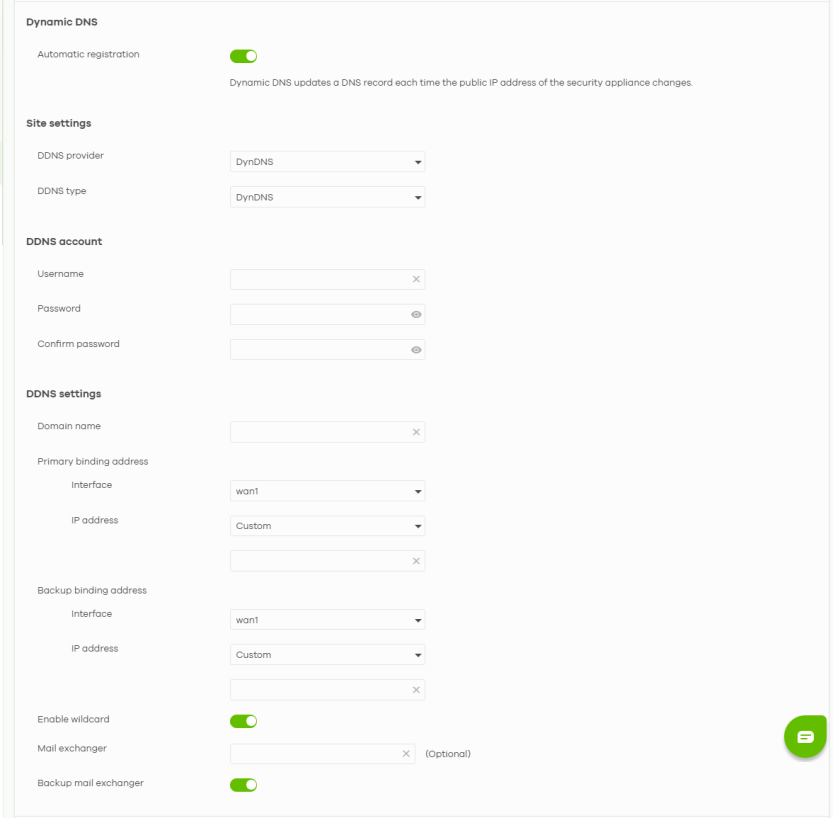
The following table describes the labels in this screen.
label | description |
|---|---|
Dynamic DNS | |
Automatic registration | Click On to use dynamic DNS. Otherwise, select Off to disable it. |
Site settings | |
DDNS provider | Select your Dynamic DNS service provider from the drop-down list box. If you select User customize, create your own DDNS service. |
DDNS type | Select the type of DDNS service you are using. This will depend on your choice of the DDNS provider. |
DDNS account | |
Username | Enter the user name used when you registered your domain name, up to 31 characters [a-zA-Z0-9_-][:a-zA-Z0-9@\._–]. |
Password | Enter the password provided by the DDNS provider, up to 63 characters [0-9a-zA-Z`~!@#$%^&*()_\\-+={}|;:<>,./\"']|[\\\\]. |
Confirm password | Enter the password again to confirm it. |
DDNS settings | |
Domain name | Enter the domain name you registered. |
Primary binding address | Use these fields to set how the Nebula Device determines the IP address that is mapped to your domain name in the DDNS server. The Nebula Device uses the Backup binding address if the interface specified by these settings is not available. |
Interface | Select the interface to use for updating the IP address mapped to the domain name. |
IP address | Select Auto if the interface has a dynamic IP address. The DDNS server checks the source IP address of the packets from the Nebula Device for the IP address to use for the domain name. You may want to use this if there are one or more NAT routers between the Nebula Device and the DDNS server. Select Custom if you have a static IP address. Enter the IP address to use it for the domain name. Select Interface to have the Nebula Device use the IP address of the specified interface. |
Backup binding address | Use these fields to set an alternate interface to map the domain name to when the interface specified by the Primary binding address settings is not available. |
Interface | Select the interface to use for updating the IP address mapped to the domain name. |
IP address | Select Auto if the interface has a dynamic IP address. The DDNS server checks the source IP address of the packets from the Nebula Device for the IP address to use for the domain name. You may want to use this if there are one or more NAT routers between the Nebula Device and the DDNS server. Select Custom if you have a static IP address. Enter the IP address to use it for the domain name. Select Interface to have the Security Firewall use the IP address of the specified interface. |
Enable wildcard | This option is only available with a DynDNS account. Enable the wildcard feature to alias sub-domains to be aliased to the same IP address as your (dynamic) domain name. This feature is useful if you want to be able to use, for example, www.yourhost.dyndns.org and still reach your hostname. |
Mail exchanger | This option is only available with a DynDNS account. DynDNS can route email for your domain name to a mail server (called a mail exchanger). For example, DynDNS routes email for john-doe@yourhost.dyndns.org to the host record specified as the mail exchanger. If you are using this service, type the host record of your mail server here. Otherwise, leave the field blank. |
Backup mail exchanger | This option is only available with a DynDNS account. Select this checkbox if you are using DynDNS’s backup service for email. With this service, DynDNS holds onto your email if your mail server is not available. Once your mail server is available again, the DynDNS server delivers the mail to you. See www.dyndns.org for more information about this service. |
Site-wide > Configure > Firewall > Firewall settings (Authentication Server / External User Group / Walled garden)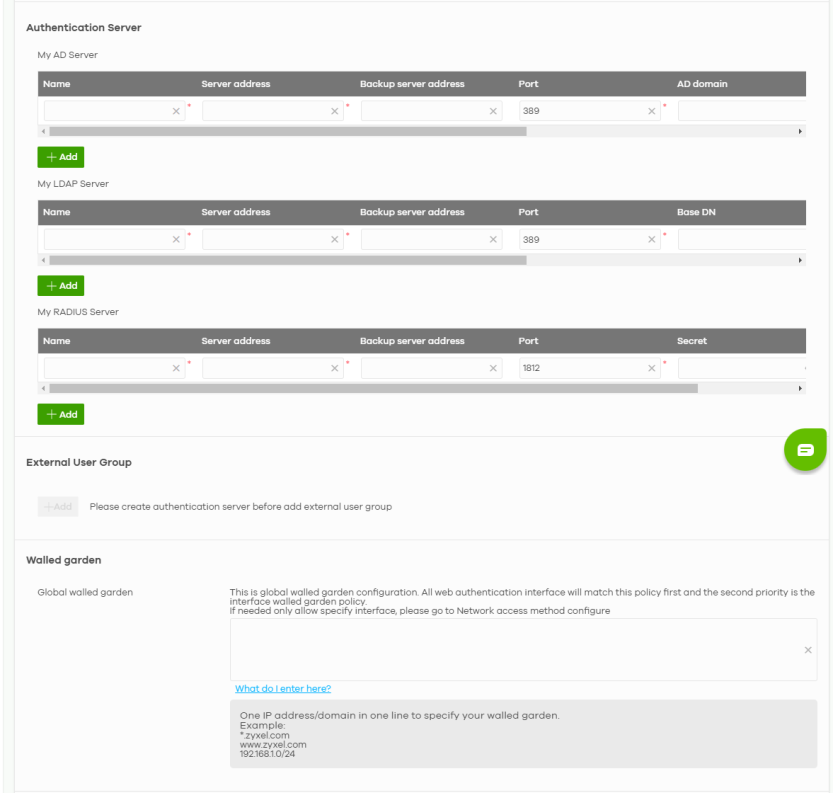
The following table describes the labels in this screen.
Label | Description |
|---|---|
Authentication Server My AD Server | |
Name | Enter a descriptive name for the server. |
Server address | Enter the address of the AD server. |
Backup server address | If the AD server has a backup server, enter its address here. |
Port | Specify the port number on the AD server to which the Nebula Device sends authentication requests. Enter a number between 1 and 65535. |
AD domain | Specify the Active Directory forest root domain name. |
Domain admin | Enter the name of the user that is located in the container for Active Directory Users, who is a member of the Domain Admin group. |
Password | Enter the password of the Domain Admin user account. |
Advanced | Click to open a screen where you can select to use Default or Custom advanced settings. See Advanced Settings. |
 | Click this icon to remove the server. |
Add | Click this button to create a new server. |
My LDAP Server | |
Name | Enter the description of each server, if any. You can use up to 60 printable ASCII characters. |
Server address | Enter the address of the LDAP server. |
Backup server address | If the LDAP server has a backup server, enter its address here. |
Port | Specify the port number on the LDAP server to which the Nebula Device sends authentication requests. Enter a number between 1 and 65535. |
Base DN | Specify the directory (up to 127 alphanumerical characters). For example, o=Zyxel, c=US. |
Bind DN | Specify the bind DN for logging into the AD or LDAP server. Enter up to 127 alphanumerical characters. For example, cn=zywallAdmin specifies zywallAdmin as the user name. |
Password | If required, enter the password (up to 15 alphanumerical characters) required to bind or log in to the LDAP server. |
Advanced | Click to open a screen where you can select to use Default or Custom advanced settings. See Advanced Settings. |
 | Click this icon to remove the entry. |
Add | Click this button to create a new server. |
My RADIUS Server | |
Name | Enter a descriptive name for the server. |
Server address | Enter the address of the RADIUS server. |
Backup server address | If the RADIUS server has a backup server, enter its address here. |
Port | Specify the port number on the RADIUS server to which the Nebula Device sends authentication requests. Enter a number between 1 and 65535. |
Secret | Enter a password (up to 15 alphanumeric characters) as the key to be shared between the external authentication server and the Nebula Device. The key is not sent over the network. This key must be the same on the external authentication server and the Security Firewall. |
Advanced | Click to open a screen where you can select to use Default or Custom advanced settings. See Advanced Settings. |
 | Click this icon to remove the server. |
Add | Click this button to create a new server. |
External User Group | |
Group Name | Enter a descriptive name for the group, up to 31 characters [0–9][a–z][A–Z][@.-_] but the first character must be an alphabet. |
Authentication Server | Select the Name of the Authentication Server you added in My AD Server, My LDAP Server, or My RADIUS Server. |
Group ID | Enter the name of the attribute that the Nebula Device checks to determine to which group an external user belongs. The value for this attribute is called a group identifier; it determines to which group an external user belongs. |
Add | Click this button to create a new group. The maximum number of external user groups is 20. |
Walled garden | |
Global walled garden | With a walled garden, you can define one or more web site addresses that all users can access without logging in. These can be used for advertisements for example. Specify walled garden web site links, which use a domain name or an IP address for web sites that all users are allowed to access without logging in. |
SIP ALG
Application Layer Gateway (ALG) allows the following applications to operate properly through the NCC’s NAT.
SIP (Session Initiation Protocol) is an application-layer protocol that can be used to create voice and multimedia sessions over Internet.
Go to SIP ALG in the Site-wide > Configure > Firewall > Firewall settings screen to access this screen. Use this screen to turn the ALG off or on, configure the port numbers to which they apply, and configure SIP ALG time outs.
Site-wide > Configure > Firewall > Firewall settings: SIP ALG / Advanced Options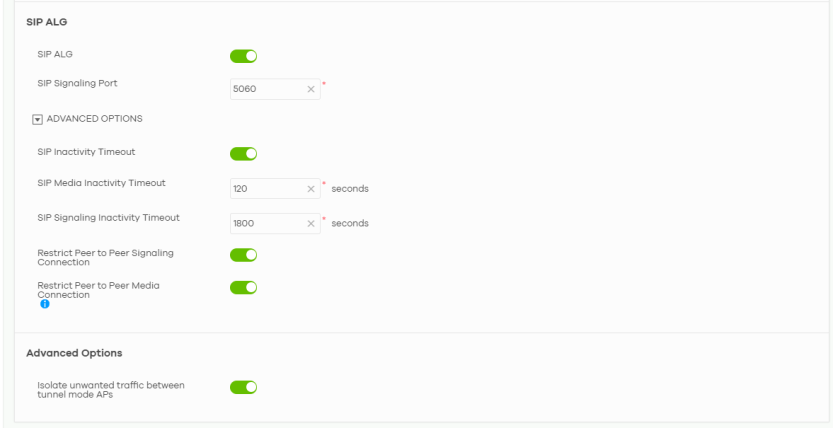
The following table describes the labels in this screen.
Label | Description |
|---|---|
SIP ALG | Turn on SIP ALG to detect SIP traffic and help build SIP sessions through the Nebula Device’s NAT. Enabling the SIP ALG also allows you to use the application patrol to detect SIP traffic and manage SIP traffic bandwidth. |
SIP Signaling Port | If you are using a custom UDP port number (not 5060) for SIP traffic, enter it here. Use the Add icon to add fields if you are also using SIP on additional UDP port numbers (1025 – 65535). |
ADVANCED OPTIONS | Click the arrow to show the fields for setting the SIP inactivity timeout and restrict peer-to-peer connection. |
SIP Inactivity Timeout | Select this to have the Nebula Device apply SIP media and signaling inactivity time out limits. These timeouts will take priority over the SIP session time out “Expires” value in a SIP registration response packet. |
SIP Media Inactivity Timeout | Use this field to set how many seconds (1 – 86400) the Nebula Device will allow a SIP session to remain idle (without voice traffic) before dropping it. If no voice packets go through SIP ALG before the timeout period expires, the Nebula Device deletes the audio session. You cannot hear anything and you will need to make a new call to continue your conversation. |
SIP Signaling Inactivity Timeout | Most SIP clients have an “expire” mechanism indicating the lifetime of signaling sessions. The SIP user agent sends registration packets to the SIP server periodically and keeps the session alive in the Nebula Device. If the SIP client does not have this mechanism and makes no calls during the Nebula Device SIP timeout, the Nebula Device deletes the signaling session after the timeout period. Enter the SIP signaling session timeout value (1 – 86400). |
Restrict Peer to Peer Signaling Connection | A signaling connection is used to set up the SIP connection. Enable this if you want signaling connections to only arrive from the IP addresses you have already registered with. Signaling connections from other IP addresses will be dropped. |
Restrict Peer to Peer Media Connection | A media connection is the audio transfer in a SIP connection. Enable this if you want media connections to only arrive from the IP addresses you registered with. Media connections from other IP addresses will be dropped. |
Advanced Options | |
Isolate unwanted traffic between tunnel mode APs | Select On to block broadcast and multicast traffic coming from Remote APs (RAPs). |
Advanced Settings
Click the Advanced column in the Site-wide > Configure > Firewall > Firewall settings screen to access this screen.
Site-wide > Configure > Firewall > Firewall settings: Advanced
The following table describes the labels in this screen.
Label | Description |
|---|---|
Preset | Select Default to use the pre-defined settings, or select Custom to configure your own settings. |
Timeout | Specify the timeout period (between 1 and 300 seconds) before the Nebula Device disconnects from the server. In this case, user authentication fails. Search timeout occurs when either the user information is not in the servers or the AD or server is down. |
Case-Sensitive User Name | Click ON if the server checks the case of the user name. Otherwise, click OFF to not configure your user name as case-sensitive. |
Group Membership Attribute | Enter the name of the attribute that the gateway checks to determine to which group a user belongs. The value for this attribute is called a group identifier; it determines to which group a user belongs. You can add ext-group-user user objects to identify groups based on these group identifier values. For example you could have an attribute named “memberOf” with values like “sales”, “RD”, and “management”. Then you could also create a ext-group-user user object for each group. One with “sales” as the group identifier, another for “RD” and a third for “management”. |
LDAP-only Fields | |
Login Name Attribute | Enter the type of identifier the users are to use to log in. For example “name” or “email address”. |
RADIUS-only Fields | |
NAS IP Address | Enter the IP address of the NAS (Network Access Server). |
NAS Identifier | Enter the Network Access Server (NAS) Identifier on the Nebula Device to identify the Nebula Device to the RADIUS server, if required. This might be necessary if there are multiple Nebula Devices behind NAT using the same public WAN IP address for the RADIUS server. |
Close | Click this button to exit this screen without saving. |
OK | Click this button to save your changes and close the screen. |