Organization-wide
Overview
This chapter discusses the menus that you can use to monitor your organization and manage sites, Nebula Devices, accounts, licenses, and VPN members for the organization.
Monitor
Use the Monitor menus to check the site and Nebula Device information and change logs for the selected organization.
Organization Overview
This screen shows you the site locations on a Google map and the summary of sites, site tags and connected Nebula Devices for the selected organization.
Click Organization-wide > Monitor > Overview to access this screen.
Organization-wide > Monitor > Overview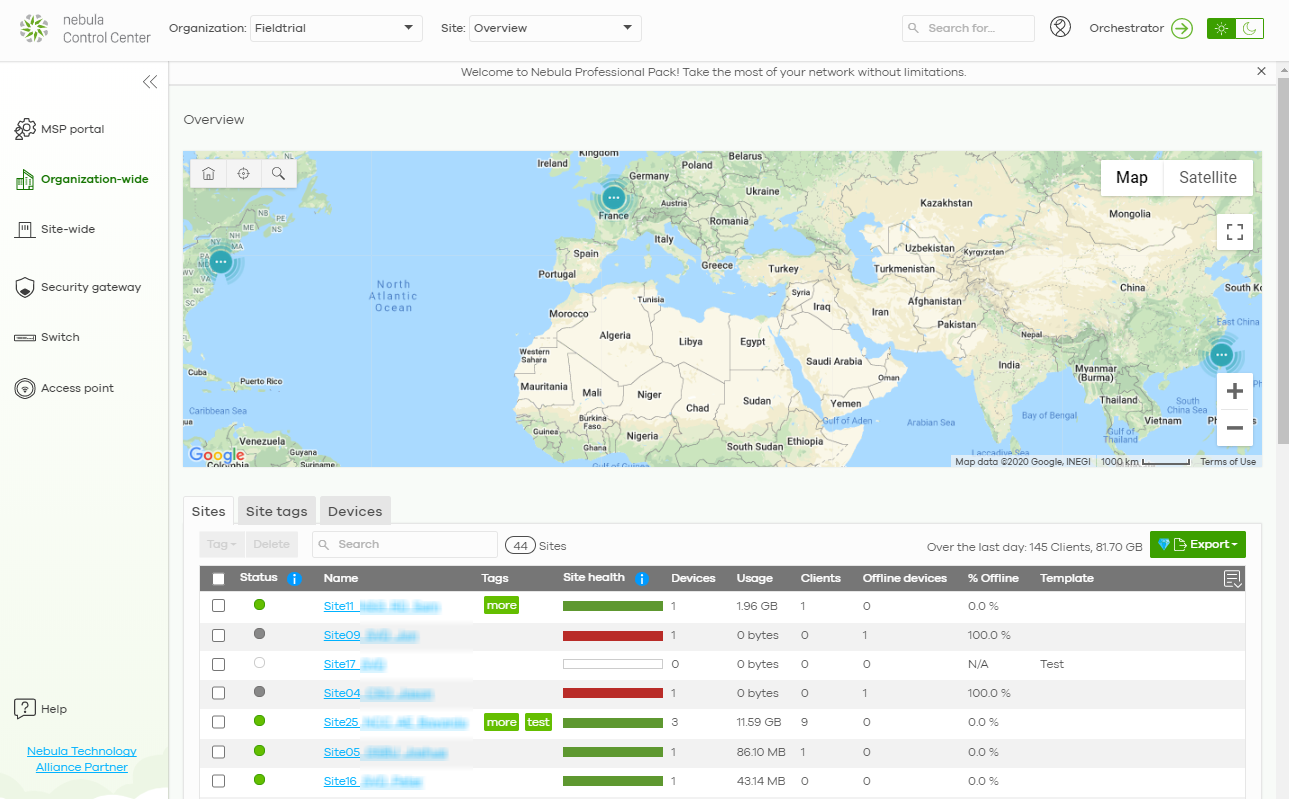
Sites
Click the Sites tab in the Overview screen to view detailed information of the sites which are associated with the selected organization.
Organization-wide > Monitor > Overview: Sites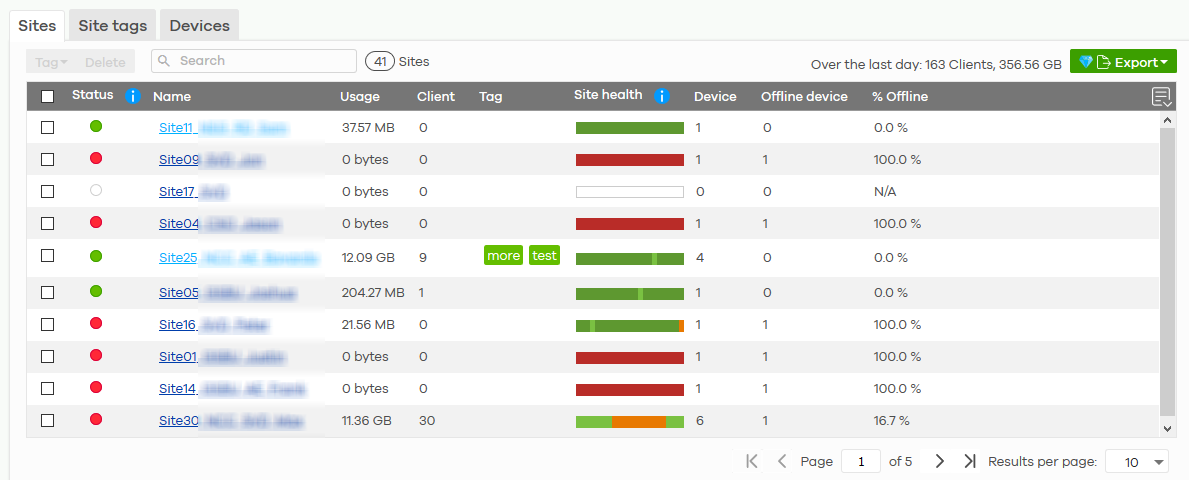
The following table describes the labels in this screen.
Label | Description |
|---|---|
Tag | Select one or multiple sites and click this button to create a new tag for the sites or delete an existing tag. |
Delete | Select the sites and click this button to remove it. |
Search | Enter a key word as the filter criteria to filter the list of sites. |
Sites | This shows the number of sites in this organization. |
Over the last day | This shows how many clients are associated with the sites in this organization and the total amount of data transmitted or received by the clients in the past day. |
Export | Click this button to save the site list as a CSV or XML file to your computer. |
Status | This shows the status of Nebula Devices in the site. • Green: All Nebula Devices are online and have no alerts. • Amber: Some Nebula Devices have alerts. • Red: Some Nebula Devices are off-line. • Gray: All Nebula Devices have been off-line for 7 days or more. • White: No Nebula Devices. |
Name | This shows the descriptive name of the site. |
Usage | This shows the amount of data consumed by the site. |
Client | This shows the number of clients connected to Nebula Devices in the site. |
Tag | This shows the user-specified tag that is added to the site. |
Site Health | This shows the percentage of uptime in a given time interval to indicate the site’s network availability. • Green: 95 – 100% network uptime • Dark green: 75 – 95% network uptime • Brown: 50 – 75% network uptime • Red: < 50% network uptime • Grey: No uptime data |
Device | This shows the total number of Nebula Devices deployed in the site. |
Offline device | This shows the number of Nebula Devices which are added to the site but not accessible by the NCC now. |
% Offline | This shows what percentage of the connected clients are currently off-line. |
Click this icon to display a greater or lesser number of configuration fields. |
Site tags
Click the Site tags tab in the Overview screen to view the tags created and added to the sites for monitoring or management purposes.
Organization-wide > Monitor > Overview: Site tags
The following table describes the labels in this screen.
Label | Description |
|---|---|
Search | Enter a key word as the filter criteria to filter the list of tags. |
Site tags | This shows the number of site tags created and added to the sites in this organization. |
Over the last day | This shows the number of clients associated with the sites in this organization and the total amount of data transmitted or received by the clients in the past day. |
Export | Click this button to save the tag list as a CSV or XML file to your computer. |
Status | This shows the status of Nebula Devices in sites with the specified tag. • Green: All Nebula Devices are on-line and have no alerts. • Amber: Some Nebula Devices have alerts. • Red: Some Nebula Devices are off-line. • Gray: All Nebula Devices have been off-line for 7 days or more. • White: No Nebula Devices. |
Tag | This shows the name of the specified tag. |
Site | This shows the total number of sites with the specified tag. |
Offline device | This shows the number of off-line Nebula Devices in all sites with the specified tag. |
Client | This shows the number of clients in sites with the specified tag. |
Usage | This shows the total amount of data consumed in all sites with the specified tag. |
Device | This shows the total number of Nebula Devices deployed to all sites with the specified tag. |
Offline site | This shows the number of off-line sites with the specified tag. |
% Offline | This shows what percentage of all sites with the specified tag are currently off-line. |
Click this icon to display a greater or lesser number of configuration fields. |
Devices
Click the Devices tab in the Overview screen to view the detailed information about Nebula Devices which are connected to the sites in the selected organization.
Organization-wide > Monitor > Overview: Devices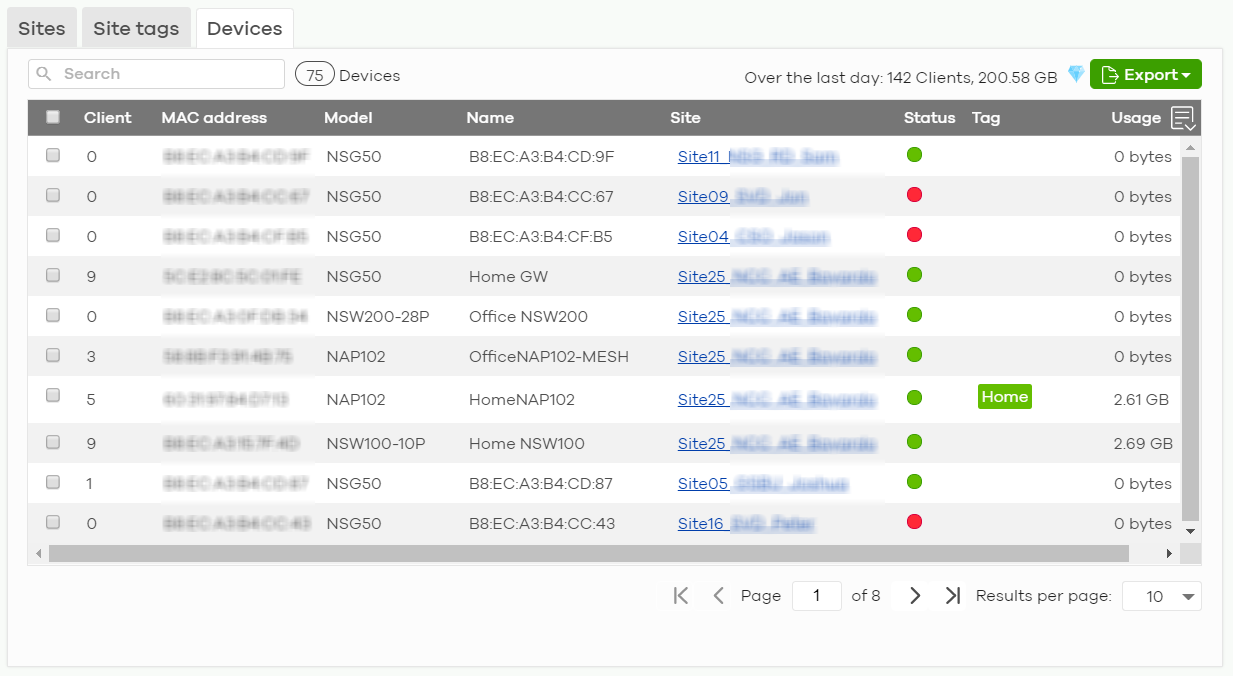
The following table describes the labels in this screen.
Label | Description |
|---|---|
Search | Enter a key word as the filter criteria to filter the list of connected Nebula Devices. |
Devices | This shows the number of Nebula Devices assigned to the sites in this organization. |
Over the last day | This shows the number of clients associated with the sites in this organization and the total amount of data transmitted or received by the clients in the past day. |
Export | Click this button to save the Nebula Device list as a CSV or XML file to your computer. |
Status | This shows the status of the Nebula Device. • Green: The Nebula Device is on-line. • Amber: The Nebula Device recently had alerts. • Red: The Nebula Device was recently off-line. • Gray: The Nebula Device has been off-line for more than 6 days. |
Model | This shows the model number of the Nebula Device. |
Name | This shows the descriptive name of the Nebula Device. |
Site | This shows the name of the site to which the Nebula Device is connected. |
MAC address | This shows the MAC address of the Nebula Device. |
Tag | This shows the user-specified tag for the Nebula Device. |
Client | This shows the number of the clients which are currently connected to the Nebula Device. |
Usage | This shows the amount of data consumed by the Nebula Device. |
Serial number | This shows the serial number of the Nebula Device. |
Configuration status | This shows whether the configuration on the Nebula Device is up-to-date. |
Connectivity | This shows the Nebula Device connection status. The red time slot indicates the connection to the NCC is down, and the green time slot indicates the connection is up. Move the cursor over a time slot to see the actual date and time when a Nebula Device is connected or disconnected. |
Public IP | This shows the global (WAN) IP address of the Nebula Device. |
Click this icon to display a greater or lesser number of configuration fields. |
Change Log
Use this screen to view logged messages for changes in the specified organization. Click Organization-wide > Monitor > Change log to access this screen.
When the log is full, it deletes older entries one by one to make room for new ones.
Organization-wide > Monitor > Change log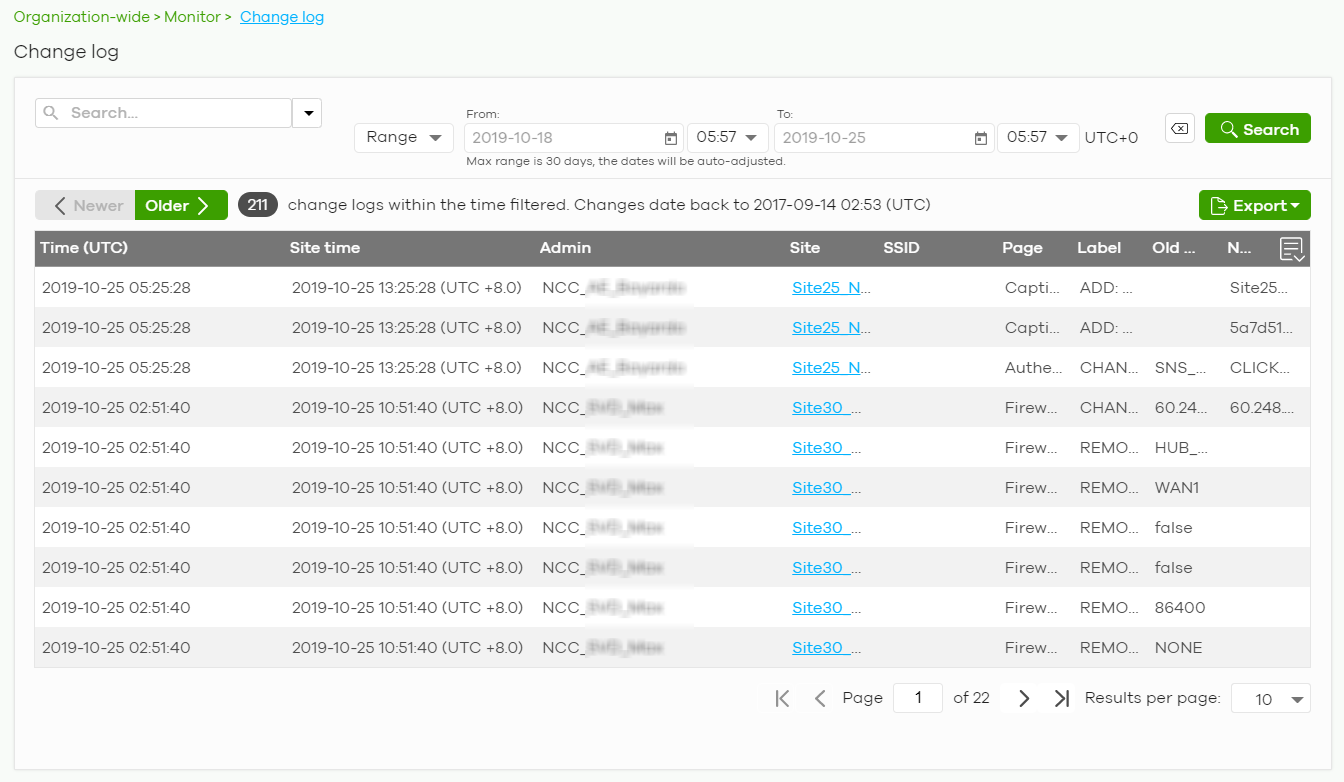
The following table describes the labels in this screen.
Label | Description |
|---|---|
Search | Click to enter one or more key words as the search criteria to filter the list of logs. |
Range/Before | Select Range to set a time range or select Before to choose a specific date/time and the number of hours/minutes to display only the log messages generated within a certain period of time (before the specified date/time). The maximum allowable time range is 30 days. |
Search | Click this to update the list of logs based on the search criteria. |
Reset filters | Click this to return the search criteria to the previously saved time setting. |
Newer/Older | Click to view a list of log messages with the most recent or oldest message displayed first. |
This shows the total number of the log messages that match the search criteria. It also shows the date and time the very first log was created. | |
Export | Click this button to save the log list as a CSV or XML file to your computer. |
Time (UTC) | This shows the date and time in UTC+00:00 (or UTC+0) when the log was recorded. UTC is a standard time for use around the world (formerly known as Greenwich Mean Time or GMT). UTC is an international abbreviation that is neither French nor English. It means both "Temps Universel Coordonné" and "Coordinated Universal Time". |
Site Time | This shows the date and time of the site, to which the change was applied, when the log was recorded. |
Admin | This shows the name of the administrator who made the changes. |
Site | This shows the name of the site to which the change was applied. |
SSID | This shows the SSID name to which the change was applied. |
Page | This shows the name of the NCC menu in which the change was made. |
Label | This shows the reason for the log. |
Old value | This shows the old setting that was discarded and overwritten with the new attribute value. |
New value | This shows the new setting that was adopted. |
Click this icon to display a greater or lesser number of configuration fields. |
Configure
Use the Configure menus to create new sites, register or unregister a Nebula Device, change organization general settings, and manage licenses, user accounts, administrator accounts or VPN members in the organization.
Create Site
After an organization is created, click Organization-wide > Configure > Create Site to add a site (network) to your organization.
1 Enter a descriptive name of up to 64 printable characters for the site.
2 If you already have one or more than one sites in the organization and you want to copy the site settings of an existing one, select the Clone from check box and then the site name.
If you have created a configuration template (see Configuration Template), you can select to bind the new site to the specified template.
3 Select the type of Security Gateway that you will add to the site (see Supported Nebula Devices for the supported Security Gateways). You can skip this selection if you do NOT plan to add a Security Gateway at the moment.
4 Choose the time zone of the site’s location.
5 Click Create site to add the new site to your organization.
Organization-wide > Configure > Create Site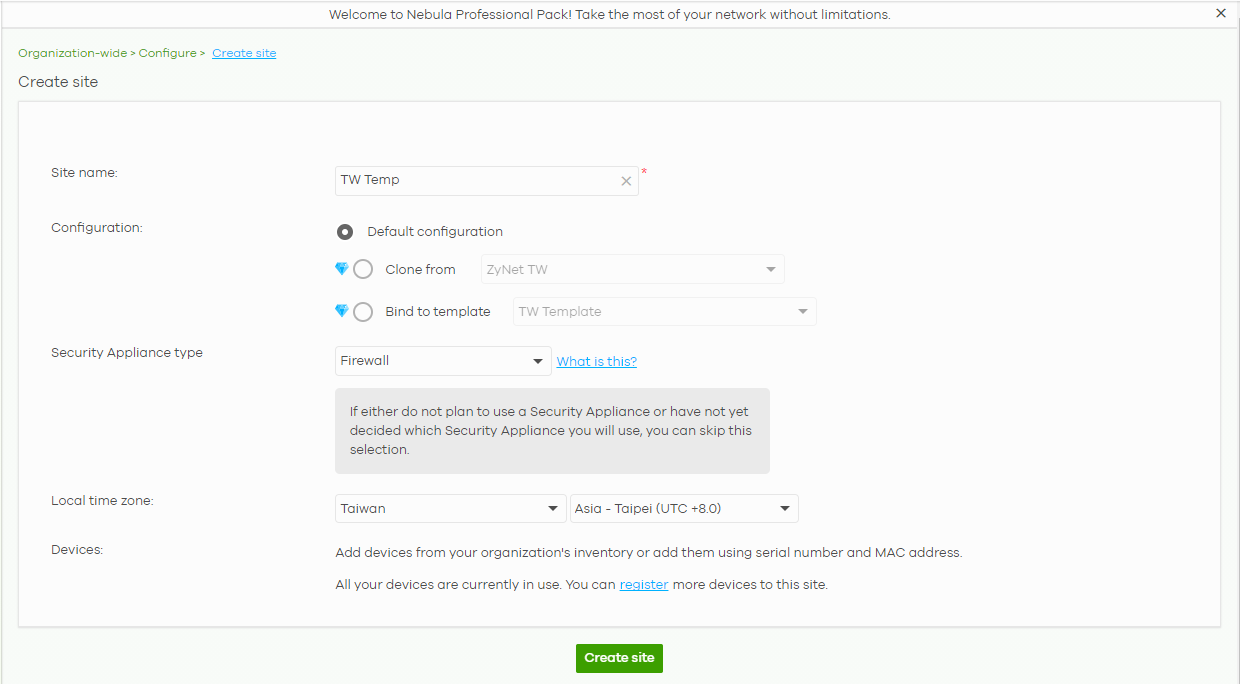
6 You will be re-directed to the Site-wide > Configure > Add devices screen. Search and select the name of the registered Nebula Device that is to be added to this site. See Add Devices for information on adding Nebula Devices.
License & Inventory
The following section describes license management screens in NCC.
Unused licenses can be transferred from a Nebula Device in an Organization to another Nebula Device in an Organization.
License & Inventory Overview Screen
Use these screens to view licenses and Nebula Devices in the organization. Click Organization-wide > Configure > License & Inventory > Overview to access this screen.
Organization-wide > Configure > License & Inventory > Overview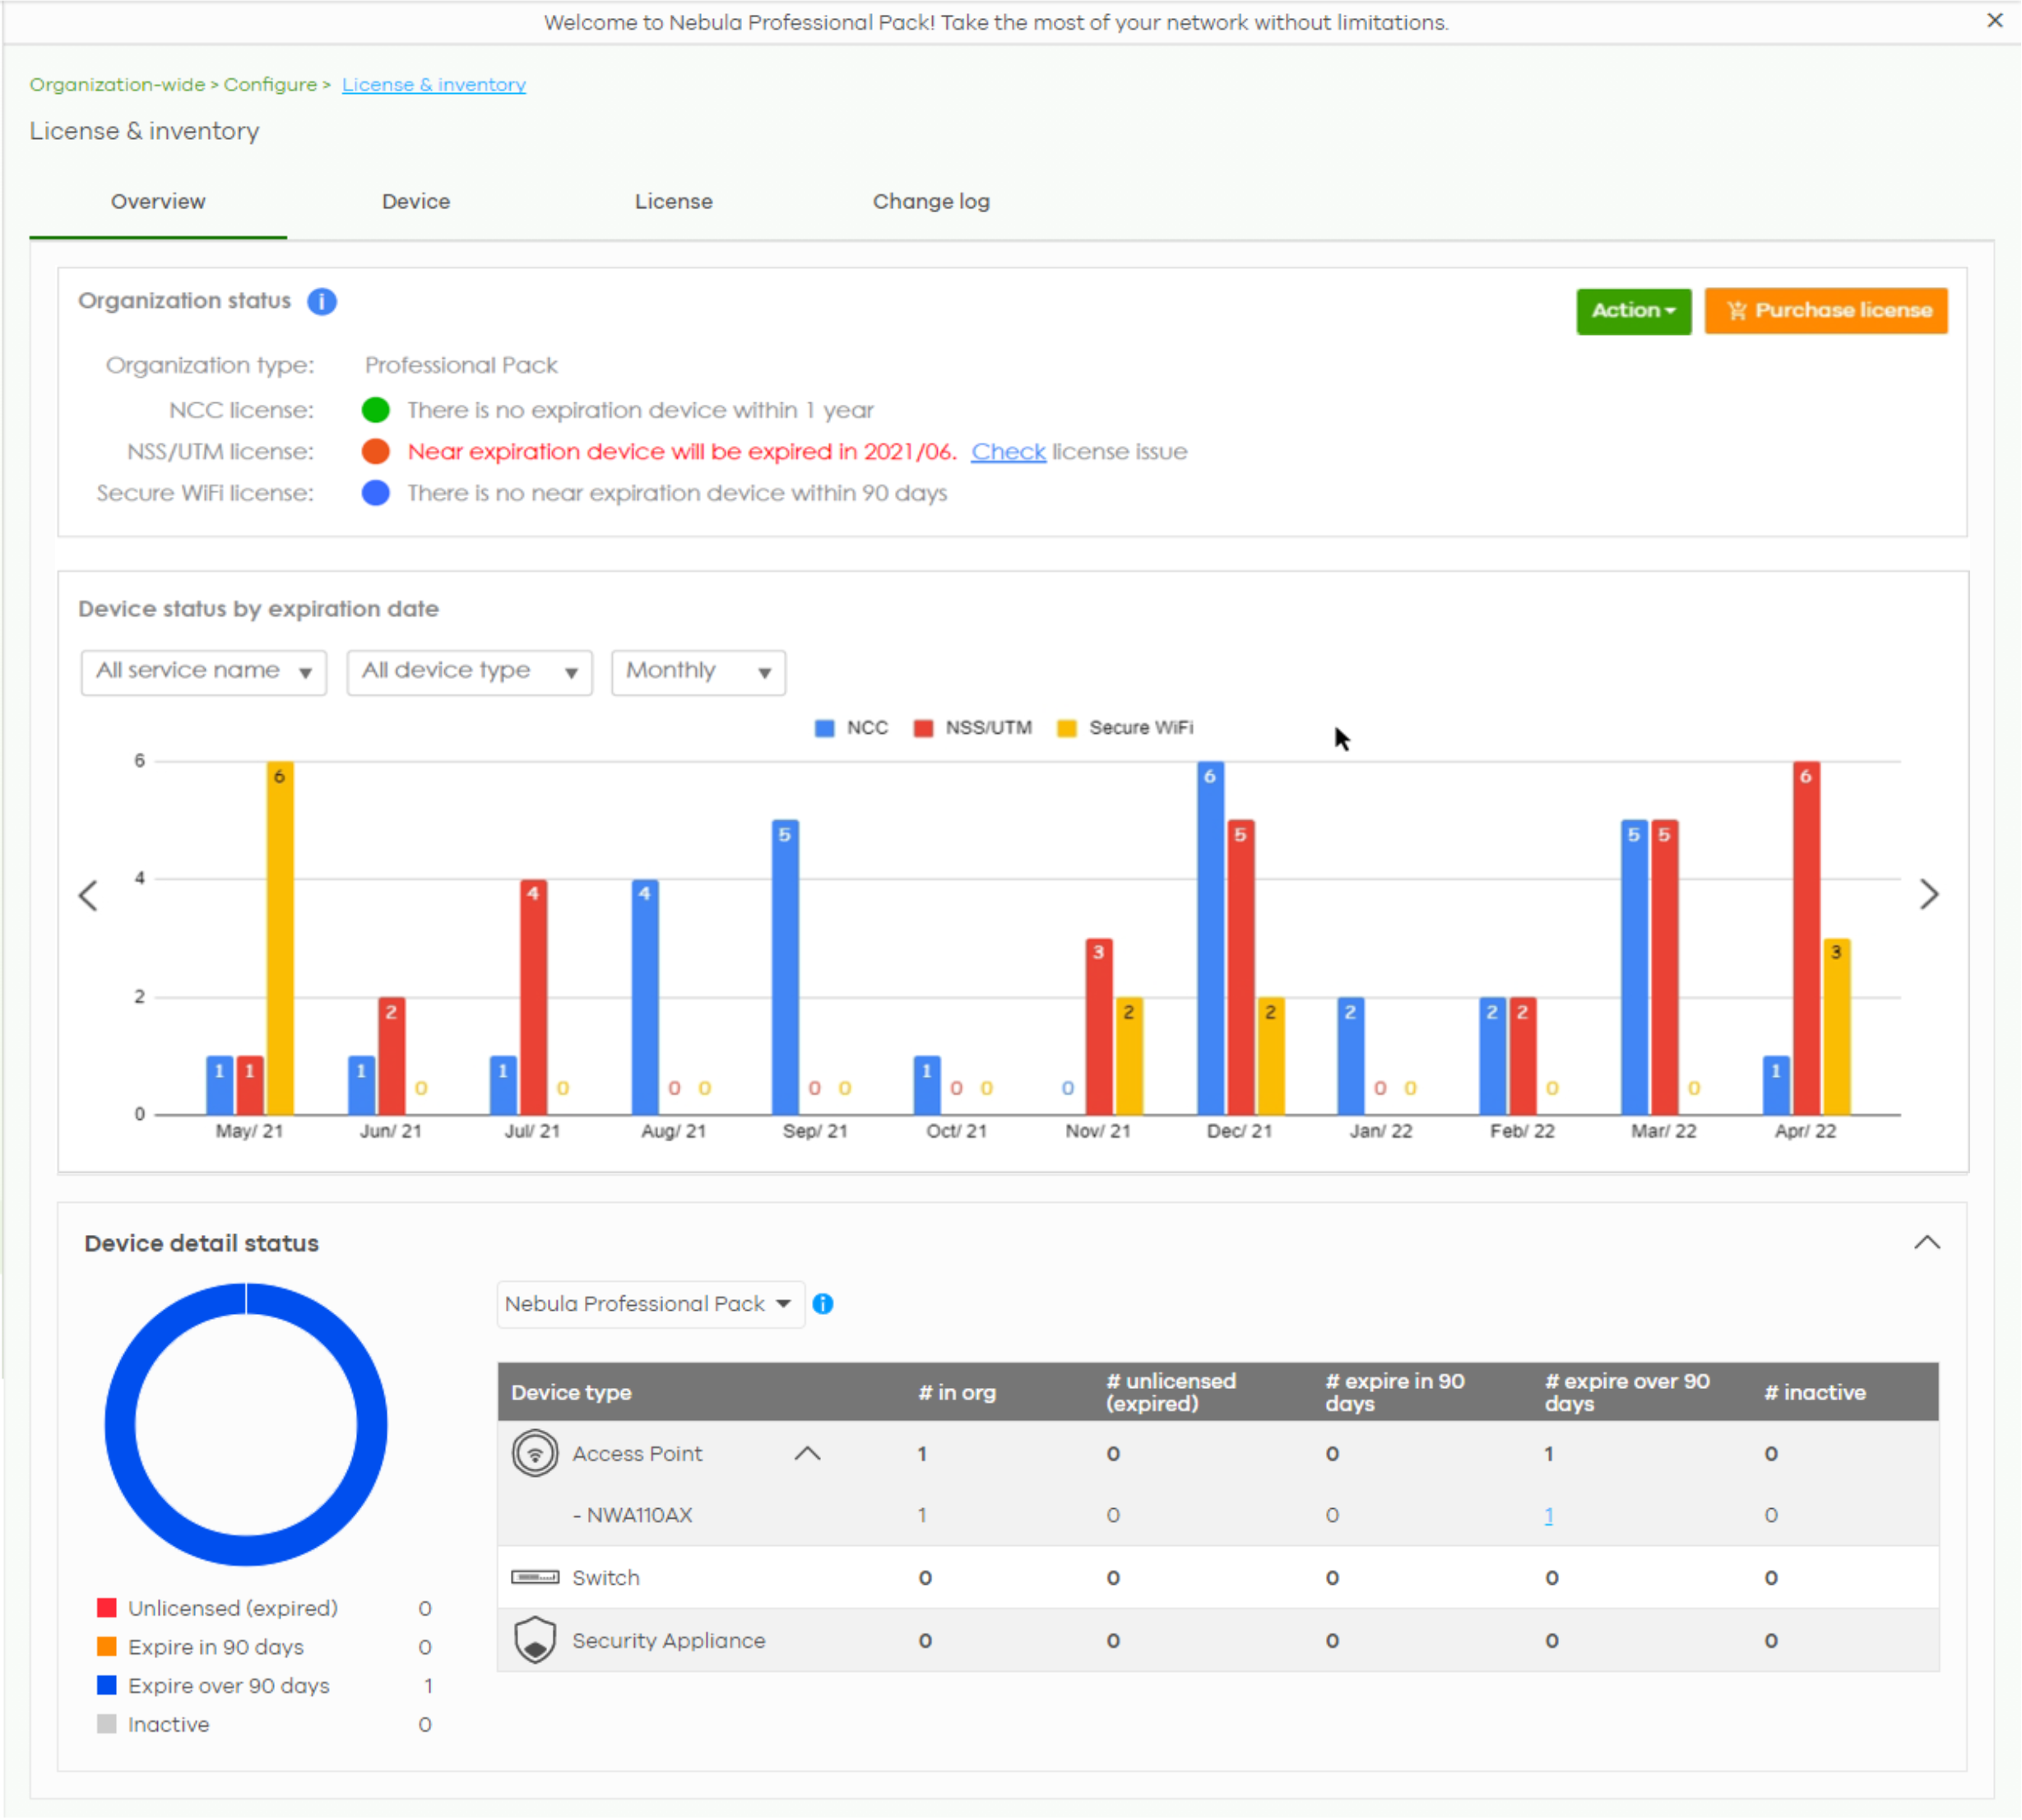
The following table describes the labels in this screen.
Label | Description |
|---|---|
Organization Status | |
Action | Click this button to add licenses and/or Nebula Devices to the organization. Choose one of the following actions: • Add more devices: Add new Nebula Devices to the organization, by serial number and MAC address. For details, see Add Devices Screen. • Add more licenses: Add new licenses to the organization, by license key. For details, see Add Licenses Screen. • Install wizard: Add Nebula Devices and licenses to the organization, assign the licenses to the Nebula Devices, and then upgrade the organization if required. For details, see Install Wizard. |
Purchase License | Click this button to go to a window that will ask if you wish to be redirected to the Zyxel Circle web site (if the NCC account has a Circle account). If you do not have a Circle account, you can do the following: 1. Use the Calculator to select what license to purchase and set the target expiration date to keep the Pro/Plus tier features/services running. 2. You may export the list of required licenses to your computer. 3. After calculating the license to purchase, click the Zyxel license marketplace link to complete your purchase.  The Calculator will not count any Unused license(s) assigned to your organization as it is not yet assigned to a Nebula Device. This button is available only for the Full (Delegated) administrator privilege or Owner administrator account with a registered Nebula Device(s). |
Upgrade Now | Click this button to upgrade the organization to Plus or Pro tier. The button is only available if you have a Plus or Pro license for every Nebula Device in the organization. |
Downgrade Now | Click this button to downgrade the organization from Plus or Pro to Base tier, or from Pro to Plus tier. All active NCC licenses in the organization will stay active and continue to count down to their expiry time. |
Organization type | This shows the licensing tier of the organization. Possible values are: Base, Plus Pack, Professional Pack, and Trial. |
NCC license | This shows whether there are any Nebula Devices with near expiring licenses. |
NSS/UTM license | This shows whether the current site has an active NSS or UTM license. |
Secure WiFi license | This shows whether the current site has an active Secure WiFi license. A Secure WiFi license unlocks the Remote AP feature. Remote AP allows users connected to an off-site (remote) AP to connect to on-site resources behind the Nebula Device through a secure IPSec VPN tunnel. |
Device status by expiration date | Click this button to select the data to be shown in the graph. Choose one from each of the following criteria: • All service name, Nebula Professional Pack, Nebula Plus Pack, Nebula Security Pack, UTM Security Pack, or Secure WiFi: select the category of licenses to display. • All device type, Access Point, Switch, or Security Gateway: select the category of Nebula Device to display. • Monthly, Quarterly, or Yearly: select the period of time to display. |
Device detail status | |
License type | Select the license type to filter your selection (Nebula Professional Pack, Nebula Plus Pack, Gold Security Pack, Nebula Security Pack, UTM Security Pack, Content Filter & SPS, Secure WiFi). |
Device type | This shows the category of Nebula Device (Access Point, Switch, Security Gateway) and Nebula Device model. |
# in org | This shows the total number of Nebula Devices of the specified category and model that are in the organization. |
# unlicensed (expired) | This shows the total number of Nebula Devices of the specified category and model that have: • No NCC Pro or Plus license. • An expired NCC Pro or Plus license. |
# near expiration in 90 days | This shows the total number of Nebula Devices of the specified category and model that have an NCC Pro or Plus license that will expire within 90 days. |
# expiration over 90 days | This shows the total number of Nebula Devices of the specified category and model that have an NCC Pro or Plus license that have more than 90 days before expiration. |
# inactive | This shows the total number of Nebula Devices of the specified category and model that have an NCC Pro or Plus license that has not been activated. |
Add Devices Screen
Use this screen to add Nebula Devices to an organization. Click Organization-wide > Configure > License & Inventory > Overview > Action > Add more devices to access this screen.
Organization-wide > Configure > License & Inventory > Overview: Add devices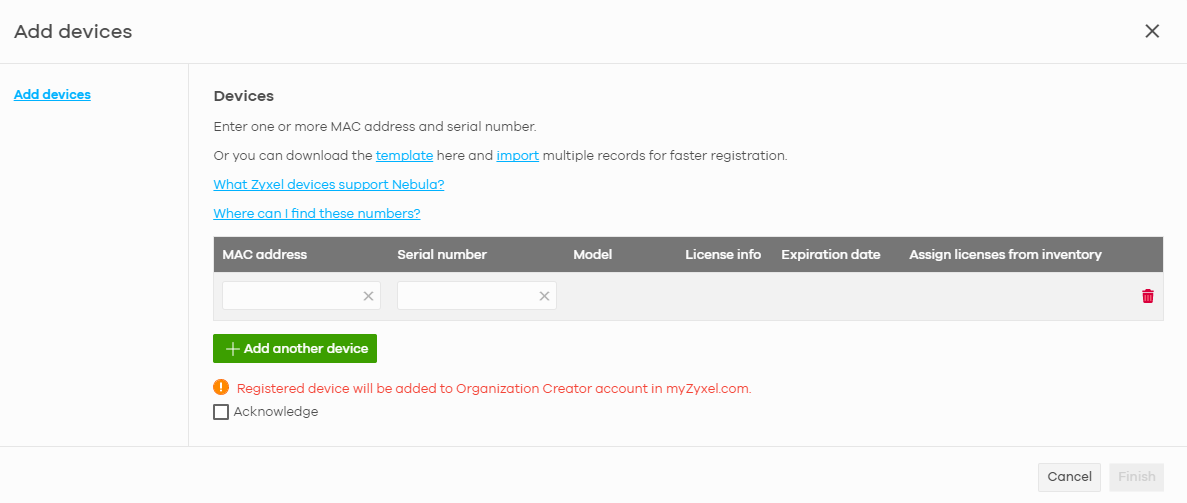
The following table describes the labels in this screen.
Label | Description |
|---|---|
template | Click this to download an XLSX file that you can use as a template to import a large number of Nebula Devices at once. Follow the instructions and formatting in the template to add the Nebula Device’s serial numbers and MAC addresses. |
import | Click this to upload a completed template XLSX file and import all Nebula Devices in the file. |
MAC address | Enter the MAC address of the new Nebula Device. |
Serial Number | Enter the serial number of the new Nebula Device. |
Model | This shows the model number of the Nebula Device being added. |
License info | This shows the type of NCC license activated on the Nebula Device, if there is one. |
Expiration date | This shows the expiration date of the NCC license activated on the Nebula Device, if there is one. |
Assign licenses from inventory | Click here to assign unassigned licenses already in the organization to the Nebula Device. |
 | Click the remove icon to delete the entry. |
Add another device | Click this to add another Nebula Device to the organization. |
Acknowledge | Select this to confirm that your NCC account will be the owner of the new Nebula Devices. |
Finish | Click this to add the Nebula Devices to the organization. |
Cancel | Click this to close the screen without saving. |
Add Licenses Screen
Use this screen to add licenses to an organization. Click Organization-wide > Configure > License & Inventory > Overview > Action > Add more licenses to access this screen.
Organization-wide > Configure > License & Inventory > Overview: Add licenses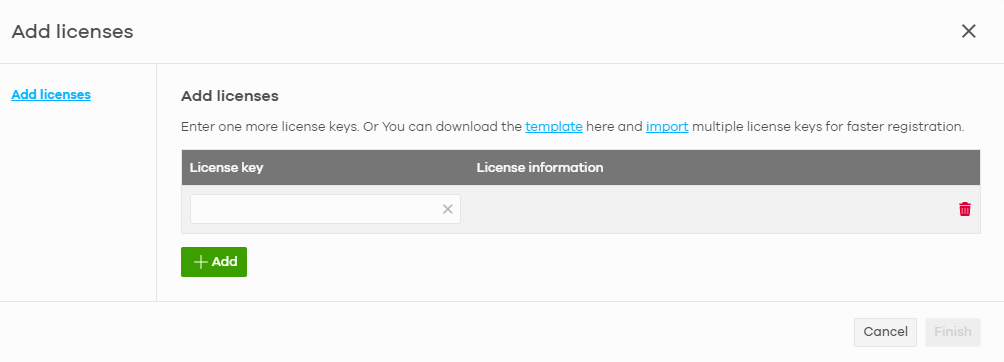
The following table describes the labels in this screen.
Label | Description |
|---|---|
template | Click this to download an XLSX file that you can use as a template to import a large number of licenses at once. Follow the instructions and formatting in the template to add the license keys. |
import | Click this to upload a completed template XLSX file and import all licenses in the file. |
License key | Enter the license key of the new license. |
License information | This shows the license type and validity period of the license being added. |
| Click the remove icon to delete the entry. |
Add | Click this to add another license to the organization. |
Finish | Click this to add the license to the organization. |
Cancel | Click this to close the screen without saving. |
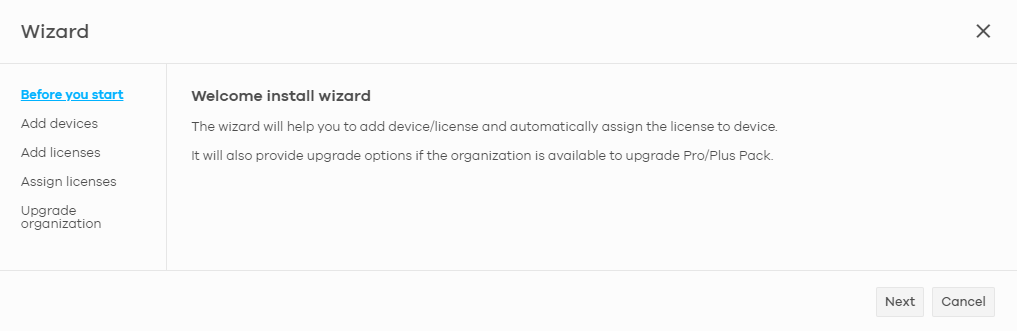
Install Wizard
Use this wizard to add licenses and Nebula Devices to an organization, assign licenses to the new Nebula Devices, and then upgrade the organization if required. Follow the steps below to use the wizard.
1 Click Organization-wide > Configure > License & Inventory > Overview > Action > Install wizard. After the wizard window opens, click Next.
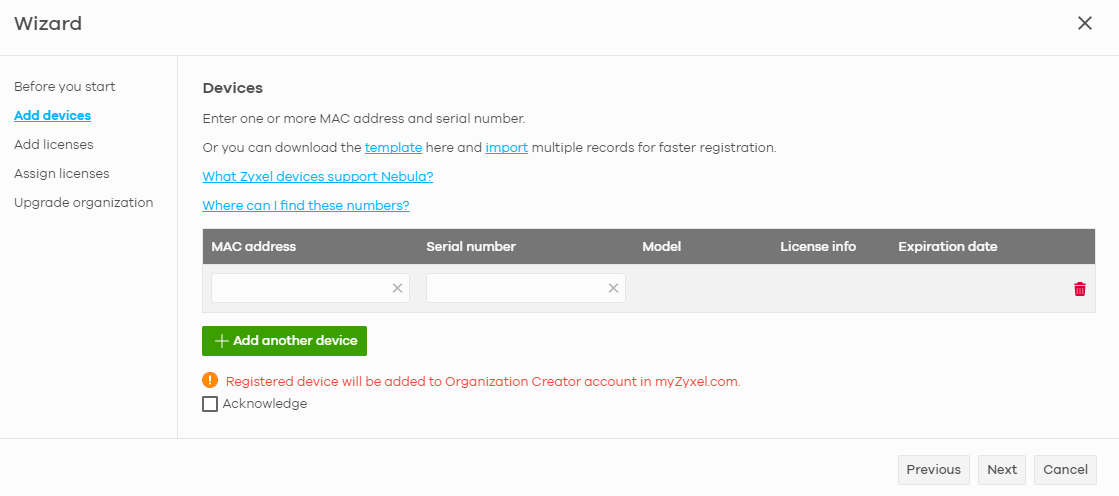
2 Add the MAC address and serial number of one or more Nebula Devices, select Acknowledge, and then click Next. For more information on this page, see Add Devices Screen.
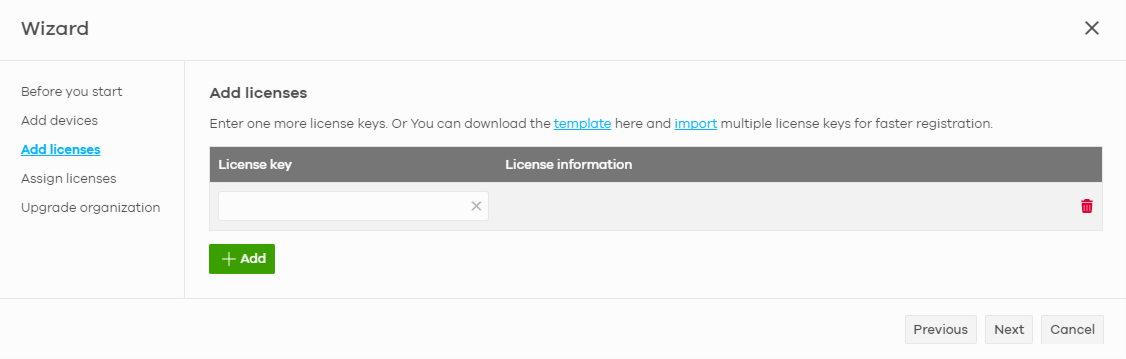
3 Add the license keys of one or more licenses, and then click Next. For more information on this page, see Add Licenses Screen.
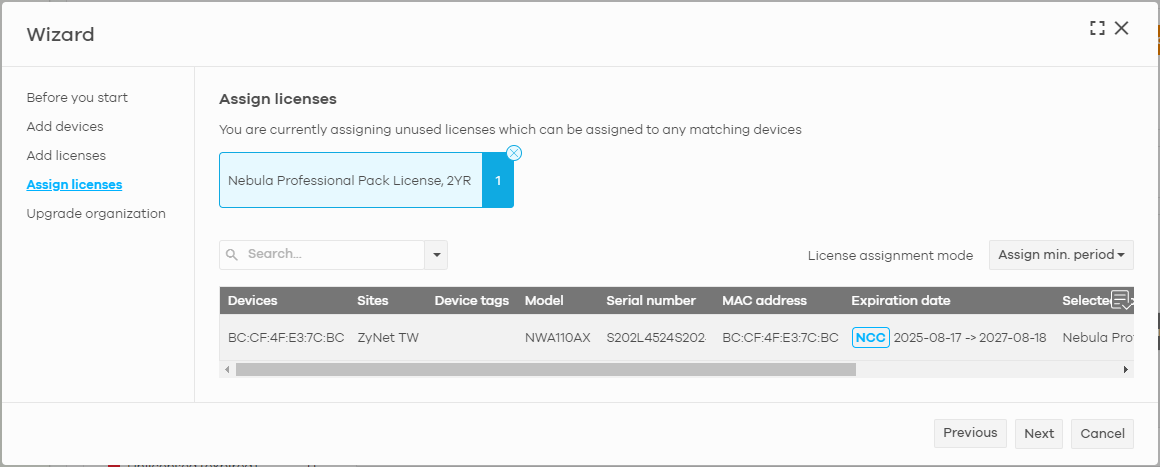
4 NCC automatically tries to assign an unused license to each matching Nebula Device. Reassign unused licenses for each Nebula Device manually by clicking Select # of license. Then click Next.
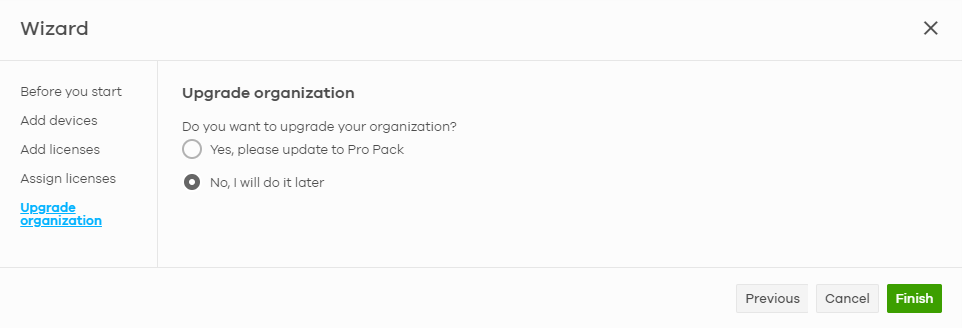
5 If the organization is on the base tier and you have added sufficient licenses for all Nebula Devices, you are given the option to upgrade to the Pro or Plus tier. Select Yes or No, and then click Finish.
License & Inventory Device Screen
Use these screen to view and manage Nebula Devices in the organization. Click Organization-wide > Configure > License & Inventory > Device to access this screen.
Organization-wide > Configure > License & Inventory > Device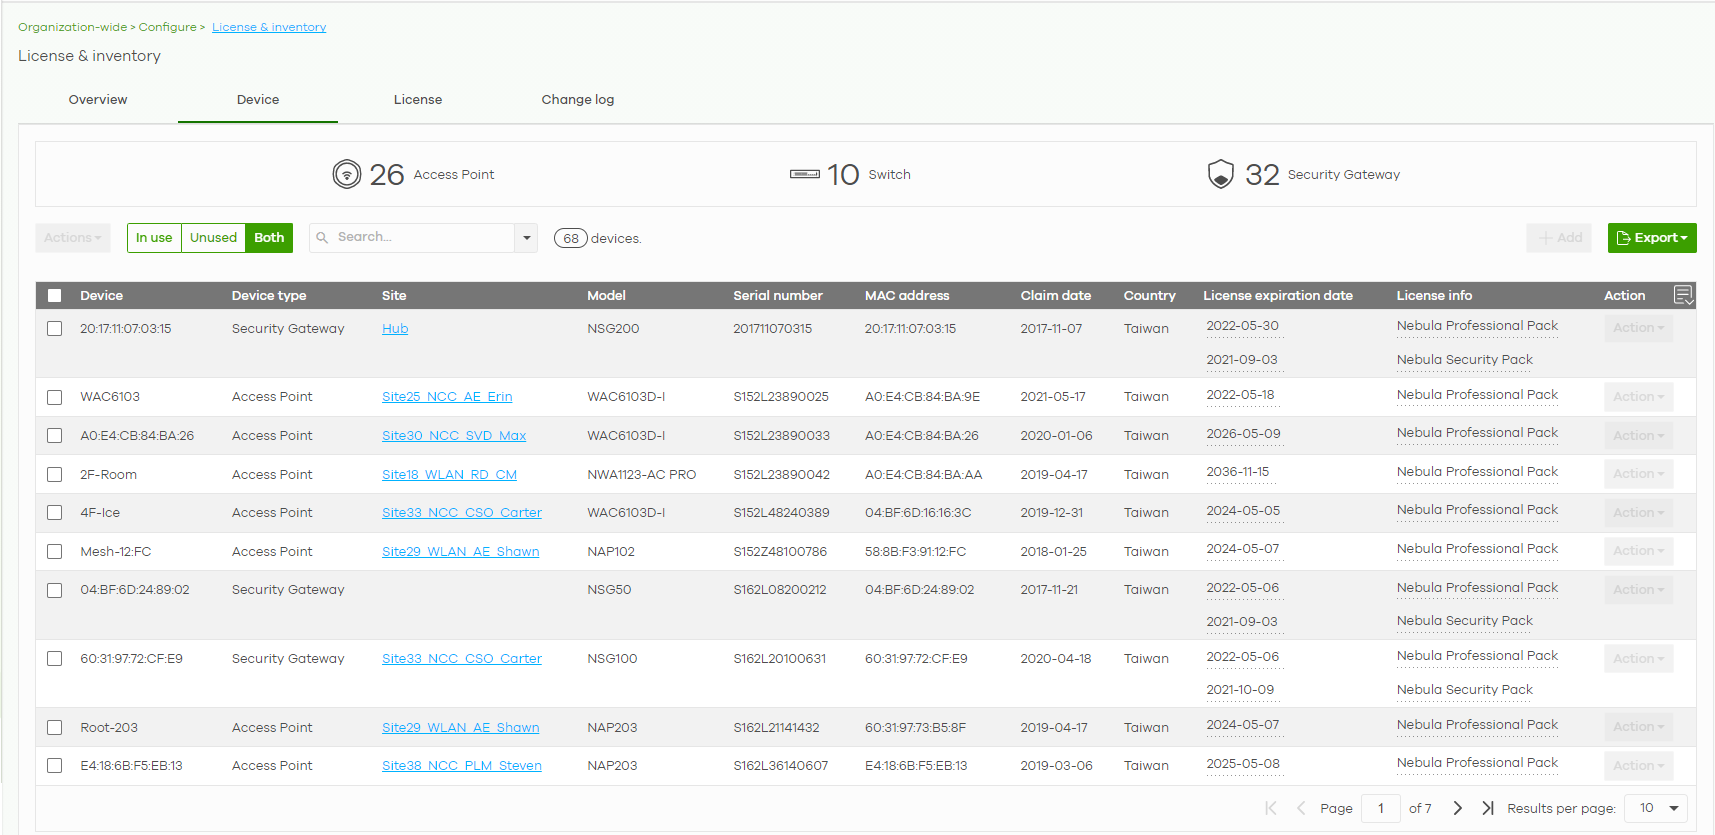
The following table describes the labels in this screen.
Label | Description |
|---|---|
N Access Point | This shows the total number of access points (N) in the organization. |
N Switch | This shows the total number of switches (N) in the organization. |
N Security Gateway | This shows the total number of Security Gateway devices (N) in the organization. |
Actions | Select one or more Nebula Devices and then click this button to perform one of the following actions: Change organization: Moves the Nebula Device to an organization. The organizations must have the same owners. Change site assignment: Moves the selected Nebula Devices to a site, or remove them from their current site while leaving them in the organization. Remove from organization: Remove the Nebula Devices from NCC. You can manage the Nebula Devices in standalone mode, or re-add them to NCC later. Assign license: Assign licenses to the selected Nebula Devices. Undo assign: Unlink the inactive licenses from the associated Nebula Devices. After unlinking, the license will be categorized as unused in Inventory. An inactive license is a license that has been assigned to a Nebula Device but is not yet in use or queued. Transfer license: Moves the unused licenses linked to a Nebula Device to another Nebula Device. Nebula Devices can be in the same organization or in a different organization. The Nebula Devices must have the same owner. Bundled, Trial, and Promotion licenses cannot be transferred. Purchase license: Use the Calculator to select what license to purchase and target expiration date to keep the Pro/Plus tier features/services running. You may export the list of required licenses to your computer. Then click the Zyxel license marketplace link to complete your purchase. 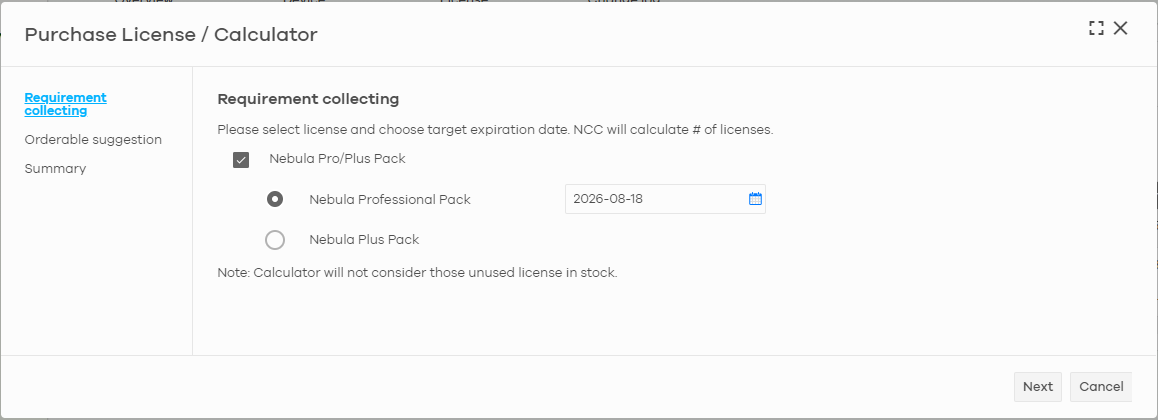 The Calculator will not count any Unused license(s) assigned to your organization as it is not yet assigned to a Nebula Device. This button is available only for the Organization (Delegated) or Owner administrator account with a registered Nebula Device(s). |
In use / Unused / Both | Select to display the Nebula Device currently in a site (In use), not current (Unused), or show all (Both). |
Search | Enter a keyword or specify one or more filter criteria to filter the list of Nebula Devices. |
+ Add | Add one or more new Nebula Devices to the organization, by entering the Nebula Device’s MAC address and serial number. For details, see Add Devices Screen. |
Export | Click this button to save the Nebula Device list as a CSV or XML file to your computer. |
Select an entry’s check box to select a specific Nebula Device. Otherwise, select the check box in the table heading row to select all Nebula Devices. | |
Device name | This shows the hostname of the Nebula Device. |
Device type | This shows the category of Nebula Device (Access Point, Switch, Security Gateway, Firewall) and Nebula Device model. |
Site | This shows the site that the Nebula Device is currently in. If the Nebula Device is not in any site, the value is blank. |
Model | This shows the Nebula Device’s model. |
Serial Number | This shows the Nebula Device’s serial number. |
MAC address | This shows the MAC address of the Nebula Device’s first Ethernet port. |
Device tag | This shows the tag created and added to the Nebula Device. |
Claim date | This shows the date on which the Nebula Device was added to NCC. If the Security Firewall has NOT yet connected to NCC (see Supported Nebula Devices for the list of Security Firewalls): • Native mode. Click this button and select Nebula Native mode in the Deployment Method. Follow the instructions to connect the Security Firewall to NCC. • Waiting ZTP will be shown if Native mode is not available. Click the Waiting ZTP button and select Zero Touch Provisioning in Deployment Method to configure the ZTP settings. |
Unused / In use | This shows Unused if the Nebula Device is not assigned to a site, or In use if the Nebula Device is currently in a site. |
Country | This shows the country in which the Nebula Device is located. |
License expiration date | This shows the date on which the Nebula Device’s NCC license will expire. |
License info | This shows the type of NCC license assigned to the Nebula Device. |
Action | Select one or more Nebula Devices and then click this button to perform one of the following actions: Change organization: Moves the Nebula Device to an organization. The organizations must have the same owners. Change site assignment: Moves the selected Nebula Devices to a selected site, or removes them from their current site while leaving them in the organization. Remove from organization: Remove the Nebula Devices from NCC. You can manage the Nebula Devices in standalone mode, or re-add them to NCC later. Assign license: Assign unassigned licenses to the selected Nebula Devices. Undo assign: Unlink the inactive licenses from the associated Nebula Devices. After unlinking, the license will be categorized as unused in Inventory. An inactive license is a license that has been assigned to a Nebula Device but is not yet in use or queued. Transfer license: Moves unused licenses linked from one Nebula Device to another Nebula Device. The Nebula Devices can be in the same organization or in a different organization. The Nebula Devices must have the same owner. Bundled, Trial, and Promotion licenses cannot be transferred. |
License & Inventory License Screen
Use these screen to view and manage licenses in the organization. Click Organization-wide > Configure > License & Inventory > License to access this screen.
Organization-wide > Configure > License & Inventory > License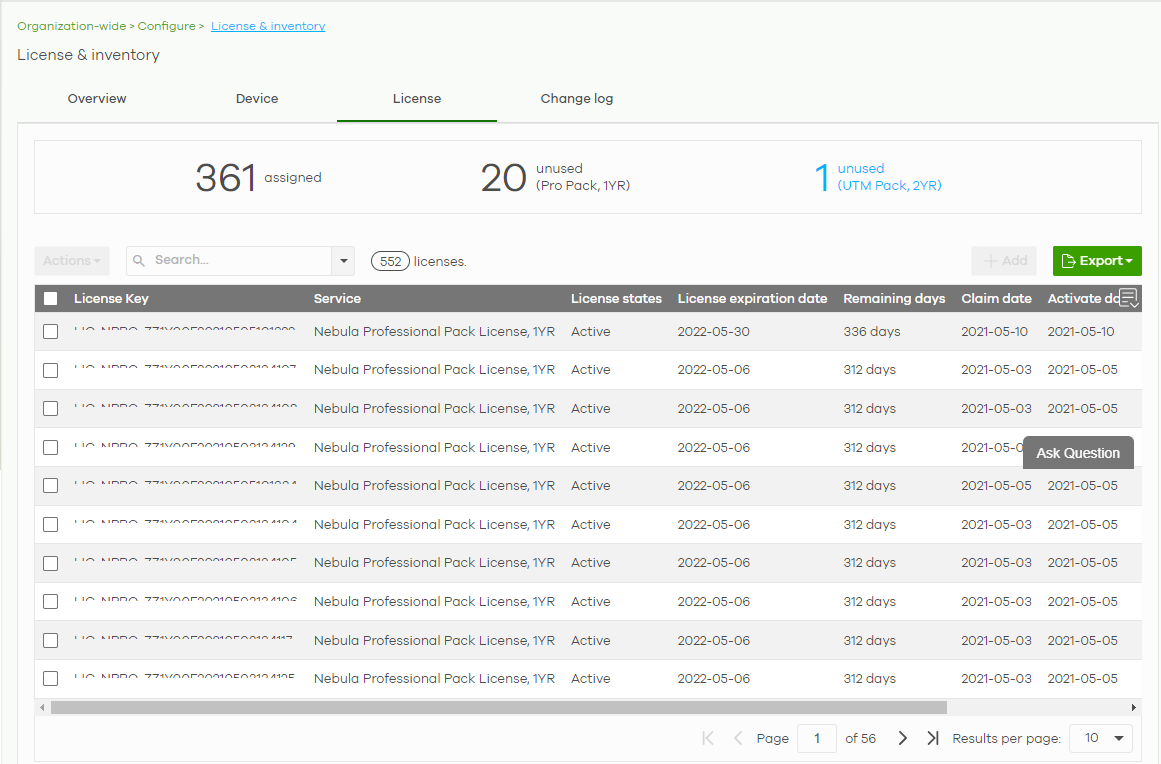
The following table describes the labels in this screen.
Label | Description |
|---|---|
N assigned | This shows the total number of licenses (N) in the organization that are assigned to a Nebula Device and activated. |
N unused (Pro Pack, 1MO/1YR/2YR/4YR/7YR) or N unused (Plus Pack, 1MO/1YR/2YR) | This shows the total number of Pro/Plus Pack licenses (N) in the organization that are not assigned to a Nebula Device. |
N unused (UTM Pack, 1MO/1YR/2YR) | This shows the total number of UTM Security Pack licenses (N) in the organization that are not assigned to a Nebula Device. |
Actions | Select one or more Nebula Devices and then click this button to perform one of the following actions: Change organization: Moves the selected licenses to an organization. The organizations must have the same owners. Assign License: Assign the selected licenses to one or more Nebula Devices. Only the licenses applicable for the Nebula Device can be selected. Undo assign: Unlink the inactive licenses from the associated Nebula Devices. After unlinking, the license will be categorized as unused in Inventory. An inactive license is a license that has been assigned to a Nebula Device but is not yet in use or queued. Transfer license: Moves the unused licenses linked to a Nebula Device to another Nebula Device. The Nebula Devices can be in the same organization or in a different organization. The Nebula Devices must have the same owner. Bundled, Trial, and Promotion licenses cannot be transferred. |
Search | Enter a keyword or specify one or more filter criteria to filter the list of licenses. |
N licenses | This shows the total assigned and unassigned licenses in the organization. |
+ Add | Add one or more new licenses to the organization, by entering their license keys. For details, see Add Licenses Screen. |
Export | Click this button to save the license list as a CSV or XML file to your computer. |
License Key | This shows the key of license, including bundled licenses. |
Service | This shows the service that license is for, for example “Nebula Professional Pack”. |
License states | This shows the current status of the license: • Active: The license is assigned to a specific Nebula Device and activated. • Inactive: The license is assigned to a specific Nebula Device but not activated. • Expired: The license is past its validity. • Queued: The license is assigned to a specific Nebula Device, and the license is waiting for the currently active license to expire. • Unused: The license is not assigned to a specific Nebula Device. |
License expiration date | This shows the date on which the license will expire. Queued means there are multiple licenses assigned to the Nebula Device, and the license is waiting for the currently active license to expire. |
Remaining days | This shows how days remain until the license expires. |
Claim date | This shows the date on which the license was added to NCC. If the Security Firewall has NOT yet connected to NCC: • Native mode. Click this button and select Nebula Native mode in Deployment Method. Follow the instructions to connect the Security Firewall to NCC. • Waiting ZTP will be shown if Native mode is not available. Click the Waiting ZTP button and select Zero Touch Provisioning in Deployment Method to configure the ZTP settings. |
Activate date | This shows the date on which the license was activated. |
Associated device | This shows the name and model of the Nebula Device that the license is assigned to. |
Associated site | This shows the name of the site that the license is being used in. Click the site to go to its dashboard. |
Action | Click this button to perform the following actions: Change organization: Moves the selected licenses to an organization. The organizations must have the same owners. Assign License: Assign the selected licenses to one or more Nebula Devices. Only the licenses applicable for the Nebula Device can be selected. Undo assign: Unlink the inactive licenses from the associated Nebula Devices. After unlinking, the license will be categorized as unused in Inventory. An inactive license is a license that has been assigned to a Nebula Device but is not yet in use or queued. Transfer license: Moves the unused licenses linked to a Nebula Device to another Nebula Device. The Nebula Devices can be in the same organization or in a different organization. The Nebula Devices must have the same owner. Bundled, Trial, and Promotion licenses cannot be transferred. |
License & Inventory Change Log Screen
Use this screen to view a record of Nebula Device and license actions within the organization. The log also shows the change in state of the organization, as a before and after, as a result of each action. Click Organization-wide > Configure > License & Inventory > Change log to access this screen.
Organization-wide > Configure > License & Inventory > Change log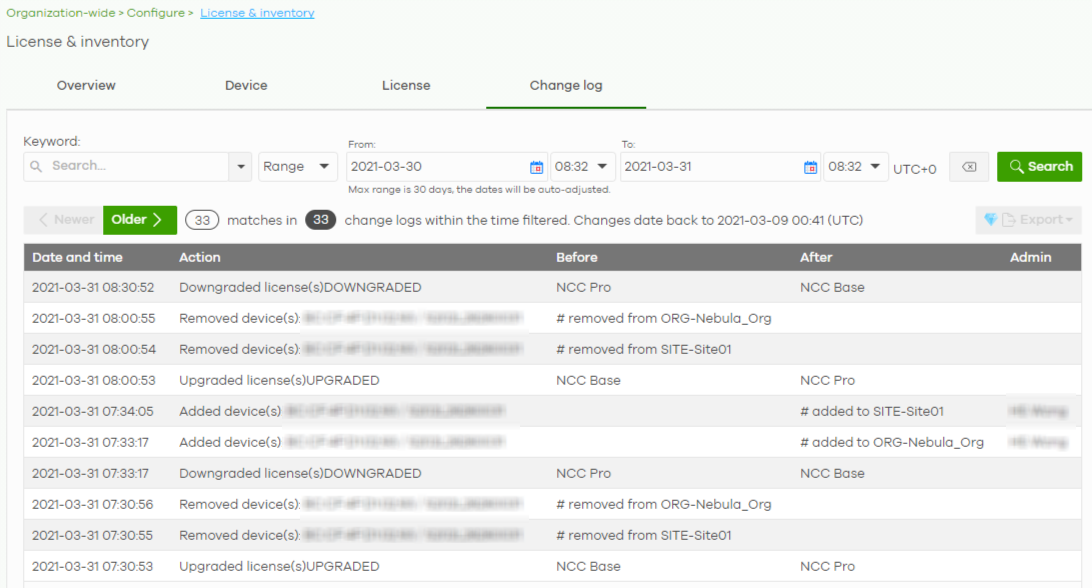
The following table describes the labels in this screen.
Label | Description |
|---|---|
Keyword | Enter a keyword or specify one or more filter criteria to filter the list of log entries. |
Range / Before | Select a filtering option, set a date, and then click Search to filter log entries by date. Range: Display log entries from the first specified date to the second specified date. Before: Display log entries from the beginning of the log to the selected date. |
Search | Click this to update the list of logs based on the search criteria. |
Reset filters | Click this to return the search criteria to the previously saved time setting. |
Newer/Older | Click to view the list of log messages with the most recent or oldest message displayed first. |
This shows the total number of the log messages that match the search criteria. It also shows the date and time the very first log was created. | |
Export | Click this button to save the log list as a CSV or XML file to your computer. |
Date and time | This shows the date and time in UTC+00:00 (or UTC+0) when the log was recorded. UTC is a standard time for use around the world (formerly known as Greenwich Mean Time or GMT). UTC is an international abbreviation that is neither French nor English. It means both "Temps Universel Coordonné" and "Coordinated Universal Time". |
Action | This shows the action that triggered the log entry. |
Before | This shows the old setting or state that was overwritten with the new value. |
After | This shows the new setting or state. |
Admin | This shows the name of the NCC administrator account that made the changes. |
Click this icon to display a greater or lesser number of configuration fields. |
Organization Settings
Use this screen to change your general organization settings, such as the organization name and security. Click Organization-wide > Configure > Settings to access this screen.
Organization-wide > Configure > Settings
The following table describes the labels in this screen.
Label | Description |
|---|---|
Name | Enter a descriptive name for the organization. |
Country | Select the country where the organization is located. |
Security | |
Idle timeout | Select ON and enter the number of minutes each user can be logged in and idle before the NCC automatically logs out the user. Select OFF if you do not want the NCC to log out idle users. |
Login IP ranges | Select ON and specify the IP address range of the computers from which an administrator is allowed to log into the NCC. Select OFF to allow any IP address of the computer from which an administrator can log into the NCC. |
Import certificate | Select ON to import a certificate that can be used by connected Nebula APs in WPA2 authentication. |
Certificate | This shows the name used to identify the certificate. |
Status | This shows whether the certificate is active. |
Actions | Click Edit to change the certificate name or password or replace the certificate. |
Update certificate | Click this button to save a new certificate to the NCC. |
Name | Enter a name for the certificate. |
File Path | Click to find the certificate file you want to upload. |
Password | Enter the certificate file’s password. |
Delete this organization | Click the Delete organization button to remove the organization when it does not have any sites, Nebula Devices or users. |
Administrators
Use this screen to view, manage and create administrator accounts for the specified organization. Click Organization-wide > Configure > Administrators to access this screen.
Organization-wide > Configure > Administrators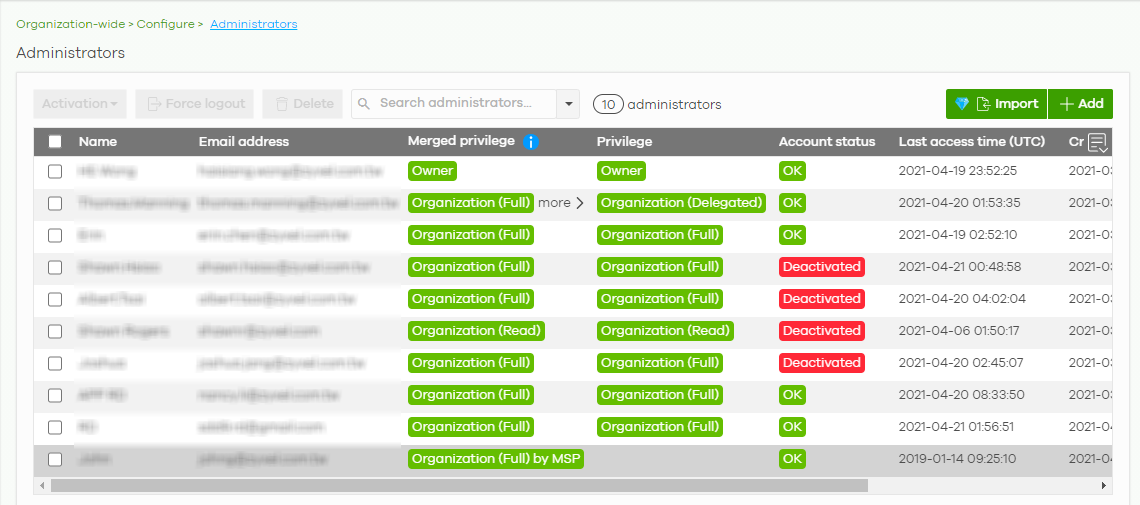
The following table describes the labels in this screen.
Label | Description |
|---|---|
Activation | Click this button to Activate/Deactivate the selected accounts. Then click Update. |
Force logout | Click this button to force the selected accounts to log out of the NCC. |
Delete | Click this button to remove the selected accounts. |
Search | Specify your desired filter criteria to filter the list of administrator accounts. |
administrators | This shows the number of administrator accounts in the list. |
Change owner | This button is only available if you are the organization owner. Click this button to transfer ownership of the organization to another user account. The new owner account must be an organization full administrator. After transferring ownership, NCC performs the following actions: • Changes your account from organization owner to organization full administrator. • Transfers all Nebula Devices and licenses in the organization to the new owner. • Sends the new owner an email, notifying them of the change. |
Import | Click this button to create administrator accounts in bulk by importing a complete list of all new administrators in an Excel file. |
Add | Click this button to create a new administrator account. See Create/Update Administrator. |
Name | This shows the name of the administrator account. |
Email address | This shows the email address of the administrator account. |
Merged privilege | This shows the final privilege the account has in the organization, when organization privileges configured on different screens are combined and prioritized. Organization privileges can be configured on the following screens; the highest privilege level takes priority: • MSP > Configure > Admins & teams > Admins • MSP > Configure > Admins & teams > Teams • Group-wide > Configure > Administrators • Organization-wide > Configure > Administrators For more information, see Administrator Privilege Priority. |
Privilege | This shows whether the administrator account has read-only, monitor-only, guest ambassador, or read and write (full) access to the organization and sites. Installer indicates that the administrator account can register Nebula Devices at a site. Owner indicates that the administrator account is the creator of the organization, who has full access to that organization and cannot be deleted by other administrators. Organization (Delegated) means that the administrator account has delegated owner privileges. This type of account can perform all of the same actions as the organization owner, except for the following: • Delete organization • Transfer organization ownership • Assign delegate owner privileges to an administrator account |
Account status | This shows whether the administrator account has been validated (OK). It shows Deactivated if an administrator account has been created but cannot be used. This may happen since you can only have up to five active administrator account on Nebula (free). |
Last access time | This shows the last date and time traffic was sent from the administrator account. |
Create date | This shows the date and time the administrator account was created. |
Status change date | This shows the last date and time the administrator account status was changed. |
Click this icon to display a greater or lesser number of configuration fields. |
Create/Update Administrator
In the Organization-wide > Configure > Administrator screen, click the Add button to create a new administrator account or double-click an existing account entry to modify the account settings.
Organization-wide > Configure > Administrator: Create/Update administrator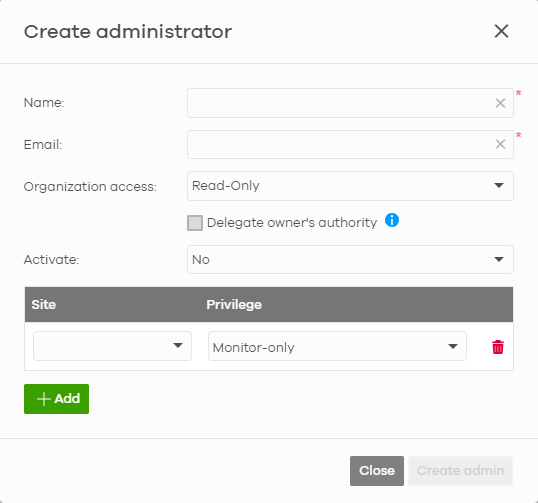
The following table describes the labels in this screen.
Label | Description |
|---|---|
Name | Enter a descriptive name for the administrator account. |
Email | Enter the email address of the administrator account, which is used to log into NCC. This field is read-only if you are editing an existing account. |
Organization access | Set the administrator account’s access to the organization. When an administrator account has read and write (Full) access, the administrator can create or delete other administrator accounts, create or delete a site, and add or renew licenses for Nebula Devices in the organization. If you select Read-only, the administrator account can be the organization administrator (that has no write access to the organization) and also be a site administrator. If you select None, the administrator account can only be a site administrator. |
Delegate owner’s authority | This setting is only available when Organization access is set to Full. Select this setting to grant delegate owner privileges to an organization full administrator account. An account with delegate owner privileges can perform all of the same actions as the organization owner, except for the following: • Delete organization • Transfer organization ownership • Assign delegate owner privileges to an administrator account |
Activate | Select Yes to enable the account or No to temporarily disable the account. |
YES, I want to do it. | The check box displays only when an administrator that has full access to the organization selects No in the Activate field to disable his/her own account. |
Site | This field is available only when you set the account’s organization access to Read-only or None. Select the site to which you want to set the account’s access. You can also select the site tag created using the Organization-wide > Monitor > Overview: Sites screen. |
Privilege | This field is available only when you set the account’s organization access to Read-only or None. Set the administrator account’s access to the site. You can select from Read-only, Monitor-only, Guest Ambassador, Installer and Full (read and write). An administrator account that has Guest Ambassador access can create, remove or manage guest accounts using the Cloud Authentication screen (see Cloud Authentication). Installer access allows an administrator to register Nebula Devices at this site. |
Add | Click this button to create a new entry in order to configure the account’s access to another site. |
Close | Click this button to exit this screen without saving. |
Create admin/Update admin | Click this button to save your changes and close the screen. |
Cloud Authentication
Use this screen to view and manage the user accounts which are authenticated using the NCC user database, rather than an external RADIUS server. Click Organization-wide > Configure > Cloud Authentication to access this screen.
Note: The changes you made in this screen apply to all sites in the organization. To change the cloud authentication settings for a specific site, go to Site-wide > Configure > Cloud Authentication (see Cloud Authentication).
User Account Types
NCC has the following types of user accounts. For details on using these accounts for WiFi and network authentication, see SSID Settings.
Account Type | Description | Authentication Methods |
|---|---|---|
User | The user account can gain access to the networks by authenticating using a pre-created user name and password, or their email address. This type of user account also supports DPPSK and two-factor authentication. | • WiFi authentication (WPA-Enterprise) • Network access through captive portal • VPN Access • WiFi authentication + network authentication through DPPSK |
MAC | The Nebula Device account that can gain access to the networks by authenticating using its MAC address. | • Mac-based Nebula Device authentication (combined with DPPSK) |
DPPSK | A user that can gain access to the network using a unique dynamic Personal Pre-Shared key that is linked to their user account. | • WiFi authentication + network authentication through DPPSK |
Cloud Authentication User Screen
Use this screen to view and manage regular NCC network user accounts. Click Organization-wide > Configure > Cloud Authentication > User to access this screen.
Organization-wide > Configure > Cloud Authentication > User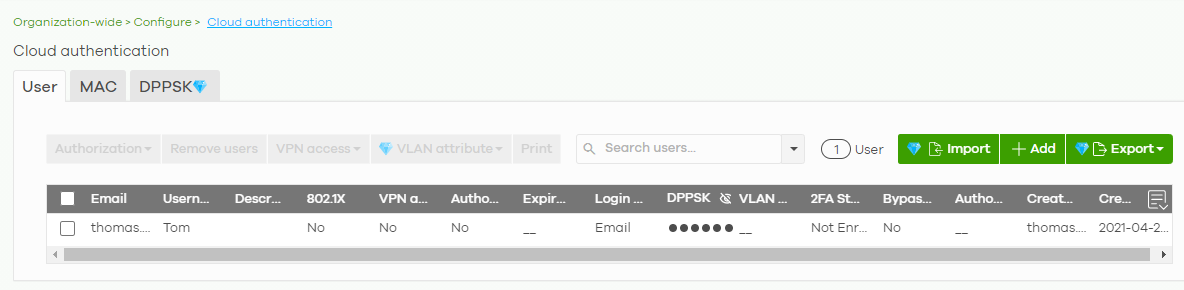
The following table describes the labels in this screen.
Note: Some of the actions on this screen are only available if your administrator account has full access to the organization.
Label | Description |
|---|---|
Authorization | Select one or more than one user account and click this button to configure the authorization settings for the selected user accounts. |
Remove users | Select one or more than one user account and click this button to remove the selected user accounts. |
VPN access | Select one or more than one user account and click this button to configure whether the accounts can be used to connect to the organization’s networks through VPN. |
VLAN attribute | Select one or more than one user account and click this button to assign the users to a specific VLAN ID, or clear the VLAN ID. Then click Update. 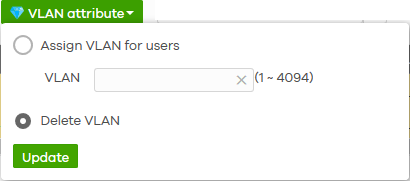 |
Print | Click this button to print information about each selected user account, such as their user name and password. |
Search users | Enter a key word as the filter criteria to filter the list of user accounts. |
N User | This shows how many user accounts (N) match the filter criteria and how many user accounts of the selected type are created in total. |
Import | Click this button to create user accounts in bulk by importing a complete list of all new users in an Excel file. |
Add | Click this button to create a new user account. See Create/Update User Account. |
Export | Click this button to save the account list as a CSV or XML file to your computer. |
Email | This shows the email address of the user account. |
Username | This shows the user name of the user account. |
Description | This shows the descriptive name of the user account. |
802.1X | This shows whether 802.1X (WPA-Enterprise) authentication is enabled on the account. |
VPN access | This shows whether the accounts can be used to connect to the organization’s networks through VPN. |
Authorized | This shows whether the user has been authorized or not (No). If the user is authorized, it shows All sites or the name of the site to which the user is allowed access. |
Expire in (UTC) | This shows the date and time that the account expires. This shows -- if authentication is disabled for this account. This shows Never if the account never expires. This shows Multiple value if the account has different Expire in values across different sites. |
Login by | This shows whether the user needs to log in with the email address and/or user name. |
DPPSK | This shows the account’s dynamic personal pre-shared key (DPPSK), if one is set. |
VLAN assignment | This field is available only when the account type is set to User. This shows the VLAN assigned to the user. |
2FA Status | This shows whether the account has set up two-factor authentication yet. |
Bypass 2FA | This shows whether the account is allowed to bypass two-factor authentication, if two-factor authentication is enabled on a captive portal or VPN gateway. |
Authorized by | This shows the email address of the administrator account that authorized the user. If the account has been authorized by different admins across different sites, it shows Multiple value. |
Created by | This shows the email address of the administrator account that created the user. |
Created at | This shows the date and time that the account was created. |
Click this icon to display a greater or lesser number of configuration fields. |
Create/Update User Account
In the Site-wide or Organization-wide > Configure > Cloud Authentication > User screen, click the Add button to create a new user account or double-click an existing account entry to modify the account settings.
Organization-wide > Configure > Cloud Authentication > User: Create/Update user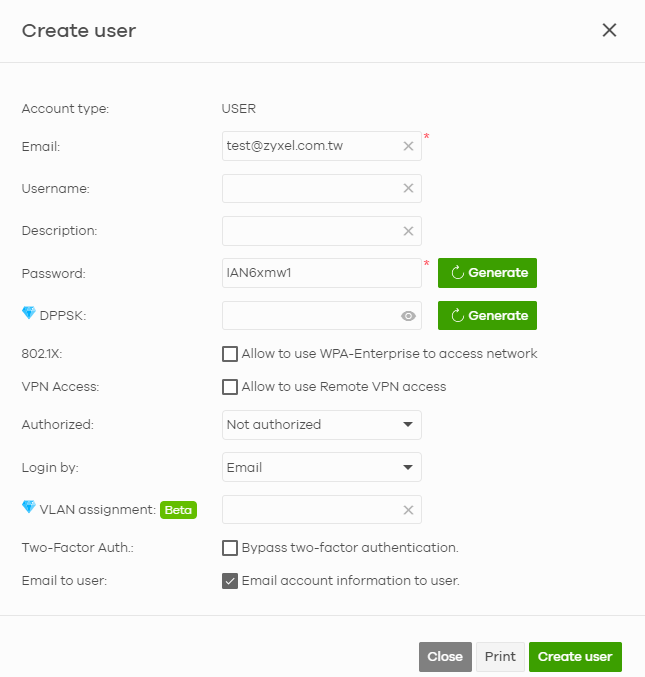
The following table describes the labels in this screen.
Label | Description |
|---|---|
Account type | This shows the type of the user account. |
Email | Enter the email address of the user account, which is used to log into the networks. |
Username | Enter a user name for this account. |
Description | Enter a descriptive name for the account. |
Password | Enter the password of this user account. It can consist of 4 – 31 alphanumeric characters. You can click Generate to have NCC create a password for the account automatically. |
DPPSK | Enter a dynamic personal pre-shared key (DPPSK) for this DPPSK user account, if you want to be able to authenticate using DPPSK in additional to a user name and password. It can consist of 8 – 31 alphanumeric characters. You can click Generate to have the NCC create a DPPSK for the account automatically. |
802.1X | Select this to allow the account to be used for single sign-on (SSO) network and WiFi authentication using 802.1X (WPA-Enterprise). |
VPN Access | Select this to allow the account to be used to connect to the organization’s networks through VPN. |
Authorized | Set whether you want to authorize the user of this account. You can select to authorize the user’s access to All Sites or Specified Sites in the organization. If you select Specified Sites, a field displays allowing you to specify the sites to which the user access is authorized. |
Expire in | This field is available only when the user is authorized. Click Change to specify the number of minutes/hours/days/weeks the user can be logged into the network in one session before the user of this account has to log in again. Otherwise, select Never and the user of this account will never be logged out. |
Login by | Select whether the user needs to log in with the email address and/or user name. |
VLAN assignment | This allows you to assign a user to a specific VLAN based on the user credentials instead of using a RADIUS server. |
Bypass two-factor authentication | This shows whether the account is allowed to bypass two-factor authentication, if two-factor authentication is enabled on a captive portal or VPN gateway. |
Email account information to user | Select this to send a copy of the information on this screen to the account email address, after the account has been created. |
Close | Click this button to exit this screen without saving. |
Print | Click this button to print the account information. |
Create user | Click this button to save your changes and close the screen. |
Cloud Authentication MAC Screen
Use this screen to view and manage NCC device user accounts, used for MAC-based authorization. Click Organization-wide > Configure > Cloud Authentication > MAC to access this screen.
Organization-wide > Configure > Cloud Authentication > MAC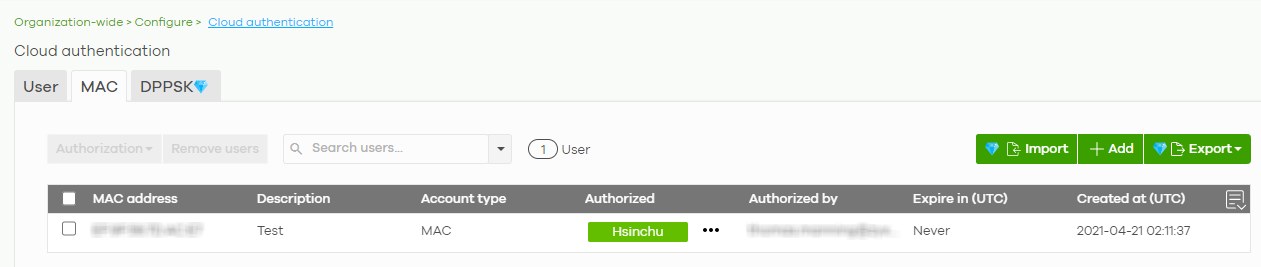
The following table describes the labels in this screen.
Note: Some of the actions on this screen are only available if your administrator account has full access to the organization.
Label | Description |
|---|---|
Authorization | Select one or more than one account and click this button to configure the authorization settings for the selected user accounts. |
Remove users | Select one or more than one user account and click this button to remove the selected user accounts. |
Search users | Enter a key word as the filter criteria to filter the list of user accounts. |
N User | This shows how many user accounts (N) match the filter criteria and how many user accounts of the selected type are created in total. |
Import | Click this button to create user accounts in bulk by importing a complete list of all new users in an Excel file. |
Add | Click this button to create a new user account. See Create/Update MAC Account. |
Export | Click this button to save the account list as a CSV or XML file to your computer. |
Email | This shows the email address of the user account. |
MAC address | This shows the MAC address of the user account. |
Description | This shows the descriptive name of the user account. |
Account type | This shows the type of user account: USER, MAC, or DPPSK. |
Authorized | This shows whether the user has been authorized or not (No). If the user is authorized, it shows All sites or the name of the site to which the user is allowed access. |
Authorized by | This shows the email address of the administrator account that authorized the user. If the account has been authorized by different admins across different sites, it shows Multiple value. |
Expire in (UTC) | This shows the date and time that the account expires. This shows -- if authentication is disabled for this account. This shows Never if the account never expires. This shows Multiple value if the account has different Expire in values across different sites. |
Created at | This shows the date and time that the account was created. |
Click this icon to display a greater or lesser number of configuration fields. |
Create/Update MAC Account
In the Site-wide or Organization-wide > Configure > Cloud Authentication > MAC screen, click the Add button to create a new user account or double-click an existing account entry to modify the account settings.
Organization-wide > Configure > Cloud Authentication > MAC: Create/Update MAC user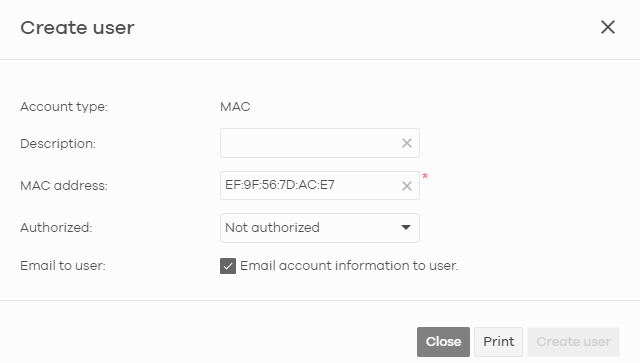
The following table describes the labels in this screen.
Label | Description |
|---|---|
Account type | This shows the type of the user account. |
Description | Enter a descriptive name for the account. |
MAC address | Enter a MAC address for this account. |
Authorized | Set whether you want to authorize the user of this account. You can select to authorize the user’s access to All Sites or Specified Sites in the organization. If you select Specified Sites, a field displays allowing you to specify the sites to which the user access is authorized. |
Email account information to user | Select this to send a copy of the information on this screen to the account email address after the account has been created. |
Close | Click this button to exit this screen without saving. |
Print | Click this button to print the account information. |
Create user | Click this button to save your changes and close the screen. |
Cloud Authentication DPPSK Screen
Use this screen to view and manage DPPSK network user accounts. Click Organization-wide > Configure > Cloud Authentication > DPPSK to access this screen.
Organization-wide > Configure > Cloud Authentication > DPPSK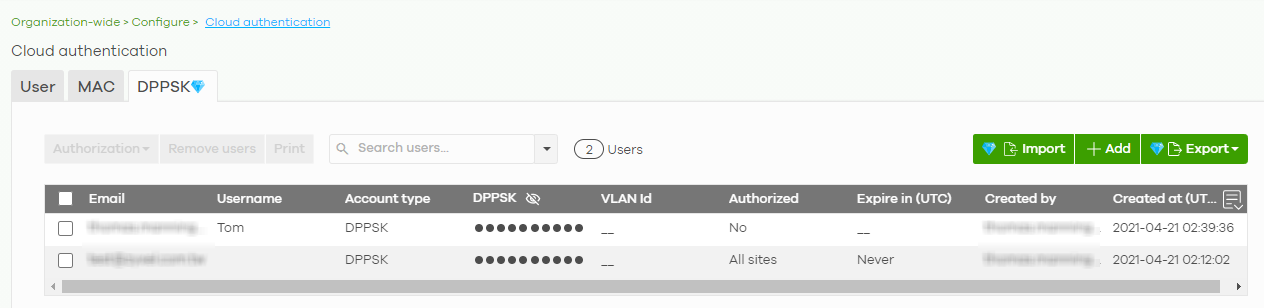
The following table describes the labels in this screen.
Label | Description |
|---|---|
Authorization | Select one or more than one user account and click this button to configure the authorization settings for the selected user accounts. |
Remove users | Select one or more than one user account and click this button to remove the selected user accounts. |
Print | Click this button to print the unique dynamic personal pre-shared key (DPPSK) and expiry time of each selected user account. The account details can be cut into cards, and then given to users in order to grant them wireless network access. 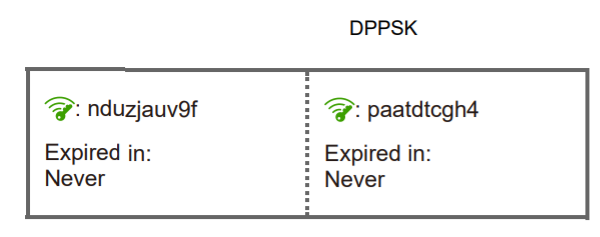 |
Search users | Enter a key word as the filter criteria to filter the list of user accounts. |
N Users | This shows how many user accounts (N) match the filter criteria and how many user accounts of the selected type are created in total. |
Import | Click this button to create user accounts in bulk by importing a complete list of all new users in an Excel file. |
Add | Click this button to create a single new account, or a batch of accounts. • Single DPPSK: See Add/Edit DPPSK Account. • Batch create DPPSK: See Batch Create DPPSK Accounts. |
Export | Click this button to save the account list as a CSV or XML file to your computer. |
Email | This shows the email address of the user account. |
Username | This shows the user name of the user account. |
Account type | This shows this type of user account: USER, MAC, or DPPSK. |
DPPSK | This shows the account’s dynamic personal pre-shared key (DPPSK). |
VLAN ID | This shows the VLAN assigned to the account. |
Description | This shows the descriptive name of the user account. |
Authorized | This shows whether the user has been authorized or not (No). If the user is authorized, it shows All sites or the name of the site to which the user is allowed access. |
Expire in (UTC) | This shows the date and time that the account expires. This shows -- if authentication is disabled for this account. This shows Never if the account never expires. This shows Multiple value if the account has different Expire in values across different sites. |
Created by | This shows the email address of the administrator account that created the user. |
Created at | This shows the date and time that the account was created. |
Click this icon to display a greater or lesser number of configuration fields. |
Add/Edit DPPSK Account
In the Site-wide or Organization-wide > Configure > Cloud Authentication > DPPSK screen, click Add > Single DPPSK to create a new user account or double-click an existing account entry to modify the account settings.
Organization-wide > Configure > Cloud Authentication > DPPSK: Create/Update DPPSK user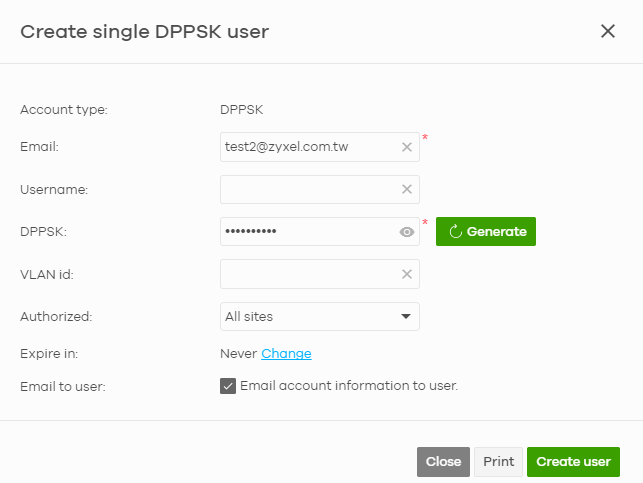
The following table describes the labels in this screen.
Label | Description |
|---|---|
Account type | This shows the type of the user account. |
Email | Enter the email address of the user account, which is used to log into the networks. |
Username | Enter a user name for this account. |
Description | Enter a descriptive name for the account. |
DPPSK | Enter a dynamic personal pre-shared key (DPPSK) for this DPPSK user account. It can consist of 8 – 31 alphanumeric characters. You can click Generate to have the NCC create a DPPSK for the account automatically. |
VLAN id | Enter the ID of a VLAN to assign a user to a specific VLAN. |
Authorized | Set whether you want to authorize the user of this account. You can select to authorize the user’s access to All Sites or Specified Sites in the organization. If you select Specified Sites, a field displays allowing you to specify the sites to which the user access is authorized. |
Expire in | This field is available only when the user is authorized. Click Change to specify the number of minutes/hours/days/weeks the user can be logged into the network in one session before the user of this account has to log in again. Otherwise, select Never and the user of this account will never be logged out. |
Email account information to user | Select this to send a copy of the information on this screen to the account email address, after the account has been created. |
Close | Click this button to exit this screen without saving. |
Print | Click this button to print the account information. |
Create user | Click this button to save your changes and close the screen. |
Batch Create DPPSK Accounts
To have NCC create multiple DPPSK user accounts, each with a unique dynamic personal pre-shared key (DPPSK), go to the Site-wide or Organization-wide > Configure > Cloud Authentication > DPPSK screen, click Add, and then select Batch Create DPPSK.
Organization-wide > Configure > Cloud Authentication: Batch Create DPPSK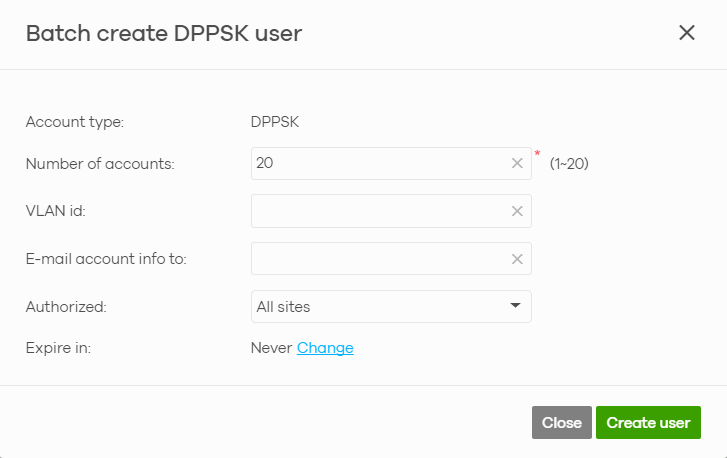
The following table describes the labels in this screen.
Label | Description |
|---|---|
Number of accounts | Enter how many DPPSK user accounts you want to create. |
VLAN id | Assign the users to a specific VLAN based on the user’s dynamic personal pre-shared key (DPPSK). |
E-mail account info to | Send a copy of each user account’s dynamic personal pre-shared key (DPPSK) and expiry date to the specified email address. This information is in a printable format. The expiry date includes a time and date in UTC format. |
Authorized | Set whether you want to authorize the user of this account. You can select to authorize the user’s access to All Sites or Specified Sites in the organization. If you select Specified Sites, a field displays allowing you to specify the sites to which the user access is authorized. |
Expire in | This field is available only when the user is authorized. Click Change to specify the number of minutes/hours/days/weeks the user can be logged into the network in one session before the user of this account has to log in again. Otherwise, select Never and the user of this account will never be logged out. |
Close | Click this button to exit this screen without saving. |
Create user | Click this button to save your changes and close the screen. |
Configuration Management
Configuration synchronization allows you to easily copy configurations from one site or Nebula Device to another. Use this screen to synchronize the configuration between sites or switch ports. You can also back up the current configurations for sites or switches to the NCC and restore the configuration at a later date.
Click Organization-wide > Configure > Configuration Management to access this screen.
Organization-wide > Configure > Configuration Management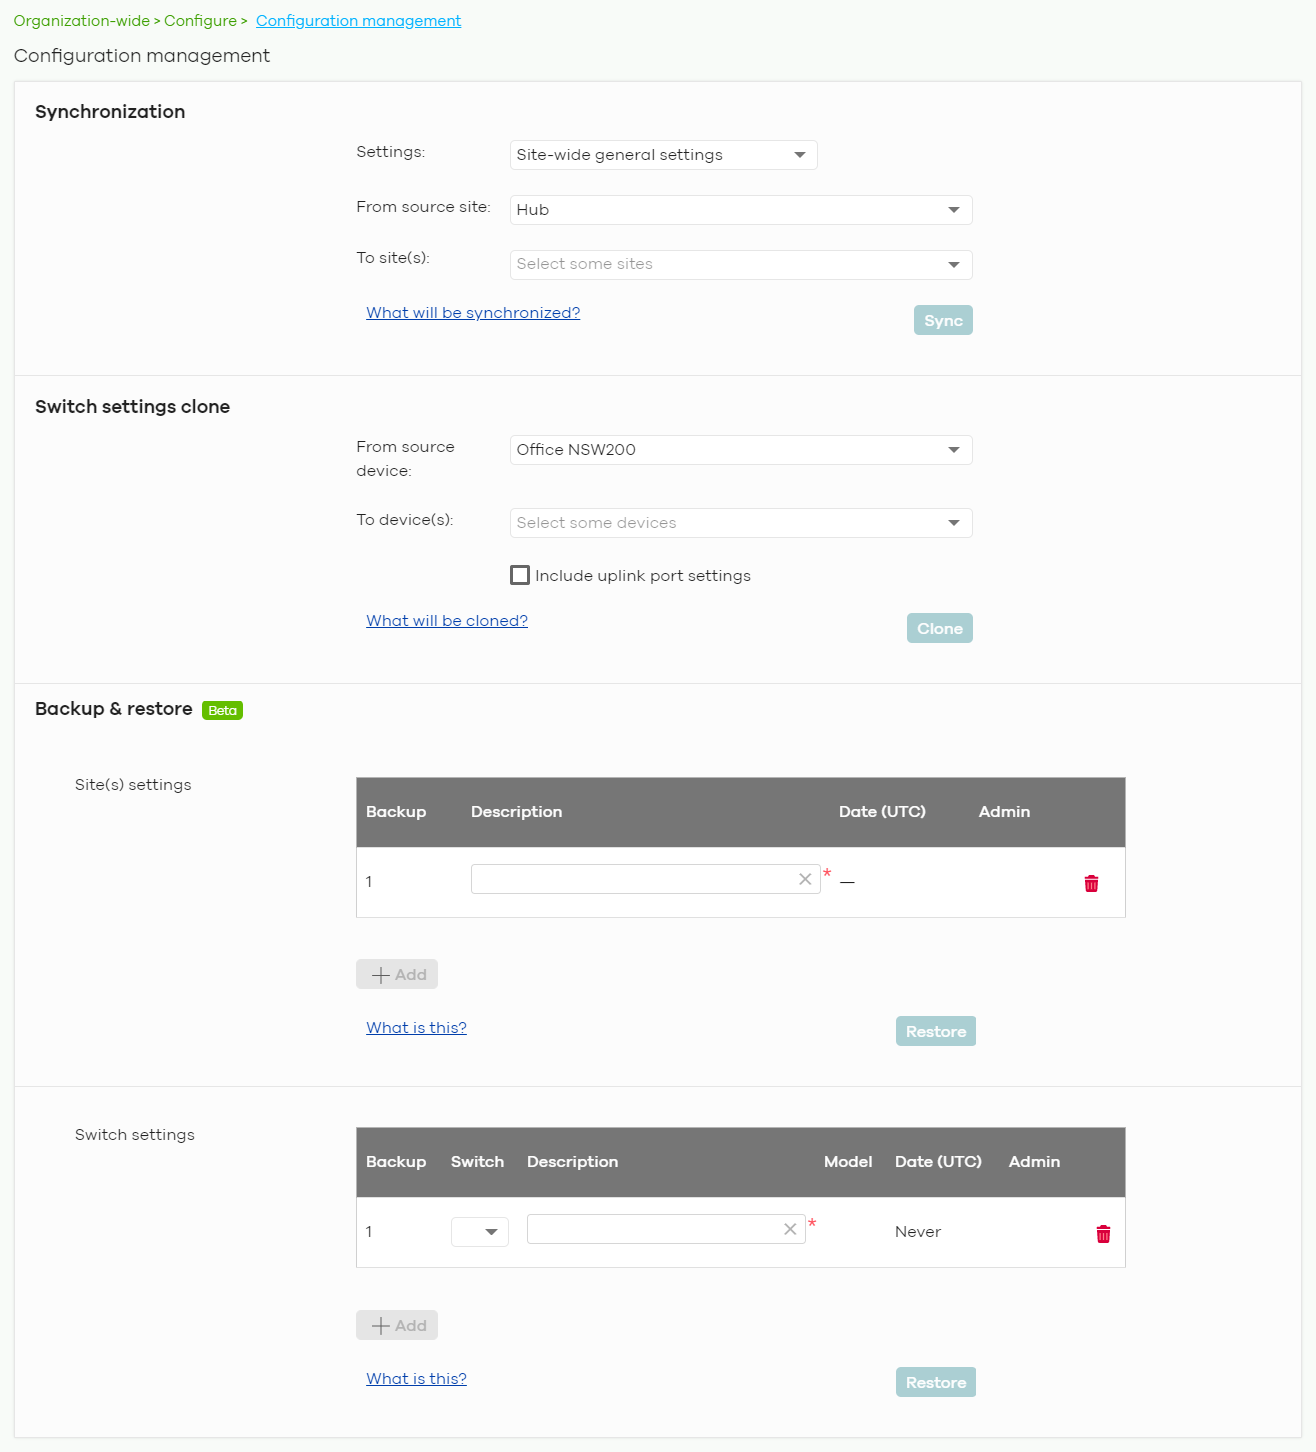
The following table describes the labels in this screen.
Label | Description |
|---|---|
Synchronization | |
Settings | Specify whether general site configuration or just SSID settings of a site will be propagated to other sites. Click What will be synchronized? to view detailed information. |
From source site | Select the site from which you want to copy its site configuration to other sites. |
To Site(s) | Select one or more sites to which you want to import the copied site configuration. You can also select the site tags created using the Organization > Monitor > Overview: Sites screen. |
Sync | Click this button to start synchronizing configuration settings between the selected sites. |
Switch settings clone | |
From source device | Select the Nebula switch from which you want to copy its switch port settings to other Nebula Devices. |
To device(s) | Select one or more Nebula switches to which you want to import the copied switch port settings. |
Clone | Click this button to start synchronizing switch port settings between the selected Nebula Devices. |
Backup & Restore | |
Site(s) settings | You can create up to three site configuration backups for the organization. The NCC automatically creates and saves one backup when you perform configuration restoration. The automatic backup cannot be deleted. |
Backup | This shows the index number of the site configuration backup. |
Description | This shows the descriptive name of the backup. |
Date (UTC) | This shows the date and time the backup was saved on the NCC server. |
Admin | This shows the name of the administrator account who performed the backup. |
Remove | Click the remove icon to delete the backup. |
Add | Click this button to create a new configuration backup of all the sites in the organization. |
Restore from backup | Select the backup you want to restore. |
Restore to site(s) | Select one or more sites to which you want to restore the specified configuration backup. |
Restore | Click this button to overwrite the settings of the sites with the selected configuration backup. |
Switch settings | At the time of writing, only one backup is allowed per Nebula Device. |
Backup | This shows the index number of the switch configuration backup. |
Switch | This shows the name of the switch. |
Description | This shows the descriptive name of the backup. |
Model | This shows the model number of the switch. |
Date (UTC) | This shows the date and time the backup was saved on the NCC server. |
Admin | This shows the name of the administrator account who performed the backup. |
Remove | Click the remove icon to delete the backup. |
Add | Click this button to create a new configuration backup of a specific switch. This button is selectable only when you have at least one switch in the organization. |
Restore from backup | Select the backup you want to restore. |
Restore to device(s) | Select one or more Nebula switches to which you want to restore the specified configuration backup. |
Restore | Click this button to overwrite the settings of the switches with the selected configuration backup. |
Configuration Template
A configuration template is a virtual site. The settings you configured in a template will apply to the real sites which are bound to the template. If you do not want to apply any new settings from the template to a site, just unbind that site. If you want to configure some specific settings directly in a site after the site is bound to a template, turn on the local override function (see Local Override).
Use this screen to create and manage configuration templates. You then can bind or unbind a site from the template (see Site Binding).
Note: A site can only be bound to one template. The same template can be used by multiple sites. The sites and the template should belong to the same organization for binding.
Note: If the NCC service is downgraded from Nebula Professional Pack to Nebula Base, all the sites will be unbound from the templates but retain the settings already applied from the template.
Click Organization-wide > Configure > Configuration templates to access this screen.
Organization-wide > Configure > Configuration templates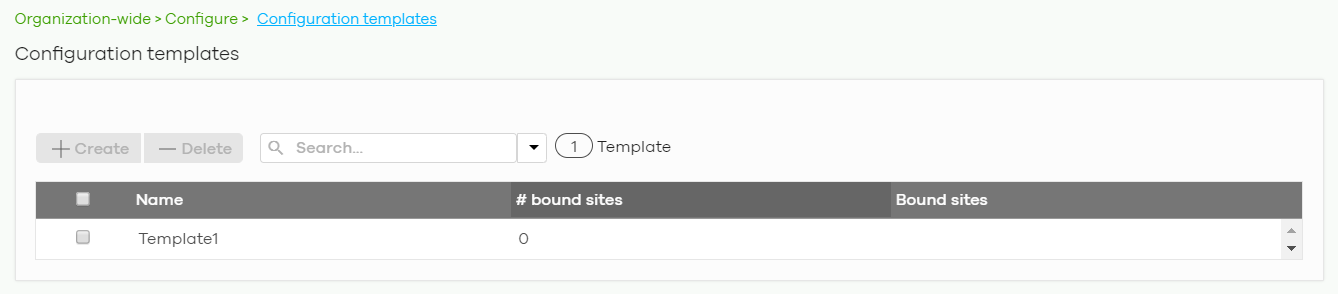
The following table describes the labels in this screen.
Label | Description |
|---|---|
Create | Click this button to create a new configuration template. You can copy settings from an existing site or configuration template, or have a new template with default settings. It is optional to bind one or more sites to the template when you are creating a template. |
Delete | Click this button to remove the selected templates. A window pops up asking you to confirm that you want to delete the templates. If you remove a template that is being used by a site, the site will be unbound from the template automatically and retain the settings previously applied from the template. |
Search | Enter a key word as the filter criteria to filter the list of templates. |
Templates | This shows how many templates match the filter criteria and how many templates are created in total. |
Name | This shows the name of the template. |
# Bound sites | This shows the number of the sites bound to the template. |
Bound sites | This shows the name of the sites bound to the template. |
Site Binding
Use this screen to bind or unbind a site from a template. Click an existing template from the list in the Organization-wide > Configure > Configuration Template screen to access this screen. To go back to the previous screen, click the Configuration template list link.
Organization-wide > Configure > Configuration Template: Template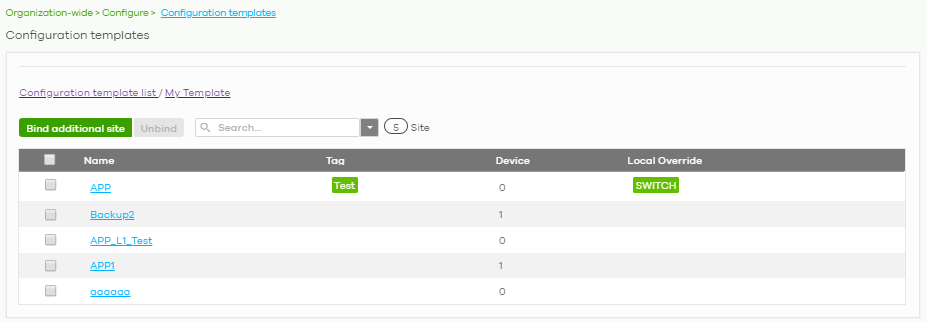
The following table describes the labels in this screen.
Label | Description |
|---|---|
Bind additional site | Click this button to bind more sites to the template. A window displays. Select the name of the sites in the Target sites field and click Bind. |
Unbind | Click this button to remove the selected sites from the template. The site which is unbound from the template still retains the settings applied from the template. |
Search | Enter a key word as the filter criteria to filter the list of sites. |
Sites | This shows how many sites match the filter criteria and how many sites are bound to the template in total. |
Name | This shows the name of the site bound to the template. |
Tag | This shows the tags added to the site. |
Device | This shows the number of Nebula Devices which are assigned to the site. |
Local override | This shows which settings in the template do not apply to the site. |
Template settings
An administrator that has full access to the organization can modify the template configurations. To access a template’s configuration screen, select the template name from the Site field in the NCC title bar. It also shows the number of sites that are bound to the template on each configuration screen.
Note: At the time of writing, you can use a template to configure site-wide, switch, and access point settings.
Local Override
When a site is bound to a template, you can see the name of the template on the site’s configuration screens (which are also available in a template and can be configured).
There is also an option to make the changes you made locally to a site persist. If you select the override check box of the site’s configuration screen, all the configuration screens under the same menu tab (Site-Wide or Switch) are configurable. Settings in these screens will not be affected and modified by the template. If the override check box is not selected, any changes of the same configuration screen in the template apply to the site.
Switch Port Profile and Configuration
Just as a configuration template is a virtual site, so is a profile to a switch. The settings you configured in a profile will apply to the switches which are bound to the profile. If you do not want to apply any new settings from the profile to a switch, just unbind that switch. If you want to configure some specific settings directly in a switch (For example, a port’s Broadcast (pps) value. See Update ports for details.) after the switch is bound to a profile, turn on the local override function (see Local Override).
Security Profile Sync
Security profile sync allows you to share the same USG FLEX security service settings with multiple sites in an organization. This replaces the Unified Threat Management (UTM) settings configured for each site at USG FLEX > Configure > Security Service.
Configuring Security Profile Sync
Follow the steps below to enable security profile sync in an organization.
1 Go to Organization-wide > Configure > Security profile sync. Select Enabled, and then under Sync sites add the sites that you want to share security settings.
Note: You can only add sites that have a USG FLEX gateway device.
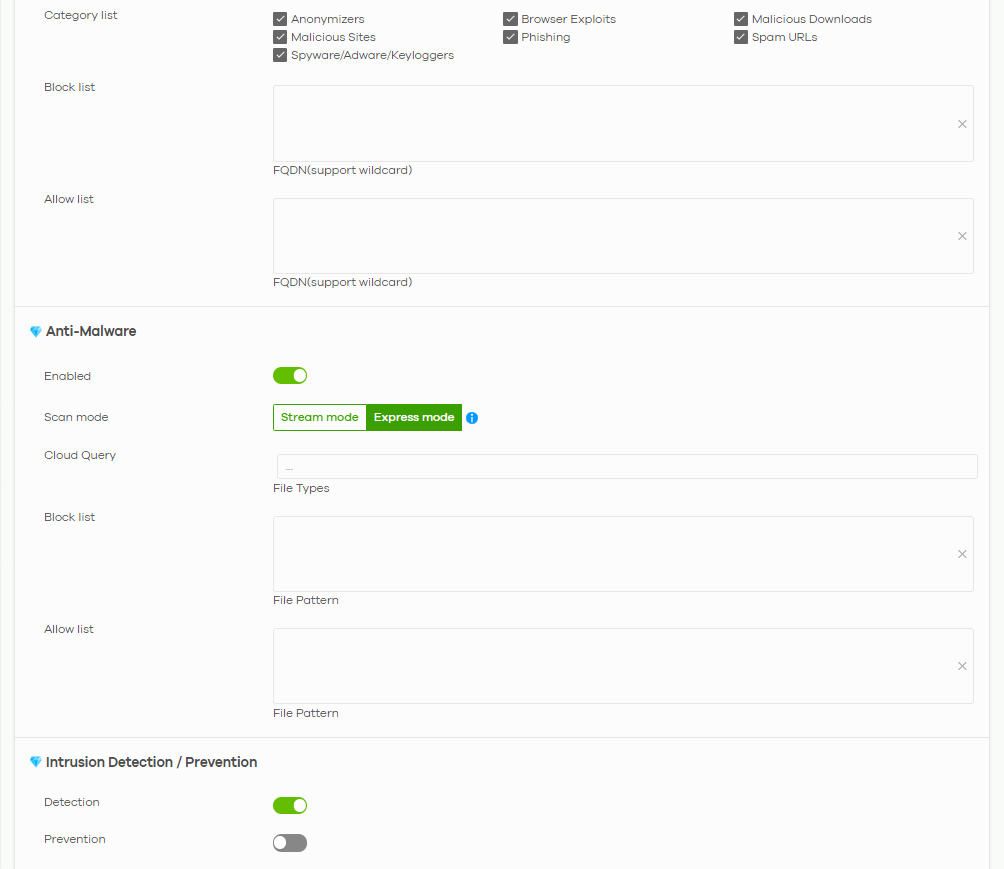
2 Configure security service settings for Content filtering, Application Patrol, URL Threat Filter, Anti-Malware, and Intrusion Detection / Prevention. Then click Save.
All security settings are synced to the selected sites.
All security settings are synced to the selected sites.
3 If you change the settings in the Security profile sync screen, the changes will be copied to all selected sites.
4 If you want to modify security settings for an individual site, go to USG FLEX > Configure > Security service and select Override security profile sync.
Security Profile Sync Screen
Use this screen to enable and configure security profile sync. Click Organization-Wide > Configure > Security profile sync to access this screen.
Organization-wide > Configure > Security Profile Sync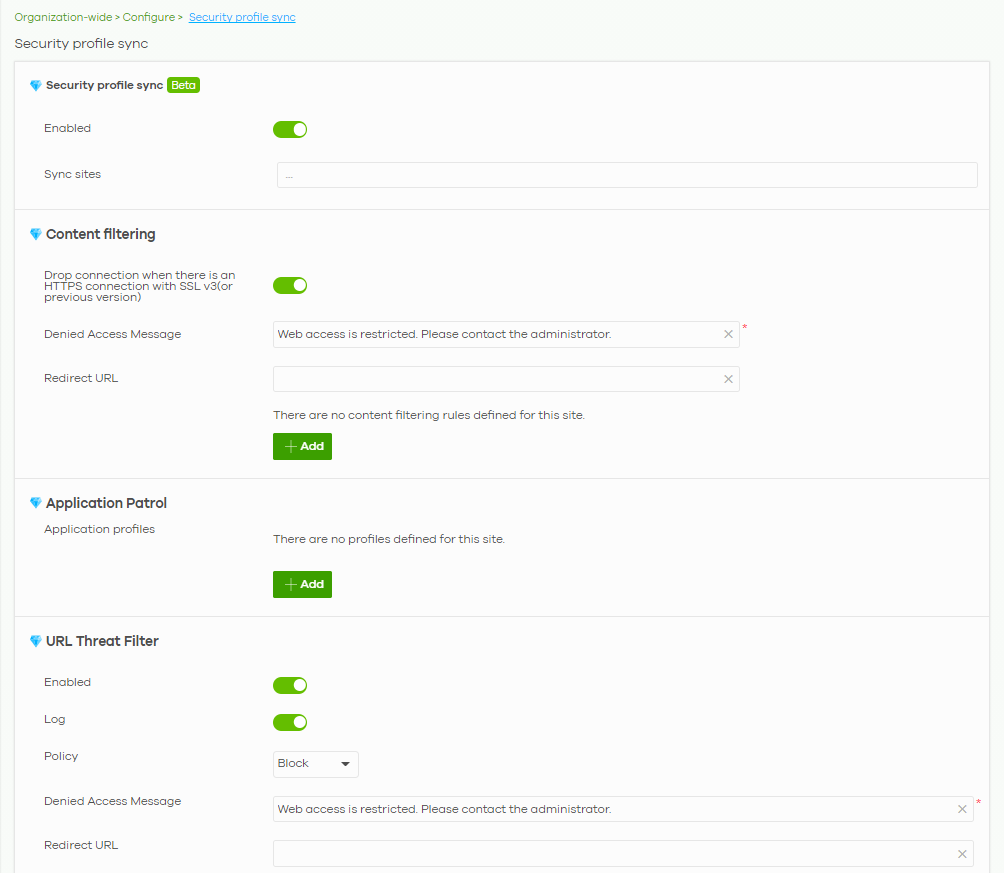
The following table describes the labels in this screen.
Label | Description |
|---|---|
Security profile sync | |
Enabled | Click this to enable or disable security profile sync for the organization. |
Sync sites | Select one or more sites that you want to sync the security settings on this screen to. Select All sites to sync security settings with all sites in the organization. |
Content Filtering | |
Drop connection when HTTPS connection with SSL V3 or previous version | Select On to have the Security Gateway block HTTPS web pages using SSL V3 or a previous version. |
Denied Access Message | Enter a message to be displayed when content filter blocks access to a web page. Use up to 127 characters (0–9a–zA–Z;/?:@&=+$\.–_!~*'()%,”). For example, “Access to this web page is not allowed. Please contact the network administrator”. It is also possible to leave this field blank if you have a URL specified in the Redirect URL field. In this case if the content filter blocks access to a web page, the security gateway just opens the web page you specified without showing a denied access message. |
Redirect URL | Enter the URL of the web page to which you want to send users when their web access is blocked by content filter. The web page you specify here opens in a new frame below the denied access message. Use “http://” or “https://” followed by up to 262 characters (0–9a–zA–Z;/?:@&=+$\.–_!~*'()%). For example, http://192.168.1.17/blocked access. |
Enabled | Select the check box to enable the content filtering profile. |
Description | Enter a description for this profile. |
 | Click this icon to change the profile settings. |
| Click this icon to remove the profile. |
Add | Click this to create a content filtering profile. See Create a Content Filtering Profile for more information. |
Application Patrol Application profiles | |
Name | Enter a name for this profile for identification purposes. |
Description | Enter a description for this profile. |
| Click this icon to change the profile settings. |
| Click this icon to remove the profile. |
Add | Click this icon to create an application patrol profile. See Add Application Patrol Profile for more information. |
URL Threat Filter | |
Enabled | Select On to turn on the rule. Otherwise, select Off to turn off the rule. |
Log | Select whether to have the Security Gateway generate a log (log), log and alert (log alert) or not (no) when the policy is matched to the criteria listed above. |
Policy | Select Pass to allow users to access web pages that the external web filtering service has not categorized. Select Block to prevent users from accessing web pages that the external web filtering service has not categorized. When the external database content filtering blocks access to a web page, it displays the denied access message that you configured in the Content Filter General screen along with the category of the blocked web page. Select Warn to display a warning message before allowing users to access web pages that the external web filtering service has not categorized. |
Denied Access Message | Enter a message to be displayed when content filter blocks access to a web page. Use up to 127 characters (0–9a–zA–Z;/?:@&=+$\.–_!~*'()%,”). For example, “Access to this web page is not allowed. Please contact the network administrator”. It is also possible to leave this field blank if you have a URL specified in the Redirect URL field. In this case if the content filter blocks access to a web page, the security gateway just opens the web page you specified without showing a denied access message. |
Redirect URL | Enter the URL of the web page to which you want to send users when their web access is blocked by content filter. The web page you specify here opens in a new frame below the denied access message. Use “http://” or “https://” followed by up to 262 characters (0–9a–zA–Z;/?:@&=+$\.–_!~*'()%). For example, http://192.168.1.17/blocked access. |
Category List | These are categories of web pages based on their content. Select categories in this section to control access to specific types of Internet content. |
Block list | Sites that you want to block access to, regardless of their content rating, can be blocked by adding them to this list. Enter host names such as www.bad-site.com into this text field. Do not enter the complete URL of the site – that is, do not include “http://”. All sub-domains are also blocked. For example, entering “bad-site.com” also blocks “www.badsite.com”, “partner.bad-site.com”, “press.bad-site.com”, and so on. You can also enter just a top level domain. For example, enter .com to block all .com domains. Use up to 127 characters (0–9 a–z). The casing does not matter. |
Allow list | Sites that you want to allow access to, regardless of their content rating, can be allowed by adding them to this list. Enter host names such as www.good-site.com into this text field. Do not enter the complete URL of the site – that is, do not include “http://”. All sub-domains are allowed. For example, entering “zyxel.com” also allows “www.zyxel.com”, “partner.zyxel.com”, “press.zyxel.com”, and so on. You can also enter just a top level domain. For example, enter .com to allow all .com domains. Use up to 127 characters (0–9 a–z). The casing does not matter. |
Anti-Malware | |
Enabled | Select On to turn on the rule. Otherwise, select Off to turn off the rule. |
Scan Mode | |
Express Mode | In this mode you can define which types of files are scanned using the File Type For Scan fields. The Nebula Device then scans files by sending each file’s hash value to a cloud database using cloud query. This is the fastest scan mode. |
Stream Mode | In this mode the Nebula Device scans all files for viruses using its anti-malware signatures to detect known virus pattens. This is the deepest scan mode. |
File decompression (ZIP and RAR) | Select this check box to have the Nebula Device scan a compressed file (the file does not need to have a “zip” or “rar” file extension). The Nebula Device first decompresses the file and then scans the contents for malware. Note: The Nebula Device decompresses a compressed file once. The Nebula Device does NOT decompress any files within a compressed file. |
Destroy compressed files that could not be decompressed | When you select this check box, the Nebula Device deletes compressed files that use password encryption. Select this check box to have the Nebula Device delete any compressed files that it cannot decompress. The Nebula Device cannot decompress password protected files or a file within another compressed file. There are also limits to the number of compressed files that the Nebula Device can concurrently decompress. Note: The Nebula Device’s firmware package cannot go through the Nebula Device with this check box enabled. The Nebula Device classifies the firmware package as a file that cannot be decompressed and then deletes it. Clear this check box when you download a firmware package from the Zyxel website. It is OK to upload a firmware package to the Nebula Device with the check box selected. |
Cloud Query | Select the Cloud Query supported file types for the Security Gateway to scan for viruses. |
Block list | This field displays the file or encryption pattern of the entry. Enter a file pattern that would cause the Nebula Device to log and modify this file. •Use up to 80 characters. Alphanumeric characters, underscores (_), dashes (–), question marks (?) and asterisks (*) are allowed. •A question mark (?) lets a single character in the file name vary. For example, use “a?.zip” (without the quotation marks) to specify aa.zip, ab.zip and so on. •Wildcards (*) let multiple files match the pattern. For example, use “*a.zip” (without the quotation marks) to specify any file that ends with “a.zip”. A file named “testa.zip would match. There could be any number (of any type) of characters in front of the “a.zip” at the end and the file name would still match. A file named “test.zipa” for example would not match. •A * in the middle of a pattern has the Nebula Device check the beginning and end of the file name and ignore the middle. For example, with “abc*.zip”, any file starting with “abc” and ending in “.zip” matches, no matter how many characters are in between. •The whole file name has to match if you do not use a question mark or asterisk. •If you do not use a wildcard, the Nebula Device checks up to the first 80 characters of a file name. |
Allow list | When you select this check box, the Nebula Device deletes compressed files that use password encryption. Select this check box to have the Nebula Device delete any compressed files that it cannot decompress. The Nebula Device cannot decompress password protected files or a file within another compressed file. There are also limits to the number of compressed files that the Nebula Device can concurrently decompress. Note: The Nebula Device’s firmware package cannot go through the Nebula Device with this check box enabled. The Nebula Device classifies the firmware package as a file that cannot be decompressed and then deletes it. Clear this check box when you download a firmware package from the Zyxel website. It is okay to upload a firmware package to the Nebula Device with the check box. This field displays the file or encryption pattern of the entry. Enter the file or encryption pattern for this entry. Specify a pattern to identify the names of files that the Nebula Device should not scan for viruses. •Use up to 80 characters. Alphanumeric characters, underscores (_), dashes (–), question marks (?) and asterisks (*) are allowed. •A question mark (?) lets a single character in the file name vary. For example, use “a?.zip” (without the quotation marks) to specify aa.zip, ab.zip and so on. •Wildcards (*) let multiple files match the pattern. For example, use “*a.zip” (without the quotation marks) to specify any file that ends with “a.zip”. A file named “testa.zip would match. There could be any number (of any type) of characters in front of the “a.zip” at the end and the file name would still match. A file named “test.zipa” for example would not match. •A * in the middle of a pattern has the Nebula Device check the beginning and end of the file name and ignore the middle. For example, with “abc*.zip”, any file starting with “abc” and ending in “.zip” matches, no matter how many characters are in between. •The whole file name has to match if you do not use a question mark or asterisk. •If you do not use a wildcard, the Nebula Device checks up to the first 80 characters of a file name. |
Intrusion Detection/Prevention | |
Detection | Select On to enable Detection. |
Prevention | Select On to enable Prevention. |
VPN Orchestrator
VPN Orchestrator enables you to automatically create Virtual Private Network (VPN) connections between sites within an organization. This allows the security gateway of each site and the Nebula Devices behind it to communicate securely.
Note: You can manually create VPN connections between sites at Gateway > Configure > Site-to-Site VPN or USG FLEX > Configure > Site-to-Site VPN.
Topology Overview
There are two topologies you can use when creating a site-to-site VPN.
• Fully Meshed: In a fully-meshed VPN topology (1 in the figure below), there is a VPN connection between every two sites in the organization. Sites can communicate directly with each other, but having permanent tunnels between every site takes up more resources.
• Hub-and-spoke: In a hub-and-spoke topology (2 in the figure below), every site is either a hub or a spoke. There is a VPN connection between each spoke site (B, C, D, and E) and the hub site (A). Traffic from each spoke site must first go through the hub site. If the hub site fails, the site-to-site VPN network fails. To avoid this, you can assign more than one hub site.
VPN Topologies (Fully Meshed and Hub-and-Spoke)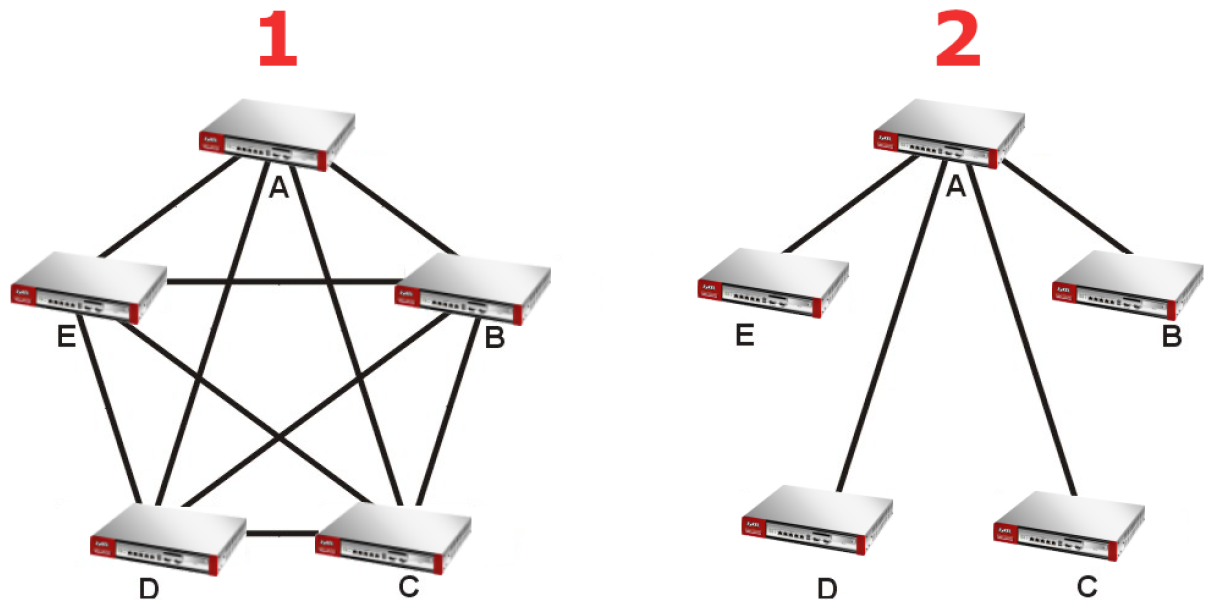
VPN Areas
An organization can contain multiple VPN areas. Each VPN area is an independent VPN with its own sites, settings, and topology. Every organization has a default VPN area called Default, which cannot be deleted. Sites in different VPN areas within the same organization can communicate if you enable the Area communication setting.
VPN Orchestrator Screen
Use this screen to manage and create site-to-site VPNs within the current organization. Click Organization-Wide > Configure > VPN Orchestrator to access this screen.
Organization-wide > Configure > VPN Orchestrator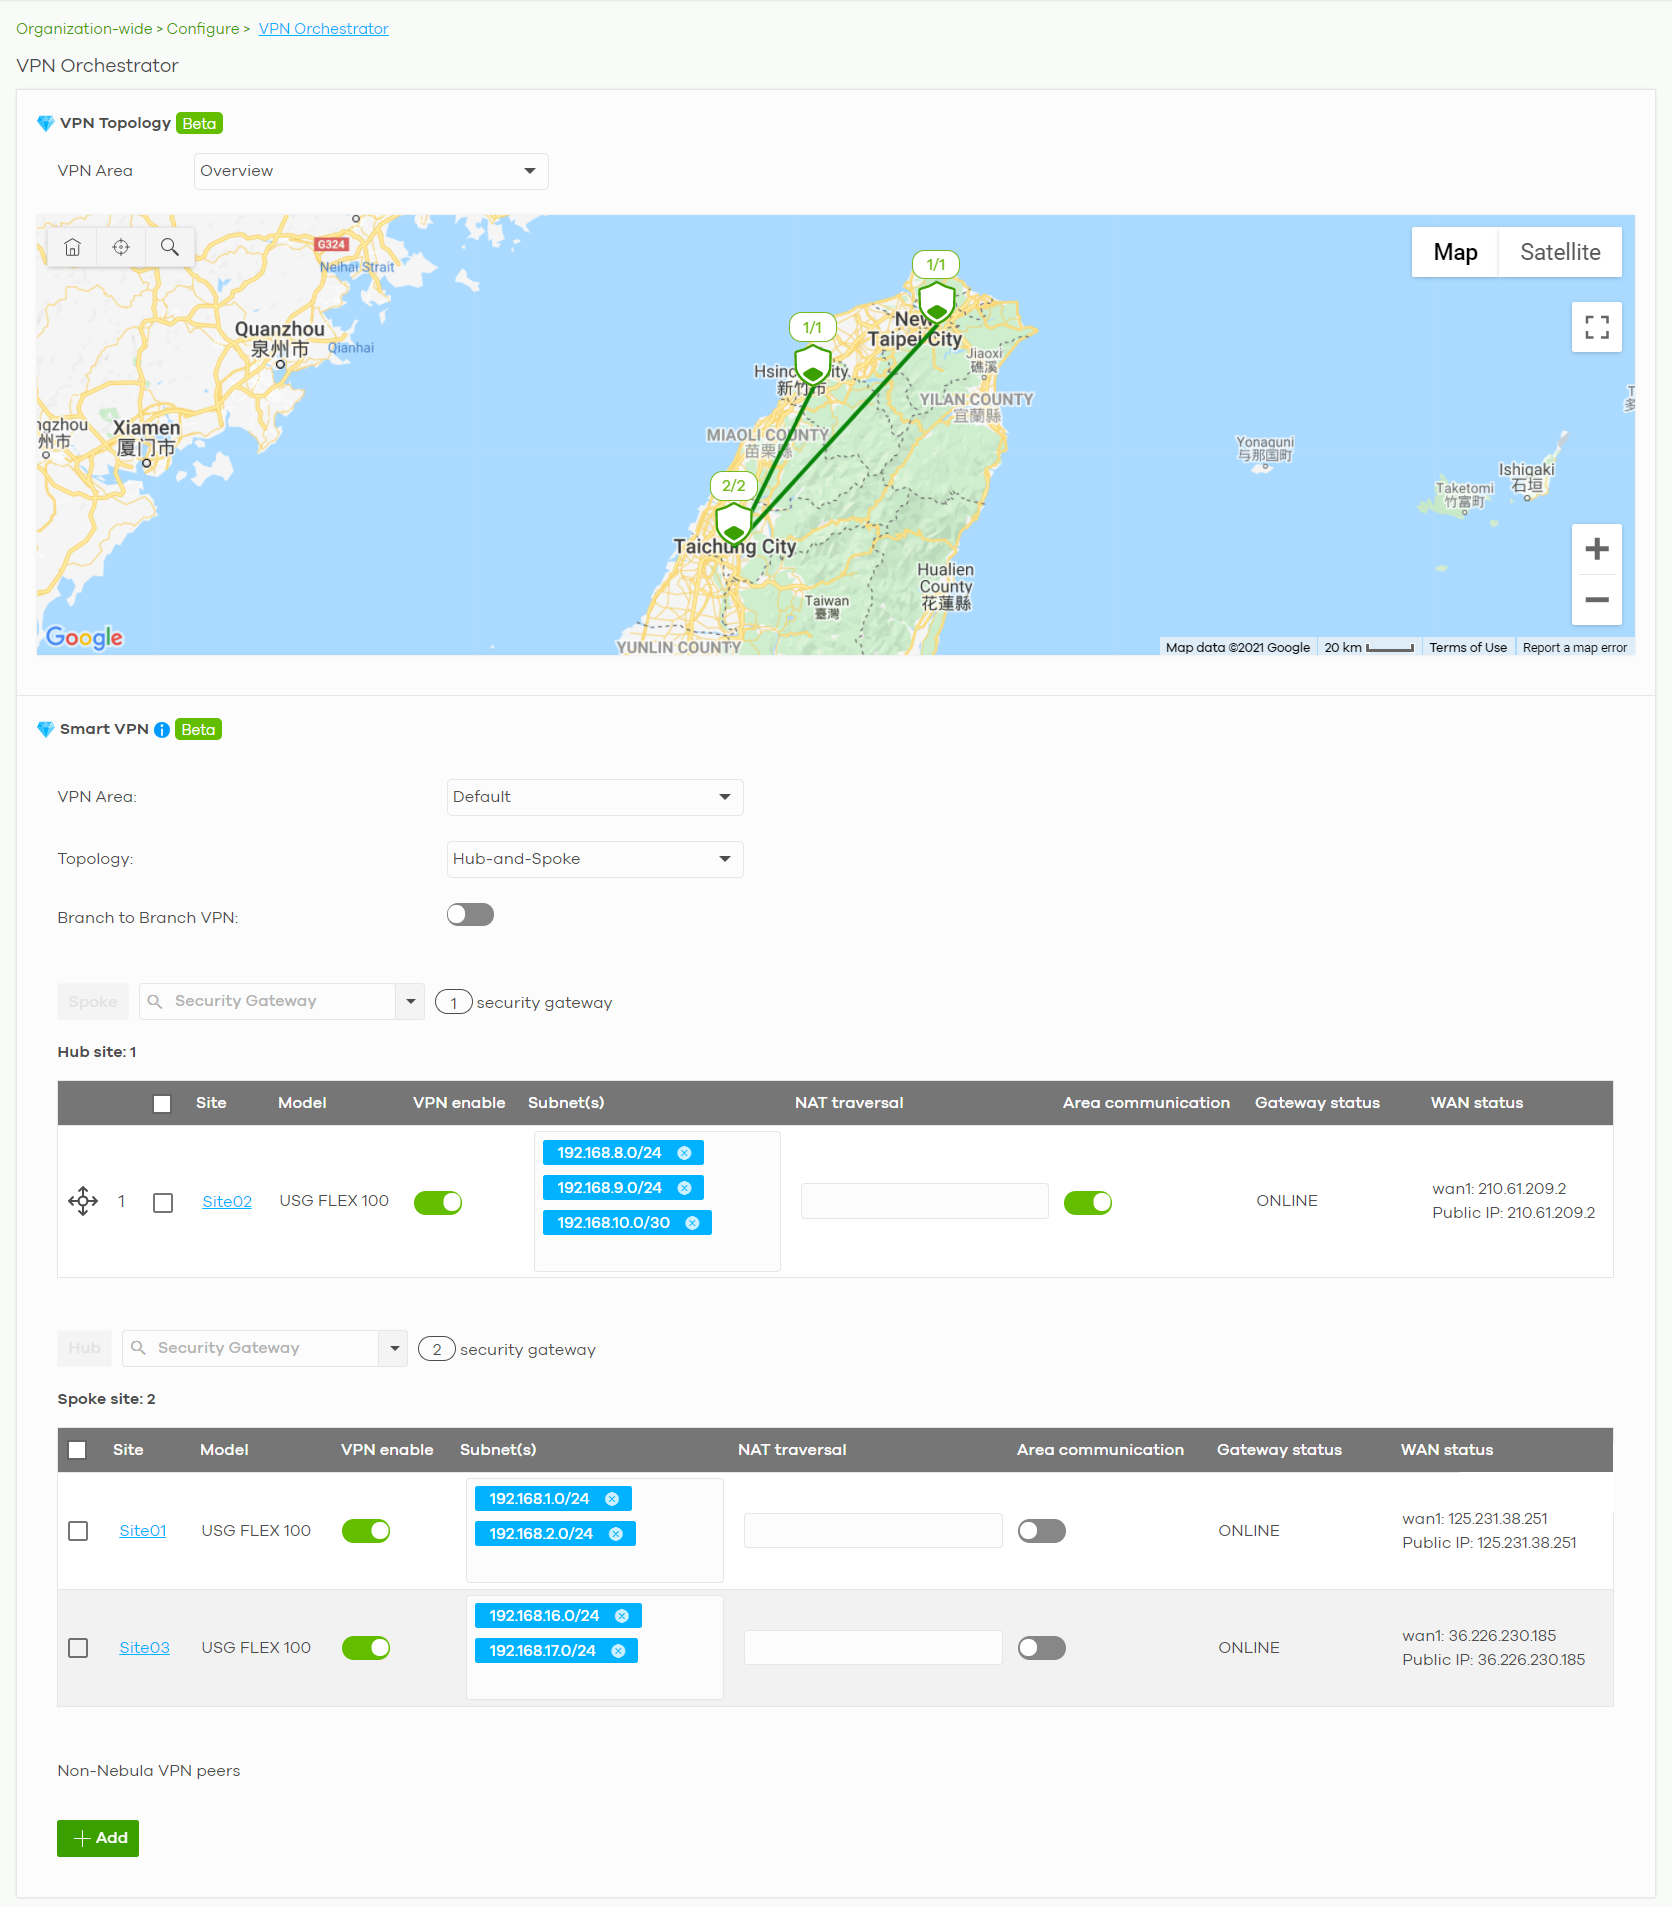
The following table describes the labels in this screen.
Label | Description |
|---|---|
VPN Topology | |
VPN Area | Select the name of a VPN area to view on the map. Select Overview to view all VPN areas in this organization on the map. |
Smart VPN | |
VPN Area | Select the name of a VPN to configure. Select + Create VPN area to create a new VPN within the organization. |
| Click the remove icon to delete the VPN area. |
Topology | Click this to select a topology for the VPN area. For details on topologies, see Topology Overview. Select Disable to disable VPN connections for all sites in the VPN area. |
The following settings are shown when Topology is set to Hub-and-Spoke. | |
Branch to Branch VPN | Enable this to allow spoke sites to communicate with each other in the VPN area. When disabled, spoke sites can only communicate with hub sites. |
Spoke | Select one or more sites and then click this to assign the sites as spokes. The sites are added to the spoke list. |
Hub | Select one or more sites and then click this to assign the sites as hubs. The sites are added to the hubs list. |
Security Gateway | Enter the name of a site or Nebula Device to filter the list of sites. |
Hub site: N | This shows the number of hub sites (N) in the hub list. |
Spoke site: N | This shows the number of spoke sites (N) in the spoke list. |
# | This shows the priority of the hub site. If VPN area contains multiple hub sites, then spoke sites always send traffic through the available hub with the highest priority. You can change the priority of a site by clicking the move icon (  ), and then dragging the site up or down in the list. ), and then dragging the site up or down in the list. |
Site | This shows the name of the site in the VPN area. |
Model | This shows the model of the site’s security gateway device. |
VPN enable | Click this to enable or disable site-to-site VPN on the site’s Security Gateway. If you disable this setting, the site will leave the VPN area. |
Subnets | This shows the IP subnets of all LAN interfaces behind the site’s Security Gateway. |
NAT traversal | If the Security Gateway is behind a NAT router, enter the public IP address or the domain name that is configured and mapped to the security gateway on the NAT router. |
Area communication | Enable this to allow the site to communicate with sites in different VPN areas within the organization. If Topology is set to Site-to-Site, then you must assign at least one site in each VPN area as the Area Leader. The area leaders create VPN tunnels between VPN areas. |
Gateway status | This shows whether the site’s security gateway is currently online. |
WAN status | This shows the IP address of the WAN interface and the public IP address of the site’s Security Gateway. |
Non-Nebula VPN peers | Configure this section to add a non-Nebula gateway, such as a ZyWALL ATP device, to the VPN area. |
+ Add | Click this button to add a non-Nebula gateway to the VPN area. |
Enabled | Select the check box to enable VPN connections to the non-Nebula gateway. |
Name | Enter the name of the non-Nebula gateway. |
Public IP | Enter the public IP address of the non-Nebula gateway. |
Private Subnet | Enter the IP subnet that will be used for VPN connections. The IP range must be reachable from other Nebula Devices in the VPN area. |
IPSec policy | Click to select a pre-defined policy or have a custom one. See Custom IPSec Policy for detailed information. |
Preshared secret | Enter a pre-shared key (password). The Nebula Security Gateway and peer gateway use the key to identify each other when they negotiate the IKE SA. |
Address | Enter the address (physical location) of the Nebula Device. |
| Click the remove icon to delete the entry. |
Firmware Management
Use this screen to upgrade Nebula Device firmware, or schedule a firmware upgrade for Nebula Devices within the organization. Click Organization-Wide > Configure > Firmware management to access this screen.
Organization-Wide > Configure > Firmware management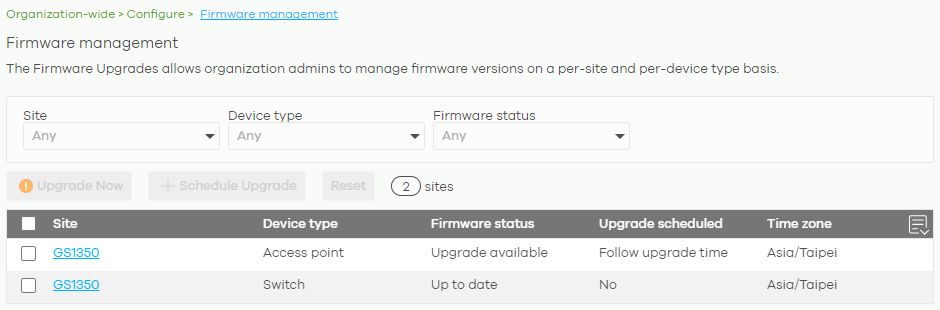
You can select Nebula Devices by device type and by site, but you cannot select individual Nebula Devices. For example, you can upgrade all switches in Site A and all APs in site B. To upgrade individual Nebula Devices, go to Organization-Wide > Configure > Firmware management.
Note: This is a Nebula Professional Pack feature. If your Nebula Professional Pack license expires, existing firmware upgrades will still run as scheduled.
Firmware Upgrade Priority
NCC prioritizes the different Nebula Device firmware upgrade schedules as follows, from highest to lowest:
1. Individual Nebula Device upgrade schedule (set at Organization-Wide > Configure > Firmware management).
2. Organization-wide or site-wide upgrade schedule. If both are set, the schedule that was most recently set takes priority.
3. NCC default per-device upgrade schedule (90 days after new firmware is released).
2. Organization-wide or site-wide upgrade schedule. If both are set, the schedule that was most recently set takes priority.
3. NCC default per-device upgrade schedule (90 days after new firmware is released).
Firmware Management Screen
The following table describes the labels in this screen.
Label | Description |
|---|---|
Site/Device Type/Firmware Status | Specify your desired filter criteria to filter the list of Nebula Devices. |
Upgrade Now | Click this to immediately upgrade the firmware on all selected Nebula Device types. This button is selectable only when there is firmware update available for the selected Nebula Devices. |
Schedule Upgrade | Click this to pop up a window where you can set a specific date and time to upgrade the firmware on the selected Nebula Devices. |
Reset | Click this button to clear the individual upgrade schedules of each selected Nebula Device. The Nebula Devices will go back to following the upgrade schedule of their site. |
Site | This shows which site the Nebula Device is in. Click the site name to go to the site’s Dashboard. |
Device Type | This shows the type of the Nebula Device. |
Firmware status | This shows whether the firmware on the Nebula Device is Up to date, there is firmware update available for the Nebula Device (Upgrade available), custom firmware was installed manually (Custom), a specific version of firmware has been installed by Zyxel customer support (Dedicated) or the Nebula Device goes off-line and its firmware status is not available (N/A). The status changes to Upgrading... after you click Upgrade Now to install the firmware immediately. |
Upgrade scheduled | This shows the date and time when a new firmware upgrade is scheduled to occur. Follow upgrade time means the Nebula Device is following the site-wide or organization-wide firmware schedule. No means the firmware on the Nebula Device is up-to-date, or the Nebula Device is off-line and its firmware status is not available. A lock icon means a specific firmware schedule has been created for the Nebula Device. This means the Nebula Device firmware will not be upgraded according to the schedule configured for the site or organization. |
Time zone | This shows the time zone settings of the Nebula Device’s site. |
Click this icon to show and hide columns in the table. |